Setting Up Relationship Plans
This chapter describes how you can alert agents to customer needs and set up scripts to guide customer interactions.
This chapter covers the following topics:
- About Relationship Plans
- Relationship Plan Components
- Process Overview of Relationship Plan Setup
- Defining Plan Groups
- Defining an Action
- Setting Up Messages and Scripts for Association with Relationship Plans
- Defining Messages
- Generating Messages
- Creating the Relationship Plan Itself
- Creating a Condition for the Relationship Plan
- Adding or Modifying Relationship Plan Conditions
- Enabling Relationship Plans in Application Modules
- Running the Relationship Plan Assignment Engine
- Modifying Relationship Plan Lookups
About Relationship Plans
Relationship plans make it possible for your organization to deliver personalized and proactive customer service by alerting agents to customer needs. Whenever an agent is working on a customer record that meets the conditions you specify, the application can automatically display an alert message or launch a script that guides the agent through the interaction with the customer.
Relationship plans can trigger the alerts and scripts for agents working in the Contact Center and Service Request windows in Oracle TeleService and in the E-Business Center window for Oracle TeleSales.
A relationship plan is a process which runs in the background periodically checking which customers meet one or more conditions you specify. Here are two examples:
-
Plan A
If a customer contract is to expire in five days, then alert the agent with a message.
-
Plan B
If a customer has ten or more open high-priority service requests, then check if the customer has orders of $1 million or more.
For customers with orders above $1 million, launch a script that guides the agent in handling the customer call.
For customers below that threshold, alert the agent with a message.
Determining what action to take is a two-step process. The relationship plan first evaluates if a customer qualifies for the plan and then determines what action to take.
If your plan includes only one condition, then all customers that meet that condition qualify for the plan and the plan takes the action you specify. For Plan A, that means alerting agents for all the qualifying customers.
But a plan can take different actions for different subsets of the customers who qualify. Plan B first decides which customers qualify for the plan by checking which have ten or more high-priority open service requests.
The plan evaluates the qualifying customers using two more conditions and takes different actions for those customers who meet them:
-
If a customer has orders of less than $1 million, the plan displays an alert.
-
If a customer has orders of more than $1 million, the plan displays a script.
Relationship Plan Components
Relationship plan implementation involves many steps in multiple modules. You must create a mechanism to decide which customers belong to your plan, for example, and you must also create the actions, the messages, and the scripts, you wish the plan to display. The relationship plan itself (Setup, Relationship Plans, Define Relationship Plans) brings all the pieces together.
This section highlights the different types of setups you need to complete. A later section gives a process overview of the actual setup steps themselves.
Monitoring the Database of Customers
To assign your customers to relationship plans automatically, you must set up a way to monitor the database to see if any customers qualify. For Plan A this means finding customers with expiring contracts. For Plan B, finding customers with high-priority service requests.
This involves setting up a Profile Check which retrieves and summarizes customer data based on the SQL query you enter. The Customer Profile Engine concurrent program refreshes this data at the periods you specify. See Setting up Customer Profiles.
Evaluating if Customers Qualify for the Plan
Now that you are collecting data on your customers, you must create the condition which evaluates the data tracked by the profile check and determines whether a specific customer qualifies for the relationship plan. Does the customer have more than one open high-priority service request? Does the customer have more than five expiring service contracts?
You enter the qualifying condition in the Relationship Plan itself. It is evaluated by the concurrent program Relationship Plan Assignment Engine. If any customers meet the condition, then they qualify for the plan.
Setting Up the Actions the Plan will Take
A relationship plan can take different actions on subsets of the qualifying customers. Now that you have assigned customers to the plan, you are ready to determine what actions you wish the plan to take for which customers.
You must define the actions and conditions separately.
For Plan B, this means creating two conditions:
-
Condition B1: If a customer has orders of less than $1 million
-
Condition B2: If a customer has orders of more than $1 million
And two actions:
-
Action B1: Display alert.
-
Action B2: Display Script
Plan A does not need to evaluate any additional condition because it displays an alert for all customers who qualify, however, you must still create one because conditions are the only way to trigger an action:
-
Condition A1: <header information only>
You must also create the action for Plan A:
-
Action A1: Display alert message that contract is about to expire.
Please note that the action setup uses a user interface provided by Oracle Contracts which includes additional functionality you do not need to use for relationship plans.
Setting Up the Messages or Scripts
You must also set up the alert messages and scripts you wish to display for the different actions your plan will take.
You set up the Messages in the Messages window under the Application Developer Responsibility and compile them by running the Generate Messages concurrent program. Messages are similar to the standard application messages used by all Oracle applications and are fully described in the Oracle Applications Developer's Guide.
You must create your scripts using Oracle Scripting as described in that applications documentation.
Hooking Up the Conditions to the Actions
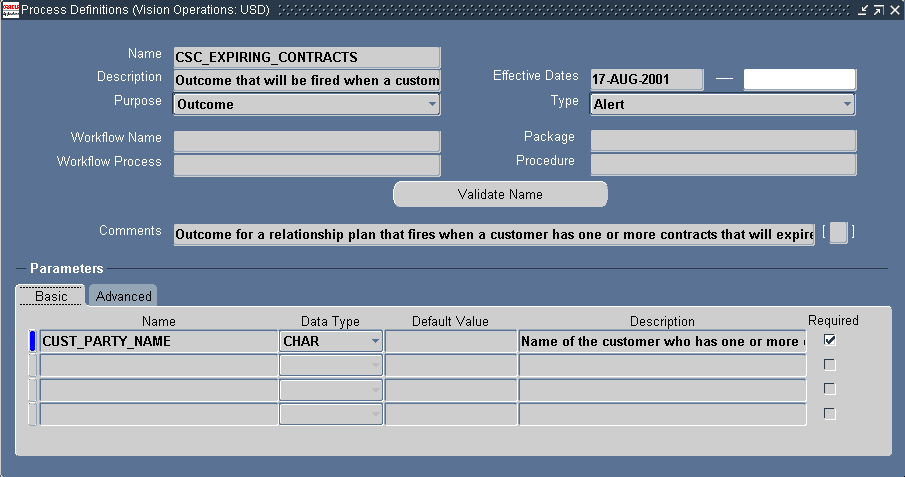
When you create the conditions of your relationship plan, you cannot directly specify the alert messages and scripts the conditions are to launch. You must make this link indirectly by first defining an "Outcome" for each script and message. To create an Outcome, you define the script or message as a Process Definition of the type Outcome and then use the name of this process definition to create the link with the condition that will trigger it.
Process Overview of Relationship Plan Setup
Here is an outline of the steps required to implement Relationship plans:
-
Log into Oracle applications under the Service responsibility.
-
Set up profile checks that retrieve and summarize your customer data. You can use one of the profile checks you set up to display key customer information for agents as part of Customer Profile setup. If you do need to create a profile check specifically for relationship plans, then you must complete at least the following steps:
-
Navigate to Setup, Customer Management, Customer Profiles.
-
On the Profile Variables tab, define the variable you wish to use in your profile check. This is where you enter the SQL queries. You can use the same variable in multiple profile checks. See Defining Profile Check Variables.
-
On the Profile Checks tab, define the profile check itself. See Defining Profile Checks.
-
-
Navigate to Setup, Relationship Plans, Events, Define Action and set up one action for every condition in the relationship plan. Every relationship plan must have at least one action. On the Basic tab, you must define all of the variables you want to use for your condition and every token that you wish to use in an alert message. See Defining an Action.
-
To have your relationship plan display an alert message, you must:
-
Under the Application Developer Responsibility, navigate to Application, Messages.
-
Define all of your messages as described in Defining Messages. The name of the message must be identical (including capitalization) to the name of the action as this is the only link between the two. For displaying customer information, such as the customer name, in the text of the message you are limited to using only the tokens you have defined in the Action window in the previous step.
-
Generate the messages (Other, Requests, Run) by running the Generate Messages concurrent program. See Generating Messages.
-
-
To have your relationship plan display a script, then prepare the script as described in Oracle Scripting documentation and note down its name. You can obtain this from the Name field of the Script Properties window in the script author's file.
-
You have now created the action(s) your relationship plan will take, but you cannot hook them up to the relationship plan just yet. You must first create an intermediary called a Process Definition of type Outcome. It is this process definition or "Outcome" and not the action itself that you associate with the relationship plan conditions that launch them.
To create the outcome:
-
Switch to the Service responsibility and navigate to Setup, Relationship Plans, Events, Define Process Definition.
-
Create the outcomes according to the steps outlined in Setting Up Messages and Scripts for Association with Relationship Plans.
-
-
To organize your relationship plans in categories, navigate to Setup, Relationship Plans, Define Plan Groups and define these categories as described in Defining Plan Groups.
-
You are now ready to create the relationship plan itself which ties together all of the setups you have done so far. In this step you enter both the condition that determines which customers qualify for the plan and any other conditions which decide what action the plan will take. The setup is done in the New Plan window (Setup, Relationship Plans, Define Relationship Plans). For details, see:
-
Now you must enable your plan for any of the forms where you wish the actions to appear. Navigate to Setup, Relationship Plans, Enable Relationship Plans) and enable the forms as described in Enabling Relationship Plans. The options are: Contact Center, Service Request, and the E-Business Center from Oracle TeleSales.
-
As a last step, run the concurrent program Relationship Plan Assignment Engine to assign customers to your plan. See Running the Relationship Plan Assignment Engine.
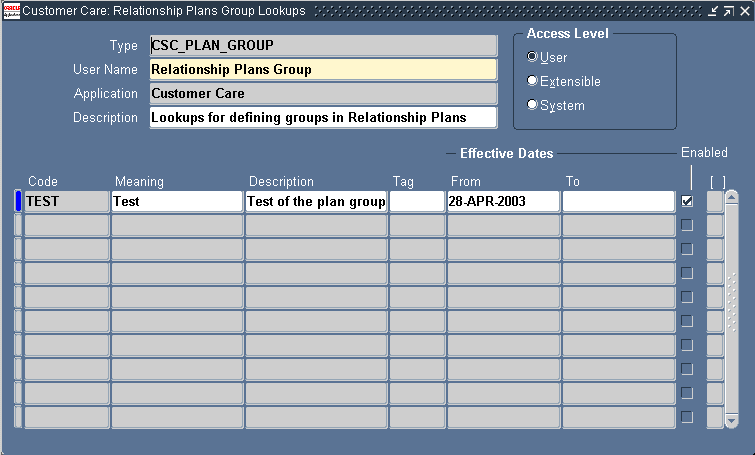
Defining Plan Groups
Use this procedure to organize your relationship plans into logical groups. Defining plan groups is optional.
Prerequisites:
None.
To define relationship plan groups
-
Under the Service responsibility, navigate to Setup, Relationship Plans, Define Plan Groups.
The Relationship Plans Group Lookup window appears.
-
In a new row, enter a value in the Code field.
-
Enter a value in the Meaning field.
-
Enter a value in the Description.
-
The Tag field is not used in Oracle Support.
-
Optionally enter dates in the From and To fields.
-
Save your plan group.
Defining an Action
Use this procedure to define the action the application will take when the relationship plan applies to a particular customer.
To display an alert message for agents as your action, you must define any tokens you wish to use in the message text in the Element Name field of the Basic tab. For example, to include the customer's name in the alert message, you must enter CUST_PARTY_NAME.
Note: You must enter the same token name when you set up condition that will trigger this action. See Creating a Condition for the Relationship Plan.
If the action you are defining is triggered by evaluating a relationship plan condition, then you must also define the variable you will use for the condition. If your relationship plan contains a condition that will take this action based on the city where the customer is located, then in the Basic tab you must enter the variable CITY.
To view the available list of variables/tokens you can query up the action with the name Customer Care - Generic Action or refer to the Seed Data for Relationship Plans appendix of this guide.
Prerequisites:
None.
To define an action
-
Under the Service responsibility, navigate to Setup, Relationship Plans, Events, Define Action.
The Action window appears.

-
Enter a name for your action in the Name field.
-
Select Action Based from the Action Type drop-down list. Date Based is not supported.
-
Optionally enter a description of your action in the Description field.
-
In the Correlation field, enter CSC_CONTACT_CENTER. This is the only valid name you can use for relationship plans.
-
Select the Enabled check box to make this action available for use.
-
Select the Allow Synchronous Outcomes check box to allow a real-time alert or script to pop up.
-
If your action displays an alert message, then in the Basic tab, enter any tokens you wish to use in your message:
Note: You need not define any tokens for generic messages that apply to all customers.
-
In Element Name, enter a valid variable name.
You can obtain the list of valid Contact Center header variable names by querying up the Customer Care - Generic Action or from Appendix B of this guide.
For example, to display the full name of the customer in the alert message, enter CUST_PARTY_NAME.
You must also enter the same value in two other places: in the text of the message when you define the message in the Messages window and in the Parameters window when defining the condition that uses this action.
-
You can enter the same value in the Name field as in the Element Name field.
-
Optionally, enter a description in the Description field.
-
Select a data type of CHAR, NUMBER, or DATE in the Data Type field.
-
Select a format mask, if appropriate.
-
-
If your action is triggered by a condition that evaluates a variable, then define the variable in the Basic tab in the same manner as the message tokens above.
-
Save your action.
Setting Up Messages and Scripts for Association with Relationship Plans
You can indicate which script or message your relationship plan is suppose to launch only indirectly by first creating what is called a Process Definition of type Outcome. It is the name of this process definition, or outcome, rather than the name of the message or script itself, that you will associate with the condition of your relationship plan.
Prerequisites:
-
You must create the action, message, and script first.
-
For Scripts, you must know the name of the script. You can obtain this from the Name field of the Script Properties window. You can open this window from the script author's file.
-
For messages, you must know:
-
The value you entered in the Name field of the Messages window.
-
The value(s) you entered for the individual message tokens used by the message. (These were entered on the Basic tab of the Action window in the Element Name fields.)
-
To define process definitions of type outcome
-
Under the Service responsibility, navigate to Setup, Relationship Plans, Events, Define Process Definitions.
The Process Definitions window opens.
-
In the Name field, enter the name of the script or message.
-
Optionally enter a description in the Description field.
-
Select Outcome from the Purpose drop-down list. This is the only permitted value.
-
From the Type drop-down box, select either Alert or Script. The other types are not supported.
-
Optionally enter comments in the Comments field.
-
If you are creating the outcome for a message, then in the Name fields of the Basic tab of the Parameters region, enter the same values you entered for Element Name fields on the Basic tab of the Action window.
-
The Data Type field defaults to the data type of the Element Name.
-
Save your process definition.
Defining Messages
Use this procedure to define the alert messages the agents will see. Messages are defined for use in displaying messages about customers in real-time alerts.
Prerequisites:
None
To define messages
-
Under the Application Developer Responsibility, navigate to Application, Messages.
The Messages window opens.
-
Enter a name for your message in the Name field. The name of the message must be identical (including capitalization) to the name of the action as this is the only link between the two. You must also use the same name when you create a Process Definition.
-
Select a language from the Language list of values (LOV).
-
Select Customer Care from the Application LOV to display the message in the Contact Center or Service to display it in the Service Request window, Customer Support, and Service Desk.
Entry in the remaining fields, Number, Type, Maximum Length and Description, are optional.
-
In the Current Message Text field, enter the message that you wish to display as a real-time alert.
To display the value of a token, for example, the customer name CUST_PARTY_NAME, you must enter the token preceded with an ampersand symbol, for example, &CUST_PARTY_NAME.
You are restricted to using only the tokens that you have entered in the Element Name fields in the Action window. See Defining an Action.
-
Save your message.
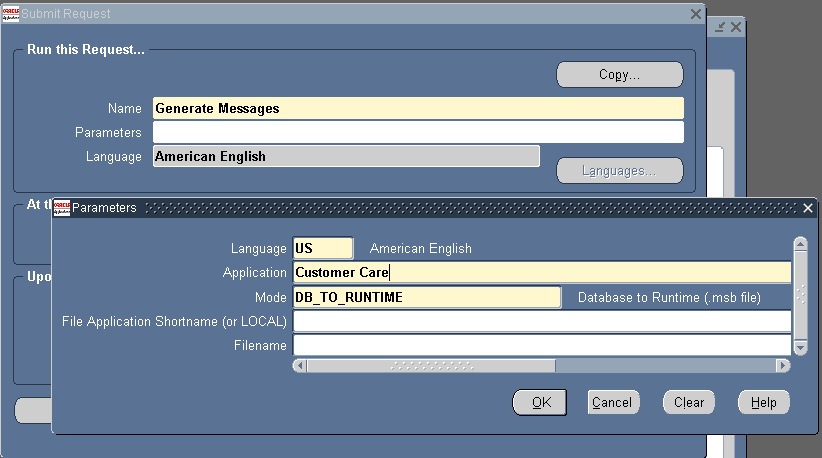
Generating Messages
Use this procedure to generate the messages you have created.
To generate messages
-
Under the Application Developer Responsibility, navigate to Other, Requests, Run.
-
Select the Single Request radio button in the Submit a New Request window and click OK.
-
Select Generate Messages from the Name list of values.
-
In the Parameters window enter:
-
Language: US or another message language
-
Application: Customer Care
-
Mode: DB_TO_RUNTIME
-
-
Click OK to close the Parameters window.
-
Click Submit.
-
Click No to submit another request.
-
You can view the status of your requests by navigating to View, Requests, All My Requests, Find
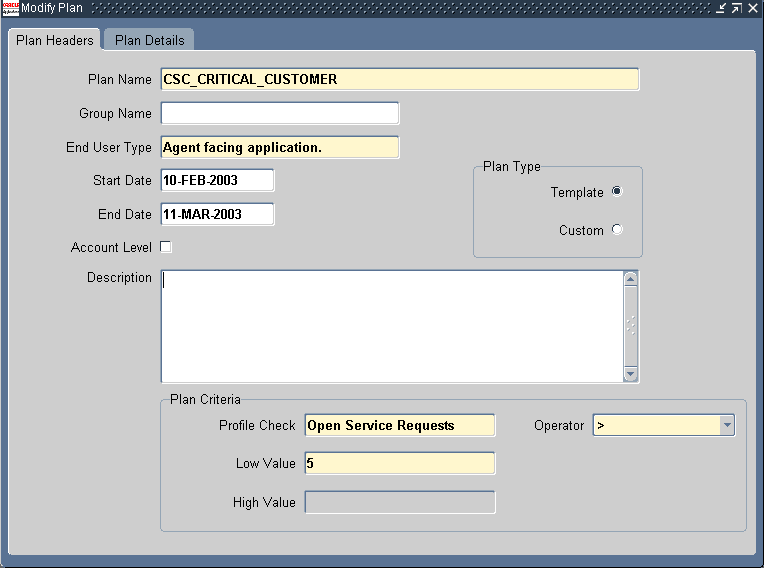
Creating the Relationship Plan Itself
Use this procedure to create the plan which ties all of the pieces of the relationship plan together. It is here you enter the condition that determines whether customers qualify for the plan and also the conditions that decide which action the plan will take.
Oracle Support provides a predefined relationship plan, Expiring Contracts, which displays an alert when a customer has any contracts that will expire in the next 30 calendar days. This relationship plan uses the profile check called Expiring Contracts. Refer to Appendix B for more details about the predefined relationship plan.
Prerequisites:
You must have defined your actions, process definitions, messages, and scripts.
To define the plan itself
-
Under the Service responsibility, navigate to Setup, Relationship Plans, Define Relationship Plans.
The New Plan window appears. (When you are modifying the plan the name of this window changes to Modify Plan, but the functionality is the same.)
-
In the Plan Headers tab, enter a name for the plan in the Name field.
-
To group this relationship using relationship plan categories you have created, select a group name from the Group Name list of values.
-
Optionally enter start and end dates for this relationship plan.
-
Unless you wish to create a plan for individual accounts rather than for customers, leave the Account Level check box unselected. An account relationship plan tracks customers who generate a significant amount of revenue in one account, for example.
-
All relationship plans are initially created from a template, so the Template radio button is selected by default in the Plan Type section. The Custom radio button can be used only from the Inquiry tab when you customize a relationship plan for one specific customer.
-
Enter a description of the Relationship Plan in the Description field.
-
In the Plan Criteria section, you define the criteria to be used by the Relationship Plan Assignment Engine to decide which customers qualify for the plan:
-
Using the Profile Check list of values, select the profile check that summarizes the customer information you wish to evaluate. The profile checks contain those seeded with the application as well as those you have defined.
-
Select an operator from the Operator list of values. The choices are =, <, >, >=. <=, Between, and Not Between.
-
Enter the constant in the Low Value field.
-
The high value is available only if you previously selected an operator value of Between or Not Between.
-
-
Save your relationship plan.
You are now ready to specify the action(s) the relationship plan is to take and any additional conditions will trigger them.
Note: To have the relationship plan display an alert message or script for all customers who qualify, you must still create a new condition for each action you wish the plan to take. Conditions provide the only way to specify which actions the plan will take. If you want all qualifying customers to trigger the action, you leave the expression tab blank.
-
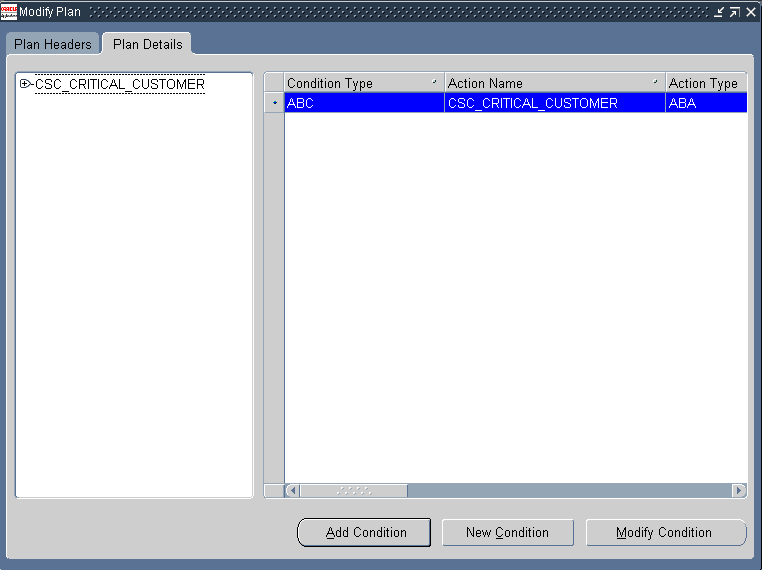
Select the Plan Details tab.
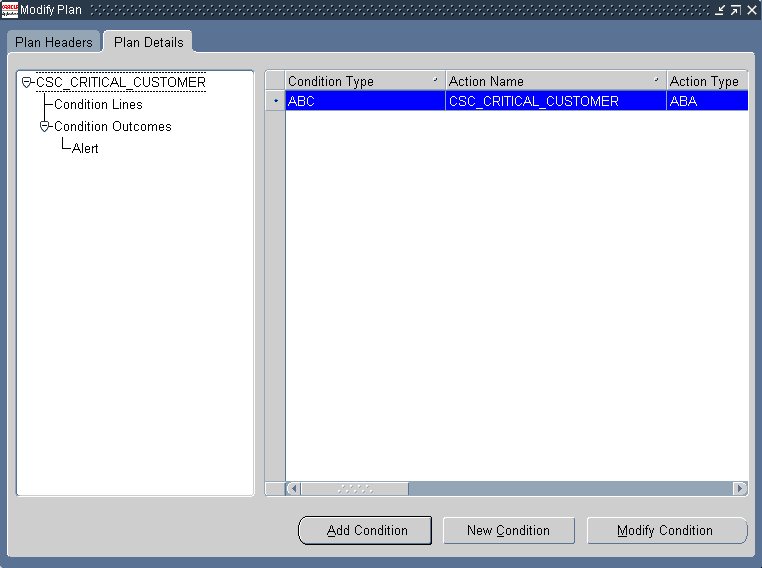
-
Click New Condition to create a new condition that will trigger one of the action as described in Creating a Condition for the Relationship Plan.
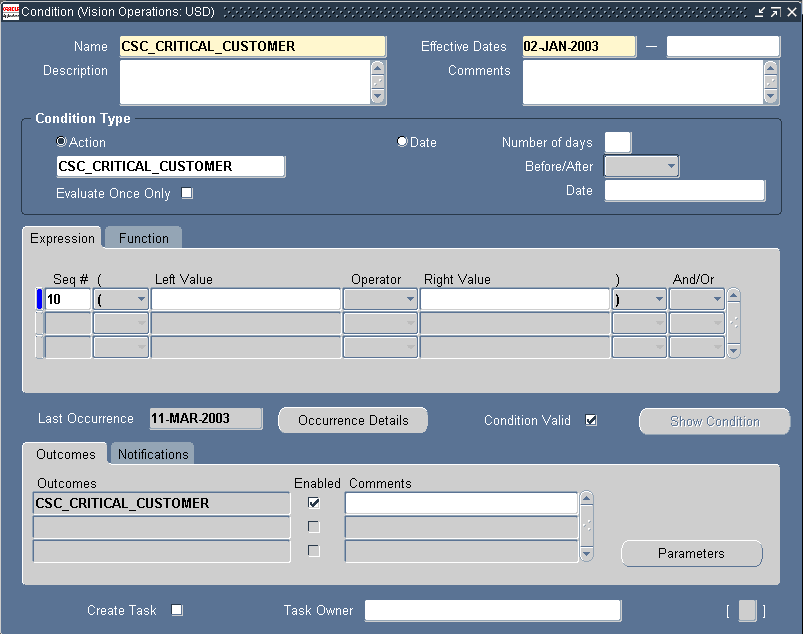
Creating a Condition for the Relationship Plan
Use this procedure to create a condition for your relationship plan. Each relationship plan must have at least one condition attached to it.
Prerequisites:
You must create the relationship plan itself before adding conditions.
To create a condition for a relationship plan
-
Under the Service responsibility, navigate to Setup, Relationship Plans, Define Relationship Plans.
-
Display the relationship plan where you wish to create a condition.
-
Select the Plan Details tab.
-
Click New Condition
The Condition window appears.
-
Enter a name for the condition in the Name field.
-
Optionally enter effective dates, description and comments for your condition.
-
In the Condition Type region, select the Action radio button. The Date condition type is not supported in relationship plans.
-
Select an action from the Action list of values (LOV). The list of values contains actions that you previously defined. You must use a unique action for every relationship plan.
-
Leave the Evaluate Only Once check box unselected unless you wish to evaluate your condition only once.
-
In the Outcomes region, use the Outcomes LOV to select the outcome which represents the message or script you wish to display for customers matching this condition.
A relationship plan can display a message, a script, or both.
Outcomes, are the intermediaries which permit you to associate scripts and messages with relationship plans. They are defined in the Process Definitions window as described in Setting Up Messages and Scripts for Association with Relationship Plans.
-
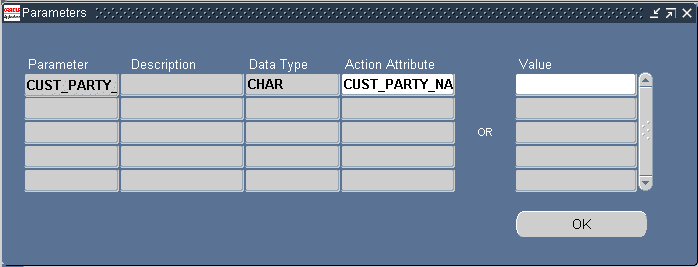
If the outcome is a message which displays the value of one or more tokens, such as the customer's name, then you must re-enter the same message tokens:
-
Click Parameters.
The Parameters window appears.
Note: If you have defined more than one outcome for this condition, then the application displays a different window. In this case you must first:
-
Select the parameter you wish to define.
-
Right-click and select Populate selected rows in PARAMETERS from the pop-up menu.
-
-
Select the token from the Action Attribute list of values.
For example, if you are displaying the customer name in the body of the message then you must select CUST_PARTY_NAME in the Action Attribute.
Note: Most of the time you will want the value in the Parameter and Action Attributes fields will be the same. But you are permitted to assign different values to the token in your message provided they are of the same data type. For example, to display the customer name in the message, you can map the full customer name, the first name, or the last name to that token using this window.
-
Click OK to return to the Conditions window.
-
-
Enter the condition that will trigger the action in the Expression tab. You can use the parameters you have just mapped.
-
Save the condition.
Adding or Modifying Relationship Plan Conditions
Use this procedure to modify relationship plan conditions. You can add additional conditions to an existing plan or modify a condition already attached to your plan.
Prerequisites:
You must define a relationship plan first.
To add or modify relationship plan conditions
-
Under the Service relationship, navigate to Setup, Relationship Plans, Define Relationship Plans.
-
Display the Relationship Plan to which you want to add condition lines.
-
Select the Plan Details tab in the Modify Plan window.
-
Click Add Condition.
-
Select a condition and click OK to attach it to the plan header.
-
To modify a condition line of a relationship plan:
-
Click Modify Condition in the Plan Details window.
-
Make the necessary changes to the condition line or outcome.
-
Save the modified condition line.
-
Enabling Relationship Plans in Application Modules
Follow this procedure to enable relationship plans in different application modules: in the Contact Center and the Service Request windows of Oracle TeleService and in the E-Business Center of Oracle TeleSales.
Prerequisites:
None.
To enable relationship plans
-
Under the Service responsibility, navigate to Setup, Relationship Plans, Enable Relationship Plans.
The Enable Relationship Plans - Setup window appears.
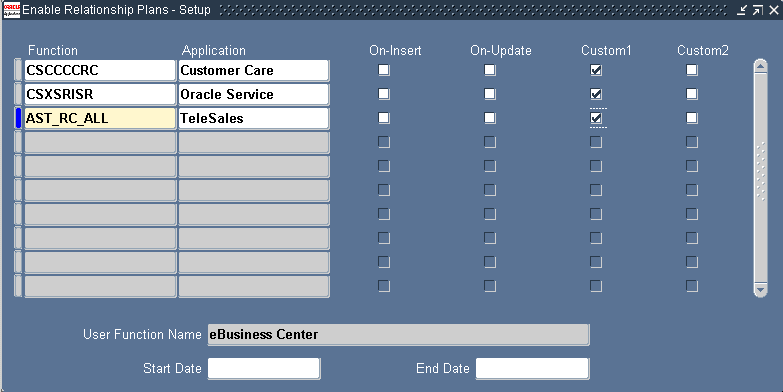
-
The Function list of values displays all forms, but you must select one of the three following forms:
-
CSCCCCRC for Contact Center
-
CSXSRIXSR for Service Request
-
AST_RC_ALL for E-Business Center
-
-
Save your settings.
Note: Please see the appendix, Enabling Relationship Plans, for additional information.
Running the Relationship Plan Assignment Engine
The Relationship Plan Assignment Engine is a server side PL/SQL concurrent program. You must run the Relationship Plan Assignment Engine after completing the relationship plan setup process so that all associations between customers and relationship plans are made.
This concurrent program also runs automatically each time you run the Customer Profile Engine.
The Relationship Plan Assignment Engine performs the following operations:
-
Evaluates all customers that meet relationship plan criteria and associates the customers with the appropriate relationship plan.
-
Evaluates all customer that do not meet relationship plan criteria and disassociates the customer from the relationship plan.
-
Checks for all customers who have been manually assigned to relationship plans and ignores automatic association/disassociation rules for these customers.
The following parameters are available for running the Relationship Plan Assignment Engine:
-
Plan Name
-
Check Name
-
Party Name
-
Account Name
Note: You must enter the plan name and check name.
Each parameter provides a list of values from which to choose. If you enter a value in the Party Name parameter, then the Account Name list of values contains only those values for the selected Party Name. If no Party Name is selected, the Account Name list of values displays all accounts.
You can initiate the Relationship Plan Assignment Engine in two ways:
-
Run the concurrent program using the Concurrent Program submission user interface.
-
Let it run automatically whenever the customer profiles are updated by the Customer Profile Engine.
Customer profiles can be updated by running the Customer Profile Engine as a concurrent program or by selecting the Refresh on the Dashboard tab.
Modifying Relationship Plan Lookups
The lookups described in this section make it possible for you to modify different lists of values for relationship plan setup.
-
Group Names for relationship plans
You can modify any of the meaning fields in the lookup described in the following table. It controls the list of values for the Group Name field.
Lookup Type Meaning Lookup Codes Meaning Level CSC_PLAN_GROUP Relationship Plans Group GROUP1
GROUP2
GROUP3Plan Group1
Plan Group2
Plan Group3User -
Group Names for relationship plans
You can modify any of the meaning fields in the lookup described in the following table. It controls the list of values for the Group Name field.
Lookup Type Meaning Lookup Codes Meaning Level CSC_PLAN_STATUS Relationship Plans Status APPLIED
DISABLED
ENABLED
MERGED
REMOVED
TRANSFEREDApplied
Disabled
Enabled
Merged
Removed
TransferredUser