Capturing Additional Service Request Attributes
This chapter, which is relevant only if you are implementing the Oracle Forms-based module, describes how you can set up the capture of additional service request information in a structured question and answer format.
This chapter covers the following topics:
- Overview of Topics on Capturing Additional Service Request Attributes in the Contact Center and Service Request Window
- About Additional Attributes
- Process Overview of Attribute Setup
- Creating Prompts and Questions
- Creating the Lists of Values for the Answers
- Setting Up Attributes for a Service Request Type
- Implementing the Validate Address User Hook
- Enabling Attribute Capture in Oracle iSupport
- About Using Request Types and Additional Attributes to Generate Tasks or Launch Workflows
Overview of Topics on Capturing Additional Service Request Attributes in the Contact Center and Service Request Window
This group of topics explains how to set up the capture of additional service request information (attributes) in a structured question and answer format at the time a service request is created by agents in the Contact Center and by customers on their Oracle iSupport web portal.
Note: You must use a different method of capturing additional service request information if you are using Customer Support, Case Management, or Service Desk. See Capturing Additional Service Request Information with Extensible Attributes.
For a general explanation of attributes see About Additional Attributes.
For an overview of the setup steps see Process Overview of Attribute Setup.
The remaining topics explain individual setup steps:
About Additional Attributes
You can require agents or customers creating a service request to enter additional information in response to a set of prompts or questions. Obtaining additional information in this structured format is important for reporting problems that do not involve inventory or installed base items and permits the application to take action based on the information provided.
For example, a government agency receiving a call about an abandoned vehicle must capture the make, model, color, and the license plate number so the towing service knows which vehicle to tow away and what tow truck to send to do the job.
Based on the information entered, the application can:
-
Automatically create different tasks
For example, you can set up the application to create a task to send a different type of tow truck depending on whether the abandoned vehicle is a passenger car or a bus.
-
Automatically check if the new service request is a duplicate
You can have the application automatically check past service requests for potential duplicates. Has anyone else called about an abandoned car with the same make, model, and color within the last ten days?
You can capture the additional attributes for service requests created by agents from the following locations:
-
Service Request tab of the Contact Center
-
Customers in Oracle iSupport
-
Workbench tab of a Service Request window
-
Header region of a Service Request window
Note: This method of capturing additional attributes is not available for service requests created using Customer Support, Case Management, Service Desk, Oracle Depot Repair, and Oracle Email Center applications.
Note: Some elements of the user interface in the setup windows refer to the Oracle Citizen Interaction Center or “CIC” rather than to Oracle TeleService. This is because the additional attribute functionality was developed by the Oracle Citizen Interaction Center which has become an integrated part of Oracle TeleService in this release. Not all of the terminology has been changed in setup windows.
Process Overview of Attribute Setup
This overview summarizes setups for the capture of additional attributes. Follow the references in each step for detailed procedures.
To set up the capture of additional service request attributes
-
Set up the prompts or questions agents will see and lists of values they will use to select the answers:
-
Enter the prompts or questions in the CUG_SR_TYPE_ATTRIBUTES lookup. For example: “Is the vehicle blocking traffic?” or “License Plate Number.” See Creating Prompts and Questions.
-
Agents can either enter an attribute by typing it in or by making a selection from a list of values.
To have agents make their entries using the list of values, create a new lookup for each list of answers. See Creating Lists of Values for the Answers.
A list of values ensures consistency of entries and improves duplicate checking. Although the application can check for duplicates based on free-text answers, the matches must be exact, including capitalization and spacing.
-
-
Navigate to Setup, Mapping, Extended Attribute Mapping and specify which questions and answers you wish to use for each service request type. See Setting Up Attributes for a Service Request Type.
-
To have customers fill in the same information when they create service requests using Oracle iSupport, follow the steps described in Enabling Attribute Capture in Oracle iSupport.
-
The application stores entries in the attribute fields as service request notes. You can choose to automatically display these notes for customers on their Oracle iSupport portal by setting the system profile Service: Default Note Status For Extended Attributes to Publish. By default this system profile is set to Public. This means that the notes are visible only to other agents. The setting of this profile overrides the setting of system profile Notes: Default Notes Status for those notes created from service request attributes.
Creating Prompts and Questions
Use this procedure to create the prompts or questions agents must answer for attribute capture.
To create the questions or prompts for capturing attributes
-
Under the Application Developer Responsibility, navigate to Lookups, Application Object Library.
The Application Object Library Lookups window appears.
-
In the Type field, use the Query Enter / Query Run method to display the lookup CUG_SR_TYPE_ATTRIBUTES.
-
Set up each question or prompt on a separate row (you can create additional rows by clicking New in the toolbar):
-
In the Code field, enter a unique code. This code is for internal use only and does not get displayed to agents or users.
-
Enter the text of the question or prompt in both the Meaning field and Description field.
The wording you enter in the Description field is what agents see.
The Meaning field is displayed in the list of values you use to link the answers to the questions. For this reason you may wish to make the entries identical.
-
-
Click Save in the toolbar.
Creating the Lists of Values for the Answers
Use this procedure to create lookups with the lists of answers for questions you have defined.
To define the list of answers
-
Under the Application Developer Responsibility, navigate to Lookups, Application Object Library.
The Application Object Library Lookups window appears.
-
In the Type field, enter a name for the list of answers. This is the name that will appear in the list of values when you link the list to the prompt or question.
-
In the User Name field, enter a user-friendly name for the value list.
-
Use the Application field LOV to select Oracle Citizen Interaction Center.
-
Optionally enter a description for this group of answers.
-
Set up the list of values in the table below the control region. You can create additional rows by clicking New in the toolbar as needed. For each value:
-
In the Code field, enter a unique code. This code is for internal use only and does not get displayed to agents or users.
-
Enter the wording in the Meaning and in the Description fields.
The wording you enter in the Description field is what agents see in the list of values.
-
-
Click Save in the toolbar.
Setting Up Attributes for a Service Request Type
Use this procedure to specify which attributes are to be captured for a service request type.
Prerequisites:
Service request types must be defined and you must have completed the setup of both the prompts and of the lists of values agents will use to make their entries.
To specify which attributes to capture for a service request type
-
Navigate to Setup, Mapping, Extended Attribute Mapping.
The Service Request Attributes Configuration window appears.
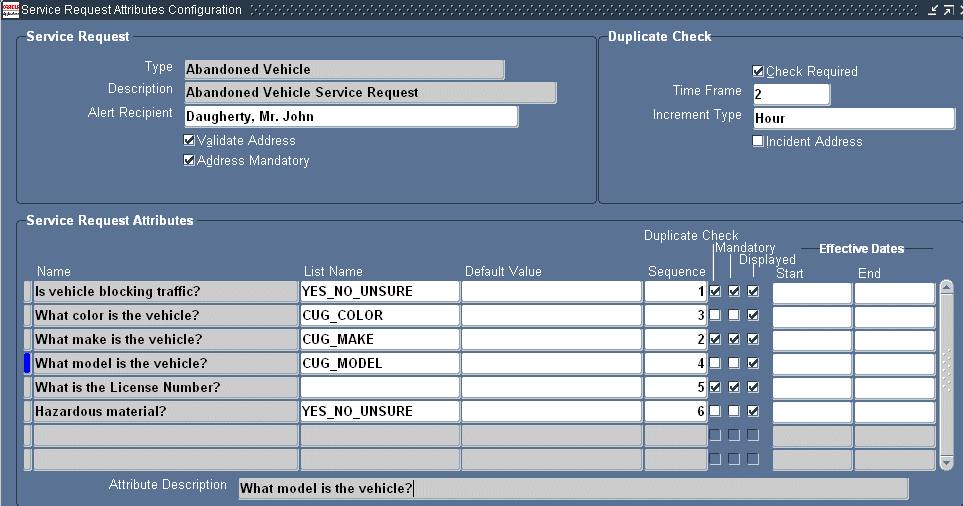
-
Use the Type LOV to select the service request type you wish to set up. The description of the service request type appears in the Description field.
-
To validate the address by a user hook you have created, select the Validate Address check box. The user hook can be read by a third party application that may have specific address format requirements. See Implementing the Validate Address User Hook.
-
Select the Address Mandatory check box to require agents to enter the incident address.
-
In the Service Request Attributes region, set up each attribute:
-
In the name field, select the prompt or question you defined in the CUG_SR_TYPE_ATTRIBUTES lookup type.
Note: The agents see the text displayed in the Attribute Description, not the name.
-
If agents must use the list of values for their entries, then use the List Name LOV to select the lookup where you defined the valid values.
If you do not select a lookup here, agents will be permitted to make entries as free text.
-
If you have not selected a lookup in the previous step, then, optionally, enter a default value for this field. The default value is prefilled automatically in the attribute capture window and is saved if agents do not modify it.
-
Enter an integer in the Sequence field corresponding to the order you wish to present the prompt. The prompts are displayed in descending order.
Entry in this field is optional. If you do not enter a sequence, the application displays the prompts in alphabetical order.
If you specify an order, then the application displays those prompts with sequence first followed by any without a sequence in alphabetical order.
-
To make entry optional, deselect the Mandatory check box. This check box is selected by default requiring agents to enter a value before saving the service request.
-
The Displayed check box must be selected to display the attribute to agents. This check box is selected by default.
-
-
Save your work.
-
To set up duplicate checking based on the attributes you have defined, follow the instruction described in Setting Up Automatic Duplicate Checking for Service Requests.
-
To have customers fill in the same attribute information when they create service requests using Oracle iSupport, follow the steps described in Enabling Attribute Capture in Oracle iSupport.
Implementing the Validate Address User Hook
You must use a Global Information System application such as Oracle Spatial, for the storage, retrieval, and manipulation of spatial data. Oracle TeleService provides the user hook for the address validation against this data.
This topic provides guidelines for implementing the validate address user hook.
To implement the validate user address hook for Runtime Form:
Upon commit, CUG_VALIDATE_ADDRESS_TYPE.Validate_Incident_Address_Type (CUGVADTS.pls and CUGVADTB.pls) is called to validate address and jurisdiction; which then calls CUG_Validate_Address_Pkg.Validate_Incident_Address (CUGVADIS.pls) for address validation, and CUG_Validate_Type_Pkg.Validate_Incident_Type (CUGVTPIS.pls) for jurisdiction validation.
You can customize or create the package body to implement address and jurisdiction validation logic in CUG_Validate_Address_Pkg.Validate_Incident_Address and CUG_Validate_Type_Pkg.Validate_Incident_Type package.
Note: The previously mentioned pls files can be found at $CUG_TOP/patch/115/sql.
To implement the validate user address hook for Oracle iSupport:
Citizen Interaction Center (CIC) has CugValidateAddressIF.java, CugValidateTypeIF.java, interface located under oracle.apps.cug.cm. This interface is the container of abstract methods that might be required to conduct address validation and jurisdiction check on a given incident address and incident type.
You must set the following profiles to determine the customer implementation class for performing jurisdiction and address validation:
-
CUG_ADDRESS_VALIDATION_CLASS: Class Name for Validating the Address
-
CUG_TYPE_VALIDATION_CLASS: Class Name for Jurisdiction Check
Note: CugValidateTypeAndAddress is a public Java class which instantiates the interface implementation classes entered in the CUG_ADDRESS_VALIDATION_CLASS and CUG_TYPE_VALIDATION_CLASS profiles.
The architecture (PL/SQL and Java) is executed only if the Validate Address flag is selected for the service request type in the Service Request Attribute Configuration window of the CIC setup.
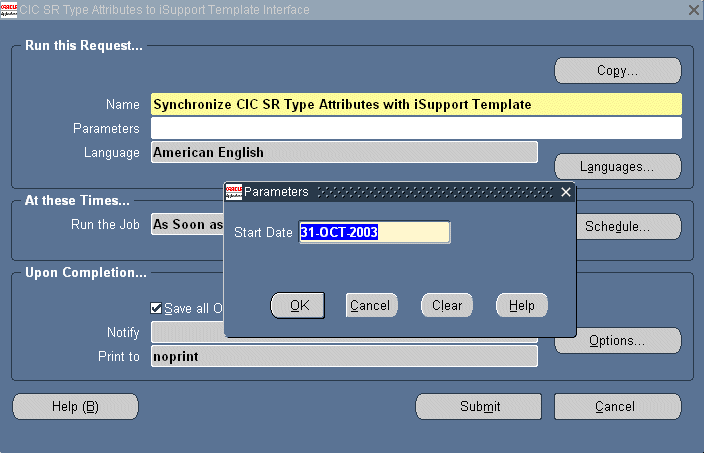
Enabling Attribute Capture in Oracle iSupport
Use this procedure to make service request attribute capture available for use in Oracle iSupport. The procedure involves running two concurrent programs to map the attribute setup to iSupport templates. By doing so, customers entering service requests are asked to submit the same information as agents in Oracle TeleService.
Prerequisites:
-
Be familiar with running concurrent programs.
-
Set up attribute capture for service request types first.
To enable attribute capture in Oracle iSupport
-
Navigate to Setup, Synchronize TeleService with iSupport, Sync SR Type to iSupport Template.
The Parameters and the CIC SR Type Attributes to iSupport Template Interface windows appear.
-
Enter the start date. All attribute setups created on or since this date will be mapped to Oracle iSupport templates.
-
Click Submit and follow the standard procedures for running concurrent programs.
-
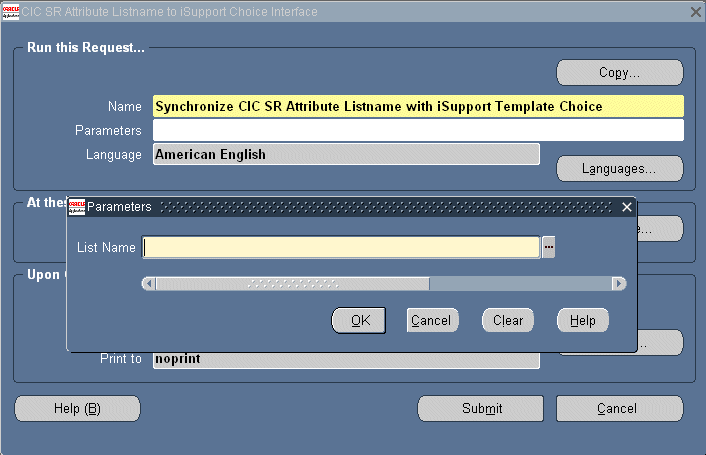
You must run a separate concurrent program to map each of the lookups (lists of values) that are used by your attribute setups. For each lookup:
-
Navigate to Sync SR Attribute Listname to iSupport.
The Parameters and the CIC SR Attribute Listname to iSupport Choice Interface windows appear.
-
Enter the name of the lookup in the List Name field.
-
Click OK.
-
Submit the concurrent program following the standard procedure for running concurrent programs.
-
About Using Request Types and Additional Attributes to Generate Tasks or Launch Workflows
If you have set up your service request types to capture additional information, you can generate tasks based on a combination of the service request type and the information agents or customers enter.
Suppose, for example, that a government agency sets up the Abandoned Vehicle service request type to capture additional information required to deal with the problem.
Whenever agents create a service request of type “Abandoned Vehicle”, the application presents them with a list of questions: What is the make of the vehicle?, the model?, The color?, The license plate number?, Does it carry hazardous materials?
You can set up the application to automatically create a task based on the values an agent enters in any attribute. For example, if the agent specifies that the vehicle is a bus, the application creates a task to send a large tow truck. If the vehicle is a passenger car, the task will be for a small tow truck. If the vehicle carries hazardous materials, the application creates an additional task to alert the hazardous materials team.
Optionally, you can set up the task to launch an Oracle Workflow process and pass to it parameters you specify.