Administering Non-Sales Territories
This chapter covers the following topics:
Non-Sales Creation Flow
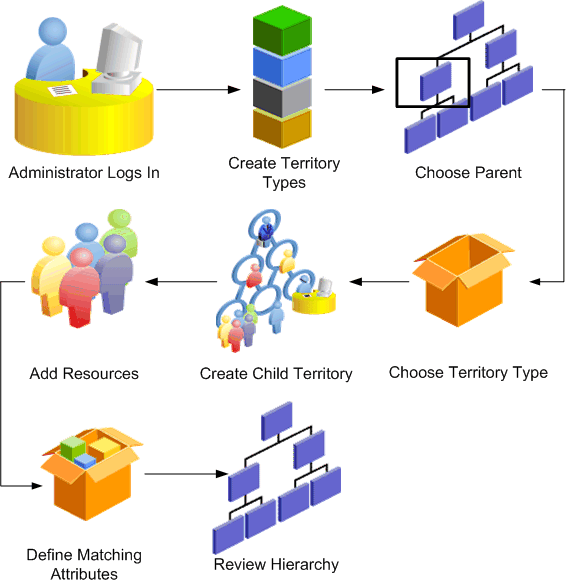
Territory administrators create and maintain territory definitions for non-sales usages. The following diagram shows the process flow.
Non-Sales Territory Creation Flow

During the territory planning phase, planners decide what transactions to assign automatically to resources by using territories. They also decide what matching attributes will aid in the territory assignment. The administrator creates a territory type for each combination of transactions and transaction matching attributes that can be used as a basis to create numerous territories.
For the Service usage, the administrator creates a territory type for the transaction type Service Request that includes matching attributes that will assign service requests to resources who deal with different products. Another territory type uses matching attributes that will assign resources based on severity of the service request and when it was first reported.
Prerequisites
- A territory type must exist for the usage.
- The matching attributes you want to use must be enabled. This includes any custom matching attributes created by your system administrator.
To create a territory
-
The Territory Administrator navigates to Territories.
-
If you have access to more than one operating unit, then you can select the operating unit.
-
Select the usage if you are the administrator for more than one usage.
-
Search for the territory that will be the parent to the one you are creating. You can choose to view only territories active on a selected date. It is possible to create a territory hierarchy for a future date, such as for the next fiscal year. The resources assigned must also be active for the specified future date.
-
Click Go to view the existing territories.
-
You can expand the hierarchies to obtain a thorough view of the existing hierarchy and determine where your new territory should be placed.
-
Select the parent territory, and click Create.
-
Select the territory type.
-
Enter the territory name and other details. The number of winners is inherited from the parent unless you specify a number. The default effective dates start with today and end at a year from today. You can create territories that become active at a future date.
-
Select the resource type and resource. You can select an individual resource, a group, or a team. The resource start date defaults to the later date of either the territory start date or the resource start date in Resource Manager. The resource end date defaults to the earlier date of either the territory end date or the resource end date.
-
For each resource, define the access for the resource to each transaction type, such as Full Access or View Only.
-
If the territory type contained a geographic matching attribute, then you can define the values of each matching attribute, add others, or delete one or more matching attributes.
For example, if the territory type includes State, then you can add State = California.
-
Enter the definition values for any other matching attributes included in the territory type.
-
Review the territory hierarchy and you will see your new territory.
You can review and edit or delete your new territory. It does not become active until the concurrent program is run.
Territory Spreadsheet
You can export territories to make changes and then upload them back to the application.
Steps
-
Click the Export icon next to the territory you want to export.
-
Choose whether you want to export the single territory, the territory plus its immediate children, or the territory including all of its children.
-
If the territory includes a geographic matching attribute, then you additionally can choose to export only the territory definition, only unassigned geographies, or both. If you selected to export geographies, select the geography type to export, such as postal codes or cities.
-
Make your changes in the spreadsheet. You can add territory definition information, add or change resources, and delete information. Your changes are validated when you upload back to the database.
-
When your changes are complete, go to the Oracle menu and choose Upload. Make sure you select Pre-Validate when uploading.
You can select any enabled matching attribute to add to a territory definition. However, if the selected attribute is not included in the selected territory type, then it will be rejected during the validation process when you upload your changes.
Related Topics