Leave and Absence Management
Leave and Absence Management Overview
Employees take paid or unpaid time off from work for a variety of purposes, such as illness or injury, vacation, labor or trade union representation and professional activities. Maintaining information on employee absences for reporting and analysis is an important aspect of human resource management. Oracle HRMS provides a convenient way to maintain information about the various absence types your enterprise recognizes.
Managing Absence Information
In Oracle HRMS you can define as many absence types as you need to track employee time off, and you can group these types into categories and define absence reasons to provide further information for absence reporting.
You can associate each absence type with a recurring or nonrecurring absence element. Each element has an input value with either hours or days as its unit of measure.
You can also set up absence benefit plans so that the Participation process checks employee eligibility for the plans when it processes absence life events.
See: Absence Categories and Types
Using SSHR, employees can enter their own absence, and managers can enter or view absences for their employees. HR Managers can also enter absence records, or you can upload absence information from timecards using Batch Element Entry.
Note: If you use OTL absence integration, then you cannot create or update the absence type from Self-Service or HR if a timecard exits for that time period in OTL and the application displays an error.
Employees can view their accrued leave details, and managers can view the same for employees in their team
See: Accrual Balances Maintained by SSHR, Oracle HRMS Deploy Self-Service Capability Guide
See: How do we track and analyze absences and net accrual entitlement: Leave and Absence Management
See: Self Service Entry of Absences
See: Leave and Absence Management: Self-Service Functionality, Oracle HRMS Deploy Self-Service Capability Guide
In the UK, there is government legislation regarding the payment of employees during periods of sickness, maternity, paternity and adoption leave (SSP, SMP, SPP and SAP). These requirements are handled by the Statutory Absence Payments feature of Oracle HRMS.
Managing PTO Accruals
Many organizations permit employees to accrue hours or days of paid time off (PTO) as they work, to use for sick or vacation leave. In such enterprises, setting up and maintaining PTO plans is another part of absence management.
In Oracle HRMS you can set up any number of accrual plans, each with its own units of accrued time (hours or days) and its own rules. For example, you can set up rules for the frequency of accruals, maximum carryover to a new accrual year, accrual bands, eligibility rules for enrolling in a plan, and accrual start rules for new hires.
Oracle Human Resources users can use PTO accrual plans; this functionality does not require Oracle Payroll.
Reporting on Leave and Absence Management
Oracle HRMS and Oracle HRMSi supply several reports to track absences and analyze absence trends in your enterprise. For example, you can use the Absences Report to track the absence details for an employee or organization, for some or all absence types.
See: Leave and Absence Management -- Reports, Oracle HRMS Configuring, Reporting, and System Administration Guide
Key Concepts
To enable you to get the most out of the Absence Management and PTO Accruals functionality, you need to understand the following key concepts:
-
Accrual Plan Structure, including elements, formulas, and the net accrual calculation rules
-
Accrual Start Date for New Hires, and ineligibility period rules
-
Accrual Bands, for determining accrual amounts and ceilings
Leave and Absence Management
Flexibility is the keynote of Oracle's approach to absence management and PTO accrual plans. You set up the rules that define how you record absences, who is entitled to paid leave of each type, and how much time can be taken.
Can I define which types of absence I want to track and the units of time in which they are recorded?
Yes, you can define as many types of absence as you require, and assign them to categories for ease of reporting. You can also define reasons for absence, to provide additional reporting information. For example, the category might be "family leave," the type might be "maternity," and the reason might be "birth." Each absence type can be recorded in days or hours.
What about study leave and other absence types that are not available to all employees?
You can control which groups of staff are eligible to take absences of each type. Absences are recorded on element entries. By linking the element to organizations, jobs, grades, employment categories, or other assignment components, you control who can take each absence type.
How do I record absences?
You can use Batch Element Entry (BEE) to make entries of absence elements, and other timecard data. You can record the number of days or hours absent, and any other information you have designed the element to hold (such as absence reasons). If you use Oracle Time & Labor, or another time entry application, you can send timecards to BEE using the API.
Alternatively, employees can enter their own absences through self-service, or their line managers can do this for them. These absence records can be submitted for approval before they are recorded in Oracle HRMS.
You can also use the Absence Detail window to enter proposed or actual absences, and to see the effect of the absence on any corresponding PTO accrual plan.
How do absence types relate to PTO accrual plans?
Each accrual plan is associated with one absence element (and hence one absence type). Each entry of time off reduces the net accrual on the plan. You can also associate any number of other elements with a plan and determine how entries to these element affect the accrual calculation. This is useful for recording time bought or sold, or unused PTO brought into a new plan on enrollment.
What rules govern PTO accrual plans in Oracle HRMS?
A few types of accrual plan are seeded with the system. However, accrual plan rules vary from enterprise to enterprise, and country to country. Oracle HRMS provides you with the flexibility to define your own plan rules. Here is just a selection of the rules you can set up:
-
The length of the accrual term (often one year), and the start date, which may be fixed (such as 1 January) or vary by employee (such as the anniversary of the employee's hire date). Some plans have no start date, but always calculate accruals for the previous 12 months (or other length of time).
-
The frequency of accrual, such as monthly, or once each pay period. In other plans, employees receive their full entitlement up front, at the beginning of the accrual term.
-
The amount of accrual and any ceiling on the amount that can be held. These figures may be fixed or vary by length of service, grade, time worked, or other factors.
-
What happens to unused PTO at the end of the accrual term.
-
Rules for part time employees, and for employees with suspended assignments
-
Rules for new hires, including when they can begin accruing PTO and when they can begin to use it.
How do we track and analyze absences and net accrual entitlement?
When you enter an absence you can see, at the employee level, how much absent time of the same type has already been recorded for the employee. If the absence affects net entitlement in a PTO accrual plan, you can see current and projected entitlement figures for the plan. In another window, you can view a full absence history for an employee.
Across all employees, you can view absences of a certain type or category, within a specified time period. Using the Absences Report, you can track absences of one or more types for employees in each organization.
Employees can view their own accrual balance on the web using Self Service, and line managers can do the same for all the employees they manage.
See:Accrual Balances Maintained by SSHR, Oracle HRMS Deploy Self-Service Capability Guide
See: Leave and Absence Management:Self-Service Functionality, Oracle HRMS Deploy Self-Service Capability Guide
Absence Management Setup
Absence Categories and Types
Oracle HRMS provides a convenient way to maintain information about the various absence types your enterprise recognizes. To facilitate reporting and analysis of employee absences, you can distinguish between absence types and absence categories. An absence category is a group of related absence types.
Some absence categories may be predefined for your legislation. The table below contains examples of absence categories and types, for illustration purposes only. You can extend the list of predefined categories and define your own absence types, as required.
Example Absence Categories and Types:
| Absence Category | Absence Type |
|---|---|
| Medical Leave | Illness or Injury |
| Work-related Injury | |
| Work-related Illness | |
| Medical Appointment | |
| Family Leave | Paid Maternity/Paternity |
| Unpaid Maternity/Paternity | |
| Dependent Care | |
| Personal Leave | Compassionate Leave |
| Personal Business | |
| Professional Leave | Certification Classes |
| Meeting Attendance |
Also, to assist with absence reporting and analysis, you can provide reasons to select from when recording employees' time taken for an absence type. For example, if you need information to analyze the particular family-related responsibilities that cause employees to miss work, you can define reasons for absence types as follows:
Example Absence Category, Types and Reasons:
| Absence Category | Absence Type | Absence Reasons |
|---|---|---|
| Family Leave | Paid Maternity/Paternity | Birth of a child |
| Adoption of a child | ||
| Dependent Care | Child Care | |
| Elder Care | ||
| Disabled Care |
Setup of Absence Types
Setting up each absence type is essentially a two-step process. One step involves defining the type, that is, entering its name, and optionally selecting a category and reasons for it. The other step involves defining an element to associate with the type. This element serves two important purposes:
-
It provides a way to maintain a running total of time taken for the absence type. The Absence Detail window shows the running total of absences with an end date before the effective date, and with an absence duration on record. Each absence can add to, or subtract from, the running total, depending on how you define the absence type.
-
It provides a way to restrict employee eligibility for the absence type. The links you build for the element establish which employees are eligible to use the type.
For example, if the absence type compassionate leave is available only to full time employees, you link its element to the assignment category Full Time.
To hold a single running total of time taken for two or more absence types, you associate all the types with the same absence element. For example, your absence category Personal Leave may include two absence types you need for certain reporting purposes, Compassionate Leave and Personal Business. However, you require just one running total to be kept of employees' time taken for both types of personal leave. In this case you simply associate both absence types with the same absence element.
Note: If you want to use absence types without recording accrued totals or eligibility rules, you can define the type with no associated element.
Absence Elements
You can associate each absence type with a recurring or nonrecurring absence element. Each element has an input value with either hours or days as its unit of measure.
Using a Nonrecurring Element
Nonrecurring element entries are valid for one payroll period. When you enter an absence of a type associated with a nonrecurring element, the application creates an element entry for the period in which the absence start date falls. For example, if you enter an absence that starts on 4 May for someone on a monthly payroll, the entry is dated 01 May to 31 May.
The entry is only created when you enter the absence end date, and you must enter the absence duration at the same time. The duration can be defaulted if you set up an absence duration formula. The full value of the absence duration is recorded in the absence element entry, even if the end date falls outside of the payroll period.
Using a Recurring Element
Important: This option is only available if you use Oracle Payroll and the Proration functionality is enabled in your localization.
UK Users: If you use the Statutory Absence Payments feature you must continue to use nonrecurring elements to record long term sick leave.
Use this approach if you want to begin processing absences before end dates are recorded. You do not enter absence duration on the recurring element entry. Instead, you use a payroll formula to calculate the absence duration to be processed in each payroll period. Use the absence duration formula to calculate the duration displayed on the Absence Detail window. This value is deducted from the current PTO accrual when you enter an end date for an absence type that is associated with a PTO accrual plan.
Recurring element entries start on the absence start date and end on the absence end date (if there is an end date). If the absence ends in the middle of a payroll period, the payroll run detects and processes the absence using the proration functionality.
Absence Balance Information
When you define an absence type, you specify whether the application should maintain an increasing balance, a decreasing balance, or no balance of time off. The balance is a running total of the hours or days an employee has taken for the absence type, as recorded in the Duration field.
Increasing Balances of Time Taken
As you would expect, an increasing balance for an absence type starts with no time entered, and increases as you enter employees' hours or days absent. For example, if the absence type Compassionate Leave has an increasing balance, the balance starts from zero for each employee and increases by the number of hours entered for each absence of this type.
Increasing balances are appropriate for most absence types. For absence types for which your enterprise sets a maximum time allowed, the system issues a message when an entry of time absent exceeds this maximum, or Oracle Alert can notify you when an employee reaches the maximum time or takes excess time.
See: Oracle Alert User's Guide
When defining an absence type for a PTO accrual plan, you give it an increasing balance that shows the employee's accrued time taken. When you record an absence using the Absence Detail window, you can see the amount of accrued time a plan participant has available for use as vacation or sick leave.
Decreasing Balances of Time Remaining
If your enterprise sets a maximum time allowed for an absence type, you have the option of setting up a decreasing balance for this type, instead of an increasing balance. (If the absence type is used for a PTO accrual plan, it is simpler to use an increasing balance and an accrual formula that records an up-front accrual amount.)
For example, suppose your enterprise allows certain employees 32 hours leave per year for professional development. The Professional Leave absence type can have a decreasing balance, and an initial entry of 32 hours.
If you record an employee absence of 4 hours for this absence type, the decreasing balance shows 28 hours still available to be taken.
Decreasing absence balances require more maintenance than increasing balances. They need a prorated initial balance entry for all eligible new hires throughout the year, and require resetting each year for all eligible employees.
Notice that an absence type cannot have both a decreasing and an increasing balance; it has one or the other.
Initializing an Absence Balance
You can initialize or adjust an absence balance using the Element Entries window, or the Element Entry API. You can also initialize a decreasing balance by entering a negative value using BEE. For example, if you enter -16 hours using BEE, a decreasing balance starts at 16 hours. However, be aware that using BEE creates an absence record that will show on employees' absence history.
Referencing Absent Time in Payroll Runs
You can define an absence element as an Information element or an Earnings element.
Using an Information Absence Element
If you define an Information absence element, you can use a recurring Earnings element to manage the calculation and payment of vacation and sick pay. When you define the absence element, you check the Database Item box for the input value that holds the absence balance. Entries to this input value then become database items that formulas for payroll calculations can access.
US Users: You will typically set up your absence elements in the Information classification for employees who do not submit timecards (Timecard Required = No on the Statutory Information tab of the Assignment window). If you are using the seeded Regular Salary or Regular Wages elements, the payroll run creates indirect results for the seeded Vacation Pay or Sick Pay elements when it finds absence entries in the Vacation or Sickness categories. These elements appear on the Statement of Earnings, but the Information elements do not. You do not need to set up any additional absence Earnings elements for these employees.
Other localizations: Typically, you define an Earnings element to have a skip rule that triggers processing when it finds an entry for the absence element. The element's payroll formula uses the database item for the entry value so that it automatically gets the sum of all the entries in the pay period. Then, using the salary database item to get the salary or hourly rate, it calculates the total absence pay for the period. You can also use the formula to reduce regular earnings for the period so employees do not get paid twice.
The advantage of this approach is that it simplifies the processing of absence payments into one calculation.
Using an Earnings Absence Element
Select the Earnings classification for absence elements if you want to process absences individually in each payroll period. You can use these elements with Oracle Time and Labor. This approach creates a one-line entry on the statement of earnings for each absence type. Typically, you would create nonrecurring Sick and Vacation Pay earnings elements. You can also create different absence elements for each rate or multiple of pay if the element must appear on the statement of earnings as a different line item.
US Users: For employees who do submit timecards (making entries in BEE to the Time Entry Wages element), you can create your absence elements as Earnings. This also applies if you do not use the seeded Regular Salary and Regular Wages elements, and you want your absence payment to show on the Statement of Earnings. Use the Earnings window to initiate the element. Select the Category Regular and check the Reduce Regular box.
Retrospective Entries and Adjustments
Oracle Payroll users: If you enter or update an absence retrospectively, or you delete an absence that started in the past, these changes are listed in the Retro Notification report the next time you run this report. This enables you to use RetroPay to correct any payroll processing.
Setting Up Absence Management
Use the following steps to set up absence management.
-
If you want to associate recurring elements with absence types, you must set up proration and retro notifications. This ensures that absences that end in the middle of a payroll period are detected and processed by the payroll run, and that retrospective changes to absences are recorded in the Retro Notifications report.
Note: Proration is available to Oracle Payroll users in selected localizations only.
To set up proration and retro notifications, you must:
-
Find all the dynamically generated triggers for the table PAY_ELEMENT_ENTRIES_F in the Dynamic Trigger Definition window. (You must deselect the Insert triggering action so that all the triggers are returned by the Find.) Make sure the Generated and Enabled check boxes are checked for all the continuous calculation triggers.
-
Query the Incident Register functional area in the Functional Area Maintenance window, and enter the business groups for which you want to enable proration on the Business Group tab. Optionally, you can further secure the proration functionality by selecting payrolls on the Payroll tab.
-
Use the Table Event Group window to group the two events that you need to detect to prorate absences - datetracked updates to absence start date and absence end date. Select Proration for the event group type, and Payroll Period for the proration period. In the Datetracked Events region, select DateTrack Update as the update type, PAY_ELEMENT_ENTRIES_F as the table, and EFFECTIVE_START_DATE and EFFECTIVE_END_DATE as the columns.
-
Use the Table Event Group window to group the datetracked events on the PAY_ELEMENT_ENTRIES_F table you want to track in the Retro Notifications report. The event group type is Retro.
-
-
Define an absence element, with at least one input value, for each absence type. Link this element to define who is eligible.
See: Defining and Linking an Absence Element
Note: Omit this step if you are setting up an absence type for which you do not need to maintain a running total of time taken or remaining, and you do not need eligibility rules.
US and Canada Payroll only: If you want to process the absence element in the payroll run, generate it using the Earnings window.
Mexico only: If you want to process the absence element in the payroll run, generate it using the Element Design Wizard.
-
Define categories of absence types as values for the Lookup Type ABSENCE_CATEGORY, and your absence reasons as values for the Lookup Type ABSENCE_REASON. In some legislations there are predefined categories and reasons.
You can select the same reason for different absence types.
See: Adding Lookup Types and Values, Oracle HRMS Configuring, Reporting, and System Administration Guide
-
Define each absence type, and associate it with an absence element.
Note: To keep a single record of employees' time taken for two or more different absence types, you can associate the same element with several types.
-
For an absence type with a decreasing balance, use BEE or the Absence Detail window to initialize the absence balances for employees eligible for the type.
If you want to make batch entries, see Making Batch Element Entries Using BEE, Oracle HRMS Configuring, Reporting, and System Administration Guide.
-
If you defined a recurring element, create a payroll formula that handles proration to process the element and calculate the appropriate absence duration in each pay period (taking into account the number of days or hours in a month, working and shift patterns, public holidays, and so on).
Sample Proration Formulas, Oracle HRMS FastFormula User Guide
-
If you want to set up the application to calculate the duration of an absence automatically, you have two options:
-
Set the HR: Schedule Based Absence Calculation profile option to Yes, if you want the application to use the worker's schedule and calendar events from their primary assignment to calculate absence durations. To use this option, you must first define schedules and calendar events that are relevant to your enterprise and assign them to various levels in your work structures.
See: Setting Up Availability , Oracle HRMS Workforce Sourcing, Deployment, and Talent Management Guide
-
To calculate absence duration from the absence start and end dates without using the schedules and calendar events information of an employee, create a basic formula. If you want the absence duration calculation to update automatically each time you change the absence dates, you must set the profile option HR: Absence Duration Auto Overwrite to Yes.
See: Writing Formulas to Calculate Absence Duration, Oracle HRMS FastFormula User Guide
-
Defining and Linking an Absence Element
Define an absence element in the Element window.
US and Canada Payroll only: If you want to process the absence element in the payroll run, initiate it on the Earnings window instead of using the Element window.
Mexico only: If you want to process the absence element in the payroll run, initiate it with the Element Design Wizard instead of using the Element window.
Spain only:If you want to compute the social security earnings you must use the predefined elements for Sickness Details, Maternity Details, Part-time Maternity Details, Pregnancy-at-Risk Details and Adoption Details.
To define an absence element
-
Set your effective date to a day on or before the start of the first payroll period for which you want to enter absences.
-
Enter a name for the element, and select the classification Information or Earnings.
Tip: Give the absence element and its absence type the same name, or coordinate the element name with the type name. For example, for the absence type Compassionate Leave, name the element Compassionate Leave or Compassionate Leave Absence.
-
Enter a reporting name, for display on reports.
-
If you are creating a recurring absence element, select your absence element event group in the Proration Group field. This field is only available to Oracle Payroll users in certain localizations.
-
Select the processing type.
-
Select Recurring if you want to be able to process absences that do not have an end date and you want to apportion absence time correctly across payroll periods.
Note: You can only select Recurring if you use Oracle Payroll and the Proration functionality is enabled for your localization. (In this case, you should see the Proration Group field on the Element window)
-
Select Nonrecurring if it is acceptable to record the full duration of the absence in the payroll period in which the absence starts.
-
-
Select the termination rule. This is normally Actual Termination.
-
Check the Multiple Entries Allowed box if you want to enable employees to have:
-
(Nonrecurring) More than one instance of the absence type within a pay period.
-
(Recurring) Overlapping entries of the absence.
-
-
If this is an absence element for a PTO accrual plan, do not select Process in Run. Uncheck this box if necessary.
If the element is recurring, ensure that the Process in Run box is checked so that the absence duration can be calculated by the payroll run.
-
If employees must be a certain age or have served for a certain number of years to be allowed this absence, enter this information in the Qualifying Conditions region.
Note: If this is an absence element for a PTO accrual plan, the plan setup relates length of service to accrued time off. Do not make an entry here for length of service.
-
Save the element, then choose the Input Values button.
-
In the Input Values window, create an input value to hold the amount of time taken. Select units of Day, Hours in HH format, or Hours in Decimal Format (to one, two, or three decimal places).
If you are defining an absence element for a PTO accrual plan, give the input value the name Hours or Days, to accord with the unit of measure of the plan. When you define the plan using the Accrual Plan window, this input value name appears in the Units field of the Absence Information region.
Important: If you select Required for an input value, you must select this input value on the Absence Attendance Type window. Do not select Required for more than one input value.
New Zealand users only: You must also create the following input values:
-
Seasonal Shutdown - for Annual Leave and Annual Leave Termination elements
-
Number of complete weeks - for the Special Leave and Protected Voluntary Service Leave elements.
-
-
You can define minimum and maximum days or hours that can be entered in an absence record. If you do this, select what happens if these limits are breached:
-
Select Warning for the system to warn users but allow them to breach the limits.
-
Select Error for the system to issue an error message and prevent users from saving an entry that breaches the limits.
-
-
Save your work.
To link the absence element
-
Set your effective date to a day on or before the start of the first payroll period for which you want to enter absences.
-
In the Element Link window, select the absence element you defined.
-
Select eligibility criteria for this absence element, if appropriate. If you want to make the element available to all employees, do not select any criteria.
-
Save the link. Then define the absence type associated with this absence element.
Defining an Absence Type
Use the Absence Attendance Type window to define an absence type and associate it with an element.
To define an absence type
-
Enter a name and category for the absence type.
Tip: Give the absence type and its associated element the same name, or coordinate the type name with its element name. For example, name the absence type for a PTO accrual plan Salaried Sick PTO Plan, and its associated element, Salaried Sick PTO Absence.
-
Select Allow Absence Overlaps if absences of this type can overlap other absences. If you deselect this option, the application warns you if you enter an absence that overlaps another absence of any type.
-
In the Associated Element region, select the element defined for this absence type. Select the element's input value that holds days or hours. The unit of measure for the input value appears in the Units region.
-
In the Balance region, select Increasing if you want each absence entry to add to a running total of time taken to date. The running total covers all absence types associated with the selected element. Select increasing balances for absence types for PTO accrual plans, and for most other absence types.
For absence types that have a set maximum amount of hours or days allowed, you may select Decreasing. In this case, each absence recorded reduces an initial balance to show time remaining to be taken for the type.
Note: Decreasing balances require more maintenance. You must enter an initial balance amount for each new hire eligible for the absence type, and must initialize the balance for all eligible employees at the start of each year.
-
Optionally, select reasons that are valid for entries of this type of absence.
-
Save the absence type.
Setting Up an Absence Benefit Plan
You can set up absence benefit plans so that the Participation process checks employee eligibility for the plans when it processes absence life events. You set up participant eligibility profiles to determine which absence categories or types are valid for each plan. Both Standard and Advanced Benefits users can set up absence benefit plans.
Tip: Use the same effective date, such as 01 Jan 1951, for all your definitions
UK Users only: There are sample plans provided for Occupational Sick Pay and Occupational Maternity Pay, called PQP OSP Plan and PQP OMP Plan. You can copy these plans using Plan Design Copy and configure them to meet your needs. If you are not using the sample plans, see: Creating Your Own Absence Plan.
Using the Sample Plans
To set up an absence benefit plan using a sample plan
-
Set the BEN:Enable Absence Plans Functionality profile option to Yes for the users or responsibilities who will enter absences for absence benefit plans, if you want them to run the Participation Process to process the absence life events. This displays the Enroll Absences button on the Absence Detail window.
See: System Profile Values Window, Oracle Applications System Administrators Guide
-
In the Submit Requests window, select the process Plan Design Copy - ImportIn the Data File parameter, enter the file pqgbgapl.ldt, which is located at patch/115/import/us in Product Top: PQP.
-
Use Plan Design Copy to copy the imported plan. In the Process Name field, enter PQP GB OSP/OMP Absence Plan.
See: Copying a Program or Plan.
Tip: First make a copy of the seeded plan in your business group without entering any prefix or suffix for your copy. Select the first option on the Enter Target Details page, which is "Reuse existing objects if current name exists in the target." Then you can make further copies of this copy to configure your plans. When you make further copies, you can select the same option if you want plans to share objects, such as eligibility profiles, or you can select the option "Reuse existing objects if new name exists in target".
-
Write or configure any formula rules you require, such as the following:
Important: The formulas attached to the sample plans are for UK users only. In other legislations, you must create your own formulas.
Rule Formula Type Supplied Examples (UK Only) Eligibility rule Participation Eligibility PQP_OSP_PARTICIPATION_ ELIGIBILITY_PROFILE_OTHER_RULE PQP_OMP_PARTICIPATION_ ELIGIBILITY_PROFILE_OTHER_RULE Person Change Person Change Causes Life Event PQP_GB_BEN_ABSENCE_START_LER_ PERSON_CHANGE_RULE, PQP_GB_BEN_ABSENCE_END_LER_ PERSON_CHANGE_RULE, PQP_GB_BEN_ABSENCE_DELETE_LER_ PERSON_CHANGE_RULE Extra Input Rule Extra Inputs PQP_OSP_STANDARD_RATES _GENERAL_EXTRA_INPUT_RULE PQP_OMP_STANDARD_RATES _GENERAL_EXTRA_INPUT_RULE Length of service rate Length of Service Calculation PQP_OSP_STANDARD_RATES _CALCULATION_METHOD_VALUE_RULE PQP_OMP_STANDARD_RATES _CALCULATION_METHOD_VALUE_RULE See: Total Compensation Formula Types, Oracle HRMS FastFormula User Guide
-
Ensure you have Program/Plan years set up.
-
Select the appropriate Person Changes for the three absence life event reasons, created by the Plan Design Copy process. There is one life event reason for each Life Event Operation Code: Start Event, End Event, Delete Event.
Note: You only perform this step once. You use the same life event reasons for all your absence plans.
-
The Start Absence life event reason must detect changes to any columns except the end date. Use the Person Change formula rule you created in step 4 to define the columns you want to use to trigger this life event.
UK users: You must attach the PQP_GB_BEN_ABSENCE_ START_LER_PERSON_CHANGE_RULE formula to the absence start life event
-
You can also use formula rules to define the person changes that trigger the End Absence and Delete Absence life events too.
-
-
Query the absence plan in the Plans window, and change the status from Pending to Active. Choose the Details button and select your plan periods.
You have completed the plan setup based on a seeded plan, but make sure you complete the Next Steps.
Creating Your Own Absence Plan
To set up an absence benefit plan without using the sample plans
Set the BEN:Enable Absence Plans Functionality profile option to Yes for the users or responsibilities who will enter absences for absence benefit plans, if you want them to run the Participation Process to process the absence life events. This displays the Enroll Absences button on the Absence Detail window.
See: System Profile Values Window, Oracle Applications System Administrators Guide
Write or configure any formula rules you require, such as the ones shown in the following table.
Note: UK users: If you want to use the supplied formulas, you must run the following scripts:
-
PQPGBLER.SQL script to create the life event formulas
-
PQPGBOSP.SQL script to create the OSP formulas
-
PQPGBOMP.SQL script to create the OMP formulas
Rule Formula Type Supplied Examples (UK Only) Eligibility rule Participation Eligibility <base name>_OSP_PARTICIPATION_ ELIGIBILITY_PROFILE_OTHER_RULE <base name>_OMP_PARTICIPATION_ ELIGIBILITY_PROFILE_OTHER_RULE Person Change Person Change Causes Life Event PQP_GB_BEN_ABSENCE_START_LER_ PERSON_CHANGE_RULE, PQP_GB_BEN_ABSENCE_END_LER_ PERSON_CHANGE_RULE, PQP_GB_BEN_ABSENCE_DELETE_LER_ PERSON_CHANGE_RULE Extra Input Rule Extra Inputs <base name>_OSP_STANDARD_RATES _GENERAL_EXTRA_INPUT_RULE <base name>_OMP_STANDARD_RATES _GENERAL_EXTRA_INPUT_RULE Length of service rate Length of Service Calculation <base name>_PQP_OSP_STANDARD_RATES _CALCULATION_METHOD_VALUE_RULE <base name>_PQP_OMP_STANDARD_RATES _CALCULATION_METHOD_VALUE_RULE See: Total Compensation Formula Types, Oracle HRMS FastFormula User Guide
-
-
Define a new plan type, selecting Absences as the Option Type.
See: Defining Plan Types
-
Ensure you have Program/Plan years set up.
See: Defining a Program or Plan Year Period
Eligibility Profiles
-
Create a participant eligibility profile for each absence benefit plan.
Important: Ensure that these profiles are exclusive: participants must only be eligible for one plan at a time.
-
Ensure that your eligibility profile checks that the absence is for the appropriate absence category, such as sickness. You can further restrict eligibility to one or more absence types.
-
UK users: Choose the Others tab and select Rule. Select the supplied rule <base name>_OSP_PARTICIPATION_ ELIGIBILITY_PROFILE_OTHER_RULE for an OSP scheme, or <base name>_OMP_PARTICIPATION_ELIGIBILITY_PROFILE_ OTHER_RULE for an OMP scheme, or another formula that you have created.
See: Defining an Eligibility Profile
Life Event Reasons
-
Create three life event reasons, all of type Absence, and one for each Life Event Operation Code: Start Event, End Event, Delete Event.
Note: You only perform this step once. You use the same life event reasons for all your absence plans.
-
Select the Person Changes that trigger these life events. The table is PER_ABSENCE_ATTENDANCES. Select columns and values as follows:
Life Event Column Old Value New Value Start Absence DATE_START any value any value End Absence DATE_END any value any value Delete Absence DATE_START any value no value -
The Start Absence life event reason must detect changes to any columns except the end date. Use the Person Change formula rule you created in step 2 to define the columns you want to use to trigger this life event.
UK users: You must attach the PQP_GB_BEN_ABSENCE_ START_LER_PERSON_CHANGE_RULE formula to the absence start life event
-
You can also use formula rules to define the person changes that trigger the End Absence and Delete Absence life events too.
Plan
-
-
Define the absence plan.
-
Select your plan type.
-
Select May Not Be In Program for the Plan Usage.
-
On the Eligibility Rates tab, check all the check boxes. Select Participant in the Eligibility Check field.
See: Defining Eligibility and Activity Rate Requirements for a Plan
-
On the Not in Program tab, enter a Sequence number and the activity rate details.
UK users: Select Per Pay Period for the Enrolment Rate/Frequency and select a value, such as Monthly, for the Activity Reference Period.
-
Choose the Details button and select your plan periods. Return to the Plans window.
-
Choose the Plan Eligibility button then the Eligibility button. Select your eligibility profile on the Profile tab. Close this window.
See: Defining Participant Eligibility Criteria for a Compensation Object
-
Choose the Life Event button. Select your End Absence life event and select Ineligible in the Eligible/Ineligible field.
See: Associating a Life Event Reason With a Compensation Object
Enrollment Requirements
-
-
Define the plan enrollment requirements.
-
Choose the General tab, the Plan tab, then Enrollment. Select Automatic in the Method field.
-
Select Current Can Keep or Choose; New Can Choose as the Enrollment Code.
-
Choose Coverage. Select Event as the Enrollment Coverage Start Date Code and End Date Code.
-
Choose Rates. Select Event as the Rate Start Date Code and End of Pay Period as the Rate End Date Code.
-
Choose the Timing tab and the Life Event tab. Select Life Event as the Enrollment Type. Select your Start Absence life event in the Life Event column and select When Elections are Made as the Close Enrollments Date to Use.
See: Defining Requirements for a Life Event Enrollment for a Plan
-
Click on General and choose the Periods region. Select As of Event Date for the Enrollment Period Start Date, and End of Pay Period for the Enrollment Period End Date.
-
Next Steps
Define or generate the elements required for the plan, then define a standard rate for the plan to calculate values for the absence element entry.
UK Users: Use the Absence Scheme Creation template, then set up the generated user-defined tables, and define a standard rate for the absence plan (or configure the copied rate if you are using a copy of the seeded plans).
PTO Accruals Setup
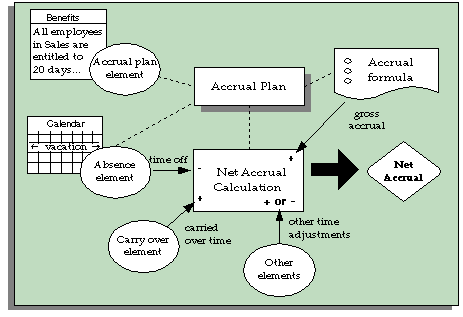
Accrual Plan Structure
In Oracle HRMS, accrual plans are based on elements, formulas, and a net accrual calculation. All of these are available for you to configure so you have complete control over the rules underlying your plans.
Oracle HRMS does not store net accrual totals. It calculates gross accruals dynamically by calling the Accrual formula. The net accrual calculation specifies the element entries that should add to or subtract from this figure to create the net entitlement.
If you use Oracle Payroll, you can set up your accrual plan so that gross accruals are stored in a payroll balance. Each payroll run retrieves the latest balance and calls the accrual formula to calculate new accruals since the end of the last payroll period. This approach - using a payroll balance - is optional but provides performance enhancements if you need to calculate accruals in a batch process. See: Accrual Balances Maintained By the Payroll Run.
The table below further explains the role of the elements, formulas, and net accrual calculation.
Accrual Elements
For each accrual plan, you define and link an absence element and then define a plan using this absence element. The system generates elements for the plan.
Generated Elements
The system generates the following elements when you save a new accrual plan:
-
An element representing the plan and which has the same name as the plan. You use this element to enroll participants in the plan.
-
An element to hold participants' unused PTO that is available for carry over to the next year.
-
An element to hold residual PTO, that is, unused PTO not available for carry over under plan rules.
If you use Oracle Payroll and have elected to store gross accruals in a payroll balance, the system also generates:
-
An element to feed a payroll balance. This element receives an entry from the accrual formula during a payroll run.
-
A tagging element, which the payroll run uses to keep track of retrospective absences (and other element entries included in the net accrual calculation) that need to be included in the gross accrual calculation.
The Carried Over and Residual elements have input values that automatically receive entries when you run the PTO Carry Over process:
-
Hours or Days (depending on the plan's units)
-
Effective Date
-
Expiry Date (on the Carry Over element), which is the date by which the employee must use the carried over time.
Oracle HRMS automatically links these elements using the same link criteria that you created for the absence element associated with the plan. If you change the links for the absence element, you should also update the links for the other plan elements.
Other Elements
Your enterprise may require other elements to reflect individual plan policies. For example:
-
Employees may be permitted to sell back PTO they have accrued but not used.
-
Employees may also be permitted to purchase additional PTO in certain circumstances.
-
You may need to store time in a special balance after running the Carry Over process, such as a balance of time that can be carried over for several plan terms and is not subject to the usual expiry date
-
You may need an element for entering unused PTO from another plan that is being transferred to this plan on enrollment.
These policies are not standard across enterprises. So, in Oracle Human Resources you can define elements, configured to your own requirements, for entering or storing these accrual amounts.
Accrual Formulas
Most accrual plan rules are incorporated in two formulas:
-
An Accrual formula, which calculates the amount of PTO accrued at any given time, and
-
A Carry Over formula, which returns the maximum amount of accrued time that a plan participant can carry over to the next plan period, the date on which this carry over is effective (normally the first day of the new accrual term), and any expiry date by which the carried over PTO must be used, or forfeited.
When the Formulas Are Run
The Carry Over formula is called by the Carry Over process. When the Accrual formula is run, it always receives a calculation date as input, as shown in the following table.
| Accrual formula is run when you: | Calculation date is: |
|---|---|
| Enter an absence associated with an accrual plan and open the Associated Accrual Plans window. Accrual formula is run three times to calculate the time accrued before and after the current absence, and at the end of the plan term | Start date of the absence, or Day before the start date of the absence, or End of plan term |
| View PTO entitlement in the Accruals window | Effective date entered in Change Effective Date window |
| Run the Carry Over process | Entered as a parameter |
| Run your payroll and some other batch processes (Oracle Payroll users only) | The date paid, or date earned, of the current payroll run - determined by the PTO Balance Type selected for your business group |
Examples of Plan Rules
These formulas can access certain data that is available as database items. For example, they can use hire date, plan enrollment date, grade, job, assignment status, assignment category (full time/part time), hours worked, or pay elements to determine:
-
The employee's entitlement each accrual period
-
Any accrual ceiling beyond which the employee will accrue no more time
-
The maximum amount that can be carried over to the next accrual term
These values can be embedded in the formulas, or entered in a user table. If they vary with length of service, which is a common criterion for accrual bands, they can be entered in the Accrual Bands window when you define the accrual plan.
Some accrual plans allow new hires to accrue time from the date of their hire. Others allow accrual to begin at the start of the next accrual term, or six months after hire, or some other start date. Some plan rules incorporate a period of ineligibility, when a new employee can accrue time but not use it. Start rules such as these can be incorporated in your Accrual formulas.
Note: Depending on how you define the ineligibility period, you may have to associate an Ineligibility formula with your plan, if you want to make absence entries using BEE (Batch Element Entry). See: Period of Ineligibility.
Adding Your Own Plan Rules
Some formulas are seeded. You can use these, as supplied, or use them as models to create your own, incorporating the rules required for your accrual plans.
Accrual Balances Maintained By the Payroll Run
If you use Oracle Payroll, you can choose to use a payroll balance to store gross accruals for an accrual plan. You do this by selecting a balance dimension (such as calendar year to date) when you define the accrual plan. The system then automatically generates the balance and other components you require.
Why Use a Payroll Balance?
Some batch processes, such as the US Check Writer, call the accrual formula to calculate PTO accruals for each assignment. If you use such processes, you will benefit from faster batch processing if you set up your accrual plan to use a payroll balance. This reduces the number of calculations the formula has to perform.
How The Balance Is Maintained
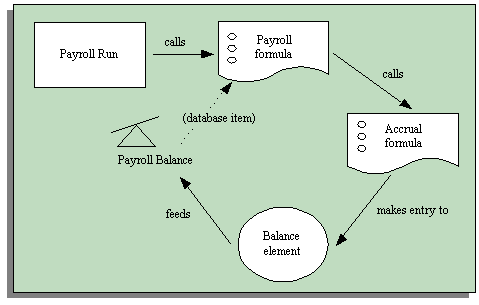
The payroll balance is maintained by the payroll run. When the payroll run processes an accrual plan element entry, it calls an Oracle Payroll formula associated with the accrual plan element. This formula calls your accrual formula to calculate the gross accrual, passing in the following information:
-
The name of the database item for the payroll balance, so the accrual formula can retrieve the number of days or hours currently in the payroll balance
-
Date to begin calculating new accruals, which is the day after either the Date Earned or the Date Paid of the last payroll period in which the assignment was processed
You can choose whether the formula uses Date Paid or Date Earned by selecting the Payroll Balance Type for your business group in the Organization window.
Date Earned is the date the payroll run uses to determine which element entries to process. In North America (and typically elsewhere too) it is the last day of the payroll period being processed. Date Paid is the date that appears on pay advices. The payroll run uses this date to select taxation rules, and store balances. In some legislations, these dates are always the same.
-
Calculation date, which is either the date earned or the date paid of the payroll run
The accrual formula returns the new gross accrual to an element that feeds the balance.
So normally the formula only has to calculate accruals since the last payroll run, and add this value to the existing payroll balance. However, if the accrual formula finds retrospective absences or other assignment changes that affect entitlement, it recalculates accruals for the whole accrual term. This processing ensures that the employee receives their full accrual entitlement.
Note: You can also force the payroll run to recalculate accruals for the full accrual term by setting the action parameter Reset PTO Accruals to "Y" before running a payroll for a set of assignments. Update the parameter to "N" after processing these assignments to ensure faster processing in your normal run.
Example
Supposing an accrual plan has a ceiling of 10 days, and two days accrual per month. An employee has a net accrual of 10 at the end of May. The June payroll run does not award any new accrual to this employee because the net accrual must not exceed the ceiling. However, in July the employee's manager enters five days vacation in May, retrospectively. The July payroll run recalculates the accrual and updates the gross accrual balance to 14. The net accrual is now nine (14 minus 5).
How To Set Up An Accrual Plan To Use a Balance
If you want the payroll run to maintain an accrual balance, you must use a formula that supports balances. This means that the system can pass the latest accrual balance to the formula, along with the date to start calculating new accruals to add to the balance.
You can use or configure one of the following seeded formulas:
-
PTO_HD_ANNIVERSARY_BALANCE
-
PTO_PAYROLL_BALANCE_CALCULATION
-
PTO_SIMPLE_BALANCE_MULTIPLIER
You must also select a balance dimension when you define the accrual plan. The balance dimension controls the period of time over which the balance accumulates before it is reset to zero. Three types of dimension are predefined:
Note: For each type, there are two dimensions. Use the Date Earned dimension (such as _ASG_PTO_DE_YTD) if you selected Date Earned as the PTO Balance Type for your business group. Otherwise use the Date Paid dimension (such as _ASG_PTO_YTD).
See: Business Groups: Selecting a PTO Balance Type, Oracle HRMS Enterprise and Workforce Management Guide
-
_ASG_PTO_YTD and _ASG_PTO_DE_YTD
The balance accumulates over a calendar year, resetting on 01 January. Select one of these dimensions if you are using the PTO_PAYROLL_BALANCE_CALCULATION formula.
-
_ASG_PTO_SM_YTD and _ASG_PTO_DE_SM_YTD
The balance accumulates over a year, resetting on 01 June, or at the end of the payroll period that contains this date. Select one of these dimensions if you are using the PTO_SIMPLE_BALANCE_MULTIPLIER formula.
-
_ASG_PTO_HD_YTD and _ASG_PTO_DE_HD_YTD
The balance accumulates over a year, resetting on the anniversary of the employee's hire date, or at the end of the payroll period that contains this date. Select one of these dimensions if you are using the PTO_HD_ANNIVERSARY_BALANCE formula.
For further information on balance dimensions, see the technical essay: Balances in Oracle Payroll, Oracle HRMS Implementation Guide.
Notice that the Oracle Payroll formula, payroll balance, element that feeds the balance, element link, and formula processing and result rules are all generated by the system when you save your accrual plan.
If you want Oracle Payroll to recalculate the accrual balance from the beginning of the accrual term when there are retrospective assignment changes that affect entitlement, you must ensure your accrual formula can track these changes. You enable a trigger for assignment updates, define an event group for the assignment changes you want to track, and ensure your PTO accrual formula references this event group. See: Setting Up PTO Accrual Plans.
Note: The predefined PTO_PAYROLL_BALANCE_CALCULATION formula handles retrospective changes to assignment status.
Net Accrual Calculation
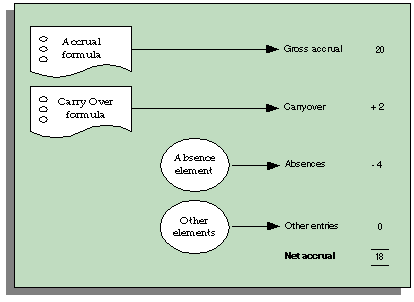
Oracle HRMS uses the following calculation for an employee's net accrual:
Net PTO accrual = (Accrued PTO + PTO carried over) - PTO taken to date
Accrued PTO is the sum of regular accruals to date in this accrual term, calculated by your Accrual formula.
PTO Carried Over is the hours or days carried over from the previous accrual term, obtained from the plan's Carried Over element.
PTO Taken To Date is all PTO taken in this accrual term, obtained from the entries to the plan's absence element.
You may require a more complex calculation of net accruals, perhaps to take some account of time stored in the residual PTO element, or to take account of time entered on other elements that you have created. You cannot change the predefined rules for PTO taken to date (the absence element) and PTO carried over, but you can add your own rules in the Net Calculation Rules window.
Notice that the system does no automatic processing of the entries of employees' residual PTO. Your enterprise may want to use these entries to inform employees of accrued but unused time they may forfeit, or to make payments for part or all of this time.
Seeded Accrual Type Formulas
There are four seeded formulas (of formula type Accrual) for calculating accruals. Each repeatedly calls another formula (of type Accrual Subformula), in a loop, to calculate the accrual for each accrual period. There is a Carry Over formula supplied to use with each Accrual formula. The top level seeded Accrual formulas are:
-
PTO_PAYROLL_BALANCE_CALCULATION
-
PTO_SIMPLE_BALANCE_ MULTIPLIER
-
PTO_ROLLING_ACCRUAL
-
PTO_HD_ANNIVERSARY_BALANCE
The formulas with "Balance" in their names can be called from the payroll run to maintain a balance of gross accruals. See: Accrual Balances Maintained By the Payroll Run.
Note: There are also two seeded formulas called PTO_PAYROLL_CALCULATION and PTO_SIMPLE_MULTIPLIER. These incorporate the same rules as PTO_PAYROLL_BALANCE_CALCULATION and PTO_SIMPLE_BALANCE_ MULTIPLIER, except that they cannot be called from the payroll run to maintain a balance of gross accruals. We recommend that you use the formulas that support balances so you can use balances now or in the future.
Ineligibility Formula
There is also a seeded Ineligibility formula:
You may require an Ineligibility formula if you use BEE (Batch Element Entry) to enter absences against an accrual plan. BEE validation must ascertain whether an employee is eligible to use accrued PTO on the effective date of an absence entry in a batch line. First it checks the Accrual Plan table, so if you enter the period of ineligibility in the Accrual Plan window, you do not need to create an Ineligibility formula.
If there is no ineligibility information in this table, BEE validation checks whether there is an Ineligibility formula to call. You need an Ineligibility formula if you use BEE and you calculate the period of ineligibility within your Accrual formula, rather than entering it in the Accrual Plan window. This formula is only used by BEE.
Note: If you use the seeded formulas, you do not need an Ineligibility formula, because these formulas take the ineligibility period from the Accrual Plan table.
Description of Seeded Accrual Formulas
This section describes the main features of each of the seeded formulas. The rules are summarized, later, in tables.
PTO_PAYROLL_BALANCE_CALCULATION
This formula calculates accruals in the same way as the accrual function in earlier releases of Oracle HRMS. It calls another formula which is called PTO_PAYROLL_PERIOD_ACCRUAL. It is designed to be used with the Carry Over formula PTO_PAYROLL_CARRYOVER.
These formulas are based on the following rules:
-
An accrual term of one calendar year, starting 1 Jan. So, accrual calculations restart at the beginning of each calendar year.
-
An accrual frequency based on the participant's pay periods. So, employees on a monthly payroll accrue time each month, employees on semi-monthly payrolls accrue time twice each month, and so on. PTO accrual occurs automatically for each eligible plan participant on the last day of his or her pay period, independently of any payroll run.
-
Accrual amounts and ceiling are determined by length of service.
-
Accruals are prorated for suspended assignments.
-
Carry over is always effective on 31 Dec of the plan year being processed. So, if you run the Carry Over process and specify the parameters '15 January 2000' and 'Previous' (plan year), the formula calculates the carry over for the year 1 Jan to 31 Dec 1999 and the result has the effective date 31 Dec 1999.
-
Carry over expires at the end of the plan year. So carried over time with the effective date 31 Dec 1999 must be used before 31 Dec 2000.
-
Maximum carryover depends on length of service bands.
PTO_SIMPLE_BALANCE_MULTIPLIER
This is a simple formula to provide a useful starting point for your own accrual plans. It calls another formula, called PTO_SIMPLE_PERIOD_ACCRUAL. It is designed to be used with the Carry Over formula PTO_SIMPLE_CARRYOVER.
These formulas are based on the following rules:
-
An accrual term of one calendar year, starting 1 June. So, accrual calculations restart at the beginning of each June.
-
An accrual frequency of one month.
-
Accrual amounts and ceiling are fixed within the formula.
-
Carry over is always effective on 31 May of the plan year being processed.
-
Carry over expires at the end of the plan year. So carried over time with the effective date 31 May 1999 must be used before 31 May 2000.
-
Maximum carry over is fixed within the formula.
PTO_HD_ANNIVERSARY_BALANCE
This formula is very similar to PTO_SIMPLE_BALANCE_MULTIPLIER, but the accrual start date is the anniversary of the employee assignment's hire date.
Note: Notice that the accrual term starts on the anniversary of the hire date. It is not affected by the entry of a continuous service date for an employee on enrollment in the plan. The continuous service date affects length of service calculations (for accrual bands and calculation of period of ineligibility), but it does not affect the accrual term.
PTO_ROLLING_ACCRUAL
This is an example formula for an accrual plan that does not have a fixed term start date. It calls the formula PTO_ROLLING_PERIOD_ACCRUAL. It is designed to be used with the Carry Over formula PTO_ROLLING_CARRYOVER. (Although carry over is not relevant to rolling accrual plans, you must select this formula for your accrual plan. It returns an effective date to the Absence Detail window.)
These formulas are based on the following rules:
-
An accrual term of one calendar year, with no fixed start date. Accruals are calculated for the previous 12 months.
-
An accrual frequency of one month.
-
Accrual amounts and ceiling are fixed within the formula.
-
Carry over is not relevant, since the accrual term never ends, but rolls forward. Time is lost if it is not used within 12 months.
Summary of Rules in Seeded Formulas
The following tables summarize the rules incorporated in the seeded Accrual formulas.
Length of Accrual Term
| All Seeded Formulas |
|---|
| One year |
Accrual Term Start Date
| PTO_PAYROLL_BALANCE _CALCULATION | PTO_SIMPLE_BALANCE_MULTIPLIER and PTO_HD_ANNIVERSARY_BALANCE | PTO_ROLLING _ACCRUAL |
|---|---|---|
| 1 January | 1 June (PTO_SIMPLE_BALANCE_MULTIPLIER) Anniversary of hire date (PTO_HD _ANNIVERSARY _BALANCE) |
No fixed date; accruals calculated for preceding 12 months |
Accrual Frequency
| PTO_PAYROLL_BALANCE _CALCULATION | PTO_SIMPLE_BALANCE_MULTIPLIER, PTO_HD_ANNIVERSARY_BALANCE, and PTO_ROLLING_ACCRUAL |
|---|---|
| Payroll period | Monthly |
Accrual Amount
| PTO_PAYROLL_BALANCE _CALCULATION | PTO_SIMPLE_BALANCE _MULTIPLIER, PTO_HD_ANNIVERSARY_BALANCE, and PTO_ROLLING _ACCRUAL |
|---|---|
| Depends on length of service accrual bands | A fixed amount per month (2 days) |
Accrual Ceiling
Note: For all the formulas, the accrual ceiling is a limit at which the employee will accrue no more time. However, net accrual can exceed the ceiling if you have made an entry of the Carry Over element, or another adjustment element affecting net calculation rules. If you have adjusted net accrual so that it exceeds the ceiling, the employee will accrue no time until net accrual falls below the ceiling.
| PTO_PAYROLL_BALANCE _CALCULATION | PTO_SIMPLE_BALANCE _MULTIPLIER, PTO_HD_ANNIVERSARY_BALANCE, and PTO_ROLLING _ACCRUAL |
|---|---|
| Depends on length of service accrual bands | Set within the formula to 20 days |
Length of Service
| All Seeded Formulas |
|---|
| Uses continuous service date (if present) or hire date. Note: continuous service date is entered using an input value on the accrual plan element. |
Accrual Start Date for New Hires
| PTO_PAYROLL_BALANCE _CALCULATION | PTO_SIMPLE_BALANCE _MULTIPLIER, PTO_HD_ANNIVERSARY_BALANCE, and PTO_ROLLING _ACCRUAL |
|---|---|
| Choice of start rules on Accrual Plan form: hire date, or six months after hire date, or 01 Jan after hire date Accrual starts in the first accrual period after the chosen date (or plan enrollment date if this is later). | Accrual starts in the first accrual period after hire date or plan enrollment date, whichever is later. |
Period of Ineligibility
| All Seeded Formulas |
|---|
| Accrued amounts are not credited until end of period of ineligibility (entered on Accrual Plan form), which is calculated from the hire date (or continuous service date if this was entered). Note that accrued amounts are not carried forward if the end of the accrual term falls within the ineligibility period. |
Calculation of Gross Accrual
| PTO_PAYROLL_BALANCE _CALCULATION | PTO_SIMPLE_BALANCE _MULTIPLIER and PTO_HD_ANNIVERSARY_BALANCE | PTO_ROLLING _ACCRUAL |
|---|---|---|
| Sums accruals in all full pay periods of the year ending on or before the calculation date; takes account of any employee termination date, accrual start rules, ineligibility period, assignment status, and accrual ceiling. |
Sums accruals in all full months of the year ending on or before the calculation date; takes account of any employee termination date, ineligibility period, and accrual ceiling. |
Sums accruals in the 12 months ending on or before the calculation date; takes account of any employee termination date, ineligibility period, and accrual ceiling. |
Suspended Assignments
| PTO_PAYROLL_BALANCE _CALCULATION | PTO_SIMPLE_BALANCE _MULTIPLIER and PTO_HD_ANNIVERSARY_BALANCE | PTO_ROLLING _ACCRUAL |
|---|---|---|
| Calculates the number of working days (Monday to Friday) in the payroll period and checks assignment status for each day. Multiplies normal accrual rate by active days divided by working days, to prorate the accrual. | No processing of assignment status. | No processing of assignment status. |
Changing and Adding Rules in Formulas
If you write your own formulas (perhaps using the simple multiplier or rolling accrual formula as a basis) you can change any of these rules and add new rules as required. However, your formulas must return certain values and must check for certain conditions (such as employee termination) to avoid errors.
For information about required formula content, see: Writing Formulas for Accrual Plans, Oracle HRMS FastFormula User Guide.
For a sample accrual formula and suggestions on how to edit it to incorporate a whole range of plan rules, see: Sample Accrual Formula, Oracle HRMS FastFormula User Guide.
Accrual Start Date for New Hires
Using the seeded PTO_PAYROLL_BALANCE_CALCULATION formula, accrual of PTO begins on a fixed date each year (01 January). For each plan that uses this formula, you can select a value in the Accrual Start field of the Accrual Plan window. This specifies when newly hired employees start to accrue PTO. The seeded choices are:
-
Hire Date
-
Beginning of Calendar Year after their hire date
-
Six Months after Hire Date
If you need additional start rules, you can define them as values for the Lookup Type US_ACCRUAL_START_TYPE. You must add a line to the seeded formula to calculate the accrual start date using your new start rule.
The other seeded formulas (PTO_SIMPLE_BALANCE_MULTIPLIER, PTO_HD_ANNIVERSARY_BALANCE, and PTO_ROLLING_ACCRUAL) do not use values in the Accrual Start field. For plans using these formulas, new hires begin accruing on their hire date or plan enrollment date, whichever is later.
If you are writing your own accrual formulas, you can choose whether to use the Accrual Start field on the Accrual Plan form to specify start rules for new hires. This is only useful if you are using the same formula for several accrual plans with different start rules. Otherwise you can specify the start rule within the formula.
Period of Ineligibility
Some accrual plans require participants to work for a period of time, perhaps three or six months, before they are eligible to use accrued PTO. They accrue time at the usual rate during this time, but it is not registered on the system until the Period of Ineligibility expires. If plan participants take vacation or sick leave during this period, the system displays a negative value for accrued time. Many enterprises set up an absence type for "approved but unpaid leave" to use for absences taken during periods of ineligibility.
You can enter the period of ineligibility on the Accrual Plan form. The seeded Accrual formulas illustrate how a formula should use the entered values. They calculate the period of ineligibility from the continuous service date (if it was entered) or the employee's hire date.
Alternatively, you can define the period of ineligibility within your Accrual formula.
Note: If you use the seeded formulas, time accrued during the ineligibility period is not carried over if the end of the accrual term falls within the ineligibility period.
Batch Element Entry and the Ineligibility Period
If you want to use Batch Element Entry (BEE) to make absence entries against the accrual plan, the BEE validation process must be able to check when the ineligibility period expires.
-
If you record the ineligibility period for the plan on the Accrual Plan form, BEE retrieves the ineligibility period directly from the table. It interprets it as a period of time from the employee's continuous service date or hire date.
-
If the period of ineligibility is defined within your Accrual formula, you must associate an Ineligibility formula with the plan. BEE calls the formula, which returns Y or N to indicate whether the employee is eligible to use accrued PTO on the date supplied by BEE. This formula should calculate the end of the ineligibility period in the same way as the Accrual formula for the plan.
If the employee is not eligible, the BEE validation process creates a warning on the batch line for the absence entry.
Note: If you use a custom method of entering timecard data, calling the Element Entry API, you can add logic to call the Ineligibility formula.
How the Seeded PTO_PAYROLL_BALANCE_CALCULATION Formula Interprets the Start Rules
The formula calculates the start date from hire date and compares it with the employee's plan enrollment date. Accrual begins on whichever of these two dates is later.
Start Rule: Hire Date
For plans with this rule, participants' accruals begin from the first full period following their hire date. For example, if the hire date of a participant on a semi-monthly payroll falls on the first day of either the first or second period in the month, PTO accrual starts as of that date.
If the hire date falls sometime after the first of the month but before the end of the first period, accruals start in the second period of the month. If the hire date falls after the first day of the second period but before its end, accruals start with the first period in the next month.
Start Rule: Beginning of Calendar Year
With this start rule, participants' accruals begin from the start of the year following the year in which they are hired. This means that a participant with a hire date of 1 January 1999 and another with a hire date of 31 December 1999 both start to accrue time as of 1 January 2000.
Notice that the amount of PTO each accrues may not be the same, as accrual amounts often depend on employees' length of service.
Start Rule: Six Months After Hire
For plans with this start rule, participants' accruals do not begin until the first full pay period after the six-month anniversary of their hire date. For example, someone on a semi-monthly payroll who is hired on 5 February 1996, completes six months of service on 5 August 1996, and starts to accrue PTO in the second period in August.
Notice that if people are hired on the first day of a period, their accruals begin with the pay period of the six-month anniversary of their hire date. For example, someone on a semi-monthly payroll who is hired on 1 February 1996 completes six months of service on 1 August 1996, and hence starts to accrue PTO in the first period in August.
The period of ineligibility is not applicable to plans with the start rule Six Months After Hire.
Accrual Bands
For many accrual plans, the time off that plan participants can accrue increases with their length of service, or varies by job, grade, or number of hours worked. That is, accrual bands determine accrual amounts. In addition, these bands can determine ceiling and maximum carry over amounts.
Ceiling rules, found in some vacation accrual plans, set a maximum amount of PTO an employee can hold at any time. When a participant's accrued PTO reaches the ceiling, no additional time accrues. Accruals begin again only after the participant uses some accrued time.
In the PTO_PAYROLL_BALANCE_CALCULATION seeded formula, the accrual amount, ceiling and maximum permitted carry over depend on length of service bands. Alternatively, you can use bands based on other factors, such as grade, or a combination of factors, to determine the accrual amounts for your plans.
Length of Service Bands
You set up length of service bands using the Accrual Bands window. For each band (such as 0 to 5 years of service), you can enter the accrual amount for the whole accrual term (such as an annual amount), an accrual ceiling, and the maximum permitted carry over.
Length of Service Override
In Oracle HRMS, the first day of the month of an employee's hire date is the default date from which his or her length of service is calculated for accrual purposes. For example, someone hired on 18 January 1997 completes one year of service on 1 January 1998, and someone hired on 31 December 1996 completes one year of service on 1 December 1997.
For individual accrual plan participants, you can override the default date from which a plan starts its length of service calculations. This is useful for managing exceptional cases that arise when, for example, employees who already have accumulated periods of service in your enterprise transfer from one place to another. You enter the date override when enrolling a participant in a plan.
Note: The default length of service start date (or the overriding continuous service date) determines the length of service for accrual bands and for the calculating the end of the ineligibility period. However it is not the same as the accrual start date. This is determined by the accrual start rules selected in the Accrual Plan window or set within the accrual formula.
Other Banding Criteria
For some accrual plans, the amount of time accrued may vary by other criteria, such as job or grade. You can create a user table to hold time accrued, ceiling rules, maximum carryover rules, and any other information you require for each job or grade. See: User-Defined Tables, Oracle HRMS Configuring, Reporting, and System Administration Guide
Include the GET_TABLE_VALUE function in your accrual and carry over formulas for the plan to access the information held in the user table. For an example of using a user table to store banding criteria, see: Sample Accrual Formula, Oracle HRMS FastFormula User Guide.
PTO Carry Over Process
To manage the carry over of employees' unused PTO to a new accrual term, you run the PTO Carry Over process from the Submit Requests window:
-
For accrual plans with a fixed term start date (such as 1 April), you run the process at the end of each accrual term.
-
For accrual plans with a variable term start date (such as hire date or seniority date), you should run the process every night to update plan information for any employees whose term has ended that day.
-
For accrual plans based on a rolling plan term (such as those using the seeded PTO_ROLLING_ACCRUAL formula), this process is not relevant.
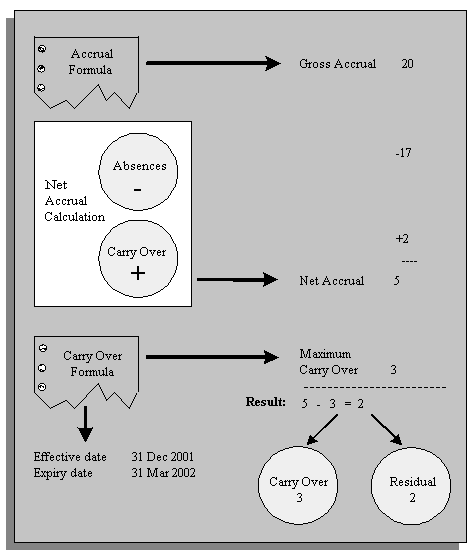
For each participant in an accrual plan, the PTO Carry Over process first uses the Accrual formula to calculate the participant's accrued PTO as of the last day of the plan's accrual term. The process then uses the Carry Over formula to get:
-
the maximum amount of time this employee can carry forward to the next accrual term
-
the effective date for the carry over, and
-
any expiry date by which the employee must use the time carried over, or lose it.
The process calculates the net accrual using time off recorded on the Absence element and any other elements associated with the plan. Finally, it compares the net accrual with the maximum carry over. permitted to determine both the amount to carry over, and the amount of any residual PTO that cannot be carried over.
For employees with unused, accrued time to carry over, Oracle HRMS enters this time on the plan's <plan name> Carried Over element. Similarly, for employees with unused, accrued time they cannot carry over, Oracle HRMS enters this time on the plan's Residual <plan name> element.
Accrual Plan Example
This topic looks at a sample set of accrual rules and discusses how you might configure the predefined accrual formulas to accommodate these rules.
An enterprise has the following vacation rules:
-
All employees accrue two days vacation per month (pro rata for part time employees)
-
The accrual term is 12 months from hire date and new employees join the plan on their hire date
-
The ineligibility period (when employees accrue time but cannot use it) varies by grade. It is two months for grades 1, 2, and 3, and three months for grades 4 and 5.
-
The accrual ceiling is 10 days for full time employees (pro rata for part time employees).
-
The amount that can be carried forward to the next accrual term is five days for grades 1, 2, and 3, and eight days for grades 4 and 5.
The enterprise uses BEE to enter vacation time taken.
You can set up one accrual plan for these rules, linking the accrual element to all employees. You can use the predefined PTO_SIMPLE_MULTIPLIER formula as the basis for your accrual formula. You need to configure this formula in the following ways.
Accrual Amount
Change the accrual calculation so that it takes into account an employee's standard hours (part time or full time). You can use HR Budgets to define an assignment's value as a proportion of FTE. Then you need to define a database item for this budget value so you can use it in the accrual formula.
Accrual Term Start Date
Change the accrual term start date from 01 June to hire date by referencing a database item such as ACP_SERVICE_START_DATE within the formula.
To see how to use this database item within the formula, see the section Changing the Accrual Term Start Date in Sample Accrual Formula, Oracle HRMS FastFormula User Guide.
Ineligibility Period
Derive the ineligibility period within the formula--rather than from the Accrual Plan window--since it varies by grade. The data could be hard coded within the formula or maintained in a user table, such as the following (which also holds the maximum carry over, since this data varies by grade too):
Example User Table for Varying Accrual Rules By Grades
| Grade | Ineligibility Period | Max. Carry Over |
|---|---|---|
| 1 -3 | 2 months | 5 days |
| 4 - 5 | 3 months | 8 days |
Since the ineligibility period is defined within the formula, and the enterprise uses BEE to enter vacation time, you need to create an ineligibility formula that BEE validation can use to check whether an employee is entitled to take time under the accrual plan.
Accrual Ceiling
Change the accrual ceiling from a standard 20 days in the predefined formula to a variable amount depending on an employee's standard hours. You address this in a similar way to the calculation of the accrual amount.
Maximum Carry Over
Change the maximum carryover from a fixed amount within the formula to an amount that varies by grade. The data could be hard coded within the formula or maintained in a user table, such as the example above.
Setting Up PTO Accrual Plans
-
Define and link an element for the plan's absence type.
See: Defining and Linking an Absence Element
Important: It is important that you link the absence element before you define the accrual plan since Oracle HRMS automatically creates links for the accrual plan elements based on your absence element links. If you define criteria on the link so that employees lose eligibility for the accrual plan as their assignments change, you must manually transfer accrual balances to the employee's new accrual plan. For simplicity, consider using open element links (that is, links with no assignment criteria).
-
Define an absence type for the plan, associating its absence element with this type.
-
Optionally, define new accrual start rules as values for the Lookup Type US_ACCRUAL_START_TYPE. There are three seeded categories: Hire Date, Beginning of Calendar Year and Six Months after Hire Date.
See: Adding Lookup Types and Values, Oracle HRMS Configuring, Reporting, and System Administration Guide
-
Decide which Accrual and Carry Over formulas to use. You can use the seeded formulas, configure them, or write your own.
See: Writing Formulas for Accrual Plans, Oracle HRMS FastFormula User Guide
-
If your Accrual formula defines a period of ineligibility and you want to use BEE to enter absences against the accrual plan, define an Ineligibility formula. BEE calls this formula to check whether an employee is eligible to use accrued PTO.
Note: If you use the seeded Accrual formulas, you do not need to define an Ineligibility formula. They use a period of ineligibility entered in the Accrual Plan window, and BEE validation can use the same value.
This does not apply to the New Zealand seeded formulas. If you are using these formulas, do not define an Ineligibility formula or enter a period of ineligibility in the Accrual Plan window.
-
Optionally, define new accrual categories as values for the Lookup Type US_PTO_ACCRUAL. There are predefined categories for some legislations.
See: Adding Lookup Types and Values, Oracle HRMS Configuring, Reporting, and System Administration Guide
-
Decide whether the payroll run should update accruals as of the run's date earned (the date the payroll run uses to determine which element entries to process) or date paid (the date that appears on pay advices). Select your choice for the business group.
See: Business Groups: Selecting a PTO Balance Type, Oracle HRMS Enterprise and Workforce Management Guide
-
Consider which balance dimension to use. Dimensions are predefined that reset the balance each year on 1 January, 1 June, or hire date anniversary. UK users: If you require your balance to accumulate over a different period of time, or reset at a different date, you can create your own balance dimension.
See: Balances in Oracle Payroll, Oracle HRMS Implementation Guide
-
If you want Oracle Payroll to recalculate the accrual balance from the beginning of the accrual term when there are retrospective assignment changes that affect entitlement, you must perform this setup:
-
Navigate to the Dynamic Trigger Generation window. In the Find Triggers window, enter the following values then click Find:
-
Dynamically Generated Triggers: selected
-
Application: Oracle Human Resources
-
Trigger Name: PER_ALL_ASSIGNMENTS_F_ARU
-
Triggering Actions: Update selected
Ensure that this trigger is generated and enabled. On the Components tab, ensure that the module pay_continuous_calc.PER_ALL_ASSIGNMENTS_F_ARU is enabled.
-
-
In the Functional Area Maintenance window, query the seeded functional area called PTO Events. Check that the trigger PER_ALL_ASSIGNMENTS_F_ARU is listed in the Details region. Select the Business Group tab in the Details region and select the business groups that are to track the assignment changes.
-
In the Table Event Group window, query the seeded PTO Event Group. This group includes the following datetracked events; you can add others that you want to track:
-
Date Track Update: Table - per_all_assignments_f, Column - assignment_status_type_id
-
Date Track Correction: Table - per_all_assignments_f, Column - assignment_status_type_id
-
Date Track Delete Future: Table - per_all_assignments_f, Column - blank
-
-
Ensure that your accrual formula uses the Get_Earliest_AsgChange_Date function to handle the events you want to track. Refer to the PTO_PAYROLL_BALANCE_CALCULATION formula as an example of how to use this function.
-
-
Define the accrual plan, selecting the formulas and absence element it is to use.
-
Optionally, set up length of service bands for the plan.
-
Oracle Payroll users: If you want the payroll run to calculate employer liability for PTO, define an employer liability element and balance, link the element, and edit the generated payroll formula and result rules.
-
Review the net calculation rules for the plan. If necessary, create additional elements and associate them with the plan by selecting them in the Net Calculation Rules window.
-
SSHR users: If you want to view employee accrual balances using SSHR, create an element set that include elements that correspond to the appropriate accrual plans, and attach the element set to the profile HR: Accrual Plan Element Set Displayed to User at the appropriate levels.
See: Viewing Accrual Balances in SSHR, Oracle HRMS Deploy Self-Service Capability Guide.
Oracle Payroll users:
The following three steps are for Oracle Payroll users only. Skip these steps if you do not want to use a payroll balance to store gross accruals.
Defining a PTO Accrual Plan
Use the Accrual Plans window to define an accrual plan.
To define a PTO accrual plan
-
Enter the plan name, and select an accrual category for it.
Tip: Coordinate the names of the accrual plan, the plan's absence type if any, and the element used to record absences taken under the plan. For example, for the Hrly Vacation PTO Plan for your hourly workers, you could name the absence type and its element Hrly Vacation PTO Absence.
-
Optionally, select a start rule for the plan in the Accrual Start field. This rule determines the date on which newly hired employees begin to accrue PTO.
Note: Some plans do not use this value; it depends which Accrual formula you select.
-
Select Days or Hours in the Accrual Units field. The units selected here must be the same as the units for the input value you select in the Absence Information region.
-
You can enter a description, summarizing the purpose and rules of the plan.
-
Select the Accrual formula and Carry Over formula to associate with the plan.
For a description of the seeded formulas, see Seeded Accrual Type Formulas.
-
In the Name field of the Absence Information region, select the element associated with the plan's absence type. In the Units field, select the element's input value that holds the entries of hours or days absent.
Selecting a Payroll Balance
-
Oracle Payroll users: If you want to use a payroll balance to store gross accruals for the plan, select the date when the balance should reset to zero.
Note: The balance may not reset on the exact date you select, since it depends on the payroll period dates. For example, if you select a Reset Date of 1 January, the balance may in fact reset on 22 December if that is the start date of the first payroll period in the new year.
If you select 1 June, 1 January, or Hire Date Anniversary, a value appears automatically in the Dimension Name field. If you select Other, you must select a balance dimension that you have created for this purpose.
Important: Select a date in this field only if you are using a formula that supports payroll balances. US users: The Check writer process and Deposit Advices do not display the correct accrual balances if you enter a balance reset date but do not use a formula that supports payroll balances.
Setting a Period of Ineligibility
-
If the start rule for this plan is Hire Date or Beginning of Year you can enter a period of ineligibility, during which a plan participant can accrue PTO but cannot use accrued PTO. For example, enter 3 in the Length field and select Calendar Month in the Units field.
-
Optionally select an Ineligibility formula. This formula is called by the BEE validation process for a batch line that enters an absence against the accrual plan. It checks whether the employee is eligible to use accrued time on that date.
Note: If you enter the period of ineligibility in the Length field, you do not need to select a formula. The BEE validation process gets this value and interprets it as a period of time from the employee's continuous service date.
-
Save your work.
When you do this, the application generates three new elements for the plan - one to represent the plan, and one each to hold carried over and residual amounts of accrued, unused PTO. The application creates links for these elements to match the links you defined for the plan's absence element.
If you selected a date in the Payroll Balance Reset Date region, the application also generates a payroll balance, an element to feed the balance, a tagging element, formula processing and result rules, and a payroll formula to call the accrual formula from the payroll run.
-
Choose the Accrual Bands button to set up length of service bands for the plan. This is optional, but may be required by your accrual formula.
-
If the Further Accrual Information is configured for your localization, enter the relevant information.
Australian users: Select the leave balance type as either Entitlement or Entitlement and Accrual for display in the Leave of Absence screen in Self-Service. Select YES if the accrual plan is foreign worker plan and then link the standard accrual plan to this foreign worker plan.
-
Choose the Net Calculation Rules button to view or change the rules for calculating employees' net PTO.
Setting Up Length of Service Bands
Use the Accrual Bands window to define length of service bands for an accrual plan.
To set up length of service bands for a PTO plan
-
For each length of service band applicable to this plan, establish the band's duration by making an entry in the To field. The first band starts from zero years of service. If it extends for five years, enter 5 in the To field. The system then sets the From field for the second band at 5, as the second band starts after five years of service.
For the last band you enter, in order to cover all participants with any length of service beyond the band's From entry, enter 99 in the To field. For example, if your bands cover service of 0-5 years, 5-10 years and 10+ years, the third band's From and To entries should be 10 and 99.
-
For each band, enter in the Term Accrual field the number of hours or days that participants whose length of service falls into this band can accrue each accrual term. For example, if plan participants accrue 80 hours of vacation per year during their first five years of service (band 0 - 5), enter 80 in the Term Accrual field.
-
If a band does not permit participants to carry unused accrued time over to the next accrual term, leave the Maximum Carryover field blank. Otherwise, enter in this field the maximum number of accrued, unused hours or days that participants at this band may carry forward.
-
If a band has no ceiling that limits the total number of hours or days participants at this band can accrue at any one time, leave the Ceiling field blank. Otherwise, enter the ceiling number for the band.
-
Save your work.
Changing Net Accrual Calculations
The rules for automatic calculation of employees' net PTO appear in the Net Calculation Rules window. You enter this window by choosing the Net Calculation Rules button in the Accrual Plan window.
The default net accrual calculation takes account of absences (entered on the Absence element) and time carried over from the previous accrual term (entered by the Carry Over process on the plan's Carried Over element). You cannot change these rules. However, if your plan's calculation needs to take account of other values (such as time bought or sold), you can add new rules in this window.
To change the net accrual calculation
-
Create and link any additional elements you need for the plan. For example, you might need an element to store the amount of PTO an employee has bought or sold. Use the Information classification for these elements, define them as nonrecurring, and give them at least two input values:
-
An input value with the same units (days or hours) as you selected for the accrual plan, and
-
An input value with the units Date (to hold the effective date).
Tip: Use names for these elements that clearly link them to the appropriate accrual plan. For example, if the accrual plan is called Standard Vacation, you could name the element Standard Vacation Bought or Sold.
-
-
Query the new elements in the Net Calculation Rules window.
-
Select the input value that hold the days or hours you want to use in the net accrual calculation.
-
Select the date input value that holds the effective date for the accrual calculation.
Note: The predefined rule for the absence element does not include a date input value because the application uses the absence start date as the effective date for subtracting the time taken from the gross accrual.
-
For each input value, select Add or Subtract to determine whether the value should increase or decrease the net accrual available to an employee.
-
Save your work.
Costing Liability For PTO Accruals
Follow these setup steps if you use Oracle Payroll and you want the payroll run to calculate the change in employer liability for PTO, as well as the gross accrual.
For example, the payroll run might calculate the following changes to employer liability, using this calculation:
Current Liability Increment = (((YTD accrual + Current net accrual) * Current Rate of Pay) - ITD PTO liability)
| Payroll Run | ITD Liability | YTD Accrual | Current Pay Rate | Current Accrual | Absence | Current Net Accrual | Liability Increment |
|---|---|---|---|---|---|---|---|
| Run 1 | 0 | 0 | 10 | 4 | 0 | 4 | 40 |
| Run 2 | 40 | 4 | 10 | 4 | 5 | -1 | -10 |
| Run 3 | 30 | 3 | 12 | 4 | 0 | 4 | 54 |
To set up costing of PTO accrual liability
-
In the Element window, define an employer liability element. The only required input value is the pay value.
-
In the Balance window, create a liability balance fed by the pay value of the element you created in the previous step.
-
In the Formula window, edit the payroll formula that was generated for your accrual plan so that it calculates changes in employer liability. The formula has the name <accrual plan name>_ORACLE_PAYROLL. It contains a sample liability calculation, which you can edit to meet your requirements.
The formula must return the Current Liability Increment.
-
In the Formula Result Rules window, query the accrual plan element. You will see a processing rule associating this element with the payroll formula you edited in the previous step, and a result rule passing the accrual to the element that maintains the accrual balance. Create another result rule to pass the Current Liability Increment formula result to the pay value of the employer liability element.
-
Use the Element Link window to link the employer liability element and to cost it appropriately.
Absence and Accrual Plan Administration
Absence Recording
When you record an absence for an employee using the Absence Detail window or self-service, you must always select an absence type.
Dates and Times
In the Absence Detail window you can conveniently record start and end dates and times of a particular type of absence, as well as the date you receive notification of the absence.
You can enter either projected or actual dates and times. When an actual absence occurs in accordance with projected absence information already entered, you record this by simply clicking a button.
Oracle HRMS records an employee's absences using the employee's payroll calendar, so all employees for whom you record absence information must have a payroll component in their primary assignment.
Some absence types are associated with nonrecurring elements. For these types, the absence is not recorded on the employee's element entries until you enter the absence end date. You cannot change the absence start date so that it is outside the original payroll period--you must delete the absence and create a new one.
Note: For Oracle Payroll users in some localizations: some absence types may be associated with recurring elements. For these types, the absence is recorded in element entries when you enter an actual start date. If you change the start date, the element entry is deleted and a new one created. When you enter or change the end date, the element entry's end date is date effectively updated.
Absence Duration
To calculate the duration of an absence automatically, you can either use the schedule and calendar event features from Oracle HRMS and Common Application Components (CAC), or use a formula that calculates absence duration from the absence start and end dates.
For the first method, the application calculates the duration of the absence based on the worker's schedule and applicable calendar events for their primary assignment. To use these features, set the HR: Schedule Based Absence Calculation profile option to Yes.
You set up availability information such as shifts, schedules, and calendar events, and assign them to various levels in your work structures.
See: Setting Up Availability, Oracle HRMS Workforce Sourcing, Deployment, and Talent Management Guide
For the second method, you write a formula to calculate absence duration from the start and end dates and times entered for an absence. Your localization team may have written a formula that the application uses by default.
See: Writing Formulas To Calculate Absence Duration, Oracle HRMS FastFormula User Guide
To control whether the formula automatically recalculates and overwrites the absence duration when a user updates the end date or time, set the user profile option HR:Absence Duration Auto Overwrite to Yes or No. For example, if you do want the duration to be updated when the end date changes, set the profile option to Yes.
When you enter an absence, the application warns you if:
-
Duration is greater than the person's net entitlement recorded in a PTO accrual plan
-
A decreasing absence balance becomes negative
-
Duration is not equal to the value calculated by the absence duration formula. Or, if there is no absence duration formula, duration is not equal to <end date/time - start date/time>. Here, the application calculates the hours using the standard hours recorded for the assignment (or for the business group if the assignment contains no record).
Authorization and Replacement
When recording a projected or actual absence in the Absence Detail window, you can select both the name of an employee authorizing the absence, and of an employee replacing the absent worker.
Absence Cases
If an employee has multiple absences that result from the same cause or are associated in another way that you want to record in Oracle HRMS, you can enter an absence case for the employee. For example, if an employee takes two periods of sick leave due to a back injury sustained at work, you can create an absence case, associate the two absences with the case, and link the case to the work incident.
Batch Entry of Accrued Time Taken
For fast batch entry, you can use BEE, instead of the Absence Detail window, to enter sick or vacation time recorded together with other timecard data. You can enter the absence start and end dates, as well as any input values defined for the element. If you leave the date fields blank, they both default to the effective date for a nonrecurring absence element; only the start date defaults for recurring elements. Note that the batch line produces an error if you enter a duration but no end date for a recurring element.
Self-Service Entry of Absences
If you have licensed Oracle SSHR, you can delegate the responsibility for recording absences to individual employees or their line managers. They can enter proposed or actual absences and submit them for approval by their supervisors (or any other approvers in a workflow).
Additionally, using self-service, employees can view their accrued leave details, and managers can view the same for employees in their team.
See: Accrual Balances Maintained by SSHR, Oracle Self-Service Human Resources Deploy Self-Service Capability Guide
See: Leave and Absence Management Overview
See: How do we track and analyze absences and net accrual entitlement: Leave and Absence Management
See: Leave and Absence Management:Self-Service Functionality, Oracle Self-Service Human Resources Deploy Self-Service Capability Guide
Viewing and Reporting on Absence Information
For monitoring and analyzing recorded employee absences, use the:
For reviewing PTO plan participants' accrued time earned and taken, use the Accruals window.
Accrual Plan Administration
Just as elements constitute the underlying structure of absence types, so they provide the structure of accrual plans. Each accrual plan is associated with an absence element, which holds information about absences taken under the plan. There is also an element for the plan itself, which you use to enroll participants in the plan.
Enrollment
You enroll an employee in an accrual plan by entering the accrual plan element. You can only enroll employees who are eligible for the plan (that is, their assignments match the element's links). When you do the enrollment you can override the default date for calculating length of service (which is used in many accrual plans to determine the appropriate accrual amount and the start date of accruals for new hires).
Note: You enter the accrual plan element for the employee's primary assignment. If another assignment becomes the primary one, you must re-enter the accrual plan element for the new primary assignment. You can transfer the accrual balance to the new assignment using a balance adjustment element entry, if your implementation team has added a balance adjustment element to the net calculation rules for this accrual plan.
Recording Accrued Time Taken
You record time taken under the accrual plan by making entries of the absence element associated with the plan.
Normally you make these entries using the Absence Detail window so you can record additional information, such as an absence reason, the name of the employee authorizing the absence, and the name of the employee replacing the absent worker. The window shows the participant's net accrual at the start of the absence and the projected accrual at the end of the accrual term.
You can also use BEE to make batch entries of hours of accrued sick or vacation time that employees have taken and noted on their timecards. Any entries you make to absence elements using BEE for an employee's primary assignment can then be viewed in the Absence Detail window. Entries made using BEE can include a reason, but the list of absence reasons available in the Absence Detail window is not automatically available here.
Viewing Accruals
You can use the Accruals window to see, at any time, how much time an employee has accrued and used under an accrual plan. You cannot change the amount accrued using this window. The gross accrual is calculated by a formula that may, for example, vary the accrual according to length of service, grade, overtime or other factors.
Recording PTO Sold or Purchased
If your enterprise pays employees for time they have accrued but not used, or if you permit employees to buy additional time, you may decide to define your own PTO-related elements to record information about these transactions. You then use the Element Entry window to enter these elements for the appropriate employees.
Running the Carry Over Process
Once each year (or other plan term), an employee's balance of unused accrued time must be cleared down ready for the new plan term. You run the PTO Carry Over process to clear down these balances and record both unused time available for carryover, and residual time unavailable for carryover. For accrual plans with a variable term start date (such as hire date or seniority date), you should run the process every night to update plan information for any employees whose term has ended that day.
Note: Some accrual plans are based on a rolling plan term. The Carry Over Process is not relevant to this type of plan.
Entering Absences
Enter projected or actual absences for an employee using the Absence Detail window.
Because the calendar holding absence records for an employee is the same as that of the employee's payroll, the primary assignments of employees for whom you enter absence information must include an assignment to a payroll. For absence types based on nonrecurring elements, the effective start date of this assignment must be no later than the start of the current payroll period.
To enter absences for an employee
-
Select the absence type.
The following information appears:
-
The category of the type.
Note: For Denmark users only: Enter absence information, as required, in the descriptive flexfields associated with the Absence Categories.
-
The occurrence of the new absence record you are entering. For example, if the employee has already incurred two absences of this type, the occurrence of the new record is 3.
-
The running total of hours or days absent for all the absence types associated with the element. For absence types with increasing balances, this is the number of days or hours absent with an end date on or before your effective date. For any types with decreasing balances, this is the number of hours or days remaining to be taken.
-
The number of days absence recorded for the absence type in the current calendar year.
-
The name of the element that maintains each employee's time taken or time remaining for this absence type.
Note: For Denmark, Finland, Norway, and Sweden users only: When you create an absence, Oracle HRMS enters the absence element for all the employee's assignments including the primary assignment. You can decide whether each assignment requires the element entry and better track absences for multiple assignments. You can also edit element entries to change the absence details for a specific assignment.
Note: For Denmark users only: You can override absence details in the Absence Details window by entering the override element in the Element Entries window. Use the same start and end dates for the override element that you use in the Absence Details window.
-
-
If the Further Information field is visible for your localization, click in the field and select a context value relevant to your localization.
-
Canada HRMS: Specify the ROE Reason and ROE Comments. You enter a ROE Reason and ROE Comments for an employee in the Additional Absence Detail Information window. The ROE Reason appears in Block 16 of the ROE. The ROE Comments appear in Block 18 of the ROE.
-
Dutch HRMS: If you have a category of sickness selected, you can enter a percentage sick by selecting the NL_S context value.
Select No in the Non SI/Pension Absence field to count an absence as a real social insurance day. Selecting Yes excludes the absence from counting as a real social insurance day.
-
Denmark HRMS: When you set up employees for Maternity/Adoption leave, you can choose whether or not to accrue holiday during the absence. Use the Absence category descriptive flexfield, to indicate if you use the accrual or not.
-
Hungary HRMS: If your absence category is Maternity, enter the expected and actual birth dates (and other dates if applicable). If your absence category is Paternity, enter the child's birth date.
-
Mexico HRMS: Specify your type of disability:
-
General Disease
-
Maternity
-
Risk Incident
The list of available Disability IDs depend on if you have assigned this disability with a Causal Incident (in the case of Risk Incident disabilities) or no Causal Incident (in the case of Maternity or General Disease disabilities).
-
-
Russia HRMS: If your absence category is Maternity Leave, enter the number of children and the new born child's date of birth. If the absence category is Child Rearing Leave, enter the new born child's date of birth. If you select the absence type as Temporary Disability with Sickness Allowance Payment, then select the disability details.
-
Finland HRMS: If your absence category is Annual Holiday, Layoff, Labour Dispute, or Unauthorized, enter the details of a similar absence taken by the employee. For the absence category Sickness, select the doctor's certificate and contract details. For the Accident category, select the work incident and doctor's certificate details. If your absence category is Family Leave, enter the child and maternity leave details.
-
UK HRMS: For an OSP or OMP scheme and an absence that is, or contains, a part of a day, select a unit of measure - days or hours - for measuring part days. For a days-based scheme, select Day and select full or half day . For an hours based scheme, select Hours and select the number of hours absent. Select the appropriate value for the start date, end date, or both. If the entire absence is less that a full day, select the value in the Start Date field.
-
-
Do one of the following:
-
Enter projected dates for the absence. You can copy these later to the Actual Date fields by choosing Confirm Projected Dates.
-
Enter actual dates and duration as days or hours, according to the units of the balance. If you enter an end date, you must also enter the duration.
If you want the application to automatically calculate the duration of the absence, then you can either use the schedules and calendar events features from Oracle HRMS and Common Application Components (CAC) or use a formula.
See: Absence Duration
-
-
You can also select:
-
Reasons for the absence
-
The employee authorizing the absence
-
The employee who replaces the absent employee for the duration of the absence
-
-
Save your work.
Note: If this absence is related to another absence (for example, they both result from the same cause), you can associate the absences using the Absence Case page.
-
If you entered an absence type that is eligible under an absence benefit plan, you can choose Enroll Absences to run the Participation Process in Absence mode. This process assesses the person's eligibility for the absence plan. If they are eligible, the process changes the status of the potential absence life event to Processed, and evaluates any standard rates linked to the plan.
Alternatively, you can run this process for a group of employees from the Submit Requests window. See: Running the Participation Process: Absence.
Note: UK Users: The Evidence and Statutory Payments buttons display, if you opened this window from an SSP menu. Please note that these buttons are only relevant to statutory absence types (sickness, maternity, paternity, and adoption).
Viewing Accruals for Plans Associated with the Absence Type
If the employee is enrolled in an accrual plan, the Accruals button is available. Choose this button to display the Associated Accrual Plans window, where you can see information about any accrual plans associated with the type of absence you are entering.
To view accruals
-
Enter or query an absence in the Absence Detail window, and choose Accruals.
-
If nothing is displayed, run a query in the Associated Accrual Plans window to display the name and category of any accrual plans associated with the absence type.
For each plan, three net accrual amounts are displayed:
The Net Entitlement figures on the This Absence tab show the effect of the absence displayed in the Absence Detail window.
-
The Before Absence figure is the net accrual calculated on the day before the absence.
-
The After Absence figure is calculated on the start date of the absence.
In most cases these figures will differ by the length of the absence you are entering. However, if the absence happens to start on the day that this period's PTO entitlement is accrued, the new accrual is also shown in the After figure. Similarly, if any other time (such as time bought or sold) is debited or credited to the accrual on that day, it is reflected in the After figure.
Projected Entitlement on the End of Plan tab shows the projected net accrual at the end of the current accrual plan term, taking account of any future absences already entered on the system. If the employee has future-dated assignment changes that affect his or her accrual entitlement, these are taken account of in the calculation.
Note: This figure does not take account of absences with a projected start date. It only includes absences that have an actual start date.
Example
Suppose Ms. Shah is enrolled on a vacation plan that runs each calendar year starting 1 January, with a gross accrual of 2 days per month. Ms. Shah did not carry over any entitlement from last year and has taken no absences before May.
Net entitlement is calculated for the last complete accrual period (that is, the period that ends on or before the start of the absence being entered). This absence is only included in the calculation if it starts on the last day of an accrual period.
The following table shows the accrual amounts (net entitlement) that would display if you enter four absences in the sequence shown.
Absences: 2 - 4 May 31 May - 3 June 12 - 15 Aug 15 June Before absence 8 5 7 3 After absence 5 3 3 2 End of plan term 21 17 13 12 -
Enrolling Employees in PTO Accrual Plans
Enroll individual participants in an accrual plan by entering for them the element generated to represent the plan.
To enroll participants in a PTO accrual plan
-
Do one of the following:
-
For enrollment of an individual employee, perhaps as a part of the hiring process, enter the element representing the plan for him or her using the Element Entries window.
-
For enrollment of a batch of employees in a plan, perhaps a newly-developed plan, use BEE.
See: Making Batch Element Entries Using BEE, Oracle HRMS Configuring, Reporting, and System Administration Guide
-
Overriding Length of Service
The default date for calculating length of service is the first day of the month of an employee's hire date. You can override this by entering another date when you enroll the participant in the plan. This is relevant to plans that have accrual bands based on length of service.
If you enter a date here, it is also used, instead of the employee's hire date, when the seeded formulas calculate the appropriate accrual start date for the employee. For example, if the plan's start date rule is Six Months After Hire Date, accrual will begin six months after the continuous service date you enter.
To override the default date for calculating length of service
-
When enrolling the participant, enter the override date in the Continuous Service Date entry value of the element representing the plan.
Running the Participation Process: Absence
You can run the Participation Process: Absence to process any absence-type life events for an individual person or a group of people. The process assesses the person's eligibility for the absence plan. If they are eligible, the process changes the status of the potential life event to Processed, and evaluates any standard rates linked to the plan.
You run processes from the Submit Requests window.
To run the Participation Process: Absence
-
Select Participation Process: Absence in the Name field.
-
Enter the Parameters field to open the Parameters window.
-
Set the effective date of the process.
-
Select Commit or Rollback in the Validate field.
Select Rollback to check your results before committing them to the database. It is easier to correct errors before you commit the results.
-
If you want to restrict the process to one person, select them in the Person Name field.
-
If you have not selected one person, you can limit the persons evaluated by the process by selecting from one or more of the following parameters.
-
Person Type
-
Organization
-
Benefits Group
-
Location
-
Postal Zip Range (US only)
-
Reporting Group
-
Legal Entity (US only)
-
Payroll
-
-
Select Yes in the Audit Log to create a file that lists the eligibility results for each person evaluated by the process.
If you select Yes, you should periodically run the Participation Audit Activity Purge process to purge the audit log tables.
-
Select Yes or No in the Limit by Person's Organization field. If you select Yes, the process only handles compensation objects that have the person's organization attached.
-
Choose the OK button.
-
Complete the batch process request and choose Submit.
Running the PTO Carry Over Process
The net accrual calculation for PTO includes carried over PTO in determining an employee's accrued PTO to date. To set the net calculation rules, use the Net Calculation Rules window. To review an employee's carry over of accrued time, use the Accruals window.
Run the PTO Carry Over Process at the end of the accrual term using the Submit Requests window. For accrual plans with a variable term start date (such as hire date or seniority date), you should run the process every night to update plan information for any employees whose term has ended that day.
Troubleshooting
The concurrent request log contains a summary of the accrual plans and assignments processed.
The Payroll Action Parameter Max Errors Allowed determines the behavior of the process when it encounters an error. If it encounters fewer than the maximum number of errors, the process completes with a warning, commits the successful assignments, and writes details to the concurrent request log of the assignments that did not process due to an error. If the process encounters the maximum number of errors, it stops processing, rolls back any processed assignments, and writes details of the errors to the log.
To help Oracle's Support organization debug an issue, you can use the Payroll Action Parameter Logging. If the parameter value includes a 'G' (General), all debug information is written to the log. Logging significantly reduces performance and generates large log files so it should be switched off in normal circumstances and only used for debugging purposes.
To run the PTO Carry Over process
-
Select PTO Carry Over in the Name field. If the Parameters window does not open automatically, click in the Parameters field.
-
Enter a date in the PTO Calculation Date field and Current or Previous in the Accrual Term field. These are used by the plan's Carry Over formula to determine the effective date of the carried over PTO.
Typically you will use the following values if you are using seeded formulas:
-
PTO_PAYROLL_CARRYOVER formula--use a calculation date of 31 December with Accrual Term = Current, or a calculation date of 1 January with Accrual Term = Previous. The effective date of the carry over is always 31 December (of current or previous year).
-
PTO_SIMPLE_CARRYOVER--use a calculation date of 31 May with Accrual Term = Current, or a calculation date of 1 June with Accrual Term = Previous. The effective date of the carry over is always 31 May (of current or previous year).
-
PTO_HD_ANNIVERSARY_CARRYOVER--set calculation date to the effective date and use Accrual Term = Previous.
Important: If you select Current for the Accrual Term and enter a calculation date that is not the end of the accrual term, this process creates future-dated carry over and residual element entries.
-
-
Select the name of one accrual plan to process, or select a category to process all plans in the category.
-
The Reprocess All Participants field defaults to No, so that the process affects only those plan participants not previously processed for this accrual term. To process all participants regardless of any previous processing, select Yes in this field.
Important: Select Yes if any employees have retrospective absences or other entries that might affect net entitlement.
-
When the entry of parameters is complete, choose OK. Choose Submit to submit the request.
The Carry Over process enters the Carried Over and Residual elements for all employee assignments included in the process.
Reviewing Employees' PTO Accruals
To view information on employees' accrued PTO, use the Accruals window.
To view an employee's net PTO accrual
-
Set your effective date to the day for which you want to calculate PTO entitlement.
-
In the Assignments Folder, query the employee's name. Choose the Accruals button to go to the Accruals window.
-
Query the accrual plan in the Name window.
The Dates region shows the dates that the accrual formula uses for the entitlement calculation. These are typically from the start of the accrual term to your effective date. The Net Entitlement field displays the net accrued days or hours between these dates. The Last Accrual date is the end of the last complete accrual period, if the formula does not calculate accrual for partial periods.
If you allow maintenance of negative balances of accrued time at your installation and an employee's time absent exceeds time accrued, the net entitlement appears as a negative number.
Note: Net Entitlement can exceed the accrual ceiling if you have increased entitlement using an adjustment element or the Carry Over element. If you have adjusted net accrual so that it exceeds the ceiling, the employee will accrue no time until net accrual falls below the ceiling.
The Entitlement Details region shows the values used in the calculation of the net entitlement:
-
The <plan name> element stores current accrued time.
-
The <plan name> Carried Over element stores accrued time carried over from the previous accrual term. If the plan has an expiry date for carried over time, the value shown after the expiry date is the amount of accrued time that was used. Any remaining time was lost.
-
The absence element stores accrued time taken.
-
Any other elements created at your site to hold values used for calculating net entitlement, such as elements to store bought or sold PTO.
If the accrual plan uses the seeded formulas, note that an absence is included in the accrued time taken figure if it starts on or before your effective date.
Important: When reviewing employee accruals at the end of an accrual term, remember that carried over and residual PTO appear only after the PTO Carry Over process is run.
-
Viewing Absence History
Use the View Absence History window to view all absences for an employee.
To view absences for an employee
-
Select an employee then choose the Find button.
The absences appear in the lower part of the window. Use the standard Folder features to select a subset of these absence records, and to choose the fields to see.
Listing Employees by Absence Type
Use the List Employees by Absence Type window to see all the absence records for a particular absence type, or category of types.
To list employees by absence type
-
Enter any combination of absence type, category, and start and end dates to define the absences to view. Choose the Find button.
The absences appear in the lower part of the window. Use the standard Folder features to select a subset of these absence records, and to choose the fields to see.
Running the Absences Report
The Absences Report shows information about employee absences during a specified period. It can show absences:
-
For an individual employee, or for all the employees in an organization
-
For all types of absence, or for selected types
The report summarizes the information as totals for each absence type since the employee was first hired.
You run reports in the Submit Requests window.
To run the Absences Report
-
In the Name field, select Absences Report.
-
Enter the Parameters field to open the Parameters window.
-
Enter the effective date for which you want to see the report.
-
Select either an organization or an employee.
-
Enter the start and end dates of the period for which you want to report absences.
-
You can choose up to 10 absence types for the report. To report on all types, leave the absence type fields blank. Choose OK.
-
Choose the Submit button.
Resetting a Stored Accrual Balance
If you use Oracle Payroll, you may have set up your accrual plans so that the payroll run maintains a stored accrual balance. Batch processes and reports that calculate accruals use this stored balance for faster processing.
Normally the payroll run maintains this balance by calculating the accrual change each period. It recalculates the accrual from the beginning of the accrual term when there are any retrospective changes that affect entitlement. However, if you have made a retrospective assignment change that your accrual formula cannot handle, you might want to force the next payroll run to recalculate accruals from the beginning of the accrual term for one or more assignments.
Note: This procedure assumes that your accrual formula uses the Reset PTO Accruals function to check the setting of the Reset PTO Accruals parameter. Refer to the seeded accrual formulas for an example of how to use this function.
-
In the Action Parameters window, check the Default Group check box to view the default action parameters. On the Parameters tab, scroll down to find the Reset PTO Accruals parameter, and change its value from N to Y.
-
Create an assignment set containing the assignments whose accrual balances you want to reset.
-
Run a QuickPay or payroll run for these assignments.
-
In the Action Parameters window, check the Default Group check box to view the default action parameters. On the Parameters tab, scroll down to find the Reset PTO Accruals parameter, and change its value from Y to N.
Important: Make sure you reset the parameter to N to ensure faster processing in your normal payroll processes.
Workforce Intelligence Key Concepts for Leave and Absence Management
Workforce Intelligence Key Concepts for Leave and Absence Management
To enable you to get the most out of Leave and Absence Management intelligence reports, you need to understand the following key concepts:
Absence Hours
The Absence Hours reports use the element information created when you enter either an absence against the absence element, or an absence in the Absence Details window.
The report plots the absence hours for the date earned. This is entered for the element. If a date earned has not been entered, then the element's effective start date is taken as the date earned.
Note: If you have entered your absences using the Absence Details window, a date earned is not set up; therefore the report uses the effective start date of the element.
Regardless of the length of time an employee has been absent, the report always plots his or her absence hours on the date earned, or the effective start date of an element. It is possible, because of the frequency and time period you select, that an absence may fall into two different time periods. The absence hours are always shown in the first time period, rather than pro-rata across two time periods.
A pre-defined formula, TEMPLATE_BIS_DAYS_TO_HOURS, calculates the absence hours. You can configure this formula to meet your requirements.
See: Discoverer Workbooks Implementation Steps, Oracle HRMS Strategic Reporting (HRMSi) User Guide
Working Hours
Within Oracle HRMS, you record the number of regular and overtime hours worked using elements. The Hours Worked reports process information for the hours worked through formulas, which you must provide using Oracle FastFormula.
See: Setting Up and Customizing Working Hours, Oracle HRMS Strategic Reporting (HRMSi) User Guide
The Hours Worked reports calculate the hours worked for each payroll time period using employee assignments. For the assignment to be included it must:
-
Be active or suspended.
-
Fit the criteria you enter. For example, if you enter a grade name, the assignment must have that grade entered against it.
Note: You can only run the Hours Worked reports if you previously set up Oracle FastFormula to calculate your employees' regular hours and overtime hours.
The Hours Worked reports display information about the payroll periods that most closely match the start and end dates that you enter for the report. For example, if the first date you enter is 05-Jan-2001, and the payroll begins on 01-Jan-2001, the report includes information from 01-Jan-2001.
Workforce Intelligence for Leave and Absence Management
Employee on Leave Detail Workbook
This workbook enables you to report on employees who are on a leave of absence on a particular effective date. The workbook shows the following employee primary assignment details:
-
Employee number
-
Organization
-
Supervisor
-
Location
-
Hire date
-
Absence details, including date start and date end
Worksheets
This workbook has the following worksheets:
-
Organization Hierarchy
-
Supervisor Hierarchy
Organization Hierarchy Worksheet
This worksheet enables you to report on employees who are on leave on the effective date chosen. Employees are listed for a given organization and its subordinate organizations. The additional parameter, Absence Types to Exclude, enables you to exclude absence types that are not of interest, for example, Unpaid Leave.
Business Questions
When are my employees in an organization hierarchy on leave?
Parameters
You must specify values for the following parameters:
-
Organization Hierarchy
-
Top Organization
-
Effective Date
Supervisor Hierarchy Worksheet
This worksheet enables you to report on employees who are on leave on the effective date chosen. Employees are listed for a given supervisor and his/her subordinates. The additional parameter, Absence Types to Exclude, enables you to exclude absence types that are not of interest, for example, Unpaid Leave.
Business Questions
When are employees, reporting directly or indirectly to a specific supervisor, on leave?
Parameters
You must specify values for the following parameters:
-
Supervisor
-
Effective Date