Checklists
Checklists Overview
Some HR actions, such as employee hiring, transfer, or termination, require the completion of standard tasks, for example, printing contracts, reassigning resources, and creating users. The Checklists functionality in Oracle HRMS enables you to link the HR action to a life event and generate checklists when the life event is initiated. The application then allocates the checklists to a person or assignment. Each allocated checklist contains the tasks relevant to an individual or assignment. The relevance of the tasks to the person or assignment is determined using eligibility profiles.You can assign each task to a performer either automatically using Oracle Approvals Management (AME), or manually.
After creating a checklist, you can use the Allocated Checklists functionality in Oracle Self-Service Human Resources (SSHR) to display and update the allocated checklists for your direct reports.
Overview of Checklist Functionality
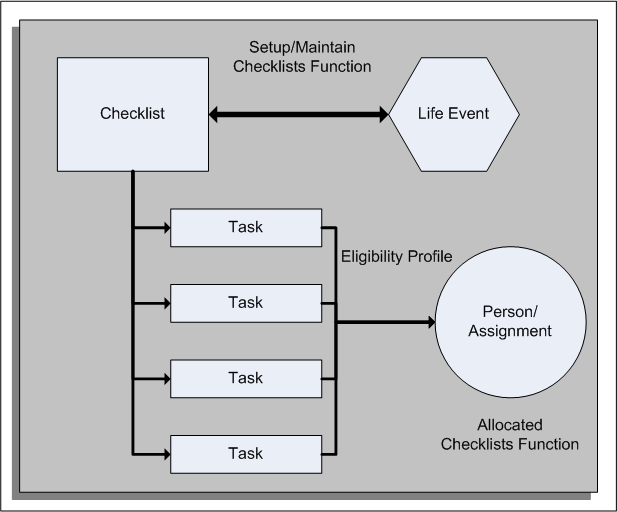
The graphic shows the relationships between checklist components. You can link the checklist to a life event, for example, a New Hire life event, and link each task to an eligibility profile. The tasks that appear on the Allocated Checklists page for each person or assignment depend on the life event and the person's or assignment's eligibility for the task. For example, if you create a location-based eligibility profile for a task, that task appears in the Allocated Checklists page only if the person or assignment meets the eligibility criteria.
Creating Checklist Templates
You create and maintain checklist templates from the Setup/Maintain Checklists menu option using an HRMS Manager responsibility. Using the Create Checklist page, define the checklist and its behavior, for example, you enter the checklist name and category.
Note: Oracle provides selected checklist categories; however, you can create additional categories if required.
When you create a checklist template, you can link the template to a life event to ensure that the checklist allocated to a person or assignment is appropriate to the HR action being performed.
Creating Checklist Tasks
You create and maintain checklist tasks from the Setup/Maintain Checklists menu option when you create a checklist template. You enter attributes to define the task and its behavior, for example, you enter the task name and specify whether the task is mandatory. If you define a task as mandatory, the self-service manager cannot delete it from an allocated checklist.
You can enter a task duration. When the task appears in an allocated checklist, the date in the Target End Date column reflects this duration.
When you create a checklist task, you can link an eligibility profile to the task. The application allocates tasks to persons or assignments based on these eligibility criteria.
You can use Oracle Approvals Management (AME) to generate a list of performers for the task. To activate AME, you select a value in the Approvals Identifier field of the Checklist Tasks page. The application retrieves the values available for selection from the values you have defined in AME and used in the AME conditions. You can create approval rules based on the task and person's details such as business group, organization name, job, position, or supervisor name.
See: Identifying Performers for Checklist Tasks
Assigning Tasks to Performers
If you are using Oracle Approvals Management (AME) to identify performers for a checklist task, the performers automatically receive notification of the task from Oracle Workflow when the task appears in an allocated checklist.
See: Identifying Performers for Checklist Tasks
Alternatively, you can manually assign a performer for a task, either when you create the task or when the task appears in an allocated checklist. If you designate a manager as the performer for a task, the manager can reassign the task from the Allocated Checklists > Update Checklist Task page.
Allocating Checklists to People and Assignments
When you invoke the Allocated Checklists function in Oracle Self-Service Human Resources, the application automatically runs the Allocated Checklists concurrent process for the relevant person or assignment. This process identifies whether any life event has occurred for the person or assignment since the last process run and allocates the appropriate checklist. When a manager uses SSHR to view the allocated checklists for a person or assignment, the application displays all allocated checklists.
Note: You should also run the Allocated Checklists concurrent process frequently to keep the allocations up-to-date.
See: Running the Allocate Checklists Process
Managing Tasks and Checklists
You create tasks using the Setup/Maintain Checklists function, however, you can also maintain tasks and checklists from the Allocated Checklists function. You can maintain the attributes for tasks and checklists, for example, the task or checklist name. From the Allocated Checklists page, you can also delete tasks and checklists.
Note: When you delete an allocated checklist or task from the Allocated Checklists page, you do not delete the corresponding checklist template and task from the database. To delete a checklist template or task from the database, you must use the Setup/Maintain Checklists function. In addition, tasks do not disappear from the allocated checklist automatically when complete; you must delete them yourself if required.
When you display an allocated checklist for a worker on the Allocated Checklists page, you can perform the associated task actions yourself or update the task to assign an alternative performer. When you have processed a task, you can change the task status as appropriate (for example, Completed, Rejected, Outstanding, Suspended).
If necessary, you can change the task duration to generate a new end date for the task.
See: Allocated Checklists, Oracle HRMS Deploy Self-Service Capability Guide
Checklists and Tasks
Setting Up Checklists
The following process describes how to set up your checklist templates and tasks.
For information on checklists, see: Checklists Overview
-
Create checklist life events. You use life events to process major changes in a person's life, for example, marriage, new employment, or the birth of a child. When a checklist life event occurs, the application initiates the appropriate checklist for the life event.
Additional Information: If you omit this step, the checklist is available for all persons and assignments, irrespective of the HR action being performed.
See: Defining General Characteristics of Life Event Reasons, Oracle HRMS Compensation and Benefits Management Guide
-
Create eligibility profiles.
You use eligibility profiles to tailor the list of tasks to a person or assignment. For example, using a location-based eligibility profile, you can define one version of a checklist for a new hire in the U.K. and a different version for a new hire in Japan.
Additional Information: If tasks do not have eligibility profiles attached, the application assigns them to all persons and assignments with that checklist.
-
Create flexfield segments to provide additional context information for the checklist or task, if required. The flexfield names are Additional Allocated Checklist Details (PER_ALLOCATED_CHECKLISTS) and Additional Allocated Task Details (PER_ALLOCATED_TASKS).
For example, you could create a location-based context to provide additional information on a U.S. New Hire checklist.
See: Defining Descriptive Flexfields, Oracle E-Business Suite Flexfields Guide
-
Create your checklist categories. Oracle provides the following predefined checklist categories:
-
On-Boarding
Covers all HR processes and procedures involved in hiring and integrating a worker in your organization. This category includes recruitment, hiring, and orientation.
-
Off-Boarding
Covers all HR processes and procedures involved in removing a worker from your organization. This category includes termination, relocation, and long-term sickness.
You can create additional categories by creating new lookup values for the CHECKLIST_CATEGORY (Checklist Category) lookup type.
See: Adding Lookup Types and Values, Oracle HRMS Configuring, Reporting, and System Administration Guide
-
-
Define Oracle Approvals Management (AME) processes to generate lists of performers for checklist tasks. Performers are the people who carry out the tasks.
Note: In the context of the checklist functionality, AME generates a list of performers; however, the equivalent terminology in AME is a list of approvers.
Oracle HRMS provides the transaction type CHECKLIST; however, you must set up all required approval groups, rules, and conditions.
See: Identifying Performers for Checklist Tasks
If you prefer to assign performers manually, omit this step.
-
Create your checklist templates using the Setup/Maintain Checklists function.
See: Checklists Overview
-
Create your checklist tasks using the Setup/Maintain Checklists function.
See: Checklists Overview
-
Schedule the Allocate Checklists process to allocate checklists and associated tasks to people and assignments.
Identifying Performers for Checklist Tasks
You can use Oracle Approvals Management (AME) in conjunction with the Checklists function to designate a task performer automatically. When you create a task, you can assign an Approval Identifier. The application passes this value to AME and generates the list of approvers for each task using attributes, rules, and approval groups.
For general information on AME, see: Overview of Oracle Approvals Management, Oracle Approvals Management Implementation Guide
Oracle provides the transaction type CHECKLIST and the approvals attribute CHECKLIST_ATTRIBUTE. The CHECKLIST transaction type enables you to create approval rules based on the task and person's details such as business group, organization name, job, position, or supervisor name.
Before attempting to set up AME, you should plan your approval requirements. For information on designing approvals processes in AME, see: Planning your Organization's Approval Processes, Oracle Approvals Management Implementation Guide.
The following figures show an example use of AME components for checklists.
Using AME for Checklists - Example 1

This figure shows the standard AME components and their use in the Checklists functionality. The approval rule shown has the following outcome:
-
If the Checklist attribute is SECURITY and the Location attribute is London, then AME uses the UK SECURITY approval group to identify the task performers.
The SECURITY attribute value appears n the list of values for the Approvals Identifier field in the Create Task and Update Task pages.
Using AME for Checklists - Example 2
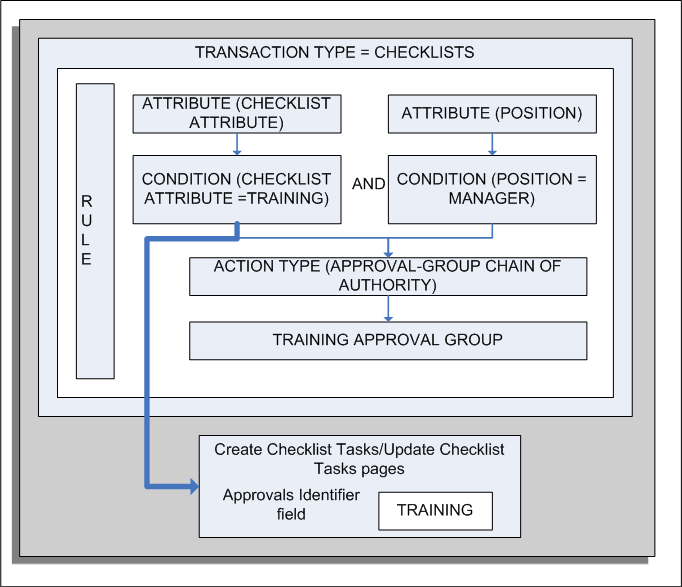
This example shows an approval rule that is designed to inform the training department about training sessions for new hires to the manager position in an enterprise. In this example:
-
If the Checklist attribute is TRAINING and the POSITION attribute is Manager, who is a new hire, then AME uses the TRAINING approval group to identify the task performers.
-
The TRAINING attribute value appears in the list of values for the Approvals Identifier field in the Create Task and Update Task pages.
You define AME components using the Approvals Management Business Analyst responsibility.
To set up AME for checklists
-
From the Business Analyst Dashboard, query the CHECKLIST transaction type (Transaction Type Key = CHECKLISTID) in the Approval Process Setup region. This region contains links to the setup pages for the AME components.
Note: For more information about the Approvals Management Business Analyst responsibility, see: AME Roles and Responsibilities, Oracle Approvals Management Implementation Guide.
-
Select an AME component to define. For example, select the Attributes link to display the delivered attribute CHECKLIST_ATTRIBUTE. If required, add additional attributes to your transaction type.
-
Select the Conditions subtab to define the conditions for your transaction type. You must define regular conditions for every possible value for the Checklist attribute, for example:
-
CHECKLIST_ATTRIBUTE is SECURITY
-
CHECKLIST_ATTRIBUTE is RESOURCES
-
CHECKLIST_ATTRIBUTE is REFERENCES
Additional Information: The condition values you define here are passed to the Create Checklist Tasks and Update Checklist Tasks pages and appear in the list of values (LOV) for the Approvals Identifier field (see figure). The values relate to the type of task, for example, a security task, resource allocation task, or reference check task.
-
-
If required, create List Modification conditions. For example, you can create a Final Approver condition and identify the approver.
-
Select the Approval Groups subtab to define the approval groups for your transaction type.
For example, you could create an approval group called UK Security to contain the list of performers who would carry out the task in question.
Note: Oracle recommends that you select the "First responder wins" voting regime for your approval groups. This ensures that only one performer carries out the task. When the performer completes the task and updates the notification, the associated workflow process automatically updates the task status to Completed or Rejected.
-
Select the Rules tab to define your rules by combining your attributes, conditions, action types, and approval groups. Each rule can contain multiple conditions.
-
Select the Test Workbench tab to create a test transaction for your rule.
See: Overview of Testing, Oracle Approvals Management Implementation Guide.
Running the Allocate Checklists Process
You run the Allocate Checklists concurrent process to identify any checklist life events that have not yet been processed. For each life event, the process allocates the checklist to the person or assignment and builds the list of checklist tasks based on the eligibility profiles.
You should schedule the Allocate Checklists process to run regularly, depending on the number of employees and the frequency with which life events occur. For example, you could schedule the process to run once a day since life events occur within a date context.
Note: When you select the Allocated Checklists function, the application runs the Allocate Checklist process automatically for that person or assignment. This ensures the checklists displayed from the Allocated Checklists function always display current data. However, it is important to run the Allocate Checklists process regularly to minimize processing effort and load times at logon.
You run the Allocate Checklists process from the Submit Requests window.
To run the Allocate Checklists process
-
In the Name field, select Allocated Checklists and Task Process.
-
Submit the process.
-
Close the window.