Using Supplier Ship and Debit
Supplier Ship and Debit Overview
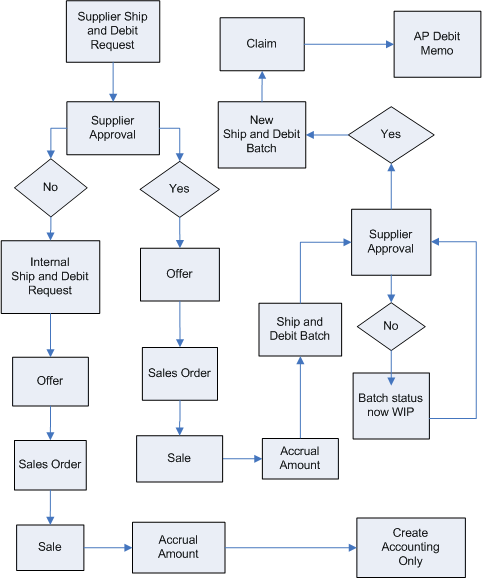
Supplier Ship and Debit is the process by which a distributor ships goods at a lower price to the customer and either debits the supplier for the difference in the acquisition and selling price or absorbs this. The customer can request this new price or the distributor can decide on this price to make a bulk sale, retain a customer, or interest a new customer. In order to debit the supplier for the difference, the distributor raises a supplier ship and debit request for the new price and sends it for supplier approval. If the supplier approves, an accrual offer is created and sales made against the offer. After accruals are calculated, the distributor creates a supplier ship and debit batch, obtains supplier approval on the claim amount, and debits the supplier for this amount. If the supplier declines the distributor’s request, the distributor raises an internal ship and debit request. The accrual or claim amount from sales against offers for internal ship and debit requests are accounted for on the distributor’s side.
Supplier Ship and Debit uses the following Oracle Trade Management modules.
-
Oracle Approvals Manager - for internal approvals on supplier ship and debit requests
-
Offers - for offers created against supplier ship and debit requests
-
Claims - for settlement of accruals against approved supplier ship and debit batches and accounting for internal requests
In addition, the ship and debit process integrates with the following applications.
-
Order Management – for booking of sales orders against offers and shipping of these orders
-
Web Applications Desktop Integrator (Web ADI) – for approval interaction on supplier ship and debit batches if specified as the supplier’s preferred request communication method
-
XML Gateway – for approval interaction on supplier ship and debit requests and batches if specified as the supplier’s preferred request or batch communication method
The key steps in the supplier ship and debit process are described below.
-
Supplier Ship and Debit Request
A distributor creates this request to obtain supplier approval for the new prices or discounts on one or more product and customer combinations. The supplier can approve of some of these prices in a request and reject others. All rejected lines are removed from the request and a new request created for them. An accrual offer can then be created for the approved request and sales made for this offer. You then consolidate accruals against ship and debit offers in a batch that you intend to claim or debit the supplier for, if approved.
-
Internal Ship and Debit Request
A distributor creates this request for prices that the supplier rejects on a supplier ship and debit request. Ship and Debit allows you to copy the original request and modify it to create a new one. Because an internal ship and debit request requires no internal or supplier approval, an offer is directly created based on the request. When the sale is processed and accruals calculated, you can directly create accounting on the cost center specified on the request. This cost center absorbs the costs of the offer.
-
Ship and Debit Batch
A distributor generates a ship and debit batch to obtain supplier approval on amounts from accruals against sales for offers on approved supplier ship and debit requests. The supplier can approve some amounts and reject others. Rejected lines and lines with no response from the supplier are retained in the batch with a batch status of Work in Progress (WIP) and a new batch is created for all approved lines. You can review and correct information in the WIP batch and resubmit the corrected lines for supplier approval. A supplier claim is automatically created for the approved ship and debit batch and this, in turn, generates a debit memo for the supplier in Oracle Payables.
The process described above is illustrated in the following diagram.
Related Topics
Creating a Supplier Ship and Debit Request
Generating a Supplier Ship and Debit Batch, Oracle Channel Revenue Management Implementation Guide
Overview of Implementing Supplier Ship and Debit
Creating a Supplier Ship and Debit Request
The sales user or requester creates a supplier ship and debit request for the distributor from the supplier ship and debit dashboard. A request can be for one or more products. You enter your new selling price as well as your retailer and end customer information. Alternatively, you can integrate with external systems to import request information for the creation, update, and copy of multiple ship and debit requests using the ship and debit public API. For more information on OZF_SDR_PUBLIC_API, see Creating Multiple Ship and Debit Requests, Oracle Channel Revenue Management Implementation Guide.
A request must be internally approved before any further action can be taken on the request. The sales user and the internal approver can be the same or different individuals in the same distributor organization. The approver approves the request and sends the request details for supplier approval either manually or using the XML Gateway. If the supplier approves, an accrual offer is created for approved lines. For rejected lines, you can create a new, internal ship and debit request.
As the distributor, you use the supplier ship and debit dashboard to create ship and debit requests and ship and debit batches, and view and track requests, batches, offers, budgets, and claims. The status of a request controls the flow from creation through approvals and offers to the closing of the request.
This section explains the process from creating to closing a supplier ship and debit request.
Creating a Supplier Ship and Debit Request
To create a supplier ship and debit request, perform the following steps.
-
Log in using the Oracle Trade Management User responsibility and navigate to Supplier Ship and Debit under Trade Management. From the Ship and Debit Overview page that functions as the supplier ship and debit dashboard, you can view requests, batches, and related information.
-
Click Create Ship and Debit Request to create a new request.
-
Select the Supplier accrual type. You can also create requests for Internal accrual. If you are creating an internal request, you must select a cost center used in claims accounting
-
Select the operating unit for the offer.
-
Select Bid Request, if you are creating this request for a specific customer or group of customers. You can then enter customer information and ensure that resultant offers apply only to these customers. If you are creating this request to make a bulk sale and move your inventory, then select Blanket Request. In this case, the offer that is created applies to all customers.
-
Enter supplier name, contact, e-mail, phone number, and the response by date.
-
Select your currency (request currency) and the currency of your customer (sales order currency). The offer is created in the sales order currency that you selected.
-
Optionally, enter the supplier quote number that you use to track supplier approval and accruals, the internal order number for the sales booked against the offer that the supplier must know before approving the request, and the authorization number that the supplier sends you authorizing you to proceed with the sale against the offer.
-
If the Request Only check box is selected you must manually apply the offer to an eligible sales order. Otherwise, the offer is automatically applied. Use the OZF: Request Based Ship and Debit profile option to set the default value for the check box. For more information, see Profile Options for Supplier Ship and Debit, Oracle Channel Revenue Management Implementation Guide.
-
Enter the start and end dates of the request. The end date you enter is added to the grace days that you specified on the supplier’s trade profile to derive the end date of the offer. The offer start date is the date on which you update the status of this request to Pending Offer Approval, see step 8 of Closing a Supplier Ship and Debit Request. For more information on the supplier trade profile, see Creating Ship and Debit Supplier Trade Profile, Oracle Channel Revenue Management Implementation Guide.
-
Click Next to enter product and price information in the Price Request Details section. After you create this request, you can view these details in the Product tab of the Ship and Debit Request Details page. Product details include the vendor’s product code if product mapping is defined, the list price of the product, competitor information, quantity that you intend to sell, the discount amount or percentage on the list price at which you want to sell, and the final selling price for which you are requesting authorization. The Vendor Approved check box is selected for products for which you receive authorization to sell at the requested final price. This enables offer creation for these products.
-
If this is a bid request, enter the billing, shipping, and buying group details of your customer. If you have a specific end customer lined up for the sale, enter relevant information in the End Customer section. This information is used on the offer and is validated against the sales order.
-
Use the Notes & Attachments tab to include remarks and attach documents.
-
Click Apply to create and save this request. This opens the new draft request that you created in the Ship and Debit Request Details page with an outcome status of In Progress and the creator of the request displayed as the requester. The outcome status is used in reporting.
Closing a Supplier Ship and Debit Request
To close a supplier ship and debit request, perform the following steps.
-
Navigate to the supplier ship and debit dashboard using the Oracle Trade Management User responsibility. On the dashboard, search and select the request you created. For an internal draft request go directly to step 7 to change the status from Draft to Pending Offer Approval. For a supplier request, update the status of the request in the Ship and Debit Request Details page from Draft to Assigned and apply your changes.
Note: If you have set up a default approver in Oracle Approval Management or for the OZF: Default Ship & Debit Request Approver profile option, a workflow notification to approve the request is sent to this approver.
-
As the assignee, navigate to the supplier ship and debit dashboard and select the supplier request that needs your approval. On the Ship and Debit Request Details page, click Accept. The approver is displayed on the request as the assignee.The assignee can be the distributor’s product manager who internally approves the request and subsequently interacts with the supplier for authorization.
-
Update the status of the request to Pending Supplier Approval and apply your changes.
-
Click Report and use the OZF: Ship & Debit Request Template to create a report of the request and e-mail this to the supplier for approval. Alternatively, you can send the information by the selected request communication method on the supplier trade profile. If the selected communication method is XML Gateway, the Pending Supplier Approval status automatically initiates the XML Gateway transaction and sends the XML message directly for supplier approval.
-
Based on supplier response, update the status of the request to either Supplier Approved or Supplier Rejected and apply your changes. If approved, then go to step 7.
-
If your supplier rejects the request and you decide to go ahead with the new prices, click Copy on the Ship and Debit Request Details page to create a new internal request from this supplier request. A new request number is generated. Enter your cost center and the start and end dates for this new request. The cost center is used in accounting. Select the components that you want to copy: product, customer, and end customer. Click Apply to create the new request.
Note: An internal ship and debit request does not require internal or supplier approval but the offers created go through standard Oracle Trade Management approval the same as for approved supplier requests. .
-
For a supplier request update the status from Supplier Approved to Pending Offer Approval. Similarly, update the status of a draft internal request. Apply your changes. This creates the offer and changes the status of the request to Active.
Note: You can send a Supplier Approved request to the sales user for sales approval. This confirms the continued availability of the sales opportunity.
-
You can view the offer details in the Offer tab of the Ship and Debit Request Details page. If you click on the Accrual Details icon, you can see that the offer is created on the default budget source for accrual offers. After the offer is created, you can update the Product section of the request with the approved amount and the maximum approved quantity on the offer.
-
After sales are made against offers on supplier requests, you generate a supplier ship and debit batch for these requests and seek supplier approval. If the supplier approves the claim amounts, a claim is created for the batch. You can view this claim in the Claims tab of the Ship and Debit Request Details page. After the claim is settled, you can also view the settled amount and the difference between the claimed and settled amounts, if any. After sales are made for offers on internal requests, you can directly navigate to the Claims tab of the Ship and Debit Request Details page and click Create Accounting to settle the claim.
For more information, see Generating a Supplier Ship and Debit Batch.
-
After claim settlement, return to the Ship and Debit Request Details page to close the request.
Generating a Supplier Ship and Debit Batch
A batch is created for a single supplier and can include one or more requests approved by this supplier. The batch provides your supplier with sales information and claims for accrual amounts submitted for supplier approval and payment. For offers on supplier requests, accruals against sales orders are generated by the funds accrual engine. Based on the batch creation frequency for the supplier site that you set on the supplier trade profile, the Ship and Debit Batch Creation concurrent program generates supplier ship and debit batches. Alternatively, you can manually run the concurrent program from the supplier ship and debit dashboard, when required.
After you create a batch, you can review and edit it before you release it for supplier approval. The method you use to communicate with the supplier is based on your selection on the supplier trade profile. Rejected amounts are retained in the original batch. A new batch is automatically generated for approved lines, a claim is created for it, and then the batch is closed out. For rejected lines, you can review the reasons for rejection communicated using industry standard dispute codes and work on resolving them.
This section explains the process from creating to closing a supplier ship and debit batch.
Creating a Supplier Ship and Debit Batch
To generate a supplier ship and debit batch, perform the following steps.
-
Log in using the Oracle Trade Management User responsibility and navigate to Supplier Ship and Debit under Trade Management.
-
From the Ship and Debit Overview page (supplier ship and debit dashboard), navigate to the Batch Creation subtab.
-
You can enter a unique request name to help search for your request later.
-
Click Next to enter the parameters for the batch that you want to create.
-
Select the operating unit and supplier.
-
Optionally, select to enter one or more of the following parameters to restrict the accruals considered for this batch. Parameters include supplier site, fund or budget, ship and debit request number, product, and start and end dates and GL period for accruals to be considered.
-
If this is a one-time manual batch creation, you can directly click Submit on the Parameters page.
-
If you intend to create a schedule for batches for approved requests for a supplier, click Next and create a new schedule. Click Advanced Schedule to select specific days and months.
-
If you do intend to include recipients, click Next to enter recipients and respective notification types.
-
If you do not intend to print the batch, submit the program. Otherwise, click Next to specify printing options and then click Next to review and submit the request.
-
Click Submit to navigate to the Review page. Review the details and click Submit again. This generates a new batch with a system generated batch number and a request ID for the concurrent program. If you did not specify a product or a ship and debit request number, the batch considers the accrual amounts for all approved and unclaimed accruals for the specified supplier.
-
Click OK on the batch schedule confirmation page to view your completed new batch on the Requests page. You can click Submit Request to resubmit this batch or copy this batch to a new batch. You can click on the Details icon to view the details of your request.
Sending Batch Information for Supplier Approval
Before you send batch information to the supplier for approval, please perform the following steps.
-
Navigate to the Batch Summary subtab from the supplier ship and debit dashboard. The Batch Details page displays a list of batches.
-
Select the batch you created and navigate to the Lines subtab to view accrual information by product. Accrual information includes quantity, order, invoice number, and claimed amount.
-
Click Export Batch to submit batch information to the supplier. You cannot edit a batch that you have submitted for supplier approval. You transmit information to an MS excel worksheet for Web ADI or to interface tables for the XML Gateway based on the selected communication method on the supplier trade profile.
-
If you are using Web ADI, your supplier edits accrual lines on the excel sheet stating rejection codes for rejected lines and sends the excel sheet back to you. When you upload the returned excel sheet into the system, the batch is updated automatically. A new batch is generated for all approved lines and a claim is generated for this batch. Rejected lines and their rejection codes are displayed on the existing batch that was submitted for approval and the batch status changes to Work in Progress. If you are using the XML gateway, the whole process of exporting and importing approval and creating a new batch is automatic.
-
For rejected lines, you can navigate to the Dispute subtab of the Batch Details page for a consolidated view of disputed lines grouped by dispute codes. Click on a dispute code to review and resolve individual lines in the Lines Detail page. Select the line to update and apply your resolution. Alternatively, you can do a mass update to correct multiple lines. You can select and delete unresolved rejected lines.
-
You can then select the lines you want transmitted and export this Work in Progress batch to resubmit the changes to the supplier for approval. See step 4 onwards.
Note: You can use the descriptive flexfield provided to capture additional information relevant to the batch irrespective of the batch status.
-
You can return to the Batch Details page and navigate to the Claims subtab to view the child batches and claims that are automatically generated for each approval cycle. You can click on the links for the batches and for their claims to see details of approved and closed batches and claims.
Related Topics
Supplier Ship and Debit Overview
Creating a Supplier Ship and Debit Request
Creating Ship and Debit Supplier Trade Profile, Oracle Channel Revenue Management Implementation Guide