Production Planning and Production
This chapter covers the following topics:
- Overview
- Managing Workorders
- Releasing Workorders
- Deferring Workorders
- Canceling Workorders
- Deferring Maintenance Requirements
- Scheduling Workorders Using the Scheduler Workbench
- Viewing the Scheduling Hierarchy
- Viewing Serial Number Change History
- Working with Maintenance Requirements
- Updating Material Requirement Details
- Editing Resource Requirements
- Updating Resource Requirement Details
- Viewing Resource Assignments
- Editing Resource Assignments
- Charging Resources
- Working with Material Transactions
- Viewing and Issuing Materials Across WorkOrders
- Returning Materials Across Workorders
- Identifying the Employee that Items are Issued To or Returned By
- Viewing the Material Transaction History
- Item Disposition
- Disposition Association during Material Transaction
- Updating Dispositions
- Viewing Item/Part Service History
- My Workorders Interface
Overview
In the maintenance, repair, and overhaul industry, it is necessary to identify, perform, and track maintenance execution to form a complete history of an unit while maintaining the units condition to ensure service availability and capturing the costs associated with the maintenance execution. While maintaining the unit it is necessary to identify defects, the corrective action steps, material, and resource requirements as well as charging resources, performing material transactions, and maintaining the quality for a job.
The objective of production planning is to evaluate a work package and develop a feasible project plan, including resource allocation by mechanics’ skill, material, breakdown man hour by zone/process, and estimate turn time for each major process. When a Visit Work Package is updated with non-routine or repair jobs, the production plan will include these.
The Production Planning module is used by production planners to manage shop floor activities, assign personnel and equipment to jobs, fine tune work schedules, manage procurement, create material requirements for unplanned maintenance, and track components sent out for repair against the maintenance visit.
This interface is also used by maintenance personnel to execute the organizations' maintenance program. Technicians and supervisors can view job assignments, view component and material availability, record maintenance activities; material and component consumption; and job completion, update maintenance compliance details, issue quality inspection results to satisfy regulatory requirements, and initiate new service requests for unplanned maintenance discovered during planned maintenance visits. See:
Production
The Production module supports the execution of the tasks against an Install Base Tracked Item. Production is the actual execution of the work required for a maintenance visit. The execution of the visit accumulates the entire history of work performed, the inspection findings, and component changes. The production activity thus provides the information necessary for the records that is required for commercial and regulatory purposes. Production manages key processes such as receiving a unit for service, disassembling, cleaning and inspecting it as well as dispositioning the parts.
The Production Planning module automates production tasks like job creation, maintenance and job completions. Once a job is released to the floor, it can be executed and vouchered to. The execution of a job can be routine, disassembly, inspection, assembly, disposition that can lead to scrap, and part request and repair job creation to correct a deviance. All costs associated with the jobs are collected throughout the repair cycle.
Routine Tasks
A routine task is a job that has been generated from a predefined route setup in Route management. If defined through a maintenance requirement, it may have a schedule and due date as defined by Unit Maintenance Plan. The task has been associated with a maintenance visit in Visit Work Package and released to Production, optionally scheduled by Long Term Plan, and optionally has resources scheduled by Production Planning.
Non-Routine Tasks
When a non-routine requirement is discovered—these non-routine, or unplanned, jobs can be accomplished in the originating visit or deferred to subsequent visits Non-routine tasks consist of a service request tracking the problem, and a job consisting of the steps required to resolve the problem. A non-routine task may have additional routes associated with it in visit work package to support the resolution. You can create service requests using the Service Request window in Oracle TeleService. You can also create non-routine service requests in the Unit Maintenance Plan region of the Planning module. These requests can be deferred to subsequent visits using MEL or CDL instructions. See: Creating Non-routine Requests During Unit Maintenance
Key Business Processes
The Production module of Oracle Complex Maintenance, Repair, and Overhaul supports the following business processes:
Search for Routine and Non-Routine Workorders
After a Routine workorder or Non-Routine workorder is created, the workorder can be selected from the results of a search using the desired filtering elements.
Create workorders from visit tasks for Scheduled, Unscheduled, and Convenience maintenance
Workorders are created in Production when the tasks are pushed to Production from Visit Work Package or when a Service Request, from Oracle Complex Maintenance, Repair, and Overhaul Production, is created in a Visit where the tasks have been pushed to Production.
Create Service Requests to track reported problems
Service Requests are created when an item has a service difficulty, requiring an action to address the issue. During the Service Request creation a Visit Task is created and a job is created if the Visit's Tasks have been pushed to Production. The Service Request creation will also be generated when an Install Base tracked item is returned or removed in the Unserviceable or MRB condition.
Create Operations to Non-Routine workorders for work definition and tracking
For Non-Route based workorders the user is allowed to create operations to describe the steps required to correct the service difficulty. For Route based workorders the operation steps are created from the definition in Route Management including the associated material and resource requirements that are valid for the execution organization.
Maintain Workorders
The user maintains the workorder by adjusting the schedule, the status, completing, deferring, and selecting the actual start and end for a workorder. In addition, the user can select if the workorder is confirming the jobs necessity by selecting the confirmed failure flag. When a workorder is completed it triggers a check to determine if the workorder is the last as part of a maintenance requirement. If the workorder was the last workorder to be completed for a maintenance requirement, the counters are reset as defined by Fleet Maintenance Program and Unit Maintenance Plan is updated to reflect the maintenance requirement is complete.
Maintain Operations
The user maintains the operations by updating the operations, adding, removing, or updating the material and resource requirements, captures costs by Charging Resources, Issuing, and Returning Materials, viewing the resource assignments, recording part changes, and completing the operations.
Maintain Quality
Quality is maintained using the Route setup from Route Management for the workorder and operation compliance and from the profile options for Non-Routine Workorder and Operation compliance, Job Deferral, MRB part disposition support, and by capturing counter readings at the job completion. The quality results are captured based on the setup storing them in Oracle Quality.
View Service History
During the planning phase of a service or the execution of a work order, planners access the history of service performed against a Unit/part. Planners will then compare the current/future requirements and schedule the tasks to be performed. Planners can also review the past, current and future maintenance requirements against a part/item.
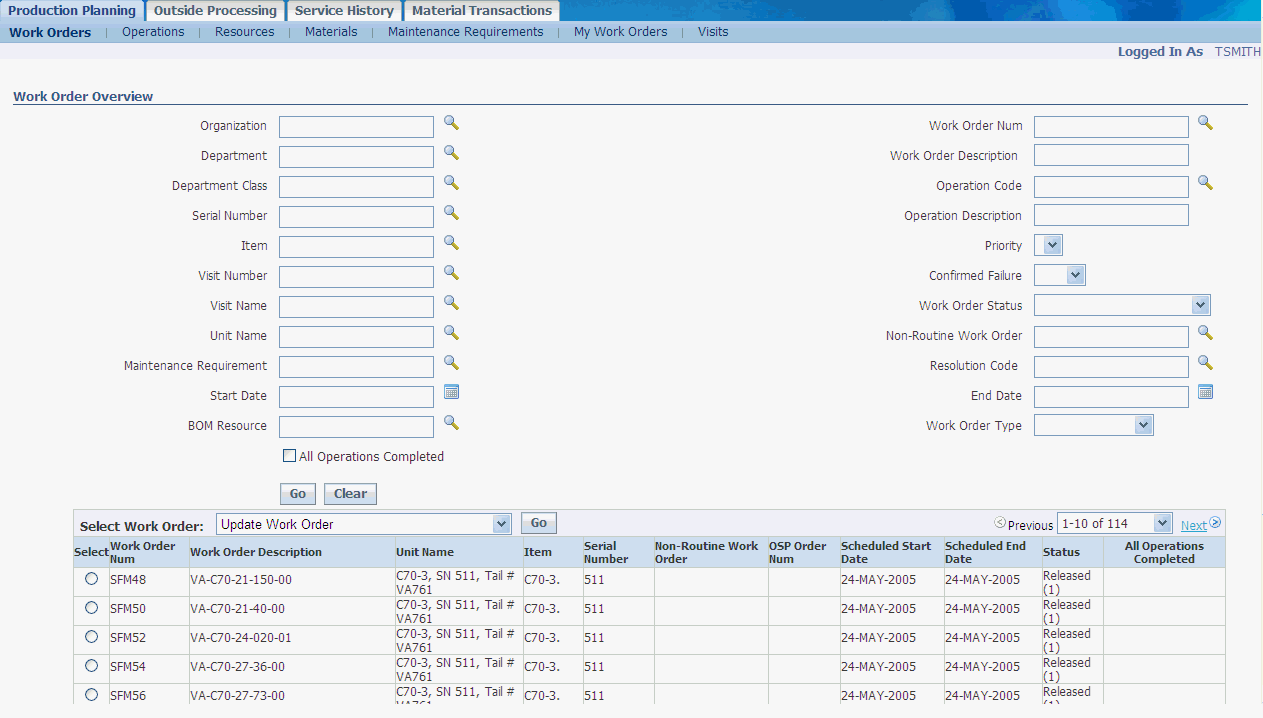
Managing Workorders
The Production module is the interface to perform various activities related to work orders. You can update, release, cancel, defer, and complete work orders; and create non-routine work orders arising out of maintenance needs discovered on the production floor. You can also view documents, scheduling hierarchy, material, and resource requirements associated with work orders. See:
Releasing Workorders
-
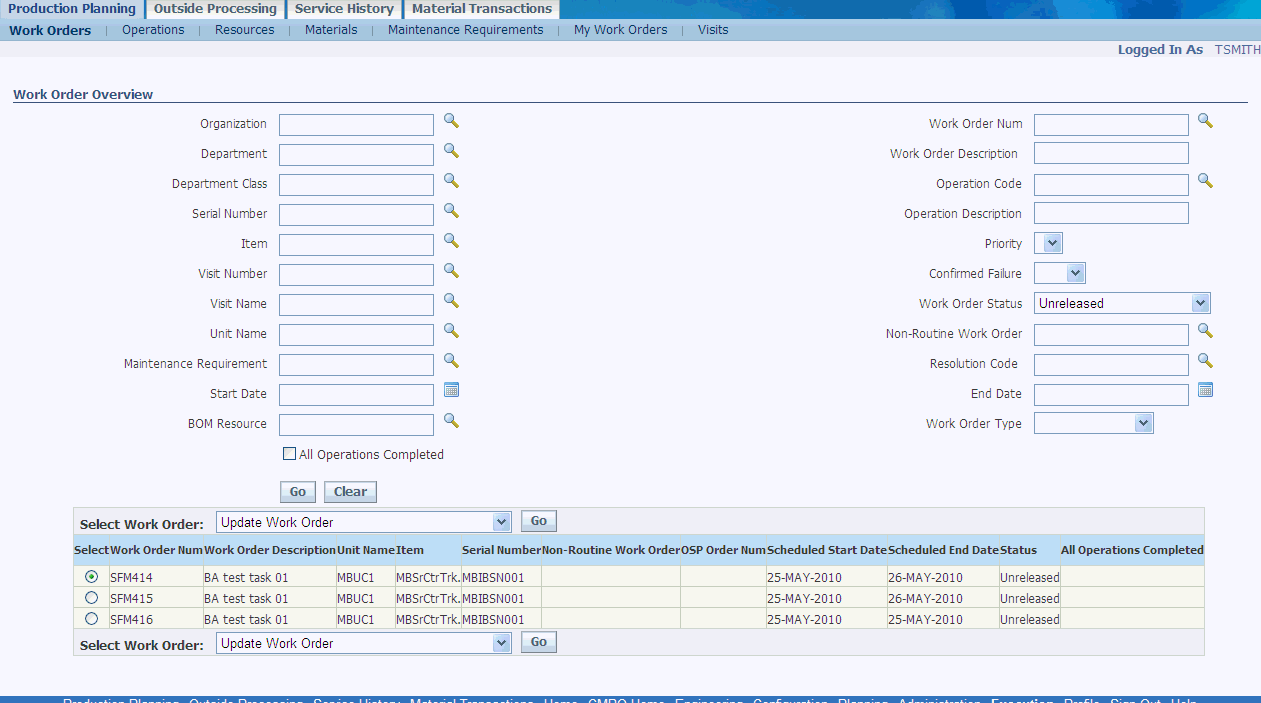
Navigate to the Execution region, and select the Production Planning tab. The Workorder Overview page appears.
-
Enter information in the applicable fields and select Go. All jobs matching your search criteria appear in the Workorder List Results table.
-
Select the workorder that you want to release and choose Release Workorder from the drop-down menu. Optionally, you can navigate to the Workorder Operations page and update the workorder status to Released.
-
To release all the workorders within a particular visit, select Release Visit Workorder from the drop-down menu. Optionally, you can also navigate to the Search Visit page under the Production Planning subtab. Search for a visit and release all workorders associated with that visit.
-
To release workorders for a particular maintenance requirement, choose Release Maintenance Workorder from the drop-down menu in the Workorder List table. This option is also available in the Search Maintenance Requirements page under the Production Planning subtab.
Deferring Workorders
-
Navigate to the Execution region, and select the Production Planning tab. The Workorder Overview page appears.
-
Enter information in the applicable fields and select Go. All workorders matching your search criteria appear in the Workorder List Results table.
-
Select a workorder, and choose Defer from the drop-down menu. Optionally, you can defer the workorder from the Workorder Operations page.
Canceling Workorders
A method is introduced to restrict access for canceling work orders to specific users. Users can cancel work orders based on status ‘Released’, ‘Unreleased’, or both.
Two new security functions have to be set for all users:
-
AHL_PRD_CANCEL_REL_JOBS
-
AHL_PRD_DISALLOW_CANCEL_JOBS
The function, AHL_PRD_CANCEL_REL_JOBS, enables the users to have the Cancelled option for any work order provided work status change rules allow the canceling of the work order.
A user having the function, AHL_PRD _DISALLOW_CANCEL_JOBS, will no longer have the Cancel Workorder option. An error indicating, User does not have the permission to cancel workorders, is shown to the users having this security function.
If both the above-mentioned functions are not enabled, the users can cancel only Unreleased workorders.
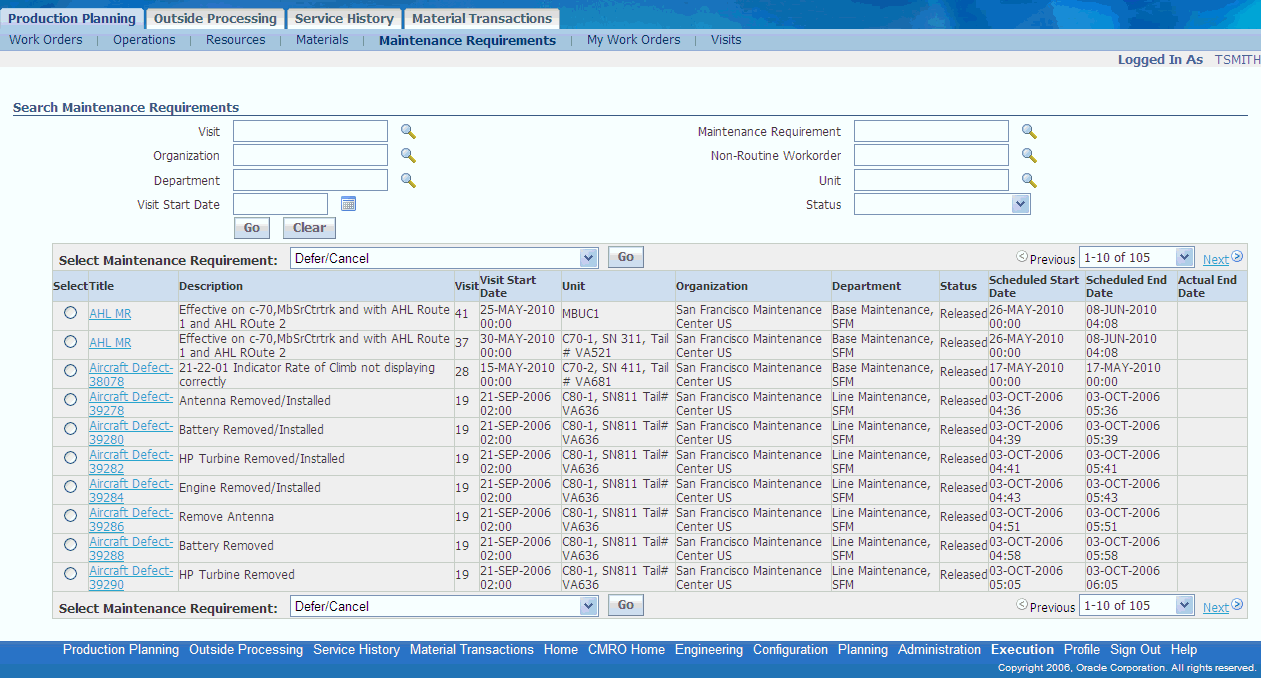
Deferring Maintenance Requirements
You can defer routine and non-routine maintenance requirements notcompleted during a visit, either due to shortage of material and resource, or because the unit was put back into service for an emergency assignment. You can also defer maintenance requirements belonging to a group MR. The group MR is signed off at the end of the visit, and the deferred MR is carried out on a later date, and accomplished with the group MR on the next group Maintenance Requirement event. Maintenance requirements can be deferred to a future date (hard date when this MR will be performed), and/or they can be based on counter threshold values. A deferred maintenance requirement with a new due date is created in Unit Maintenance Plan.
You can skip a planned maintenance requirement to the next repetitive one, and also push the next due date based on the deferred date
To defer a maintenance requirement
-
Navigate to the Search Maintenance Requirements page.
-
From the search results, select the maintenance requirement that you want to defer, and click Defer. The Maintenance Requirement Deferral Details page appears.
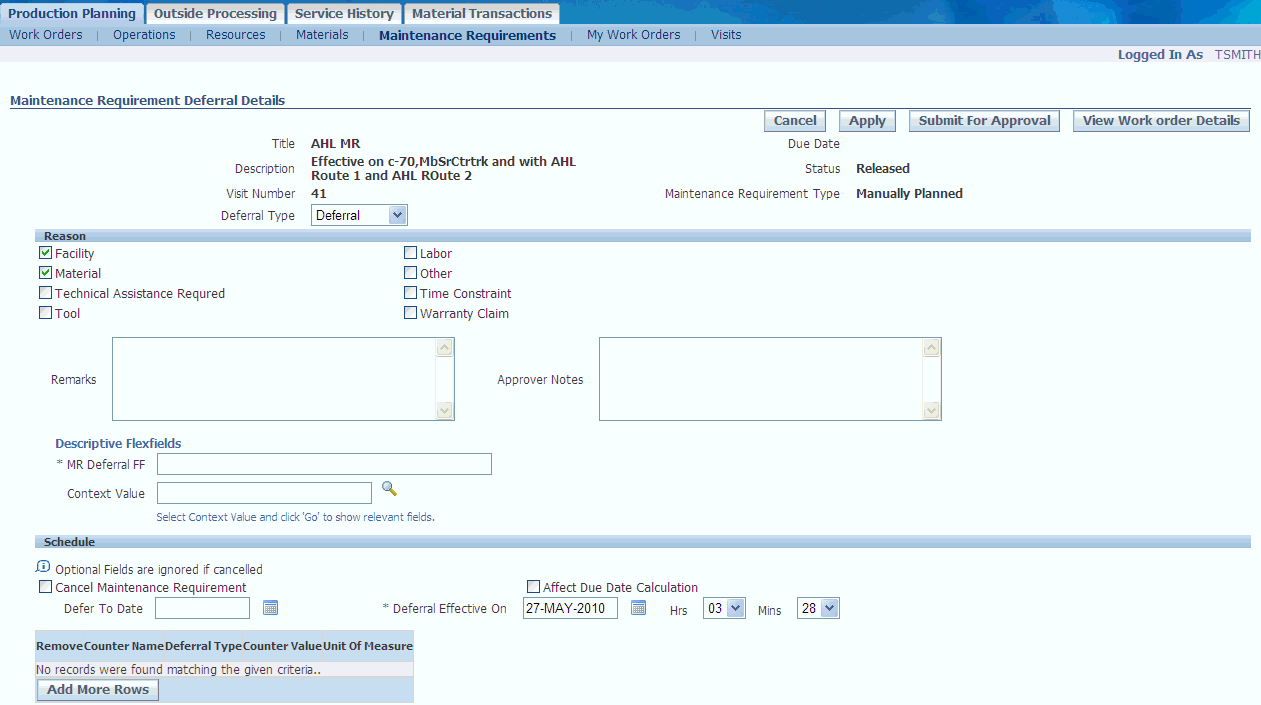
Use the information in the following table to enter deferral details.
Description of fields in the Maintenance Requirement Deferral Details page Field Name Description Title The title of the maintenance requirement, that you want deferred. Description Maintenance requirement description. Visit Number Is an alphanumeric value that uniquely identifies the visit definition that you wish to retrieve. Due date Due date of the maintenance requirement. Status Seeded workorder status of the maintenance requirement. Reasons User-defined reasons, displayed for the user to select. Remarks Multiple lines field to allow the user to enter additional information related to his/her deferral request. Approver Notes Multiple lines field to allow the approver to enter approval or rejection information. Defer To Date The date to which the maintenance requirement is going to be deferred. Deferral effective on Defaults to the system date, when the deferral is being created. Counter Name Fleet Maintenance Requirement threshold counter name. Deferral Type Deferred By counter UOM or Deferred To counter UOM value. -
Choose the deferral reasons by checking the corresponding check boxes in the Reasons region. You can select more than one deferral reason. Enter Remarks.
-
To defer the maintenance requirement to a later date, enter a date in the Defer To Date field. Alternatively, select from the Oracle Calendar.
-
Enter a date in the Deferral Effective On field. Alternatively, select from the Oracle Calendar.
-
To defer the maintenance requirement based on counter readings, select Add More Rows, and enter the counter threshold values.
-
Select Counter Name from the LOV. The Unit of Measure is returned based on the selected Counter Name.
-
Choose Defer By or Defer To from the Deferral Type drop-down menu. Enter a counter value.
Note: The system will return an error message if the deferred date or deferred counter is equal or greater than the next due date/due counter for the repetitive maintenance requirement.
-
If you select the Affect Due Date Calculation check box, Unit Maintenance Plan uses the new deferred date or counter value, to calculate when repetitive requirements will be due again.
-
To remove this instance of the requirement from Unit Maintenance Plan without affecting subsequent forecasted requirements, select the Skip Maintenance check box.
-
Click Apply to save the record. Click Cancel to cancel the transaction.
-
Select View Workorder Details to navigate to Workorder Overview UI, and to view all workorders related to the requested MR for deferral.
-
To submit the deferral for approval, select Submit For Approval. The status changes to Approval Pending.
-
When the Deferral is submitted for approval, all the workorders associated with the MR are put on-hold.
-
On approval, all workorders in Released status and associated with the MR are completed, and all Unreleased workorders are cancelled. A new UMP is created to track the deferred requirement in Unit Maintenance Plan, in case the Deferral is not to skip the MR.
-
If the Deferral is rejected, all associated jobs statuses are reverted to their previous statuses. You can rectify the errors and resubmit for approval.
Note: You cannot submit a Deferral for approval, if a child MR is pending deferral approval.
-
Scheduling Workorders Using the Scheduler Workbench
Before a workorder is executed, the planner needs to balance the requirements (resource & materials) with the available supply/capacity, also known as resource leveling. The planner assigns the workorders in such a way that the resources are consumed in a steady rate, thus avoiding the peak-valley situations. The Scheduler Workbench provides a graphical user interface of the Visit's work hierarchy, and enables the planner to schedule workorders and operations, manage dependencies, and assign resources. The scheduling decisions are validated against the applicable maintenance visit's start and end dates, as well as the defined technical dependencies between production workorders.
A large maintenance operation can have multiple visits and thousands of workorders at a single facility. The Scheduler Workbench allows the planner to quickly schedule and reschedule workorders, while viewing the required and available resources, and the workorder dependencies.
The scheduling hierarchy and the completion dependencies of a visit are pushed to Oracle Work-In-Process (WIP). Completion Dependencies are the technical dependencies between visit tasks in Visit Work Package. For example, Task 3 is executed after Task 1.
Prerequisites
- To use Enterprise Asset Management's Scheduler Workbench, workorders must have already been created. After creating a visit in Visit Work Package, associating the applicable maintenance requirements and scheduling the visit to an available organization and department, workorders are created by pushing the visit to production. Non-routine workorders are created manually in Production Planning.
Related Topics
Using the Scheduler Workbench, Oracle Enterprise Asset Management User's Guide
Viewing the Scheduling Hierarchy
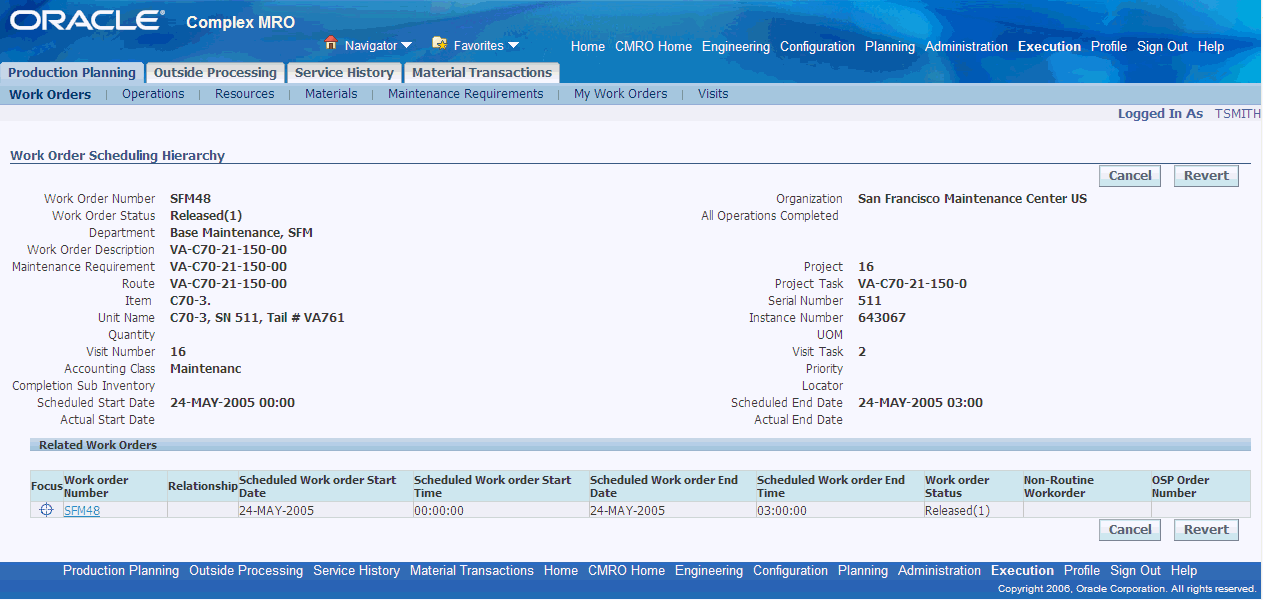
You can view the completion dependencies for a workorder in the View Workorder Scheduling Hierarchy user interface. The selected workorder information is displayed as read-only Context.
To view the scheduling hierarchy
-
Navigate to the Workorder Overview page.
-
Enter information in the applicable fields and select Go. All workorders matching your search criteria appear in the Workorder List Results table.
-
Select the workorder, and choose View Scheduling Hierarchy from the drop-down menu. Click Go. The Work Order Scheduling Hierarchy page appears, displaying the workorder details, and the related workorders.
-
To focus on a workorder to view it's relationships, clicking the Focus Icon in the Related Work Orders result set.
-
To navigate to the Workorder Operations user interface, click the Workorder Number link in the Related Work Orders result set.
Viewing Serial Number Change History
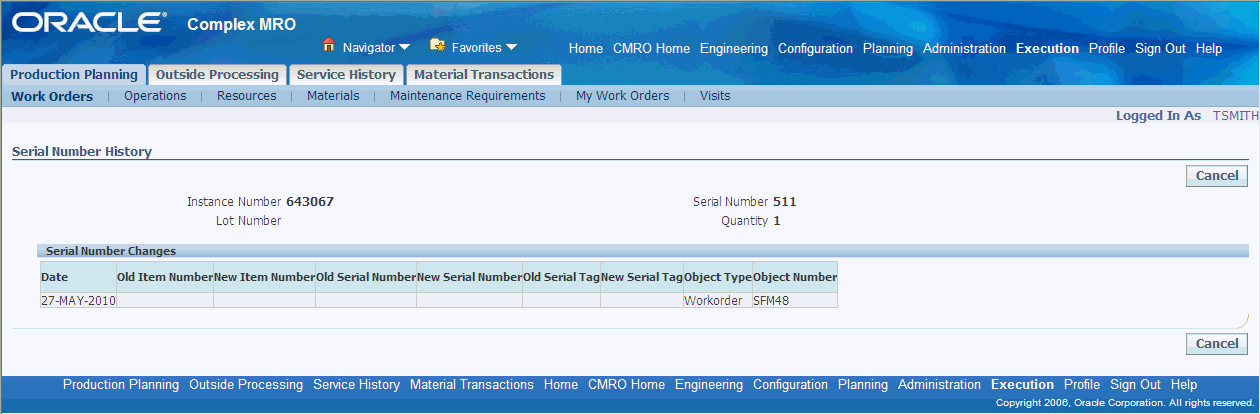
You can view all serial number changes performed for the work order item instance, in the Serial Number History page.
To view the serial number change history
-
Navigate to the Item Number/Serial Number Change page. See Changing Item and Serial Numbers Associated with Work Orders.
-
Select View History. The Serial Number History page appears, displaying the following information about the serial number changes:
-
Date
-
Old Serial Number
-
Old Serial Tag
-
New Serial Number
-
New Serial Tag
-
Working with Maintenance Requirements
You can search for maintenance requirements associated with workorders and perform all actions including deferring, signing off, submitting quality results, and viewing relationships using the Maintenance Requirements secondary tab.
To work with maintenance requirements
-
Under the Production Planning tab click the Maintenance Requirements secondary tab. The Search Maintenance Requirements page appears. Enter your search criteria and click Go. A list of maintenance requirements will appear in the results table.
-
You can select a maintenance requirement and do the following:
-
Defer
-
Submit Quality Results
-
Sign off
-
View associated workorders
-
View relationships
-
-
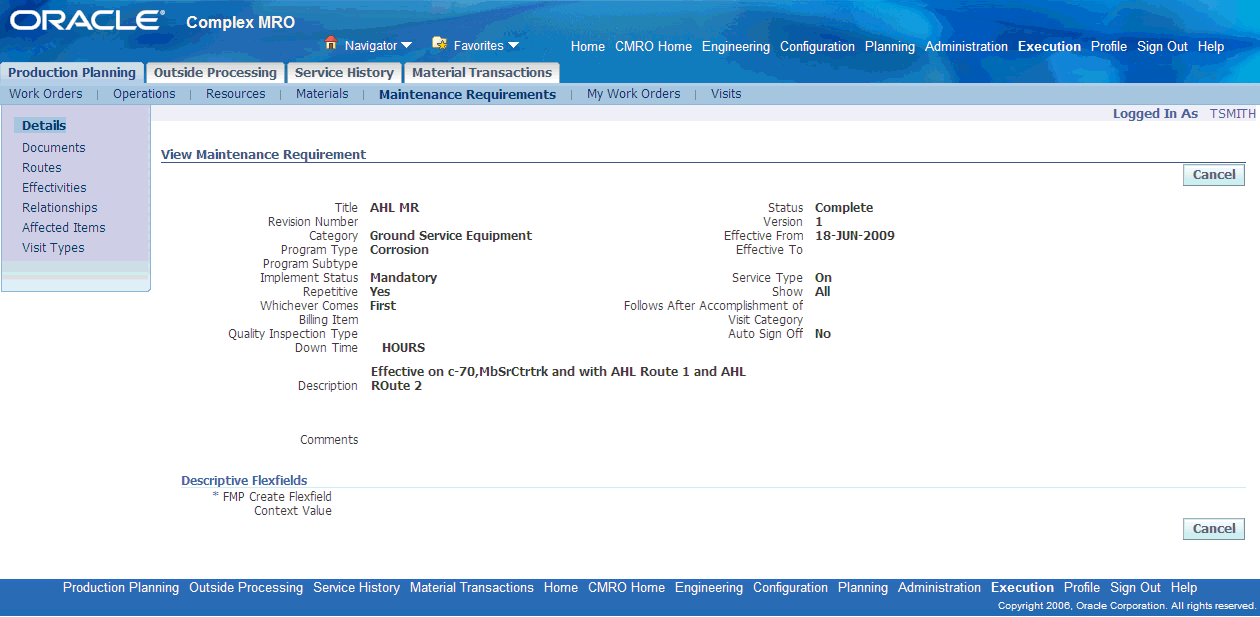
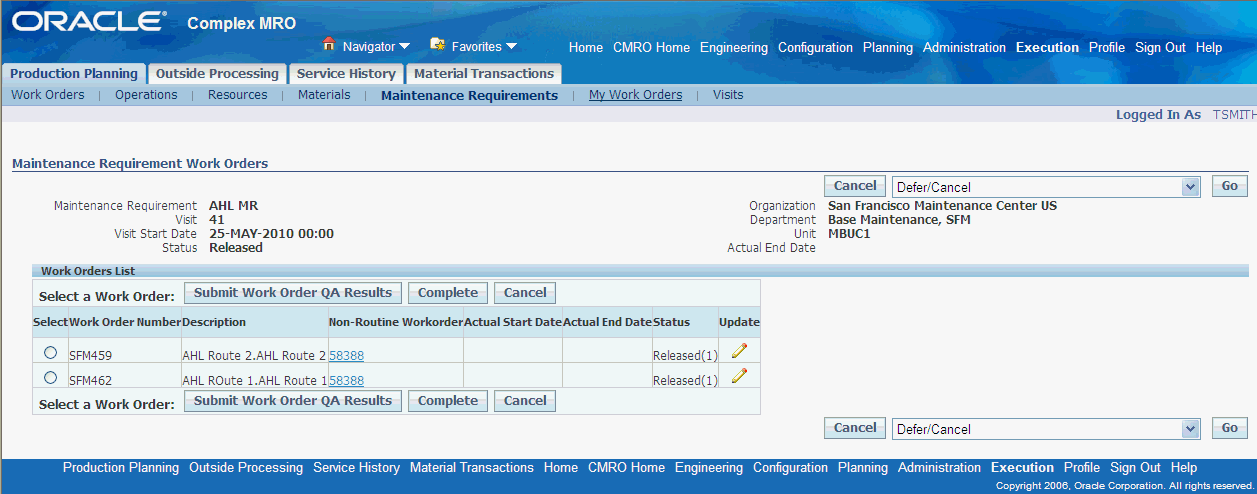
Select Maintenance Requirement to navigate to the View Maintenance requirement page to view details, associated documents, routes, effectivities, relationships, and effected items.
-
Optionally, select a maintenance requirement and click View Workorders. The Maintenance Requirement Workorders page appears displaying information about the workorders associated with a maintenance requirement. You can do the following :
-
Submit quality results and complete work order
-
Navigate to the Update Workorder Operations UI by clicking the Update Icon in the work order result set
-
Navigate to the View Service Request page by selecting Service Request.
-
Submit quality results, sign off and defer the maintenance requirement
-
Updating Material Requirement Details
- A workorder with a status of Draft, Unreleased, Parts Hold, Hold, or Pending QA status must exist in the database. The WIP Mass Load Concurrent Program must be running. The operation must have a Uncomplete or Pending QA status.
To update material requirement details
-
From the Oracle Complex Maintenance, Repair, and Overhaul Home page, click Execution. Select the Production Planning tab. The Workorder Overview page appears.
-
Enter information in the fields for which you know the value then click Go. All workorders matching your search criteria appear in the Workorder List Results table.
-
Click the Workorder number. The Workorder Operations page appears.
-
Select Materials from the left-hand navigation bar. The Update Material Requirement page appears.
-
Select the material requirement that you want to update, and click Details. The Material Requirement (Detail) page appears.
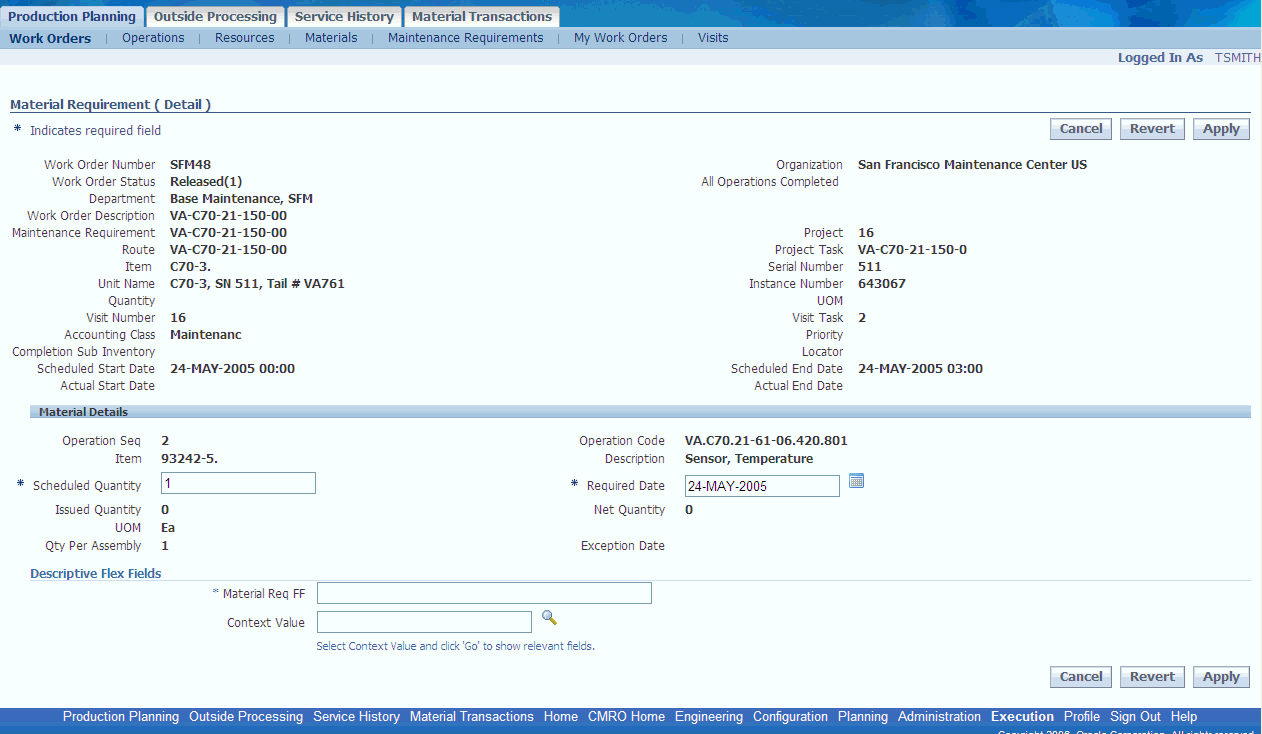
Use the information in the following table to modify material requirement details.
Field Name Description Operation Sequence The jobs operation sequence number. Operation Code The standardized operation code, if selected. Item The Item Number for the requirement. Description The description of the item defined. Scheduled Quantity The quantity scheduled by the Long Term Plan. Required Date The date on which the requirement is expected. Issued quantity Part quantity issued. Net Quantity The difference between total quantity issued and total quantity UOM The unit of measure for the item's quantity. Quantity per Assembly Part usage quantity. -
Make the required changes, and click Apply. Click Cancel to cancel any changes and return to the previous page.
Note: When changing an existing requirement defined in Route Management, the selection is limited to the alternates for the Item.
Editing Resource Requirements
- A visit or workorder with associated requirements must exist in the database.
To edit resource requirements and view summaries and details
-
Find the workorder or operation you want to edit. See Finding Workorders.
-
Navigate to the Resource Requirements page.
-
Make any necessary changes to the items displayed in the Resource Requirement list. To add requirements, click Add More Rows. Add a resource requirement.
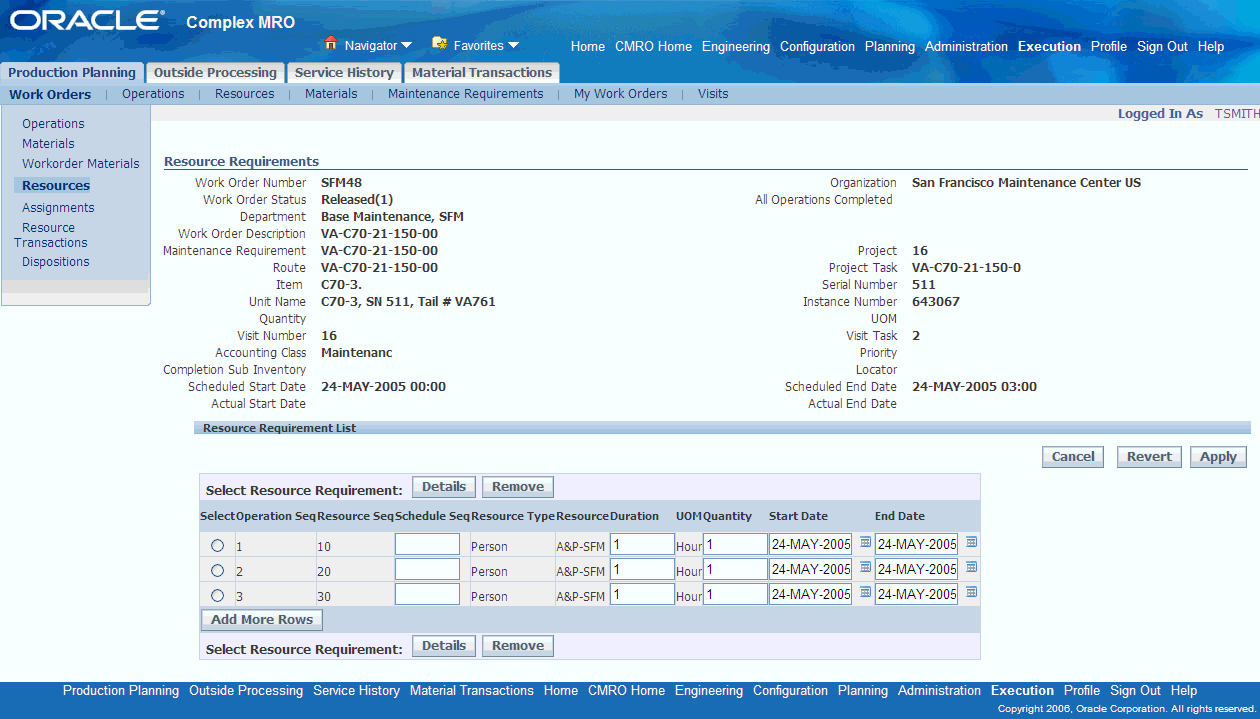
Use the information in the following table to modify resource requirements.
Field Name Description Operation Sequence The workorders operation sequence number. Resource Sequence The sequence number for the resource within an operation. Resource Type The type of resource requirement. Resource The resource name within the operations department. Duration The length of time required. UOM The unit of measure for the time required. Quantity The quantity of resources required. Start Date The start date for the resource. End Date The end date for the resource. -
Click Apply to save your changes; click Cancel to cancel changes and return to the Workorder Overview page.
Updating Resource Requirement Details
- A workorder with a status of Draft, Unreleased, Parts Hold, Hold, or Pending QA status must exist in the database. The WIP Mass Load Concurrent Program must be running. The operation must have a Uncomplete or Pending QA status.
To update the resource requirement details
-
From the Oracle Complex Maintenance, Repair, and Overhaul Home page, click Execution. Select the Production Planning tab. The Workorder Overview page appears.
-
Enter information in the fields for which you know the value then click Go. All workorders matching your search criteria appear in the Workorder List Results table.
-
Click the workorder number. The Workorder Operations page appears.
-
Select Resources from the left-hand navigation bar. The Update Resource Requirement page appears.
-
Select the requirement you want to update and click Details. The Resource Requirement Detail page appears.
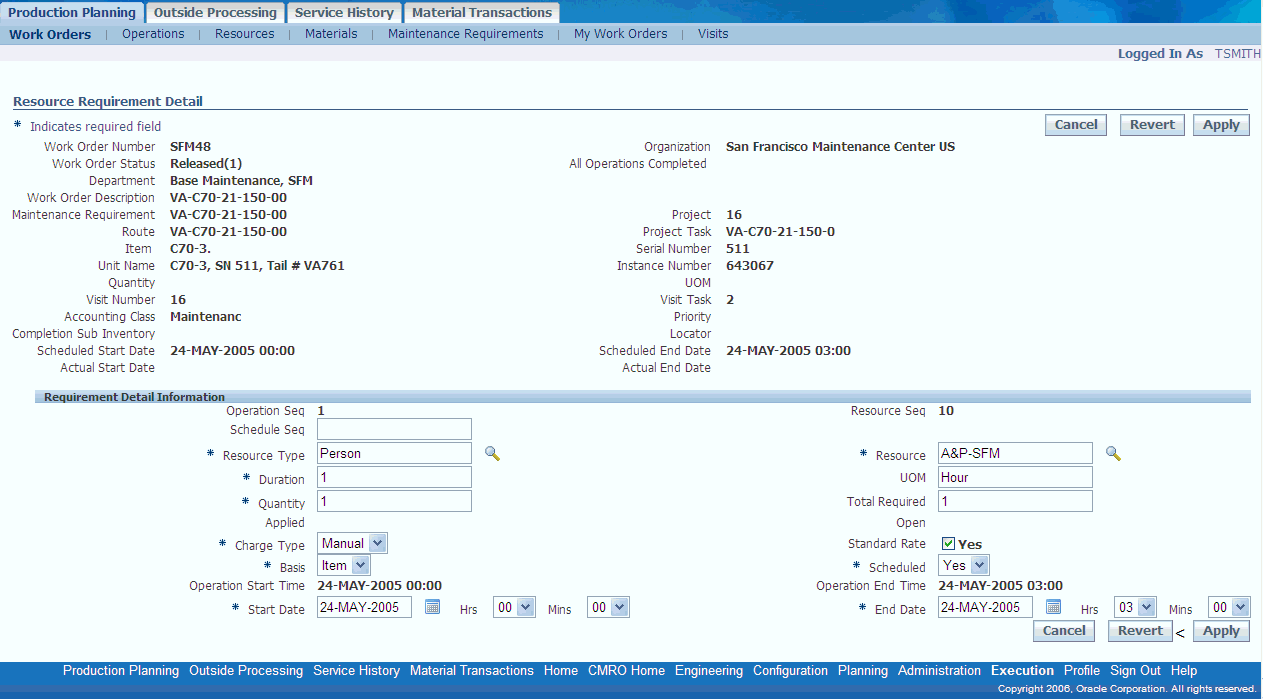
The following table provides information about the fields in the Resource Requirement Detail page.
Field Name Description Operation Sequence The workorder operation sequence number. Resource Sequence The sequence number for the resource within an operation. Resource Type The type of resource requirement. Resource The resource name within the operations department. Duration The length of time required. UOM The unit of measure for the time required. Quantity The quantity of resources required. Total Required The total amount of time required derived my multiplying the duration with the quantity. Applied The duration of the resource charged to date. Open The duration of the resource difference between the Total Required and the Applied amount. Charge Type The expected method of charging the resource. Standard Rate Determines if the resource is to be charged at the standardized rate. Basis Provides the basis for determining the resource requirement. Operation Start Time The date on which the operation is scheduled to start. Operation End Time The date on which the operation is scheduled to end. Start Date The start date for the resource. End Date The end date for the resource. -
Make the required changes, and click Apply. Click Cancel to cancel any changes and return to the previous page.
Note: When changing an existing requirement defined in Route Management, the selection is limited to the alternates for the Item.
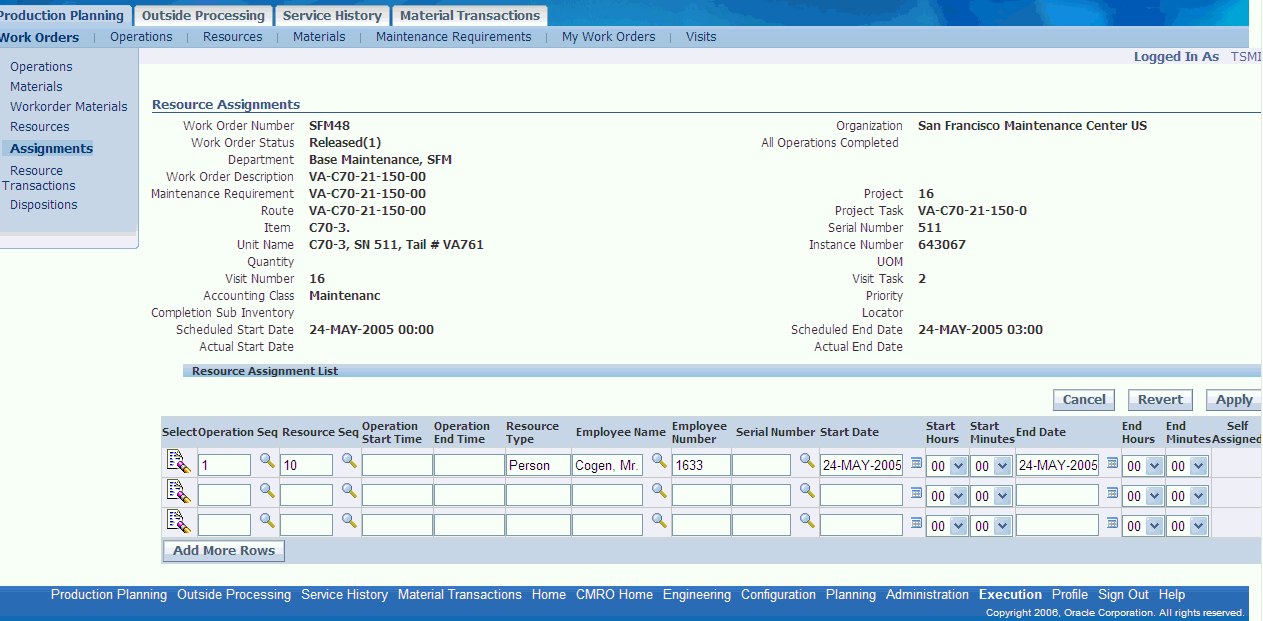
Viewing Resource Assignments
-
Find the workorder you want to view assignments for. See Finding Workorders.
-
Navigate to the Workorder Operations page. Select Assignments from the left-hand navigation panel. The Resource Assignments page appears.
The following table provides information about the fields in the Resource Assignments page.
Field Name Description Operation Sequence The workorder's operation sequence number. Resource Sequence The sequence number for the resource within an operation. Operation Status The status of the operation. Operation Start Time The date on which the operation is scheduled to start. Operation End Time The date on which the operation is scheduled to end. Resource Type The type of resource requirement. Employee Number The number assigned to identity the employee. Employee Name The full name of the employee. Serial Number The Serial Number used for non-person type resources. Start Date The start date for the assignment. End Date The end date for the assignment. -
Make any necessary changes to the items displayed in the Resource Assignment list. To add assignments, click Add More Rows.
-
Click Apply to save your changes; click Cancel to cancel changes and return to the Workorder Overview page.
Editing Resource Assignments
-
Find the workorder with the assignments that you want to edit. See Finding Workorders.
-
Navigate to the Resource Assignments page. Make any necessary changes to the items displayed in the Resource Assignment list. To add assignments, click Add More Rows.
-
Click Apply to save your changes; click Cancel to cancel changes and return to the Workorder Overview page.
Charging Resources
-
From the Oracle Complex Maintenance, Repair, and Overhaul Home page, click Execution. Select the Production Planning tab. The Workorder Overview page appears.
-
Enter information in the fields for which you know the value then click Go. All workorders matching your search criteria appear in the Workorder List Results table.
-
Click the workorder number. The Workorder Operations page appears.
-
Select Resources Transactions from the left-hand navigation bar. The Perform Resource Transactions page appears.
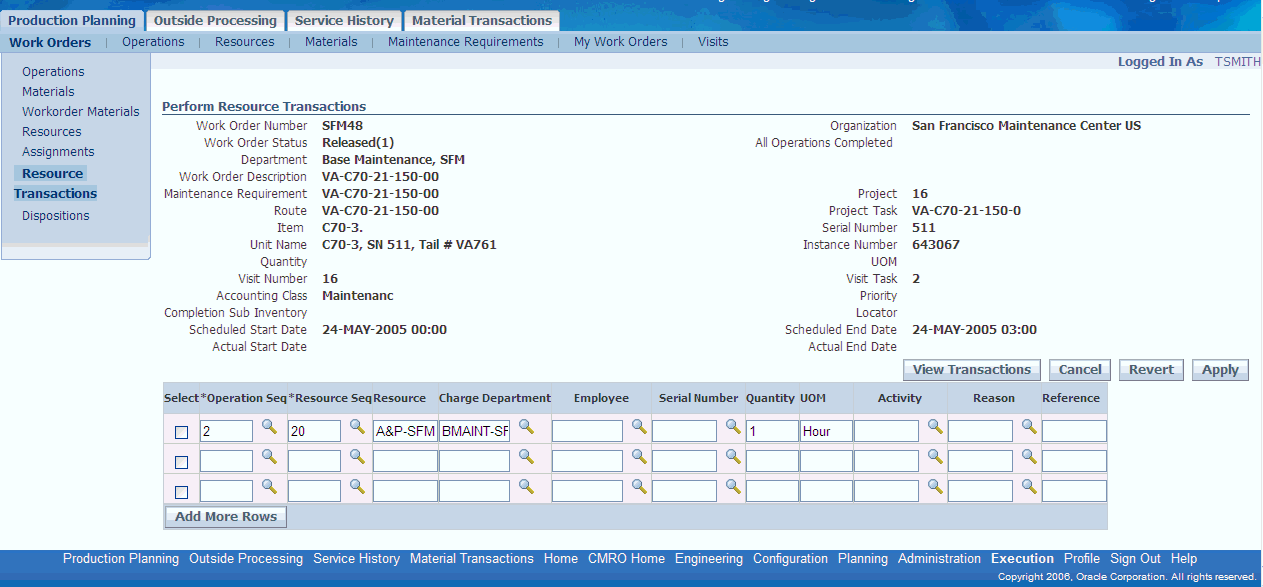
The following table provides information about fields in the Perform Resource Transactions page.
Field Name Description Operation Sequence The workorder's operation sequence number. Resource Sequence The sequence number for the resource within an operation. Resource The resource name within the operations department. Department The department within the organization to be charged. Employee The employee number to be charged. Serial Number The serial number, if serial controlled, of the tracked item for which the service request will be created. Quantity The quantity of resources to be charged. UOM The unit of measure for the quantity to be charged. Reason The reason for charging the resource. Reference User defined reference information. -
You can then perform the following:
-
Make any necessary changes and click Apply to save your changes.
-
Click Add More Rows to add charged resources.
-
Click Revert to clear any changes.
-
-
Click Cancel to cancel any changes.
Note: You have the option to disable the Resource Transactions side menu bar in the Resource Requirements page by running a specific function. This minimizes the chances of incorrect labor and usage costing.
Working with Material Transactions
Using the Production Planning module, users can issue and return materials to Inventory with a single work order in context, identify the employee that items are issued to or returned by, and view the material transaction history. This allows a user to perform material transactions across workorders rather than having to drill into each and every work order.
See:
Viewing and Issuing Materials Across WorkOrders
Users can view material requirements, identify the materials previously issued against these requirements and determine which items need to be issued for each job, based on the defined requirements.
To view material requirements and issue materials across workorders
-
Under the Execution link, click the Material Transactions tab. The Material Issue page appears under the Issues secondary tab. Enter search criteria and click Go. Material requirements across workorders matching your search criteria are displayed in the Workorder Requirements table.
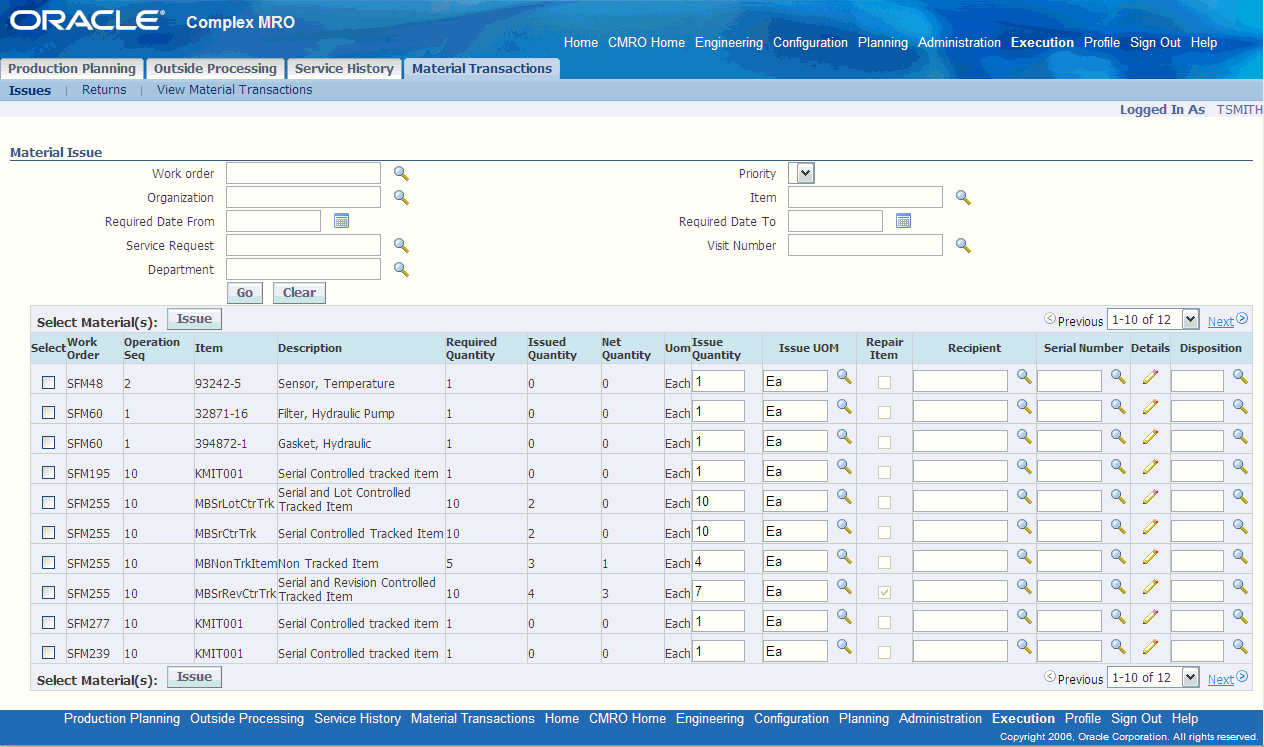
-
The Item and the Required Quantity are displayed against each workorder. The Issued Quantity defaults from the material requirements and the Net Quantity is calculated as the difference between total quantity issued and total quantity returned. You can change the quantity as required. Select the UOM and the Recipient (the employee who will receive the item) from the corresponding list of values. If the issued quantity is 1, select the serial number of the item from the Serial Number list of values. Optionally, you can associate disposition to the material issued by selecting it from the Disposition list of values.
-
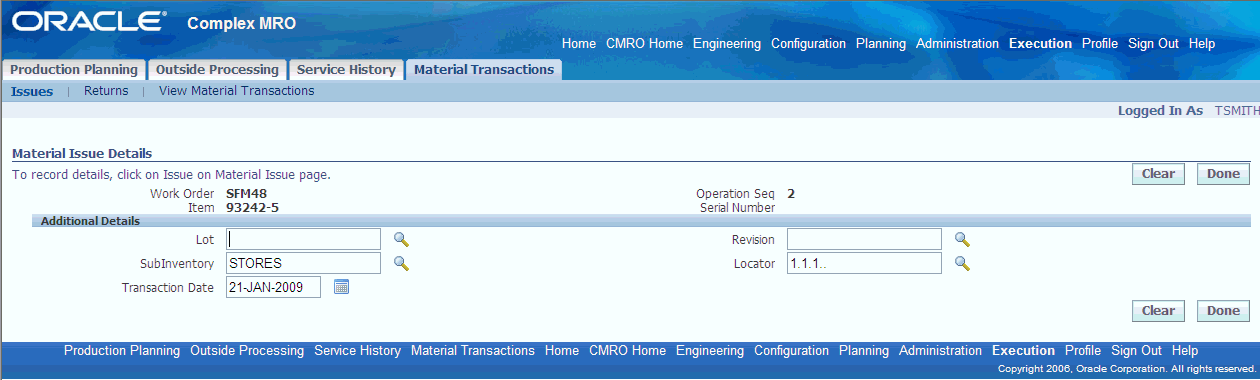
Optionally, click the Details icon to navigate to the Material Issue Details page and enter lot, revision, locator, and subinventory information if the item is controlled in inventory. Click Done to apply this information and return to the Material Issue page.
-
Select the workorder or workorders for which you have entered issue details and click Issue. The required items are issued to the workorder.
Returning Materials Across Workorders
Users can query for items that have already been returned or that need to be returned and also search for items that were issued, but not completely used to complete the applicable job. Multiple items can be returned at the same time without the user having to navigate to a single job or associated visit in context. Users can also manually identify the issued items that will replace the non-tracked parts which will be returned.
To return materials across workorders
-
Under the Material Transactions tab, click the Returns secondary tab. The Material Returns page appears.
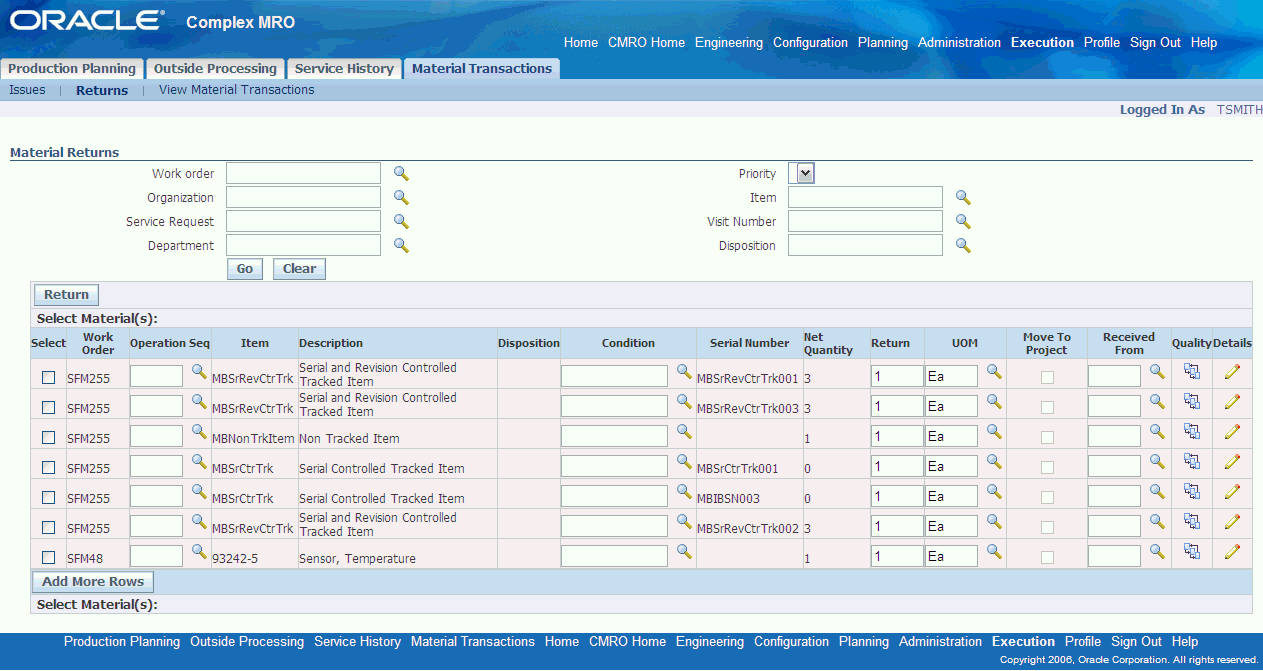
-
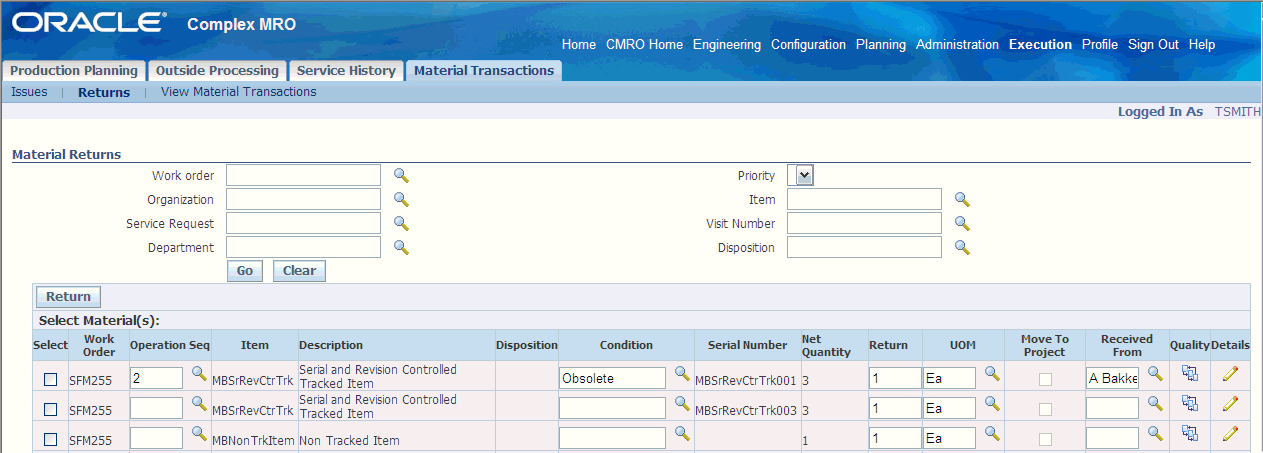
Enter your search criteria and click Go. The workorders matching your search criteria are listed in the Workorder Return Results table. The following two types of material are available for return:
-
Material that was issued to the job. If the material has associated Dispositions, then each Disposition is shown as a separate return line. For non-serialized items, net quantity available to return will be defaulted to (Total of all Issues – Total of all Returns) for the given Material. The returned material should not be more than disposition quantity if disposition is associated.
-
Material that was not issued to the job but has a Disposition associated to it. (For tracked items removed from the Unit Configuration, a Disposition will be created automatically, if it does not already exist).
-
-
The Item and the Net Quantity are displayed against each workorder. Enter the quantity to be returned. The quantity to be returned must be 1 if the item number is serial number controlled and should not be more or greater than the Net quantity. When a disposition is associated to the return, the quantity to be returned should not be more than the net disposition quantity.
Select the UOM and the employee from which it is received from the UOM and Received From list of values respectively. Optionally, choose the condition in which item is returned. The condition defaults when a disposition is associated.
-
To enter additional information, click the Details icon. The Material Return Details page appears. Serial, lot, and locator information must be provided if the item is controlled in inventory.
The Locator and SubInventory fields are populated with values defaulting from WIP_PARAMETERS. The Transaction Date should not be more than the system date. The Reason and Problem Code will not be displayed if a disposition is associated with the item. Click Done to apply changes and return to the Material Returns page.
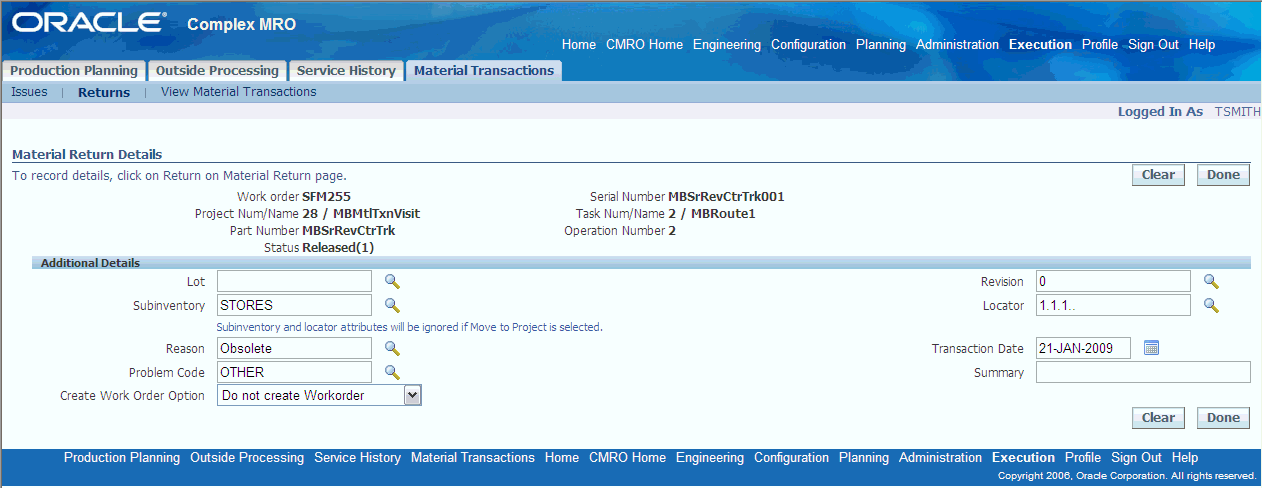
-
You must enter quality results if the condition is MRB and when no disposition is associated with the material return. To enter quality results, click the Quality icon.
-
After entering the required details, select the workorder and Click Return to return materials. A service request is created for all unserviceable tracked parts being returned.
Identifying the Employee that Items are Issued To or Returned By
A high level of accountability is maintained whenever a material transaction is performed. Material transaction details like item, or multiple items, serial numbers (if applicable), quantity, employee, operations and the date of the transaction are stored. Organizations track each issue and return made against workorders. Users can identify the employees to whom the material is issued and also the employees who return the items. The profile: AHL_MTL_ISSUE_RETURN_EMPLOYEE must be set to Yes. Users can query for employee names using the Recipient and Received From list of values in the Material Issue and Material Return pages respectively.
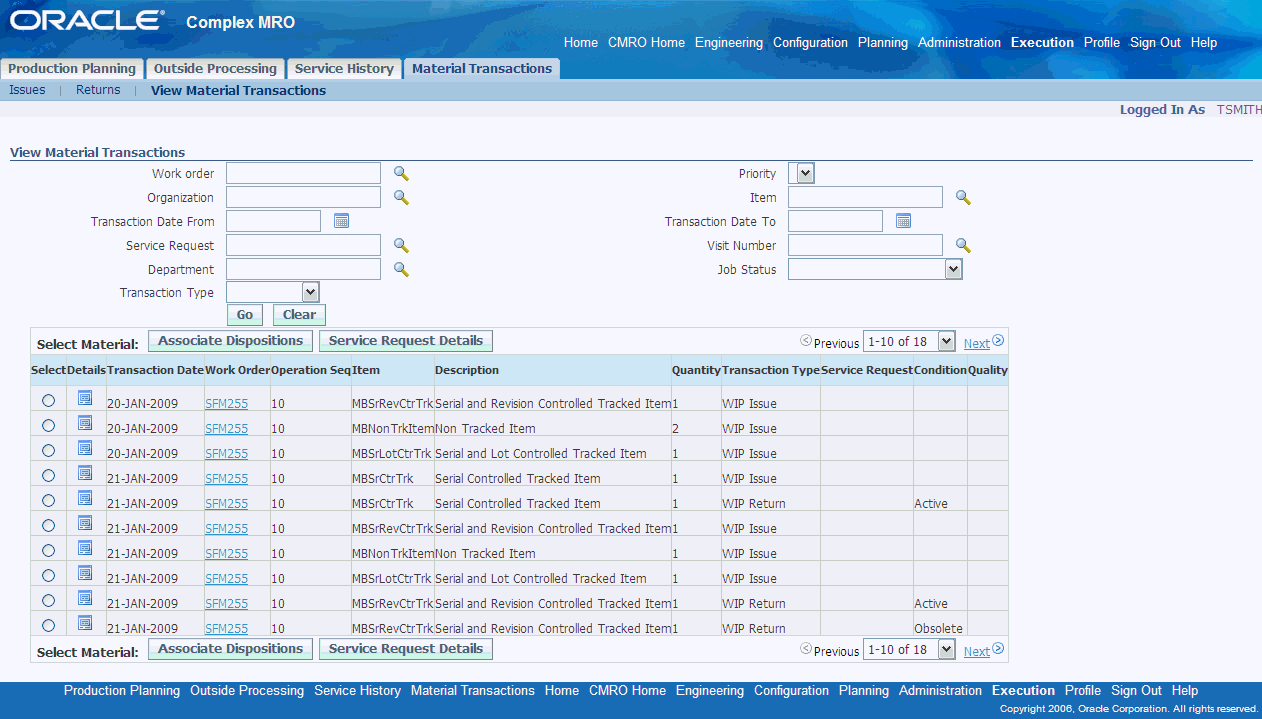
Viewing the Material Transaction History
The View Material Transactions page displays a summary of the all material requirements and their associated transactions.
Prerequisites
- Valid workorders must exist, and materials associated with and transacted against them.
To view the material transaction history
-
Under the Material Transaction tab, click the View Material Transactions secondary tab. The View Material Transactions page appears. Enter your search criteria and click Go. The results display both issue and return transactions history.
-
You can perform the following actions:
-
View the details of the transaction by clicking the Details icon
-
Associate the transaction to existing dispositions
-
View the Service Request details
-
Click the Workorder number link to navigate to the Workorder Operations page and view details associated with the workorder
-
Item Disposition
Disposition lists are defined in Route Management as a subset of a composition list or master configuration to compliment material requirements and to setup planning percentages. Disposition Lists can also act as a superset if additional materials are defined for the item or configuration. When a workorder is created based on a route, the disposition list associated with the route is carried over into production where the maintenance user can specify the disposition details as well as add items from the composition list, which have not been previously defined in engineering. Maintenance or inspection personnel use the disposition details to transact the material (serviceable/non-serviceable) and initiate overhaul, repair or scrap requirements accordingly. Maintenance or inspection personnel can create and view the discrepancies/non-conformances recorded, create a material requirement based on the disposition item, initiate the removal and installation of tracked parts, and initiate the capturing of the MRB quality disposition information.
Note: For an unserviceable part, if you first create a non-routine and subsequently remove the part, the process of part removal results in the part getting transferred to the non-routine work order.
Prerequisites
- Items must have been set up in inventory. A composition list must exist for the item. A disposition list must have been created for the item- route or the master configuration- route combination. There must be a workorder for which to disposition the item or position against.
To disposition items in production
-
From the Workorder Overview page, select a workorder and navigate to the Workorder Operations page. Click Dispositions in the side navigation menu. The Workorder Dispositions page appears displaying the disposition list associated with the workorder. The Disposition List includes all the default dispositions which are automatically generated when the workorder is created (based on the route_id associated with this workorder), dispositions created by the user and the dispositions created or updated by the corresponding part changes.
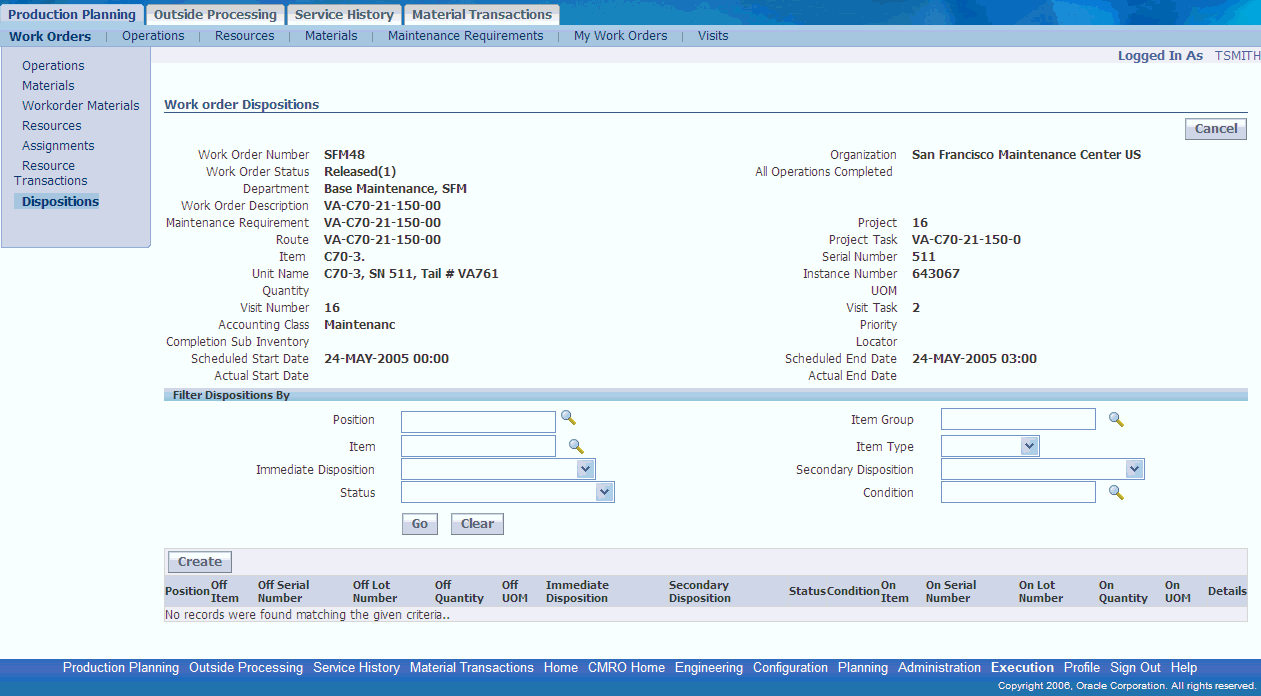

You can do the following:
-
Create a new entry by clicking the Create button
-
Edit or view an existing record by clicking the Details icon
-
View position information by clicking the Position link
The on /off log displays the removal and installation information as they are accomplished, and the disposition status reflects the progression of the disposition. You can query for specific dispositions by entering your search criteria in the Filter Dispositions By region.
-
-
Click the Details icon corresponding to the item that you want to disposition. The Disposition Details page appears. You can disposition both tracked as well as non-tracked items.
You can select the item and instance information if the process of combining the disposition list definition with the instance information did not result in an instance being found for some of the defined positions or alternate part groups. If you select an item group, the item list of values will comprise only items allowed for the configuration position and item group.
-
Select the immediate disposition. The immediate disposition and secondary disposition types drive the transaction requirements. The disposition options and actions are different for a tracked and non-tracked item.
Tracked Item Disposition
The following table describes the immediate disposition types and the action that the user needs to perform consequently for a tracked item.
Disposition Type User Action BFS (Bad From Stock) Enter Non-Conformance and Secondary Disposition Not Applicable No Action Required Non-Conformance Enter Non-Conformance and Secondary Disposition Not Received No Action Required Not Removed No Action Required RTC (Return to Customer) Remove Instance RTV (Return to Vendor) Remove Instance Scrap Enter Non-Conformance, Removal Details, and MRB QA results Use As Is Remove Instance from Install Base keeping the item in serviceable condition When the immediate disposition and condition is selected, the secondary disposition is enabled if applicable. The following table describes the secondary disposition types and user actions for a tracked item.
Disposition Type User Action Hold Further Secondary Action Required Rework – Removal Not Required No Further Action Required Rework – Removal Required Remove Item Instance RTC (Return to Customer) Remove Item Instance RTV (Return to Vendor) Remove Item Instance Scrap Remove Item Instance and Enter MRB QA -
If the disposition is for a position, click the position link to navigate to the View Position Path page to view the position path across all sub configurations.
-
A service request is created when you enter the primary non-conformance information. Click Create to create additional non-conformances. The Non Conformance Log lists all the service requests associated to this disposition either directly or indirectly (through Parts Change or Material transaction). The Primary column indicates if the Non Conformance is a primary (Auto generated) one or not. You can enter the Problem code, summary and severity fields (Primary Non Conformance section) only when the Immediate type is Non Conformance or BFS and the condition is Unserviceable or MRB.
Click the Incident number link in the Non Conformance Log section to navigate to the View/Edit SR page to view or edit the service request details.
-
Click Material Requirement to create a material requirement for the disposition item and quantity.
-
Click Submit QA Results to navigate to the quality collection user interface to enter the MRB quality results. You can enter quality results only when the item condition is set to MRB when defining the item in Inventory.
-
Click Terminate to close the disposition.
-
Click Apply to save the changes made or click Cancel to discard the changes.
Non-Tracked Item Disposition
The following table describes the immediate disposition types and the user action for a non-tracked item.
Disposition Type User Action Non-Conformance Secondary Disposition Required Not Received No Action Required Not Removed No Action Required RTC (Return to Customer) Material Transaction Required RTV (Return to Vendor) Material Transaction Required Scrap Material Transaction Required Use As Is No Action Required When the immediate disposition and condition is selected the secondary disposition is enabled if applicable. The secondary disposition types and actions are as follows:
Disposition Type User Action Hold Further Secondary Action Required RTC (Return to Customer) Material Transaction Required RTV (Return to Vendor) Material Transaction Required Scrap Material Transaction Required 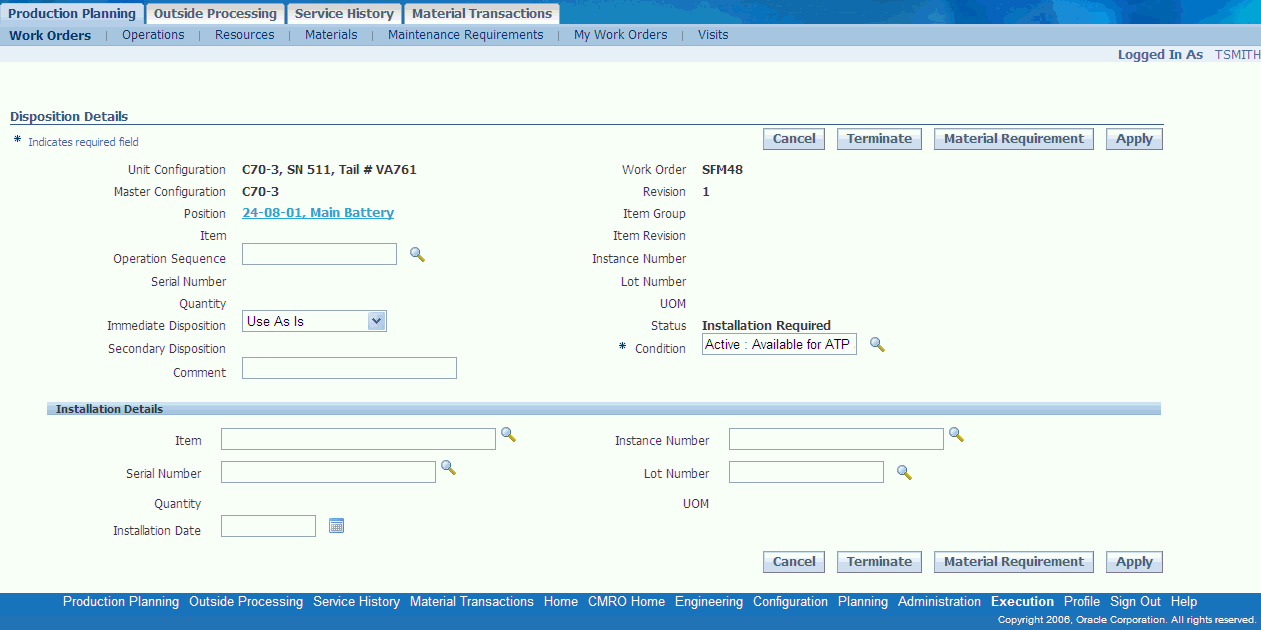
-
Click the Terminate button to close the disposition.
-
Click the Material Requirement button to create a material requirement for the disposition item and quantity.
-
Click Apply to save the changes made and click Cancel to discard the values entered.
-
-
To create a new disposition record, click Create in the Workorder Dispositions page. The Create Disposition page appears. Select an item to disposition using the Position, Item Group or Instance search criteria. Enter the disposition details as required. Select the condition in which to disposition.
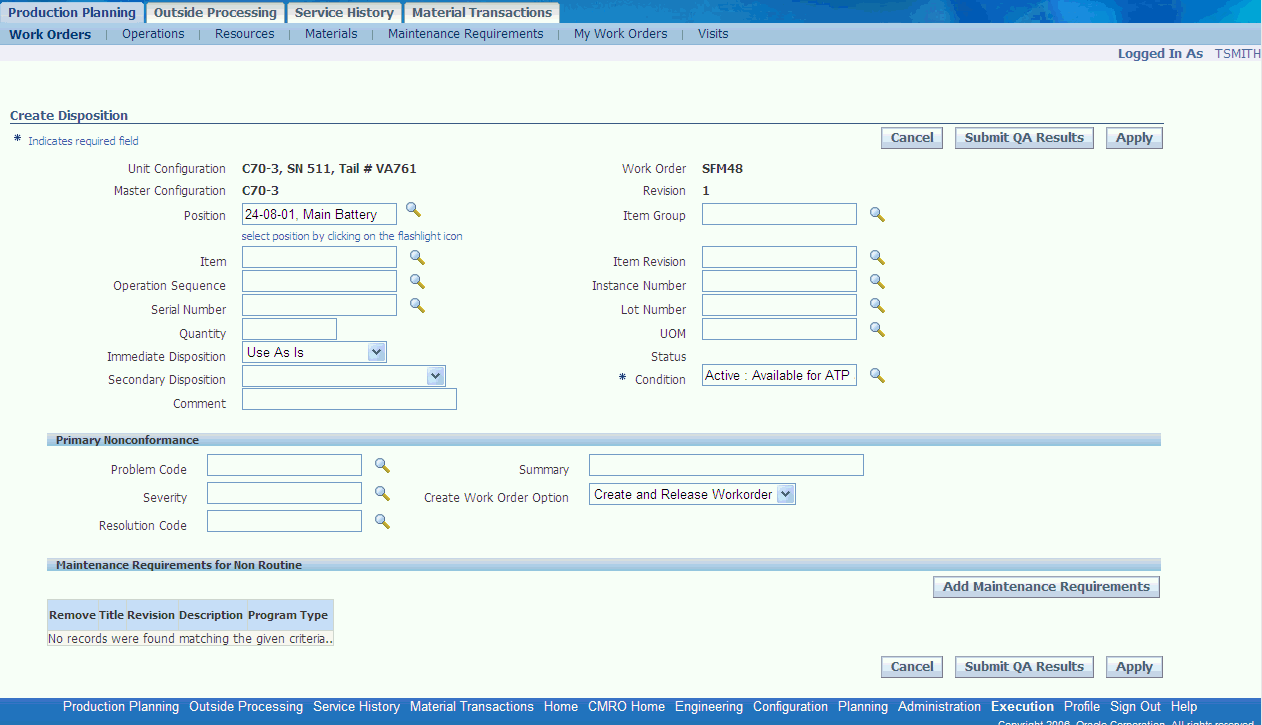
-
Click Apply. The page will refresh with the applicable disposition details listed in the lower half of the page. If the item being dispositioned is a tracked item, you need to perform the parts change as required. If the item being dispositioned is non-tracked, you can associate the appropriate material transactions with it.
Additionally, you can create material requirements to support the disposition, submit quality results if submitting for MRB review, or create additional service requests if needed.
Disposition Items from the Parts change user interface:
-
You can enter disposition details when performing an item or a unit configuration parts change. Navigate to the Workorder Operations page and select Perform Part Removal/Install. The Unit Configuration Part Changes page appears displaying the configuration tree. Select the position against which you want to perform the disposition. The page refreshes displaying the position details. The input parameters for disposition appear in the lower half of the page.
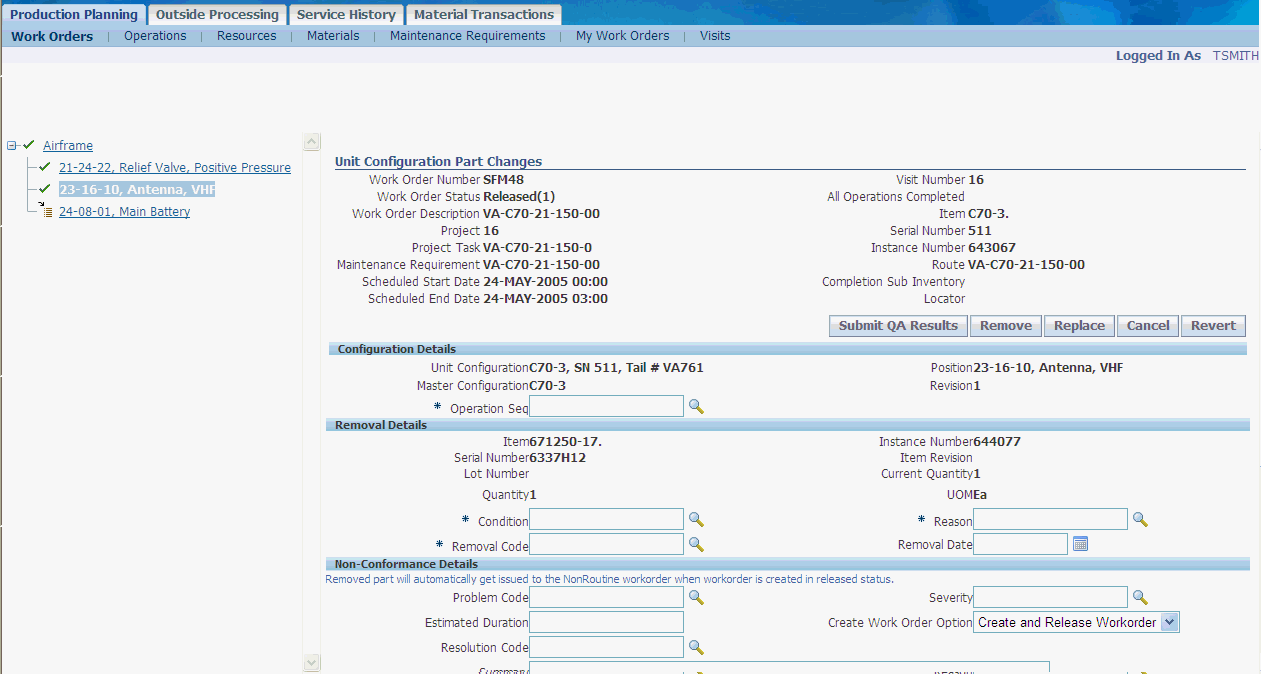
-
Enter the required information.
Disposition Association during Material Transaction
When issuing materials to a workorder from the Material Issue page, you can associate the existing dispositions for that workorder and issue parts directly to disposition. Click the Disposition search icon in the Workorder Requirements table to navigate to the Select Disposition page and select the appropriate disposition.
When returning materials issued to a workorder, the dispositions associated with the workorder if any appear in the Workorder Return Results table. This allows for the disposition to be directly associated with a material transaction.
You can associate a disposition to a material transaction for a non-tracked item after the transaction has occurred. Query for the material transaction in the View material Transaction page. Select the transaction and clicking Associate Dispositions to navigate to the Update Associated Dispositions page to select the disposition(s) to associate. Select from the available dispositions to associate with the material transaction.
Updating Dispositions
-
Navigate to the Workorder Dispositions page.
-
Select the disposition to update. Optionally, query for specific dispositions using the search criteria in the Filter Dispositions By region.
-
Click the Position link to view the position details. Click the Details icon to navigate to the Disposition details page. Modify information as required.
Viewing Item/Part Service History
Maintenance planners can access the history of service performed against a unit/part during the planning phase of a service or the execution of a work order. The history of the performed service, enables the planner to plan and execute decisions about the currently planned service, as well as provides support for the maintenance engineer during workorder execution. The planner or maintenance engineer is able to view a detailed service history on a workorder part such as maintenance requirements, jobs and operations that have been performed on the part and all the visits it has been part of. The service history includes both in-house service as well as supplier-performed service.
To view the service history of an item/serial number, you must enter the item and serial number or the instance number. You can either search for workorders for the entered part/serial number or search for maintenance requirements associated to the part/serial number. You can restrict the search by providing additional filters like workorder scheduled Start/End date range, workorder Actual Start/End dates, mechanic, organization, department, machine, visit, program type, and so on.
To view work order history
-
Under the Execution link, click the Service History tab. The Search Workorders page appears. Enter your search criteria and click Go.
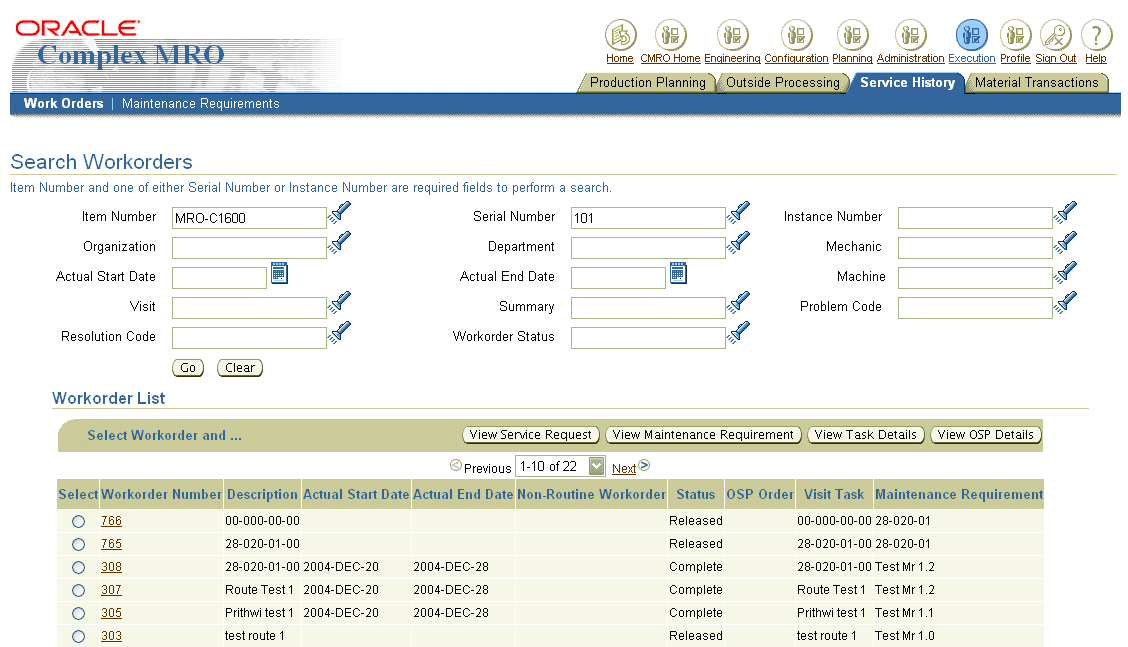
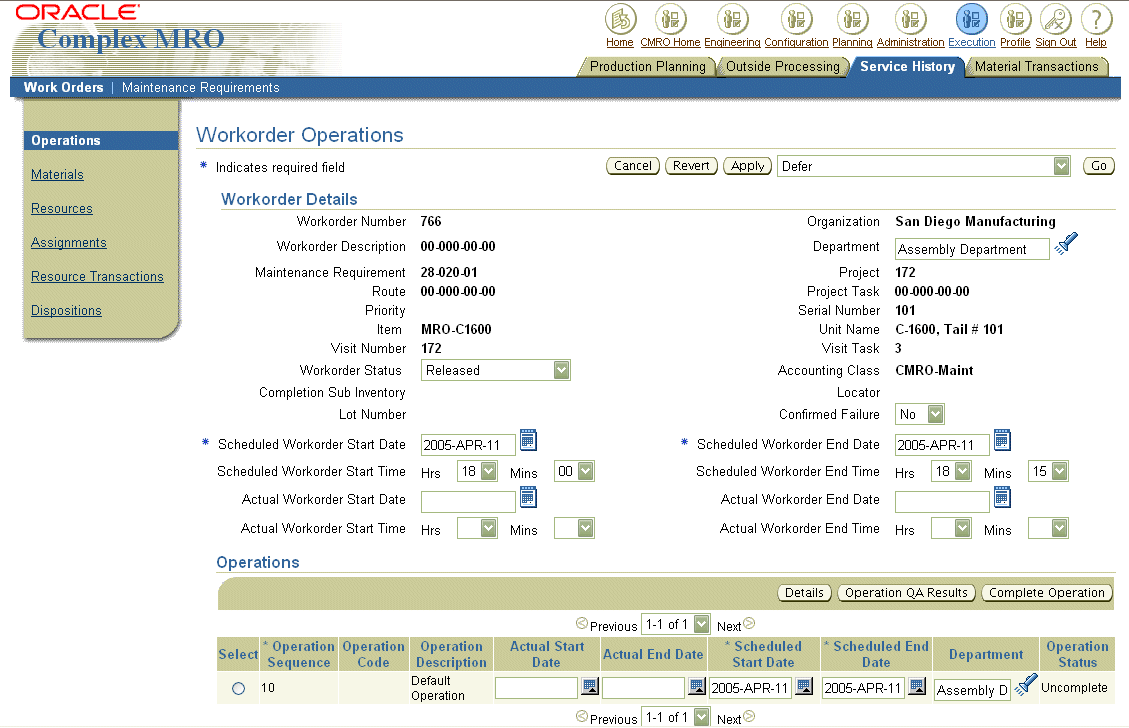
-
Click the Workorder Number link to navigate to the Workorder Operations page and view the work order details, the materials, resources, assignments, resource transactions, and dispositions associated to the work order.
-
You can do the following:
-
Select a work order with an associated OSP order number and click View OSP Details to view the order details.
-
View the visit task details
-
View maintenance requirements associated with the visit
-
View service requests associated with the visit
-
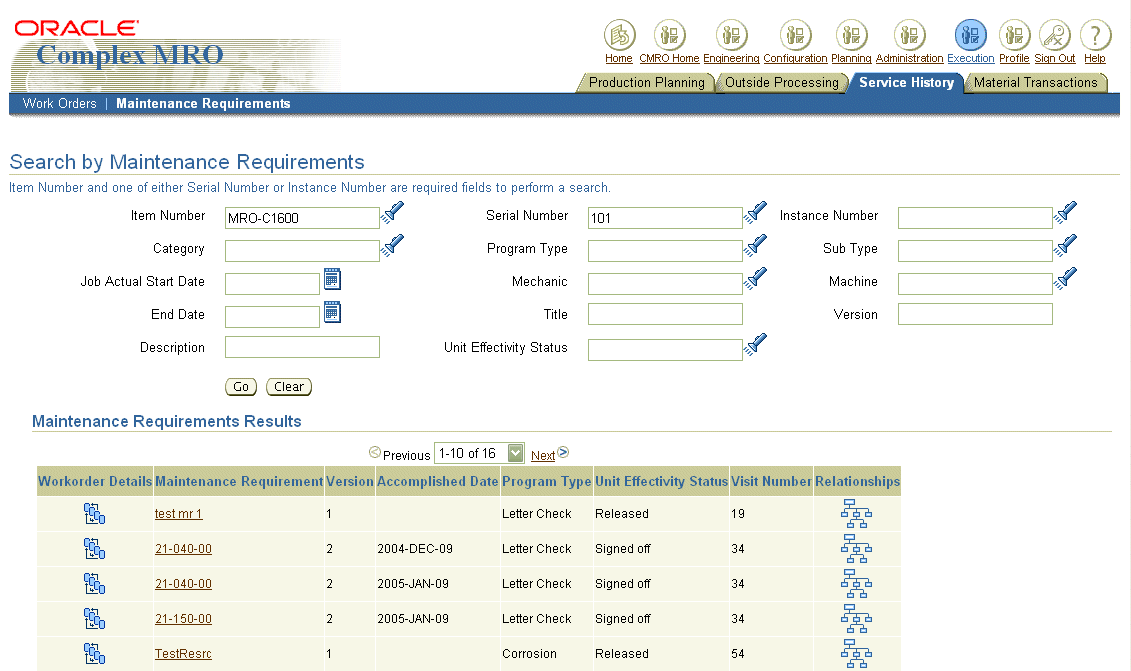
To view maintenance requirements history
-
Click the Maintenance Requirements subtab under Service History. The Search by Maintenance Requirements page appears. Enter your search criteria and click Go. The date range filter must be applied against the MR’s effective from and effective to date. Maintenance requirements meeting your search criteria are listed in the maintenance requirements results table.
-
Click the Maintenance Requirement link to view the details of the selected maintenance requirement.
-
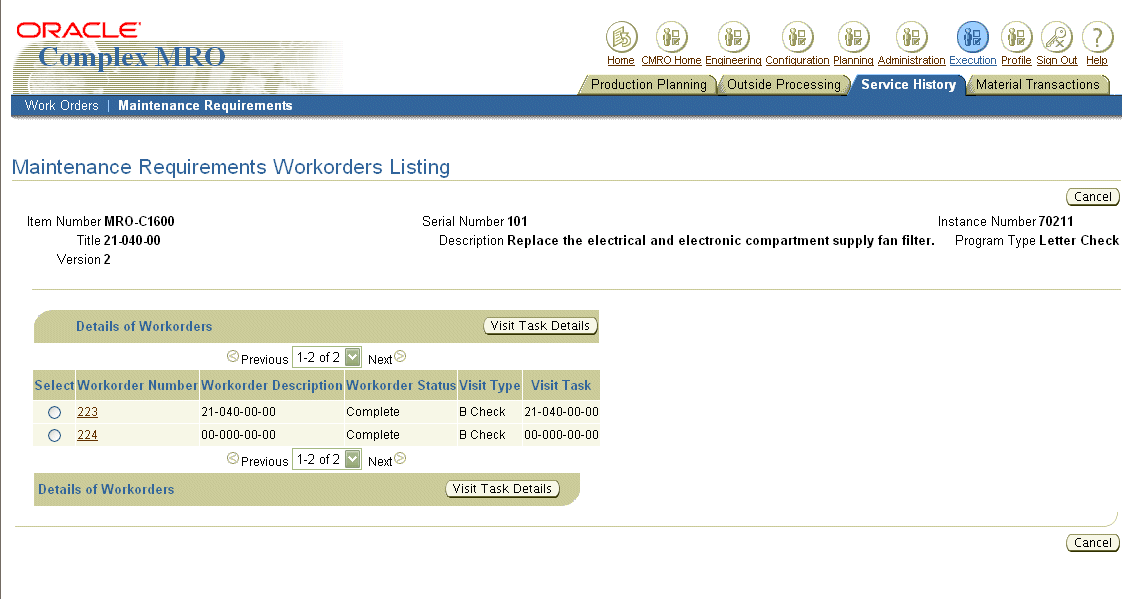
To view work orders associated with the maintenance requirement, click the Workorder Details icon. The Maintenance Requirements Workorders Listing page appears displaying the details of the associated work orders. Click the Workorder Number link to navigate to the Workorder Operations page and view all the materials, resources, assignments, resource transactions, and dispositions associated with the work order.
-
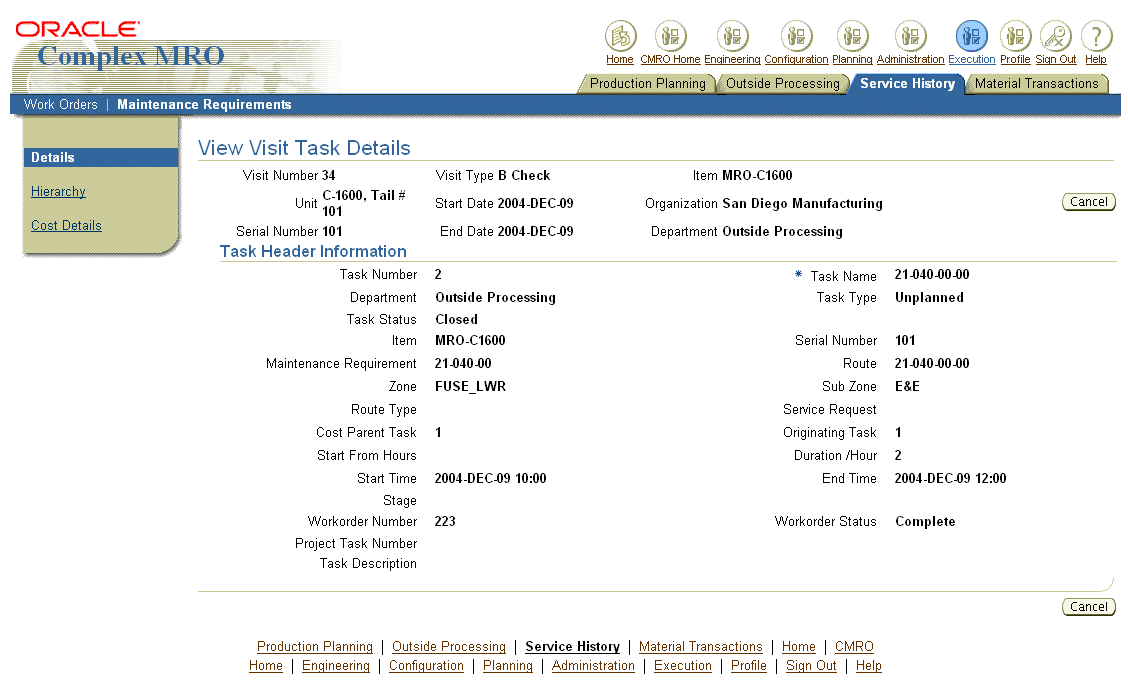
Click the Visit Task Details button to view the visit details, hierarchy, and cost information pertaining to the visit associated with the work order.
-
To view relationships for a Group MR, click the Relationships icon in the Maintenance Requirements Results table. The Maintenance Requirement Relationships Listing page appears displaying all the child MRs.
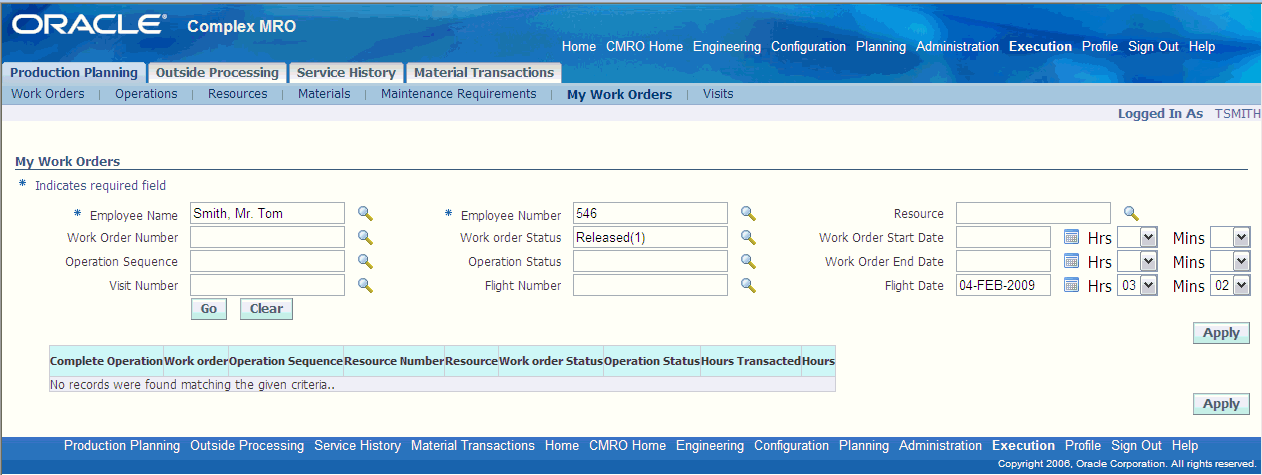
My Workorders Interface
The My Work orders user interface displays all the work orders for the user logged in the system. Employees can record labor time and sign off for the work orders and operations assigned to them, from one central location. Thus users can sign off and transact simple work orders especially those associated with standard line maintenance visit. Additionally, users can also perform other work order execution functionality like parts change, non-routine creation, quality recording, and so on if required.
Note: You can now create a non-routine from an existing non-routine work order by selecting the appropriate non-routine work order from the My Work Orders page. You can perform this by adding the function, Allow creation of a Non-Routine originating from a Non-Routine. The corresponding function is AHL_ALLOW_CREATE_NR_FROM_NR to the menu associated to a responsibility.