Recalls
This chapter covers the following topics:
- Overview
- Recall Process Flow
- Creating a Recall Event
- Using the Details Tab
- Using the Items Tab
- Using the Corrective Actions Tab
- Using the Metrics Tab
- Finding a Recall
Overview
A recall is an action taken to address a problem with an item that makes it likely to fail, cause injury, or violate safety laws. A recall is not always an intimation to a customer to discontinue using the product or return it to the company. It means that the item or device needs to be checked, adjusted, recharged or fixed. Recalls are also called field change orders (FCOs), field actions, technical bulletins, and safety alerts.
A recall is of two types depending on where the recall action takes place:
-
Correction: A correction addresses a problem with an item in the place where it is used or sold. This is managed by providing information to end customers to fix the problem, sending replacement part to swap out the defective part, or sending a field service agent to resolve the issue.
-
Removal: A removal addresses a problem with an item by removing it from where it is used or sold. Removals include items in warehouse inventories; spare pools or parts inbound in transit. A company may ship a replacement product to the customer or the customer may return the product to a depot for repair. Removals also include items replaced in the place of purchase.
When a company recalls an item, it contacts the impacted parties, supplies information on how to correct the problem, and ensures a plan to prevent the recurrence of the same. Sometimes unsold finished goods are recalled from internal warehouses and refurbished items are recalled from the exchange pool. In such cases, notification and corrective action are directed to the appropriate internal parties. In the cases where the manufacturer issuing the recall is not aware of the end consumers, he only notifies the distributors and instructs them on the various corrective actions to take.
Recall Process Flow
There are different types of user types involved in a typical recall business flow.
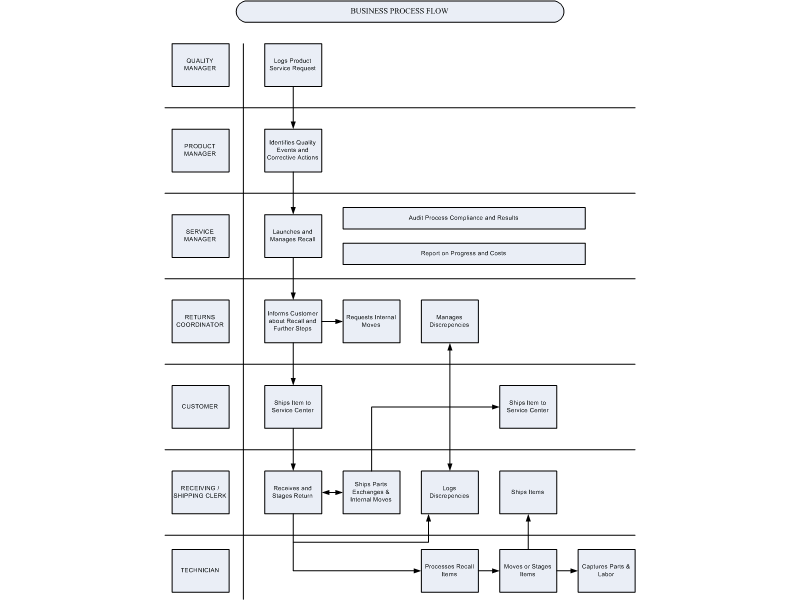
Quality Manager: Responsible for monitoring customer complaints and the return stream to determine the potential quality event. The Quality Manager can log a product service request in Agile to indicate to the product management and engineering teams that a quality event has occurred.
Product Manager: Works with the Quality Manager to determine if a product service request indicates a legitimate quality event that requires corrective action. If action is required, the Product Manager works with the Engineering and Service teams to determine the best corrective action for the problem.
Service Manager: Responsible for launching and managing the recall effort. The Service Manager provides reports on recall progress and cost, and is responsible for ensuring that service fulfillment is performed.
Returns Coordinator: Works through the queue of recall orders to notify customers of the recall and next steps. He is also responsible for requesting the movement of materials from one location within the enterprise to the appropriate processing location. Additionally, he is responsible for moving materials to another internal or external location after completion of service processing.
End Customer: Receives notification of recall via phone, E-mail or letter. He is responsible for shipping the correct item or part to the appropriate location based on the information provided. He should be able to view details and status for their recalled product online.
Receiving Clerk / Shipping Clerk: Receiving Clerks receive returned materials at the receiving dock. They enter returned material information into the system; log discrepancies between expected and actual returns, and stage material for the next step in processing. Shipping Clerks pack and ship materials to their next destinations, both within an organization or external to it.
Service Technician (internal or third party): Responsible for processing recalled items. This involves performing repair, upgrade, hazardous material removal, part swap, and retirement processing or recycling. He is responsible for tracking the actions they perform, the parts that they use and the hours they spend on each job.
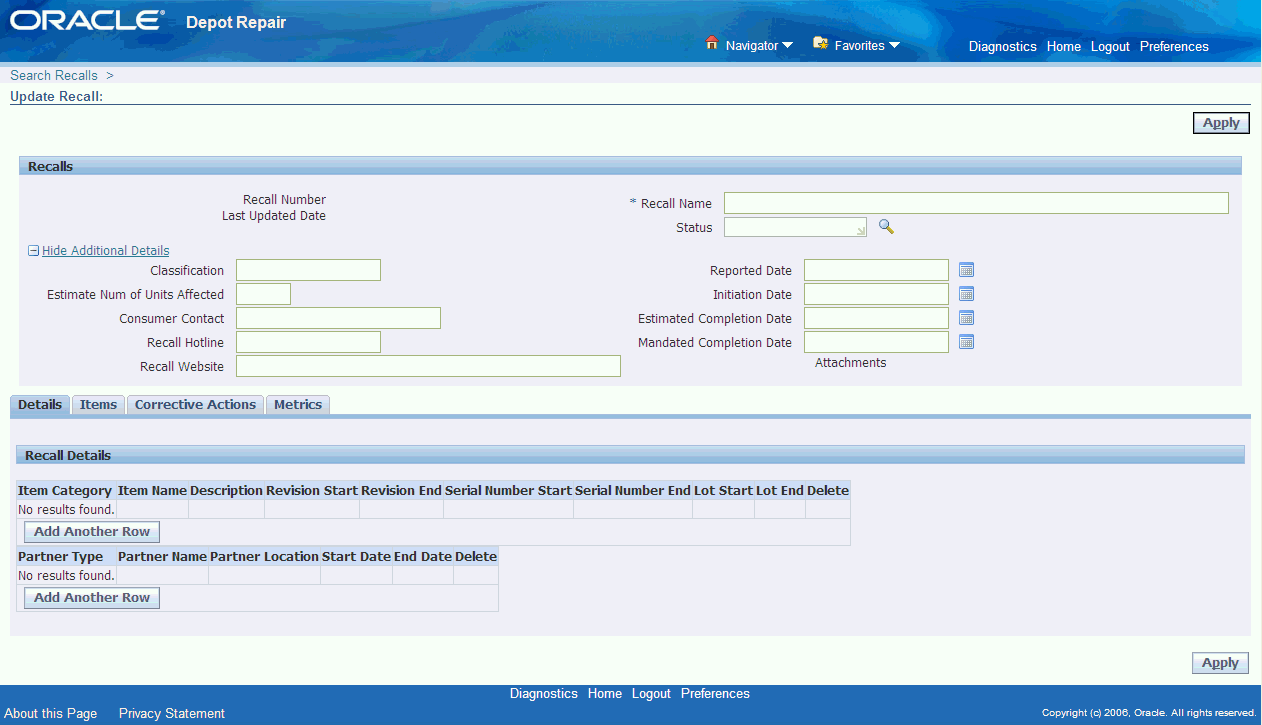
Creating a Recall Event
A recall event must be unique. It is described by attributes that makes it clear as to what event or problem triggered the recall, when it was initiated, who initiated it, and the actions needed to resolve it. The recall record is linked to all the related service requests, repair orders, logistics operations, and service operations required to resolve the recall. These linked connections are required to accurately track the scope, progress and cost of a recall.
To create a recall event
-
Navigate to the Search Recalls page and click the New Recall button. The Create Recall page opens. This page enables you to create a new recall or view and update the attributes of an existing recall record.
-
Enter the following details in the fields provided. Fields marked as * are mandatory fields.
-
Recall Number: System generated unique identifier for the recall. It is not updateable.
-
Recall Name: Unique name of the recall.
-
Status: The status of the recall.
-
-
Expand Hide Additional Details to enter the following details:
-
Classification: Codes indicating categorization.
-
Estimated Number of Units Affected: Estimation of units being affected by the recall.
-
Consumer Contact: Employee or contractor who customers contact with recall queries.
-
Recall Hotline: Number that customers call to get details about the recall.
-
Recall Website: Web site for consumers to find out information about the recall.
-
Reported Date: Date on which recall is made public.
-
Initiation Date: Date on which recall activity starts.
-
Estimated Completion Date: Date on which recall is anticipated to terminate.
-
Mandated Completion Date: Date on which a regulatory body mandates recall completion.
-
Attachments: Represents standard Oracle Applications attachments. You can link attachments to a particular recall.
-
-
Click Apply to save the new recall. The Update Recalls page opens.
The main body of the Create Recall/Update Recalls page contains four tabs - Details, Items, Corrective Actions, and Metrics. For more details about these tabs, select one of the following:
Using the Details Tab
The Recall Details region of the Details tab enables you to update the attributes of a recall.
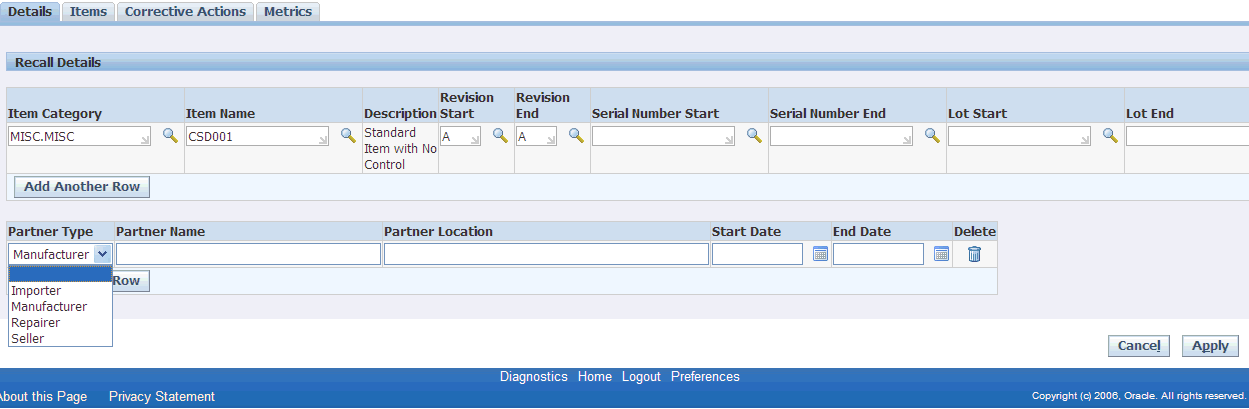
The various attributes that can be updated are:
-
Item Category: Includes product category, family, or line. You can include multiple categories in a recall.
-
Item Names: Name of the item. You can include multiple names in a recall.
-
Description: Description of the selected item.
-
Revision Start and End: The iterative value assigned to an item with multiple design configurations.
-
Serial Number Start and End: The serial numbers stamped on item instances that uniquely identify them. Recalls sometimes apply to specific ranges of serial numbers, or to serial numbers with specific prefixes or suffixes.
-
Lot Start and End: Lot numbers tie together groups of items that came from the same production run, shipment, configuration or other arbitrary association. A recall may include multiple lot numbers.
-
Partner Type: You can filter by specific partners namely:
-
Importer: Party or parties that imported the finished good into the country of sale.
-
Manufacturer: Party or parties that manufactured a finished good that is under recall.
-
Repairer: Party or parties that repaired a finished good that is under recall.
-
Seller: Vendor party or parties that sold an item to the end customer.
-
-
Partner Name: Name of the specific partner
-
Partner Location: Location of the specific partner
-
Start Date: The start date of the recall
-
End Date: The end date of the recall
After entering all the required attributes, click the Apply button to save the changes to the Recall.
Using the Items Tab
The Items tab contains a list of all known item instances impacted by the recall. You can link each item instance to a service request, repair order and an associated WIP job during recall execution.
You can click on the Service Request number or Repair Number to drill to the service request and repair order windows.
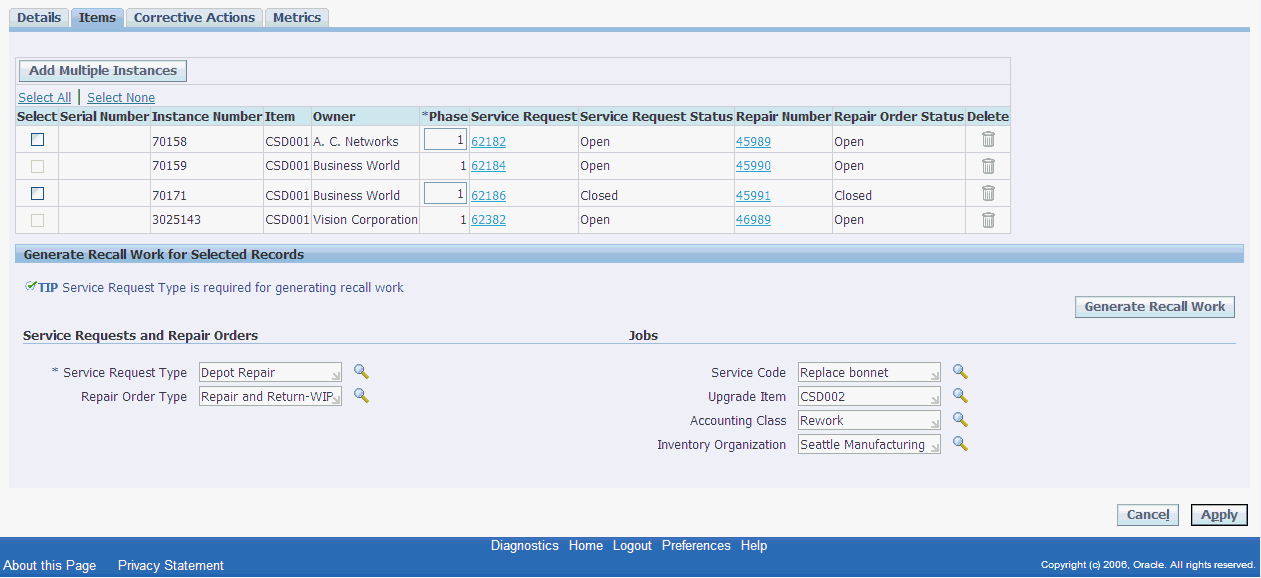
To use the items tab
-
Click the Add Multiple Instances button to navigate to the Search Item Instances page. The Search Item Instance page allows you to perform advanced searches against the Install Base.
-
Specify any one of the mentioned search parameters to query for the required item instance. To add more search parameters, select a parameter from the Add Another list and click the Add button.
-
Select the Go button to display the Install Base instances matching your search criteria.
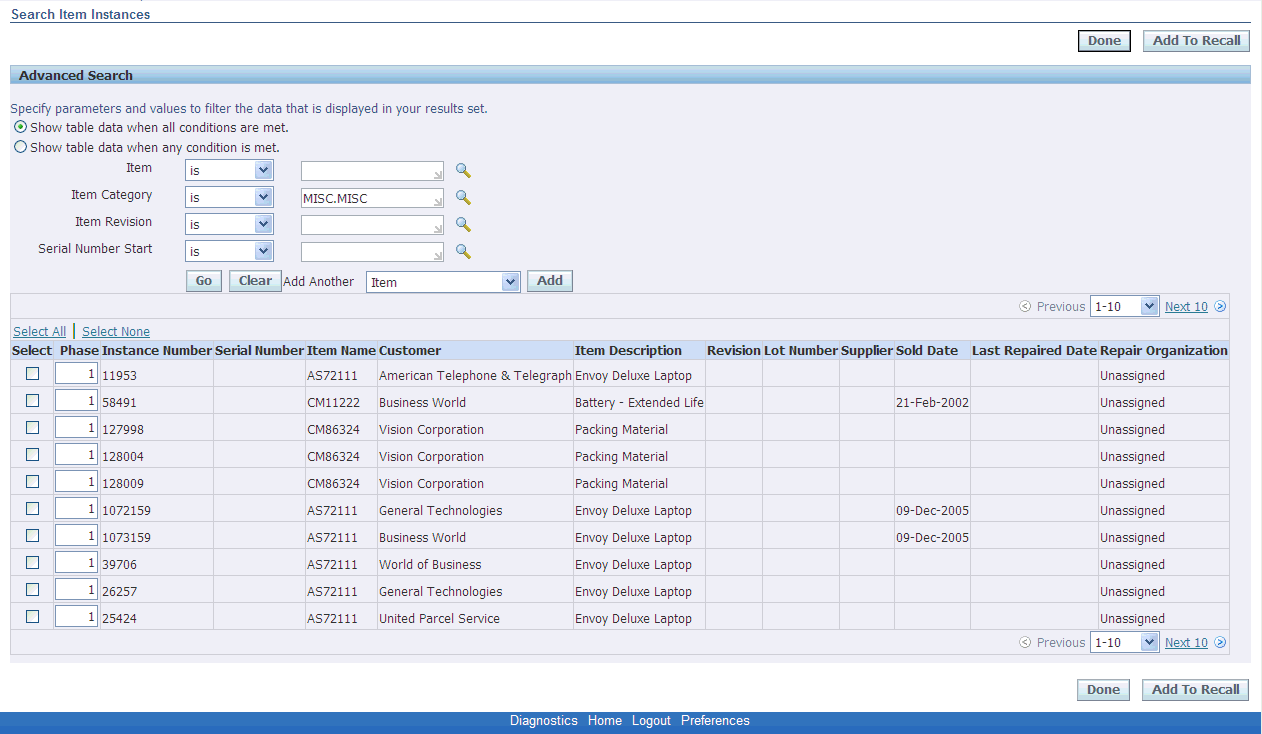
-
Select the item instance you want to add or click the Select All option to add all the item instances.
-
Click the Add to Recall button. A confirmation message appears confirming the addition of item instances.
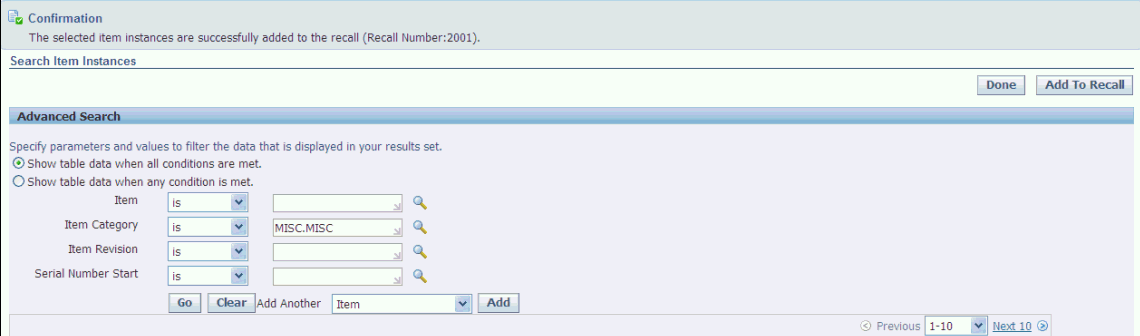
-
Click the Done button. The Update Recall page appears with the selected item instance(s).
-
Select one or more instance numbers and click the Generate Recall Work button to generate service requests, repair orders and/or repair jobs for them. The quantity on the repair order is directly derived from the quantity specified in Install Base for the instance.
-
If you enter only the Service Request Type and click Generate, it creates a service request for each selected item instance, or if there are multiple non-serialized quantities create a single service request for the entire non-serialized quantity.
-
If you select both Service Request Type and Repair Order Type and click Generate, it creates a service request and repair order for each item instance, again consolidating multiple non-serialized quantities.
-
If you enter a Service Request Type, a Repair Order Type and a Service Code and click Generate, it creates a service request, repair type and repair job for each checked item instance, again consolidating multiple non-serialized quantities.
-
If no service request exists for an item, you cannot generate repair orders and jobs. Similarly, if no repair order exists, you cannot generate a job for an instance. However, if a service request was previously created for an instance, then you can generate a repair order and job for it at a later time.
-
If an upgrade item is specified, and a job is created for the selected instance, the job is created for the upgrade item and not for the item specified by the instance. This job has at least one material requirement line with item as the item of the selected instance.
-
-
The system generates a service request, repair order, and work order for the specific item instance.
-
You can navigate to the Repair Order page of the Technician Portal by clicking on the Repair Number link generated on the Items tab. The Repair Execution tab displays the operations, materials and resources specified by the Service Code that displayed on the Items tab before you clicked Generate Recall Work.
Using the Corrective Actions Tab
When a company recalls an item, it contacts the impacted parties, supplies information on how to correct the problem, and puts a plan in place to prevent the problem from happening again. Sometimes unsold finished goods are recalled from internal warehouses and refurbished items are recalled from the exchange pool. In such a case, notification and corrective action are directed to the appropriate internal parties. In some cases, the manufacturer issuing the recall may not know the end consumers, and notifies their distributors and instructs them on the corrective actions to take.
The Corrective Actions tab stores information regarding the reason for the recall, risk, discovery and resolution plan.
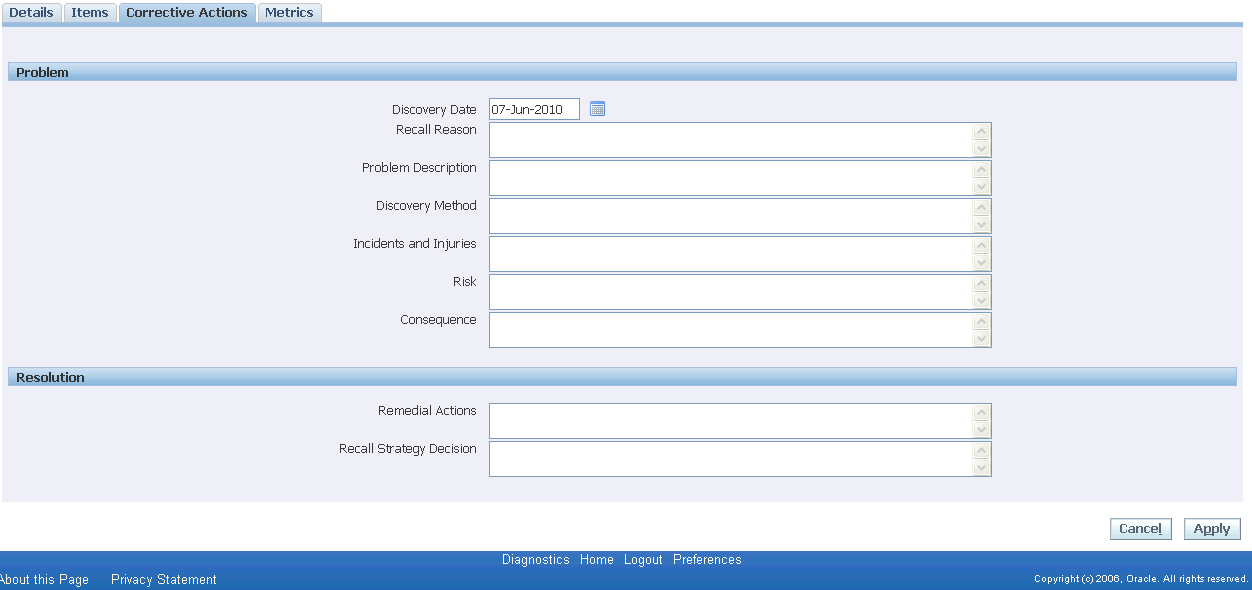
Problem Region
The Problem region enables you to enter the problem details. Enter the following information in the fields provided:
-
Discovery Date: The date on which the company realized that a recall is needed.
-
Recall Reason: Descriptive text describing why a particular recall was made.
-
Problem Description: Description of the problem that resulted in a need for recall.
-
Discovery Method: Description of how the problem was identified.
-
Incidents and Injuries: Description of notable cases of occurrence, especially those involving injuries.
-
Risk: Describes the possible risks introduced if the recall is not made.
-
Consequence: Description of the potential impact to customer health, customer satisfaction, company reputation and company finances.
Resolution Region
Resolution region enables you to enter the details of the remedial actions taken. Enter the following information in the fields provided:
-
Remedial Actions: Description of specific actions that need to be taken to resolve the problem under recall.
-
Recall Strategy Description: Description of the plan of action for the recall. This is required for reporting to regulatory agencies. This includes a description of the different phases of the recall.
After entering the problem and resolution details, click the Apply button to save the changes to the Recall.
Using the Metrics Tab
The Metrics tab provides information regarding how many item instances are impacted, how many customers are impacted, how many items still require processing, and how many customers are still impacted.
Additionally, the Metrics tab tracks the accumulated cost of the recall so far and the estimated remaining cost of the recall.
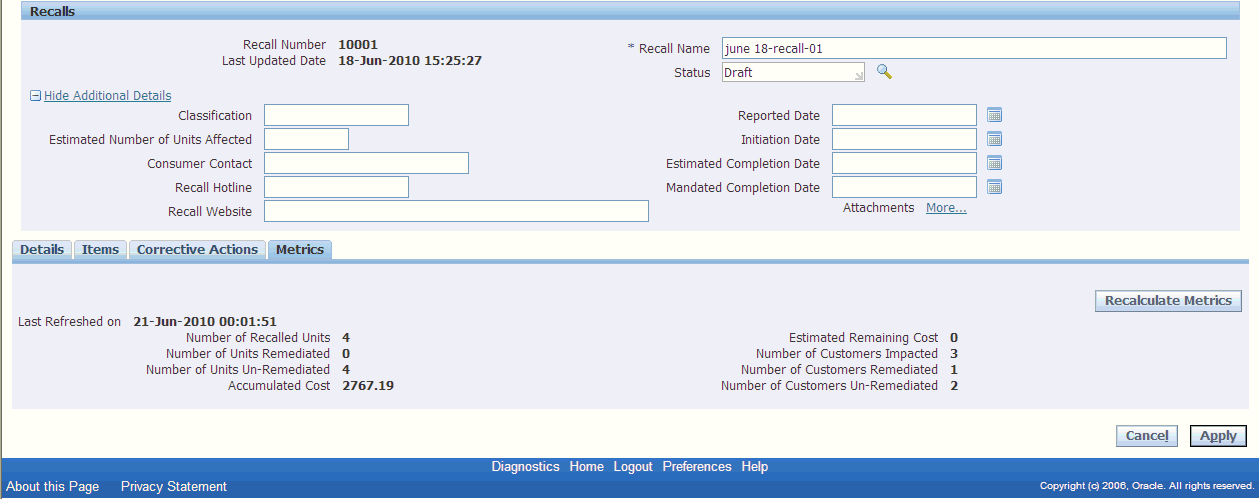
The various fields in the Metrics tab display the following information:
-
Number of Recalled Units: Derived from the number of item instances linked to a recall. If item instances have multiple quantities, the total quantity is aggregated.
-
Number of Units Remediated: Derived from the quantity of Install Base (IB) instances linked to the recall with closed service requests. If an IB instance with multiple quantities is linked to a service request, and the service request is still open, the system considers the entire quantity un-remediated. If the service request is closed, the system considers the entire quantity remediated.
-
Number of Units Un-remediated: Derived from the number of item instances linked to a recall for which no closed service request exists. In cases where item instances linked to the recall have no service request, these instances are included as un-remediated.
-
Accumulated Cost: The calculation for accumulated cost factors in the cost of issued material and transacted labor time for jobs linked to the recall.
-
Estimated Remaining Cost: Derived as, (Accumulated cost till date / Number of units used for calculation of accumulated cost) * Number of item instance quantities that are eligible but not yet costed
Number of item instances that are eligible but not yet costed, represent all the instances that do not have a positive cost yet, minus the closed service requests (SR). Since a closed SR is a remediated unit, you must not consider it for the calculation of estimated cost remaining.
A recall has 4 instances linked to it and the quantity for all the instances in Install Base (IB) is 1.
Instance 1 has SR, RO and WIP job created and some part and labor costs are recorded against it. Assume the cost is $100.00
Instance 2 has SR, RO and WIP job created but no part of labor costs recorded against it.
Instance 3 has SR and RO created but no WIP job created against it yet.
Instance 4 has only SR created and the SR is closed.
The Estimated Remaining Cost: in this case is (100/1)*2.
-
Number of Customers Impacted: Derived from the unique number of customers linked to the recall. This is determined from the install base instances linked to the recall.
-
Number of Customers Remediated: Derived from the unique number of customers linked to the recall for which all service requests are closed.
-
Number of Customers Un-remediated: Derived from the unique number of customers linked to the recall whose service requests are not all closed.
-
Click the Recalculate Metrics button to refresh the Recall Metrics.
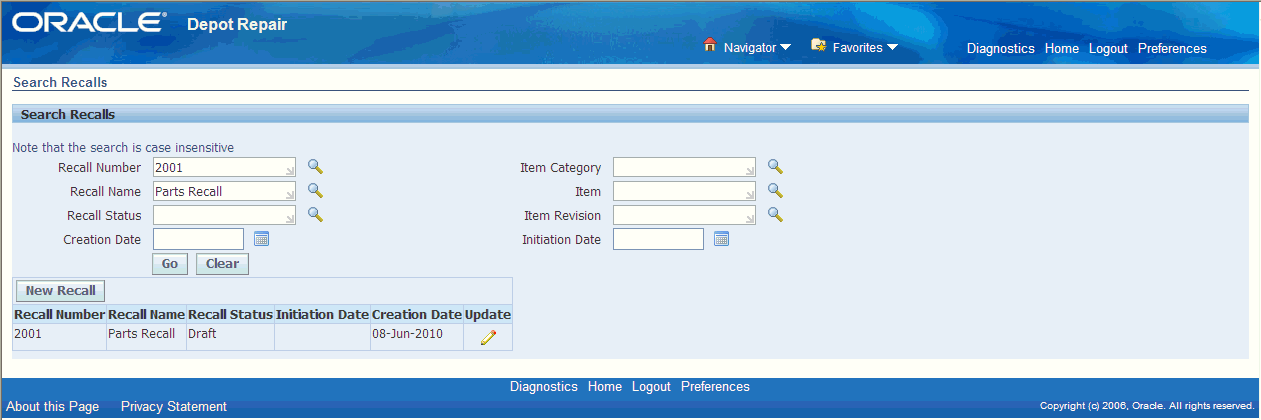
Finding a Recall
On the Search Recalls page, you can retrieve Recall records from the database. A search in Oracle Depot Repair enables you to retrieve Recalls based on parameters related to a Recall. You can use a combination of these parameters to restrict your search so as to retrieve only the Recall that you want.
To find a recall
-
Navigate to the Search Recalls page.
-
Enter any one of the following search parameters:
-
Recall Number
-
Recall Name
-
Recall Status
-
Creation Date
-
Item Category
-
Item
-
Item Revision
-
Initiation Date
-
-
Click the Go button. The results area displays the recall record matching your search criteria.