Charts, Views, and Custom Reports
This chapter explains how to chart, view, and report quality results data.
This chapter covers the following topics:
- Quality Results Analysis
- Copy Settings Function
- Copying Settings
- Functional Grouping and Processing
- Quality Results Folders
- Pareto Charts
- Histograms
- Trend Charts
- Control Charts
- Cp and Cpk Indexes
- Viewing Descriptive Statistics
- Viewing Quality Results
- Viewing Quality Results Details
- Entering, Updating, or Viewing Related Child Quality Results
- Viewing Quality Results by Lot Number
- Viewing Quality Results by Serial Number
- Using the Quality Results ReportWriter
- Viewing and Deleting Action Log Entries
- Exporting Quality Results
Quality Results Analysis
You can view quality results data in a variety of ways. You can select specific data for analysis based on any combination of collection element criteria.
You can chart quality results using Pareto Charts, Trend Charts, Control Charts, and Histograms. You can use the View Descriptive Statistics window to calculate basic statistics (sum, mean, variance, standard deviation, total number of occurrences, number of null occurrences, maximum, minimum, and range) on them. You can also use the Quality Results ReportWriter to create custom reports. The quality results that you view, chart, and include in reports can be exported for further analysis.
Tip: Ask your system administrator to run the Manage Collection Element Indexes Process, if you want to enable faster searches for reports and charts on user-defined collection element values.
Related Topics
Creating and Viewing Pareto Charts
Creating and Viewing Histograms
Creating and Viewing Trend Charts
Creating and Viewing Control Charts
Viewing Descriptive Statistics
Copy Settings Function
You can view the same subset of data in different ways using the Copy Settings function. Copy Settings copies the saved settings from a source chart, descriptive statistic view, or custom report to a destination chart, descriptive statistic view, or custom report. The "settings" that are copied include the collection plan and the record selection criteria, and, depending on the source chosen, may also include the primary collection element, specification limits, or both.
You can change all of the settings that are copied - the primary collection element, selection criteria, control limits (where applicable), and the specification (where applicable) - except the collection plan.
Copying Settings from a Trend to a Pareto Chart
The following provides you with an example of how you can create settings for a source Trend Chart then apply these settings to a destination Pareto chart.
Creating the Source Chart
Using the Trend Charts window, create a trend chart called Jones Trend using the WIP Defects collection plan. The WIP Defects collection plan has several collection plan elements assigned to it among which are Defect Code, Inspector ID, and Entry Date.
Specify that the Defect Code collection element is to be the primary (Y-axis) Collection Element and Entry Date is to be the Group By (X-axis) collection element. To chart only those quality results that inspector Jones has entered since 01-JAN-1996 and that have a Defect Code of 40 or greater, enter the following record selection criteria in the Show Results Where region of the Trend Chart window:
Inspector ID equals 'Jones' and Defect Code at least '40'and Entry Date at least '01-JAN-1996'
View the trend chart by choosing the View Chart button, then save the settings for the Jones Trend chart by choosing the Save Settings button.
Creating the Destination Chart
To create a new Pareto chart using the saved settings from Jones Trend, navigate to the Pareto Charts window.
Do not enter a Chart Name. Instead, choose the Copy Settings button to invoke the Copy Settings From list of values. This list includes the names of all charts, reports, and descriptive statistic views for which settings have been saved.
Select the Source chart, Jones Trend, from the list and choose OK. The following settings are copied from the source chart to the new chart:
-
Collection plan: WIP Defects
-
Show Results Where record selection criteria: Inspector ID equals Jones and Defect Code at least '40' and Entry Date at least '01-JAN-1996'
-
Primary (X-axis) collection element: Defect Code
Important: In this example, the Defect Code collection element (primary X-axis collection element) is copied to the X-axis Element (primary collection element) of the new chart. The non-primary Y-axis collection element, Group By, is not copied.
Finish creating your chart by choosing a Y-axis Element and optionally entering the chart name, Jones Pareto, and chart title. View the Pareto chart by choosing the View Chart button. If you have entered a chart name you can save the settings for Jones Pareto by choosing the Save Settings button.
Copied Settings
The specific settings copied from a source report, chart, or descriptive statistic view to a destination report, chart, or descriptive statistic view depend on the source chosen and the destination specified. Not all the settings saved for a source may be applicable to the destination. Conversely, the settings of a source may not include some settings required by the destination.
For example, you can use Copy Settings to copy all the information associated with a source descriptive statistics view - its collection plan, primary collection element, selection criteria, control limits, and specification - to a destination descriptive statistic view. However, if you use Copy Settings to copy from a source descriptive statistics view to a destination Pareto chart, information that is not applicable to Pareto charts, in this case the specification and control limits, is lost. The following table illustrates the later case:
| Settings | Source: Descriptive Statistics View | Destination: Pareto Chart |
|---|---|---|
| Collection Plan | + | + |
| Primary Collection Element | + | + (X-axis element) |
| Control Limits | + | - |
| Specification | + | - |
| Selection Criteria | + | + |
Conversely, if you Copy Settings from a source Pareto chart to a destination descriptive statistics view, the control limits and specification are not copied because they do not exist for the source. In such a case, you would need to enter control limits and select a specification for the destination descriptive statistics view. The following table illustrates this case:
| Settings | Settings Copied From Source (Pareto Chart) | Setting Copied To Destination (Descriptive Statistic View) |
|---|---|---|
| Collection Plan | + | + |
| Primary Collection Element | + (X-axis element) |
+ n/a |
| Control Limits | None | Required |
| Specification | None | Required |
| Selection Criteria | + | + |
Also, as noted above, Copy Settings copies only the primary collection element, if one exists, from a source to a destination. Primary collection elements represent those collection elements that are being graphed or those collection element for which statistics are being collected. If you are copying from a source whose primary collection element is plotted along the X-axis to a destination whose primary collection element is plotted along the Y-axis, the source's X-axis collection element is mapped to the destination's Y-axis collection element. Non-primary axis collection elements are not copied.
The following table describes what source data is associated with the various charts, custom reports, and descriptive statistic views:
| Description | Collection Plan | Primary Collection Element | Control Limits | Specification | Selection Criteria |
|---|---|---|---|---|---|
| Histogram | + | + (Y-axis element) | - | + | + |
| Control Chart | + | + (X-axis element) | + | - | + |
| Pareto Chart | + | + (X-axis element) | - | + | + |
| Trend Chart | + | + (Y-axis element) | - | - | + |
| Custom Reports | + | - | - | - | + |
| Descriptive Statistic View | + | + | + | + | + |
Important: If you Copy Settings from a source report to a chart or descriptive statistics view, you must always enter primary collection elements and specification limits for the destination chart or descriptive statistic view. Reports do not have primary collection elements and specification limits associated with them.
Copying Settings
You can apply the saved settings from a source chart, descriptive statistic view, or custom report to a destination chart, descriptive statistic view, or custom report. See: Copy Settings.
Prerequisites
- Create and save a source chart, descriptive statistic view, or custom report. See: Creating and Viewing Control Charts, Creating and Viewing Histograms, Creating and Viewing Trend Charts, Viewing Descriptive Statistics, and Using the Quality Results ReportWriter.
To copy selection criteria
-
From the Pareto Charts, Trend Charts, Quality Results Report Writer, or Descriptive Statistics View window, choose the Copy Settings button. The Copy Settings From list of values appears.
-
From the Copy Settings From list, choose the copy from Source (chart, report, or descriptive statistics view).
Important: Also displayed in the Copy Settings From list of values are the names of the collection plans and the names of the primary collection elements associated with the available Source reports, charts, or descriptive statistic views.
-
Choose OK to copy all settings from the source to the destination chart, report or descriptive statistic view.
You can modify the copied settings as required. Previously entered settings on the destination chart, report or descriptive statistic view, if any, are overwritten.
Functional Grouping and Processing
Functions are used to group quality results when creating Pareto charts, trend charts, and custom Quality Results ReportWriter reports.
Functions and Groups
You can use functions to specify how to group and process quality results values associated with a collection plan element. The five available functions are as follows:
| Sum | Sums all quality result records. |
| Count | Counts the number of quality result records. |
| Average | Calculates an average of the quality result records. |
| Min | Evaluates and groups quality results to find those records with the minimum value. |
| Max | Evaluates and groups quality results to find those records with the maximum value |
Note: If you select a function when using the Quality Results ReportWriter, all the reported columns where a function has not been selected are grouped together. For example, assume you want to report Item, Department, and Test Voltage (Average). The report displays the average test voltage for each item and department.
Functions and Data Types
The data type - numeric, character, or date - of the chosen collection plan element determines what function or functions can be applied to quality results values for a collection element. You can, for example, select and sum quality results for a “numeric" Quantity Defective collection plan element. Similarly for a "non-numeric" (character or date) Defect Code collection plan element, you can choose the “count" function to produce a count of all the Defect Codes results that meet the specified selection criteria. Numeric quality results can also be totalled.
Data types and the functions that can be performed for values of each are as follows:
| Numeric data type | Numeric values can be Summed, Counted, and Averaged. They can also be grouped based on Minimum or Maximum quality result values. |
| Character data type | Character values can only be Counted. |
| Date data type | Date values can only be Counted. |
Data types are assigned as you define your collection elements. See: Defining Collection Elements.
Quality Results Folders
You can use folders to customize the field and record layouts that are used when:
Related Topics
Customizing the Presentation of Data, Oracle E-Business Suite User's Guide
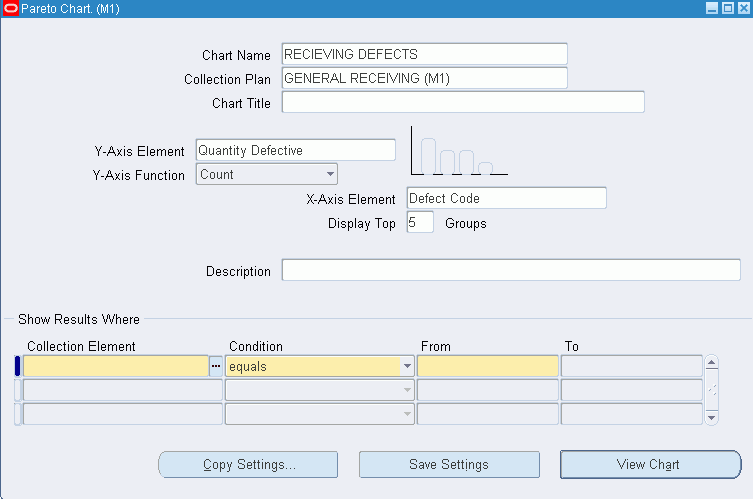
Pareto Charts
You can summarize and chart product defects using Pareto's law to focus on the most often occurring defects. For example, you can create Pareto charts to monitor the following:
-
top defects
-
most occurring causes
-
most frequent repair types
You can chart quality results for any collection plan element. For example, you can chart the top defects entered for a particular production line this week.
Creating and Viewing Pareto Charts
You can chart quality results using Pareto charts. You can create Pareto charts from "scratch" or you can create them by copying settings from another chart, descriptive statistic view, or custom report. Copying settings allows you to view the same subset of data in different ways. See: Copy Settings.
You can save your chart settings so that you can recreate charts using the same settings. You can change these settings to create new charts. You can select only those results that are to be charted. When you are satisfied with your settings and record selection, you can view your chart. You can optionally export chart information for further analysis.
To copy settings to your Pareto chart
-
Navigate to the Pareto Chart window.
-
Choose the Copy Settings button. See: Copying Settings.
-
Enter missing information or change the copied information as required (See below).
You can change all copied settings except the collection plan.
To specify settings for your Pareto charts
-
Navigate to the Pareto Chart window.
-
To save your chart parameters, you must enter a chart name.
-
Select the Collection Plan to chart.
If you are creating a chart, you can select any collection plan, even those that are no longer effective. If you are changing a chart, you cannot change the collection plan.
-
Optionally, enter the Chart Title.
The text you enter here is displayed at the top of the chart.
-
Select the X-axis Collection Element.
The X-axis of the chart (the horizontal dimension) is the primary collection element that you want to analyze. For example, for a top defects Pareto, choose Defect Code as the collection element for the X-axis.
The X-Axis Element can be any collection plan element. However, usually you should select a collection element that represents an attribute or reference collection element; for example, Defect Code, Cause Code, Department, or Item Category.
-
Select the Y-axis Collection Element.
The Y-axis of the chart (the vertical dimension) usually represents a quantity or count of occurrences.
-
If the X-axis collection element selected is a number, you can sum or count the values associated with that collection element. You can also choose to determine the minimum, maximum, or average of these values. For example, if the collection plan contains collection elements Defect Code and Quantity Defective, you can choose Defect Code for the X-axis element, Quantity Defective for the Y-axis, then select the sum function for the Y-axis. When sum is selected all the defective quantities for each defect code are added up and charted. See: Functional Grouping and Processing.
If the X-axis collection element you select is a character or date (for example, Defect Code), you must select count. For example, if you have a collection plan with collection elements Serial Number and Defect Code, you might assume a quantity of 1 for each serialized unit. In this case, you can select Defect Code as the X-axis and specify the chart to count all the occurrences for each defect code.
-
Enter the Top n Groups to display on the chart. For example, enter 5 to chart the top five defect codes.
-
Optionally, enter the chart Description.
The text you enter here is displayed at the top of the chart, under the chart title.
To find and select quality results
Navigate to the Show Results Where region of the Pareto Chart window. See: Finding Quality Results.
If you do not select which quality results to chart, all results associated with the collection plan are used.
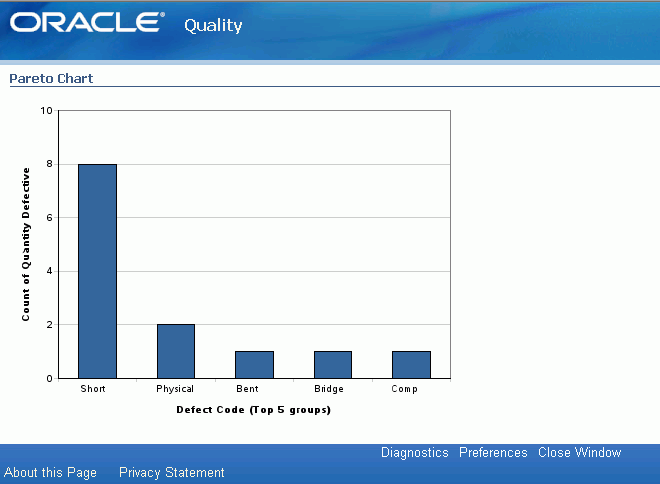
To view charts
Choose the View Chart button. The chart you created will display in a separate window.
To save chart settings
Choose the Save Settings button if you want to save the inquiry settings.
To export chart results
Choose Export Results from the Tools menu. See: Exporting Quality Results.
Histograms
Histograms provide a graphic summary of variations in a set of data. This is done by partitioning the range of data into several intervals of equal length, counting the number of points in each interval, and plotting the counts as bar lengths. Histograms are useful in the study of process capability since they graphically display one or more of three important data distribution properties: shape, location, and scatter.
The process should be, approximately, normally distributed for the SPC techniques, supported by Oracle Quality, to be directly applicable. If the process is not normally distributed, data should be transformed to make them approximately normal, before these techniques can be applied.
Histogram analysis is a basic step in analyzing a process and can provide the following sense of accomplishment:
-
We have quantified some aspect of the process; we are managing by facts, not opinions.
-
We have a better understanding of the variability inherent in the process; we have a more realistic view of the ability of the process to produce acceptable results consistently.
-
We have new ideas and theories about how the process operates or about the causes of a problem and we have set the stage for additional investigative efforts.
-
We have pictured the distribution of the process.
Creating and Viewing Histograms
You can graphically display, in histogram form, quality results for any collection plan element with a numeric data type. You can select and graph a subset quality results values.
You can create histograms from "scratch" or you can create them by copying settings from another chart, descriptive statistic view, or custom report. Copying settings allows you to view the same subset of data in different ways. See: Copy Settings.
You can save your chart settings. You can re-create charts using these saved settings, and you can change these settings to create new charts.
Histogram X-Axis and Y-Axis
The X-axis of the chart (the horizontal dimension) represents the value of the selected collection plan element. The Y-axis of the chart (the vertical dimension) represents the count or sum of occurrences of the primary collection element on the X-axis. Usually, this axis represents a quantity or count of occurrences. For example, if you select the collection plan element Quantity Defective, the Y-axis is used to show the frequency of occurrences.
Prerequisites
- Optionally, define specifications and specification elements with specification limits. See: Defining Specifications and Defining Specification Elements.
To create histograms using copied settings
-
Choose the Copy Settings button. See: Copying Settings.
-
Enter missing information or change the copied information as required (see below). (You can change all copied settings except the collection plan.)
To create histograms
-
Navigate to the Histograms window.
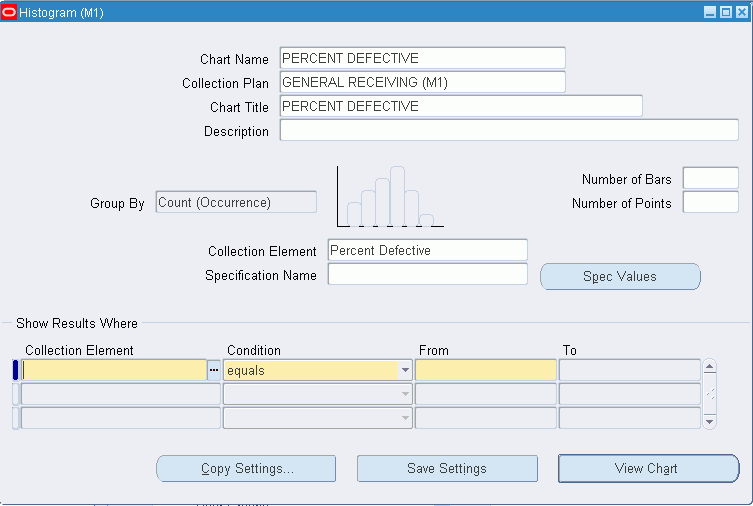
-
To save your chart parameters, you must enter a chart name.
-
Select the Collection Plan.
If you are creating a chart, you can select any collection plan, even those that are no longer effective. If you are changing a chart, you cannot change the collection plan.
-
The text you enter here is displayed at the top of the chart.
-
The text you enter here is displayed at the top of the chart, under the chart title.
-
Select the Collection Element.
You can select any collection element on the collection plan, however, you must select a collection plan element with a numeric data type.
-
Optionally, select or find the specification.
You can only select specifications that have specification elements in common with the selected collection plan element defined. See: Defining Specification Element.
You can find and select any specification, even specifications that do not have the selected collection element as a specification element. If this is the case, Upper and Lower Specification Limits and the Target Value are defaulted from the collection element. See: Defining Collection Element Specification Limits.
-
Optionally, enter the Number of Bars for the graph.
If you do not enter a number, the number of bars is calculated as the square root of the number of points.
-
Optionally, enter the Number of Points.
The Number of Points represents the total number of data points to be included. If you do not enter a specific number of points, all points are used. If you do enter a specific number, the most recently collected results are used.
To find and select quality results
Navigate to the Show Results Where region of the Control Chart window. See: Finding Quality Results.
If you do not select which quality results to chart, all results associated with the collection plan are used.
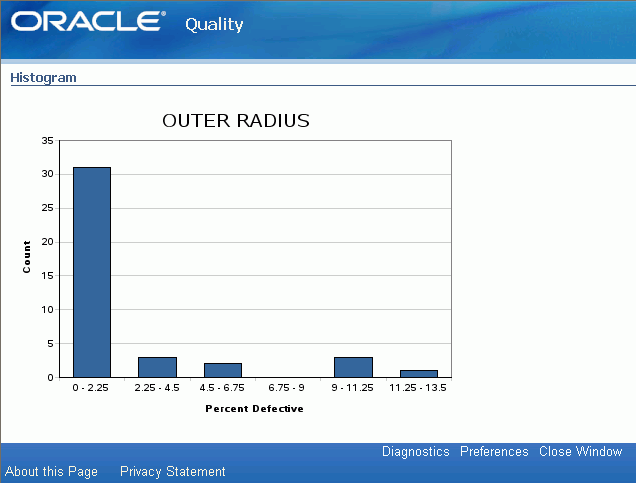
To view charts
Choose the View Chart button. The histogram you created will be displayed in a separate window.
To save chart settings
Choose the Save Settings button if you want to save the inquiry settings.
To export chart results
Choose Export Results from the Tools menu. See: Exporting Quality Results.
Trend Charts
You can use trend charts to analysis data collected over a period of time. By observing trends, you can determine the appropriate time to take corrective action. For example, you can create a Glazing Process collection plan to collect process quality variables such as oven temperature and voltage from a glazing process. You can use this collection plan to record five readings at random times during each shift. Once the results are collected, you can create a trend chart to graphically display the results of temperature or voltage. See: Creating and Viewing Trend Charts.
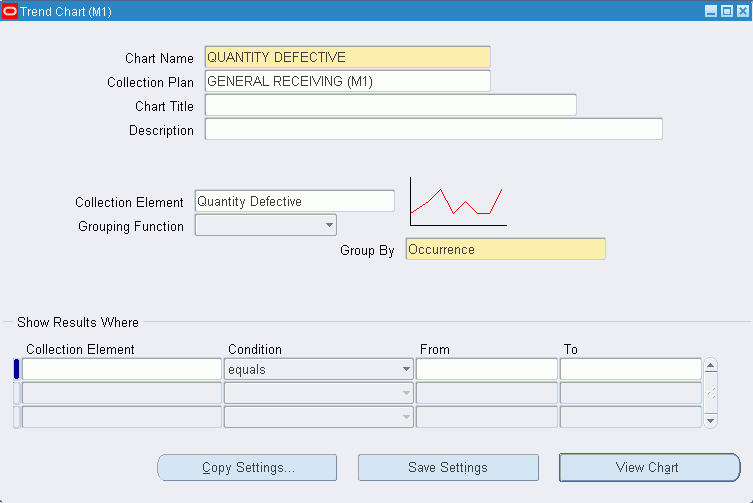
Creating and Viewing Trend Charts
You can chart quality results using Trend Charts. Trend charts show values collected for a particular collection element over a period of time.
You can select results based on any combination of collection elements in the collection plan. For example, you can chart oven temperatures for a burn-in chamber for a particular production line this week.
You can create Trend charts from "scratch" or you can create them by copying settings from another chart, descriptive statistic view, or custom report. Copying settings allows you to view the same subset of data in different ways. See: Copy Settings.
You can save your chart settings. You can re-create charts using these saved settings, and you can change these settings to create new charts.
After creating and viewing your chart, you can optionally export the raw data that the chart was based upon. Exported data can be further analyzed using a spreadsheet or statistical analysis software package.
To create trend charts using copied settings
-
Enter missing information or change the copied information as required (See below).
-
Choose the Copy Settings button. See: Copying Settings.
You can change all copied settings except the collection plan.
To create trend charts
-
Navigate to the Trend Chart window.
-
Optionally, enter the Chart Name.
To save your chart parameters, you must enter a chart name.
-
Select the Collection Plan to chart.
If you are creating a chart, you can select any collection plan, even those that are no longer effective. If you are changing a chart, you cannot change the collection plan.
-
Optionally, enter the Chart Title.
The text you enter here is displayed at the top of the chart.
-
The X-axis of the chart (the horizontal dimension) can be any collection plan element but is usually a collection element that represents time or groups of quality results collected consecutively over time. For example, you can view results by:
Occurrence: individual quality results or readings presented consecutively over time, from the oldest occurrence to the most recent occurrence
Collection number: a group of individual quality results or readings, grouped into a collection and identified by a collection number
Entry date: individual quality results or readings, grouped by the date in which they were entered
-
The Y-axis of the chart (the vertical dimension) represents the primary collection element that you want to analyze. Usually, this axis of the chart represents a variable collection element; for example, temperature or voltage.
-
Select the Y-axis Function if you want to group the collection element values. See: Functional Grouping and Processing.
If the X-axis represents a grouping (for example, Collection Number or Entry Date), you must select a grouping function for the Y-axis. For example, if the X-axis is Entry Date, you can select a function like Average to display average values for the collection element for each day. If you choose Occurrence for the X-axis, you cannot select a grouping function. See: Functional Grouping and Processing.
-
Optionally, enter the chart Description.
The text you enter here is displayed at the top of the chart, under the chart title.
To find and select quality results
Navigate to the Show Results Where region of the Control Chart window. See: Finding Quality Results.
If you do not select which quality results to chart, all results associated with the collection plan are used.
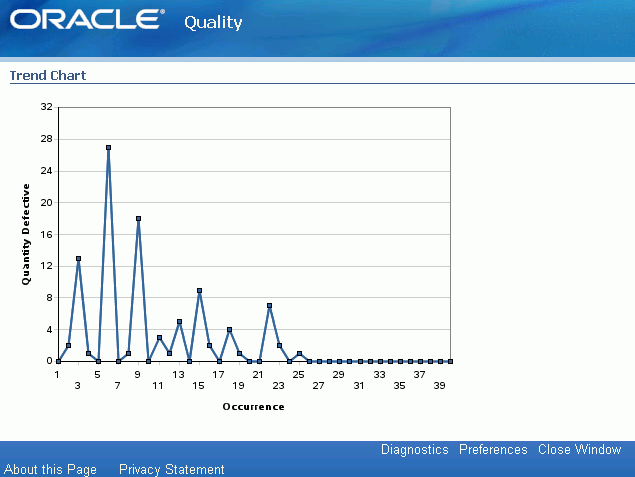
To view charts
Choose the View Chart button. The trend chart you created will be displayed in a separate window.
To save chart settings
Choose the Save Settings button if you want to save the inquiry settings.
To export chart results
Choose Export Results from the Tools menu. See: Exporting Quality Results.
Statistical Process Control (SPC)
Traditionally enterprises have depended on their production departments to make products and on their quality control departments to inspect and screen out items that do not meet specifications. Often this approach results in reiterative inspections in an effort to detect instead of prevent problems. Obviously this approach is wasteful because it allows time and materials to be invested in products or services that are not always usable. After the fact inspection is both uneconomical and unreliable.
Statistical process control, on the other hand, is a preventative system. Because it provides immediate feedback, it can minimize or eliminate waste. There are essentially four elements involved in SPC:
-
The process: The combination of people, equipment, materials, methods, and environment that work together to produce output.
-
Information about Performance: Process output provides qualitative and quantitative information about process performance. In a broad sense, process output includes not only the products that are produced, but also any intermediate 'outputs' that describe the operating state of the process, such as temperatures or cycle times. Collected and interpreted correctly, this data can provide the information you need to determine whether the product or process or both require corrective action.
-
Action on the process: Action on the process is future oriented because it prevents the production of out-of-specification products. Corrective actions can include changes in operations (e.g. operator training), raw materials, and even in the process itself. Process changes might include equipment repair and maintenance or the addition of temperature and humidity controls.
-
Action on the output: Action on the output is past-oriented, because it involves detecting out of specification output already produced. Unfortunately, if current output does not consistently meet customer requirements, it may be necessary to sort all products and to scrap or rework any nonconforming items.
Process control focuses on gathering process information and analyzing it so that actions can be taken to correct the process itself.
Process Variation
To use process control, it is important to understand the concept of variation. Some sources of variation in the process cause short term or piece to piece differences, such as backlash and clearances within a machine and its fixturing. Other sources of variation cause changes in the output over the long term. Consequently, the time period and conditions under which measurements are made have a direct affect on the amount of total variation.
They are two types of variations: common cause and special cause variations. Common cause variations occur when processes are in statistical control. They are inherent to the system and are therefore difficult to reduce or eradicate. The variability that exists within the control limits of a typical control chart is usually due to common causes. Special cause (often called assignable cause) variations can be attributed to factors or sets of factors that are external to the system. Examples of special cause variations include operator errors, poor machine maintenance, and missed process steps. Special cause variations can be detected by simple statistical techniques one of which is the control chart.
Related Topics
Control Charts
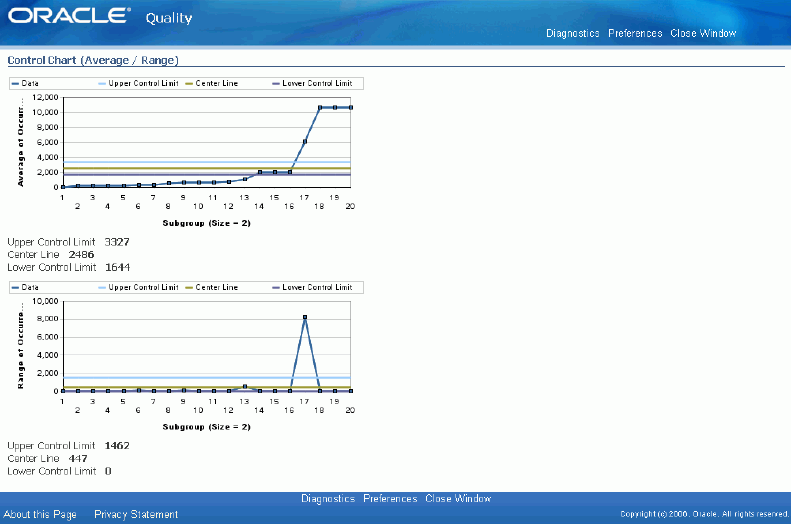
Control charts are used to determine whether process stability has been upset by special or assignable causes. Oracle Quality provides the following types of control charts and pairs of control charts.
-
Xbar and R charts (XBar R): A pair of line graph charts which plot subgroups of data collected over a continuous period of time. The Xbar chart plots the average value for each subgroup. The R chart, or range chart, plots the range (difference between the maximum and minimum observations within a subgroup) of values within each subgroup.
-
Individual X and Moving Range charts (XmR): A pair of charts based on individual data points instead of subgroups. The individual X chart simply plots individual data points. The moving range chart plots a specified range of the data points up to and including the current data point. For example, if a subgroup size of 5 is specified then the 10th point on the Moving Range chart is plotted using the range between points 6 and 10. These charts are commonly used when the process results do not fall into subgroups, for instance when the process is slow and data does not form clusters over a period of time.
-
Xbar and S charts (XBar S): A pair of line charts similar to the Xbar and R charts except that the standard deviation is used instead of the range when the S chart is plotted. The S chart is an inherently superior estimator of process standard deviation than the R chart, for any sample size, because it uses all observations. The R chart uses only maximum and minimum observations. The difference in efficiencies of these two estimators become acute for large sample sizes. For example, if you had a subset size of 20 that contained one outlying data point, the range plotted on an R chart would be large even though the remainder of the data is fairly evenly distributed.
Subgroups
Selection of a subgroup is extremely important when defining a control chart. Improper subgroup selection can lead to misleading results and false corrective actions.
Note: Control charts supported by Oracle Quality work well only when the process distribution is approximately normal. Histograms can be used to check the distribution of the process.
Creating and Viewing Control Charts
Control charts are Statistical Process Control (SPC) tools used for monitoring the state of a process. After viewing data samples, out-of-control processes can be adjusted accordingly. See: Statistical Process Control and Control Charts.
You can chart all or only specific quality results associated with a collection plan. You can create Control charts from "scratch" or you can create them by copying settings from another chart, descriptive statistic view, or custom report. Copying settings allows you to view the same subset of data in different ways. See: Copy Settings.
You can save your chart settings. You can re-create charts using these saved settings, and you can change these settings to create new charts.
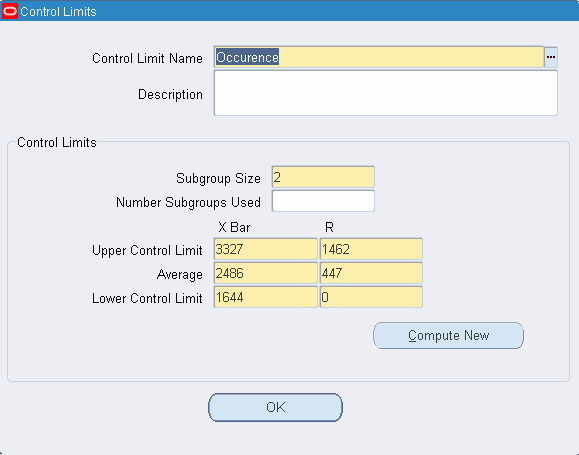
You must define control limits before you can view a control chart. Control limits can be defined in any of the following three ways:
-
Based on Collection Results: You can compute new control limits by entering the subgroup size and number of subgroups to use. Pressing the Compute New button then computes control limits based on the data most recently collected for the specified Collection Plan.
-
Based on Saved Limits: You can use the control limits that were last used to generate the chart. You can also select saved limits from another chart, however, the selection of charts is limited by the chart type and the collection element.
Note: You can only save one set of control limits for a chart.
-
Based on Manual Entries: Enter the subgroup size, number of subgroups to use, and all control limits computed via some other mechanism.
To create control charts using copied settings
-
Choose the Copy Settings button. See: Copying Settings.
-
Enter missing information or change the copied information as required (See below).
You can change all copied settings except the collection plan.
To create control charts
-
Navigate to the Control Charts window.

-
To save your chart parameters, you must enter a chart name.
-
Select the Collection Plan to chart.
If you are creating a chart, you can select any collection plan, even those that are no longer effective. If you are changing a chart, you cannot change the collection plan.
-
Optionally, enter the Chart Title.
The text you enter here is displayed at the top of the chart.
-
Optionally, enter the Chart Description
The text you enter here is displayed at the top of the chart, under the chart title.
-
Select the Chart Type. See: Control Charts
Recommendations for the use of each set of charts are as follows:
XBar R: Use when the subgroup size is less than 10.
X mR: Use when monitoring a process that produces quality results that do not naturally fall into subgroups.
XBar S: Use when the subgroup size is greater than 10.
-
Select the Collection Element.
This is the primary collection element that you want to analyze. It must have a numerical data type.
Important: Quality results are always grouped by occurrence or by the order in which the results were collected.
To find and select quality results
Navigate to the Show Results Where region of the Control Chart window. See: Finding Quality Results.
If you do not select which quality results to chart, all results associated with the collection plan are used.
To define control limits based on collection results
-
From the Control Charts window, select the Control Limits button.
-
Select or enter the Control Limit Name.
-
Enter the Description.
You can use descriptions to identify the set of data you are charting.
-
Enter the Subgroup Size. You must enter a subgroup size and it must be between 2 and 25.
Important: You must recalculate control limits after changing the subgroup size.
-
Optionally, enter the Number of Subgroups to use in the calculation of control limits. If you do not enter the number of subgroups to use for the calculation, you can manually specify the control limits.
-
Choose the Compute New button.
To choose saved control limits
-
From the Control Charts window, select the Control Limits button.
-
Select the Control Limit Name of the saved set of control limits.
You can also select saved limits from other charts, however, the selection of charts is limited by the chart type and the collection element.
-
Choose OK to save your work.
To manually specify control limits
-
Specify control limits by manually entering new limits - Upper X and R Control Limits, X and R Average values, and Lower X and R Control Limit values.
-
Choose OK to save your work.
To view charts
Choose the View Chart button. The control chart you created will display in a separate window.
To save chart settings
Choose the Save Settings button if you want to save the inquiry settings.
To export chart results
Choose Export Results from the Tools menu. See: Exporting Quality Results.
Cp and Cpk Indexes
Cp and Cpk, commonly referred to as process capability indices, are used to define the ability of a process to produce a product that meets requirements. These indices, which are a fairly recent addition to the field of statistical process management, greatly simplify the management of statistically controlled processes.
To understand Cp and Cpk you must have an understanding of the following terms:
| Specification | Specifications define product requirements. In other words, they define what is expected from an item for it to be usable. Specifications are normally defined in terms of nominal (+/-) tolerances or ranges (low to high. A specification for a piston ring, for example, might specify that the diameter be 74mm +/- 0.05mm. The upper specification limit (USL) is the upper limit of the specified range. Similarly the lower specification limit (LSL) is the lower limit of the specified range. See: Overview of Specifications. |
| Standard Deviation | The standard deviation is a measure of variability in a process. Defined as the root mean square (RMS) deviation from average it indicates how much a process can be expected to vary from the average. The standard deviation is normally fixed for a process that is under statistical control and can only be affected by a process change that affects the variability in a process. |
| Mean | The arithmetic average of a group of values. |
Cp
The Cp index is calculated using specification limits and the standard deviation only. This index indicates, in general, whether the process is capable of producing products to specifications. No information on the ability of the process to adhere to the target value is included in this index.
The formula for Cp is as follows:
| Cp = (upper spec - lower spec) / 6 * Standard Deviation |
CpK
This Cpk index is calculated using specification limits, the standard deviation, and the mean. The index indicates whether the process is capable of producing within specification and is also an indicator of the ability of the process to adhere to the target specification.
The formula for Cpk is as follows:
| Cpk = min {(Mean - Lower Spec) / 3 * Standard Deviation, (Upper Spec - Mean) / 3 * Standard Deviation} |
Application of Cp and CpK
The following conditions must be met before Cp and CpK can be successfully used to evaluate the ability of a process:
-
the sample size must be adequate (large enough)
-
the data should be tested for normality
-
the process being analyzed should be under statistical control
Caution: Only after a process is under statistical control, can one safely assume that the mean and standard deviation to have a stable values over time.
Cpk is more widely used than Cp, since it takes into account the mean and the standard deviation in its calculation. Please note that the difference between Cp and Cpk is an indicator of how far the average of the process is from the target specification. When the average of the process approaches the target value, the gap between Cpk and Cp closes. When the average of the specification is equal to the target value, then Cpk is equal to Cp. Cpk can never exceed Cp.
Both Cp and Cpk can be calculated with the generation of descriptive statistic views and histograms.
Related Topics
Viewing Descriptive Statistics
Viewing Descriptive Statistics
You can compute basic statistics for quality results associated with any collection plan element using the Descriptive Statistics window. You can enter selection criteria to find only specific quality results for the collection plan element.
You can create descriptive statistic views from "scratch" or you can create them by copying settings from another chart, descriptive statistic view, or custom report. Copying settings allows you to view the same subset of data in different ways. See: Copy Settings.
You can save your descriptive statistic view settings. You can recreate descriptive statistic view using these saved settings, and you can change these settings to create new views.
The statistics calculated include the sum, mean, variance, standard deviation, total number of occurrences (the count), number of null occurrences (that is, occurrences where a value was not entered for the collection element), maximum, minimum, and range.
If you select specification limits, you can also calculate Cp and Cpk values as you view descriptive statistics. Cp and Cpk are measures of process capability, which is defined as the measured, inherent reproducibly of the product turned out by the process. See: Cp and Cpk.
After viewing descriptive statistics, you can optionally export the raw data that was used to create the view. Exported data can be further analyzed using a spreadsheet or statistical analysis software package.
To create a descriptive statistic view using copy settings
-
Choose the Copy Settings button. See: Copying Settings.
-
Enter missing information or change the copied information as required (See below).
You can change all copied settings except the collection plan.
To create a descriptive statistic view
-
Navigate to the Descriptive Statistics window.
-
Optionally, enter the Statistic Name.
To save your settings, you must enter a statistic name.
-
Select the Collection Plan.
If you are updating a descriptive statistics view, you cannot change the collection plan.
-
Select the Statistical Element for which to view descriptive statistics. You can select any collection element on the collection plan.
-
Optionally, select the Specification Limits for the Cp and Cpk calculation using one of the following methods. If you do not select specification limits, Cp and Cpk are not calculated when statistical results are calculated and displayed.
Select Specification Element Specification Limits: To select specification element specification limits, select a Specification Name from the Specifications list of values and choose OK. When the Specification Limits window appears, the specification element specification limits (if any) are displayed. See: Defining Specification Elements.
Important: The Specification list of values that appears displays only those Specifications that have the selected Statistical Element as a specification element.
Find Specification Element Specification Limits by Finding a Specification: If you do not know which specification has the required specification element specification limits, you can choose the Find Spec Limits button from the Specification Limits window. The Find Specifications window appears.
In the Find Specifications window, you can narrow your search criteria by choosing the specification type (Item Spec, Supplier Spec, or Customer Spec) and an Item or Item Category and Revision. If you select a Supplier Spec or Customer Spec specification type, you must also select the Customer or Supplier.
If you try to find an "item" specification, but a specification for that item cannot be found, Oracle Quality searches for a specification based on the category of the item entered. To determine the item category, the default category set you defined using the QA:Quality Category Set profile option is used. See: QA:Quality Category Set.
To select which quality results to include in the calculation
-
In the Show Results Where region, select the Collection Element to use for your query.
-
Select the query Condition (operator). See: Query Operators.
-
If the condition selected requires a range, enter both the From and To value. If the condition requires a single value, enter only the From value. If the condition (not equals) requires a null character, do not enter anything. To create an In or Not in List, see Creating In and Not In Lists.
-
Repeat steps 1 through 3 until all selection conditions are entered.
To calculate and display statistical results
Choose the Statistics button. The Statistical Results window appears displaying the calculated statistics. If specification limits were selected, Cp and Cpk are automatically calculated.
To save your descriptive statistic settings
Choose the Save Settings button to save the inquiry settings.
To export chart results
Choose Export Results from the Tools menu. See: Exporting Quality Results.
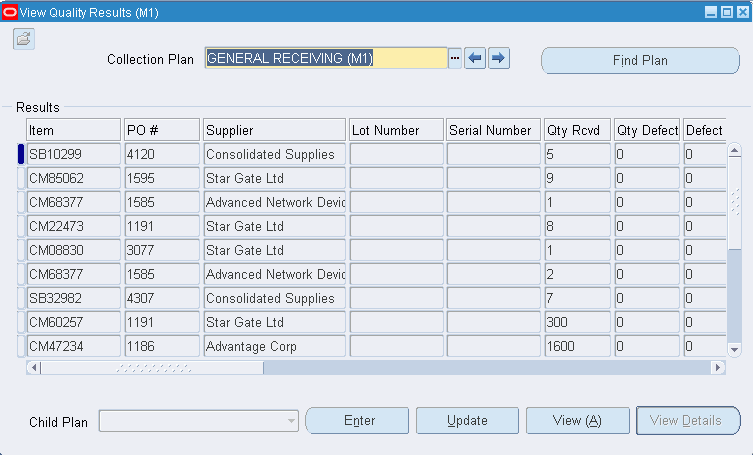
Viewing Quality Results
You can find and view all quality results associated with a collection plan. You can also find and view specific quality results associated with a collection plan using Query Find and Query-by-Example. You can also view detailed information - the target value and specification limits, if any - for specific quality results values.
You can view collection plan attachments, which are illustrative or explanatory files, as you view quality results.
You can optionally export results after viewing them.
Tip: Ask your system administrator to run the Manage Collection Element Indexes Process, if you want to enable faster searches on user-defined collection element values.
To select all quality results for a collection plan
-
Navigate to the View Quality Results folder window. See: Customizing the Presentation of Data, Oracle E-Business Suite User's Guide.
-
Select a Collection Plan.
If a default collection plan has been specified, it is automatically selected. See: QA:Default Collection Plan.
You can choose the Find Plan button or the standard list of values to find and select a collection plan. After selecting a collection plan, you can use the previous plan/next plan arrow buttons, located to the right of the collection plan name, to scroll to another valid collection plan.
Once a collection plan is selected, the results associated with that collection plan are automatically displayed in date order. The Prompts entered when defining the collection elements are displayed as the column headings.
You can view the following three common collection plan elements here (See: Collection Elements in Collection Plans):
-
Created By
-
Collection (Collection Number)
-
Entry Date
To view the remaining common collection plan elements, select Help, then Record History from the menu.
-
To find specific quality results
Position the cursor in any field in the Results region and choose Find from the Query menu. The Find Results window appears. See: Finding Quality Results.
To find specific quality results using query-by-example
Position the cursor in any field in the Results region and choose Enter from the Query menu. See: Searching for Data, Oracle E-Business Suite User's Guide.
To view quality result details
See: Viewing Quality Results Details.
To enter, update, or view related child plan results
See: Entering, Updating, or Viewing Related Child Quality Results.
To export quality results
See: Exporting Quality Results.
To view collection plan attachments while viewing quality results
See: Viewing Attachments Associated with Quality Results.
To view item descriptions along with items while viewing quality results
-
Create a collection element for the item description. See: Defining Collection Elements.
Caution: You cannot name this collection element Item Description. The name Item Description is used for a pseudo common collection plan element (See: Collection Elements in Collection Plans.). You can use this pseudo element in charts and graphs, but you cannot include it in a collection plan. You can use similar names, such as Description or Item Desc when creating an actual collection element for item description.
-
Create a collection plan that includes at least your item description collection element and the Item collection element. See: Creating Collection Plans.
-
Define an Assign a Value action for the Item collection plan element that assigns a value to the item description collection plan element once the item is entered. See: Defining Assign A Value Actions: User-Defined Formulas. Use the following SQL script:
select description
from mtl_system_items_kfv
where concatenated_segments = &ITEM and organization_id = :parameter.org_id
-
Choose the Variables button to associate the token &ITEM with the Item collection plan element.
Related Topics
Viewing Quality Results Details
You can view detailed information about a specific quality results value. Details include the target value and the specification limits.
Prerequisites
- Query quality results. See: Viewing Quality Results, Updating and Deleting Quality Results, Viewing Quality Results by Lot Number, and Viewing Quality Results by Serial Number.
To view details for results value
-
From the Results region, select a results value.
-
Choose the View Details button. The Details window appears displaying the description, target value, and specification limits for the selected result.
You can define up to 2000 comment characters on a collection plan if a comment collection element was added to the collection plan (See: Defining Collection Elements). Position the cursor within the Comment field and select Ctrl-E to view or update the long comment.
Entering, Updating, or Viewing Related Child Quality Results
You can enter, update, or view the child quality results related to the parent quality results queried from the View Quality Results folder window.
Prerequisites
- Query quality results. See: Viewing Quality Results, Updating and Deleting Quality Results, Viewing Quality Results by Lot Number, and Viewing Quality Results by Serial Number.
To enter, update, or view child quality results related to the parent quality results queried
-
Choose the related child plan that you want to work with from the Child Plan field pull down list.
The Child Plan field initially appears empty even if related child plans exist. If the pull down arrow is black, you can select one of the related child plans to work with. If the pull down arrow is gray, no related child plans exist.
-
Select either the Enter, Update, or View button to enter, update, or view related child plan quality results.
Viewing Quality Results by Lot Number
You can view quality results for specific lots and lot controlled items by collection plan. You can also view detailed information about the target value and specification limits, if any, that are associated with a quality results value. See: Tracking Lot Controlled Items.
You can optionally export results after viewing them.
To find quality results for specific lots and/or lot controlled items
-
Navigate to the Lot Quality folder window. See: Customizing the Presentation of Data, Oracle E-Business Suite User's Guide. The Find Lot window appears.
-
In the Find Lot window, select a Lot number or select an Item and Lot Number then choose the Find button. The Lot Quality window appears.
-
Select a collection plan.
Your collection plan choices are restricted to those than collection plans that contain the selected lot number, including those that are no longer effective. If there is only one valid collection plan, it is automatically selected. If the default collection plan is one of the valid choices, it is automatically selected. See: QA:Default Collection Plan.
You can choose the Find Plan button or the standard list of values to find and select a collection plan. After selecting a collection plan, you can use the previous plan/next plan arrow buttons, located to the right of the collection plan name, to scroll to another valid collection plan.
Once a collection plan is selected, the results associated with that collection plan are automatically displayed in date order. The Prompts entered when defining the collection elements are displayed as the column headings.
To find specific quality results
Position the cursor in any field in the Results region and choose Find from the Query menu. The Find Results window appears. See: Finding Quality Results.
To view quality result details
See: Viewing Quality Results Details.
To export chart results
Choose Export Results from the Tools menu. See: Exporting Quality Results.
Related Topics
Viewing Quality Results by Serial Number
You can view quality results for serial number controlled items by collection plan. You can also view detailed information about the target value and specification limits, if any, that are associated with a quality results value. See: Tracking Serial Controlled Items.
You can optionally export results after viewing them.
To find quality results for specific serial numbered items
-
Navigate to the Serial Number Quality folder window. See: Customizing the Presentation of Data, Oracle E-Business Suite User's Guide. The Find Serial Number window appears.
-
In the Find Serial Number window, select a Serial number or select an Item and Serial Number then choose the Find button.
-
Select a collection plan.
Your collection plan choices are restricted to those collection plans that contain the selected serial number, including those that are no longer effective. If there is only one valid collection plan, it is automatically selected. If the default collection plan is one of the valid choices, it is automatically selected. See: QA:Default Collection Plan.
You can use the Find Plan button or the standard list of values to find and select a collection plan. After selecting a collection plan, you can use the previous plan/next plan arrow buttons, located to the right of the collection plan name, to scroll to another valid collection plan.
Once a collection plan is selected, the results associated with that collection plan are automatically displayed in date order. The Prompts entered when defining the collection elements are displayed as the column headings.
To find specific quality results
Position the cursor in any field in the Results region and choose Find from the Query menu. The Find Results window appears. See: Finding Quality Results.
To view quality result details
See: Viewing Quality Results Details.
To export chart results
Choose Export Results from the Tools menu. See: Exporting Quality Results.
Related Topics
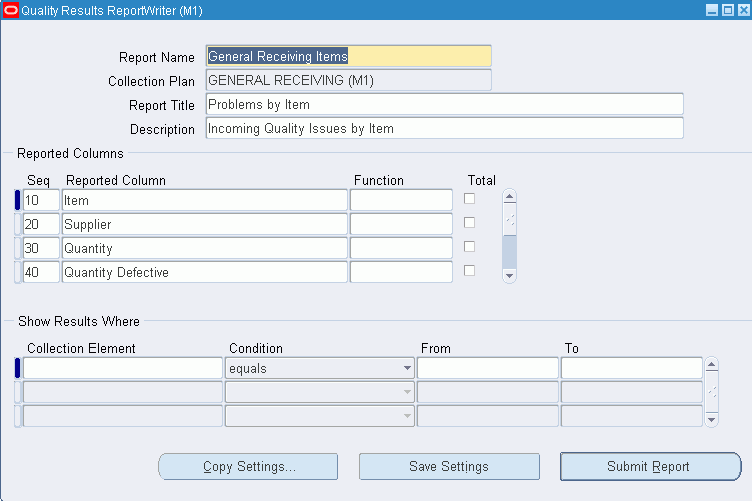
Using the Quality Results ReportWriter
You can create custom quality results reports using the Quality Results ReportWriter. You can include quality results for some or all collection plan elements. Results can be sequenced in any order that you choose.
You can use functions - sum, count, average, min, or max - to specify how to group and process the quality results you include in your reports. The data type - numeric, character, or date - of the chosen collection plan element determines what function or functions can be applied.
Report output can be saved to a file or sent to a printer. You can also export the raw results data that your reports are based upon. You can save the settings of a report so that users throughout your organization can use it.
You can optionally create custom reports using settings copied from another chart, descriptive statistic view, or custom report. Copying saved settings allows you to view the same subset of data in different ways.
Item Category Reporting
You can choose to report quality results by item category when an Item collection element appears on a collection plan. Oracle Quality determines an item's category based on the default category set from QA:Quality Category Set profile option. See: Profile Options.
To create a customer report using copied settings
-
Choose the Copy Settings button. See: Copying Settings.
-
Enter missing information or change the copied information as required (See below).
You can change all copied settings except the collection plan.
To create a quality results report
-
Navigate to the Quality Results ReportWriter window.
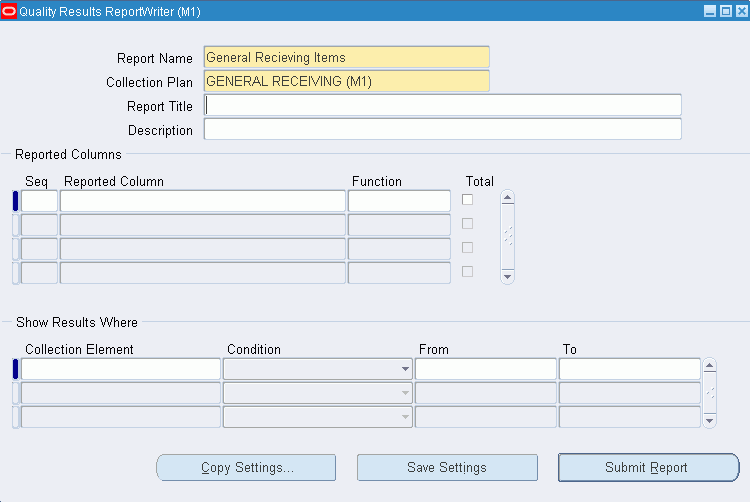
-
Optionally, enter a Report Name.
To save your report and its parameters, you must enter a report name.
-
Select the Collection Plan.
-
Optionally, enter the Report Title.
The text you enter here is displayed on the report.
To specify and format results
-
In the Reported Columns region, enter the column Sequence number.
The sequence number determines the columnar order of the collection plan elements that appear on your report.
-
Optionally, select a Function to use to process and group the results in the reported column. See: Functional Grouping and Processing.
-
Optionally, check the Totals check box to create a column total at the bottom of the report.
You can only total a reported column if it contains a numeric collection plan element.
-
Repeat Steps 2-4 for each collection element you wish to include on your report.
To find and select quality result
Navigate to the Show Results Where region of the Pareto Chart window. See: Finding Quality Results.
If you do not select which quality results to report, all results associated with the collection plan are used.
To process the report
Choose the Submit Report button to launch a concurrent request to process the report. All quality results that meet the specified selection conditions are reported.
To save report settings
Choose the Save Settings button to save the report settings.
To export chart results
Choose Export Results from the Tools menu. See: Exporting Quality Results.
Viewing and Deleting Action Log Entries
Entries are made in the Quality Action Log when the Post an entry to the Quality Action Log message action is invoked. See: Posting Action Log Entries and Message Actions.
For each numbered log entry in the quality action log, the following information is displayed on each of three tabs:
-
Message tab: action Message
-
Action Rule tab: Collection Element, Condition, Low, High, Result
-
Collection tab: Collection Plan, Collection Number, Log (data entry) Date
After viewing action log entries you can delete them if you have function security set to allow you to do so. See: Security Functions.
To find and view specific action log entries
-
Navigate to the Action Log window. The Find Log Entries window appears
If a default collection plan has been assigned using the Default Collection Plan profile option, that collection plan name appears as the default in this window.
-
Enter query criteria in the Find Log Entries window.
You can search for a particular message, or for action log entries for a particular collection plan or collection element. You can also search by action log number, collection number, or by date or date range.
-
Choose the Find button. The Action Log window appears with the results of your query.
-
Select and deselect queried records as required. See: Multiple-Record Selection, Oracle E-Business Suite User's Guide.
-
Choose Delete from the Edit Menu.
Related Topics
Searching for Data, Oracle E-Business Suite User's Guide
Exporting Quality Results
You can export to a browser as a tab-delimited ASCII file. You can then import this information into a spreadsheet, statistical analysis, or graphical presentation software package for further analysis.
Results Exported: Oracle Quality Statistics Engine
If you are using the Oracle Quality statistics engine, the information that is exported is limited and varies based on which window you exporting from.
Information is always exported to a browser as a tab-delimited ASCII file and can then be imported into spreadsheet, statistical analysis, or graphical presentation software packages.
By window, the information and the order that it is exported in is as follows:
| Control Charts | For each record that satisfies the selection criteria entered, the Subgroup Number entered (X-axis collection element), and the calculated X-bar average, X-bar range, X-bar Upper Control Limit (UCL), X-bar target value, X-bar Lower Control Limit (LCL), and the calculated R-bar UCL, R-bar target value, and R-bar LCL values are exported in this order. See: Creating and Viewing Control Charts. |
Note: If you have manually specified Upper X and R Control Limits, X and R Average values, and Lower X and R Control Limit values, these values are exported instead.
| Histogram | For each selected record, the calculated values for the range and number of occurrences within that range are exported. See: Creating and Viewing Histograms. |
| Pareto Chart | For each selected record, the X and Y collection element values are exported. For example, if you are charting the defect codes and the number of items classified with those codes, only the selected and charted values for defect codes (X) and quantities (Y) and are exported. See: Creating and Viewing Pareto Charts. |
| Trend Chart | For each selected record, the X and Y collection element values are exported. For example, if you are charting annealing temperatures recorded over a period of several weeks, only the selected and charted values for X (temperatures) and Y (dates) are exported. See: Creating and Viewing Trend Charts. |
| Descriptive Statistics | Only the values for the statistical element specified for each selected record. For example, if your statistical element is item number and your selection criteria indicates all items inspected in a given date range, a list of items, which may include duplicate entries, is exported. See: Viewing Descriptive Statistics. |
| Lot Quality | Only result records that meet the lot selection criteria and the record selection criteria entered in the Find Results window are exported. Values for all collection plan elements as well as the common collection plan elements - Created By, Collection Number, and Entry Date - are included for each record. See: Viewing Quality Results by Lot Number. |
| Serial Number Quality | Only result records that meet the serial number selection criteria and the record selection criteria entered in the Find Results window are exported. Values for all collection plan elements as well as the common collection plan elements - Created By, Collection Number, and Entry Date - are included for each record. See: Viewing Quality Results by Serial Number. |
| View Quality Results | Only result records that meet the record selection criteria entered in the Find Results window are exported. Values for all collection plan elements as well as the common collection plan elements - Created By, Collection Number, and Entry Date - are included for each record. See: Viewing Quality Results |
| Quality Results ReportWriter | Only the results values that are included on the report are exported. They are exported in columnar order. See: Using the Quality Results ReportWriter. |
| Update Quality Results | Only result records that meet the record selection criteria entered in the Find Results window are exported. Values for all collection plan elements as well as the common collection plan elements - Created By, Collection Number, and Entry Date - are included for each record. See: Updating and Deleting Quality Results. |
Prerequisites
- Collect quality results. See: Data Collection Options.
- Consider asking your system administrator to run the Manage Collection Element Indexes Process, if you want to enable faster searches on user-defined collection element results to export.
To export results if you are using the Oracle Quality Statistics Engine
-
Query results in the View Quality Results, Update Quality Results, View Quality Results by Lot Number, View Quality Results, Pareto Charts, Trend Charts, Control Charts, Histograms, or Quality Results Report Writer window.
-
Choose Export Results from the Tools menu.
When Quality results are exported, a web browser window opens. Depending on your browser's configuration for MIME type, the exported results may appear on your browser, a helper application may open and display the data, or you may be prompted to save the data to your local file system.
Related Topics
Viewing Descriptive Statistics
Viewing Quality Results by Lot Number
Viewing Quality Results by Serial Number
Using the Quality Results ReportWriter
Creating and Viewing Pareto Charts
Creating and Viewing Trend Charts