Network Routings
This chapter covers the following topics:
- Overview of Network Routings
- Creating a Network Routing
- Modifying Network Routings
- Importing Routings
- Defining Alternate Resources for Standard Operations
- Defining Operation Yield Values on Routings
- Calculating Lead Times
- Integration with Advanced Supply Chain Planning
- Integration with Outside Processing
Overview of Network Routings
Network routings in Oracle Shop Floor Management, comprise all possible operations defined for manufacturing a particular assembly. While discrete jobs use standard routings, lot based jobs use network routings. The primary feature of network routings is, based on the results of an operation, to define different paths for the next operation. However, there must be a unique start and last operation defined in the network. When this information is captured, a network of operations is available for processing a lot based job on the shop floor.
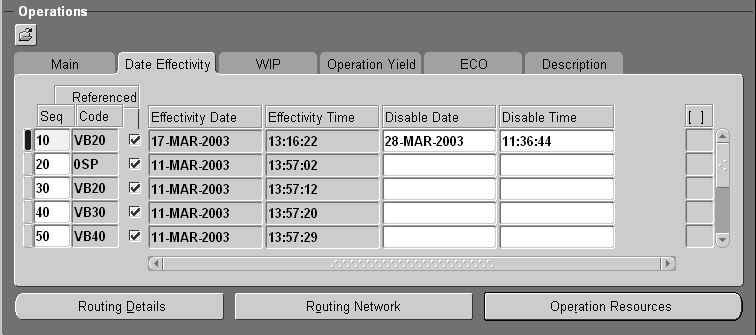
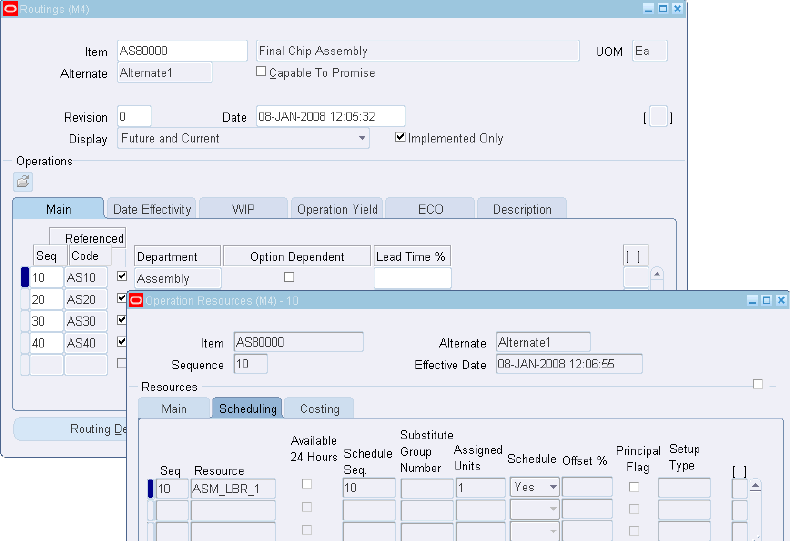
You define two major aspects to create this functionality. First, all the possible allowable operations are defined in the Oracle Shop Floor Management Routings window as shown in the following illustration. Operation yield information for costing updates is also defined in the Operation Yield tab of this window.
Next, the network operations are defined in the Routing Network window. Here the primary and alternate paths are outlined, and the percentage each is likely to be used. This percentage is used by Advanced Supply Chain Planning.
The combination of definitions provides for dynamic, flexible operation of a job. There are numerous possibilities in executing a routing and any one of these can be based on the outcome of the last operation performed. However, there must be a unique starting operation and a unique ending operation in the entire network.
As seen in this illustration, the first example shows the Network—that is, the entire network of the routing and all operations that the WIP Lot can use.
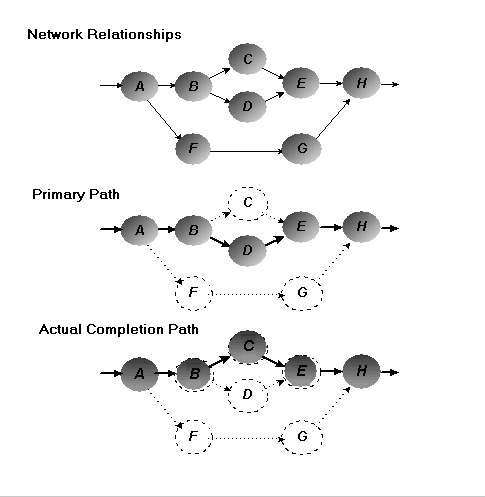
The next example—Primary Path—shows the main path that a job is most likely to follow.
And the third example—Actual Completion Path—shows the real route a particular job moved. This path could be the primary path or any of the other valid paths defined in the network. In the illustration, the job deviates from the primary path after operation B, and moves to operation C instead of D.
Once a complete network routing is defined for a sector, a WIP lot begins at the first operation of the network. As the job completes the first step, you select the next operation in the network. This can be the operation on the primary path, or any valid alternate paths. The process continues until the job reaches the last step when the job is completed.
Creating a Network Routing
The network routing defines different paths for the next operation. Oracle Shop Floor Management enables you to use both standard and non-standard operations in network routings, and supports repeating operations—standard and non-standard.
To create a network routing
To create a network routing
-
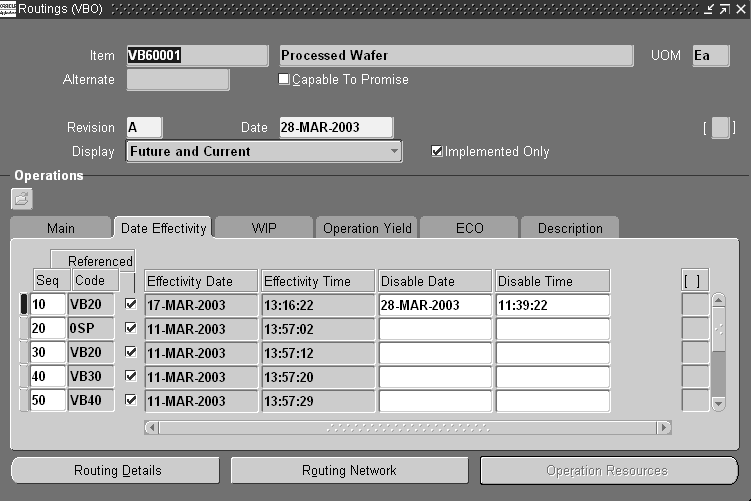
Navigate to the Routings window in the Oracle Shop Floor Management menu and enter information to define this item's routing.
This includes item number, alternate routing designator, revision, operation sequence, operation code, department, effective date, effective time, disabled date and disabled time. See: Creating a Routing, Oracle Bills of Material User's Guide.
Note: When jobs are moved through network routing or WIP lot transactions are performed, Oracle Shop Floor Management considers an operation effective if the job's routing revision is greater than or equal to the operations effective date and less than or equal to its disable date if defined. In addition, a component is considered as effective if its effective date is less than or equal to the job's BOM revision date.
The operation sequence numbers entered for each operation in this window do not signify the order of the particular operation in Oracle Shop Floor Management. The actual operation sequencing is built as you choose the operations based on the network path.
-
Choose Routing Details to enter completion subinventory and locator information, or to view a common routing.
The completion subinventory defaults from the stocking point of the last operation. See: Completion Subinventory and Locator Fields, Oracle Bills of Material User's Guide..
You can unreference a standard operation at this time. This lets you enter more resource information for that particular operation. You can also enter any alternate resources or additional resources by unreferencing a standard operation.
-
Save your work.
-
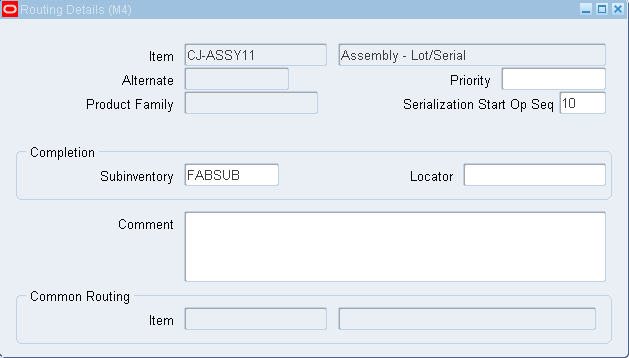
Choose Routing Details to enter the Serial Start Operation.
This operation is defaulted to the lot based job. If the routing is defined for a Lot and Serial Controlled Assembly, then Serialization Start Operation Sequence should be specified in the Routing Details window.
-
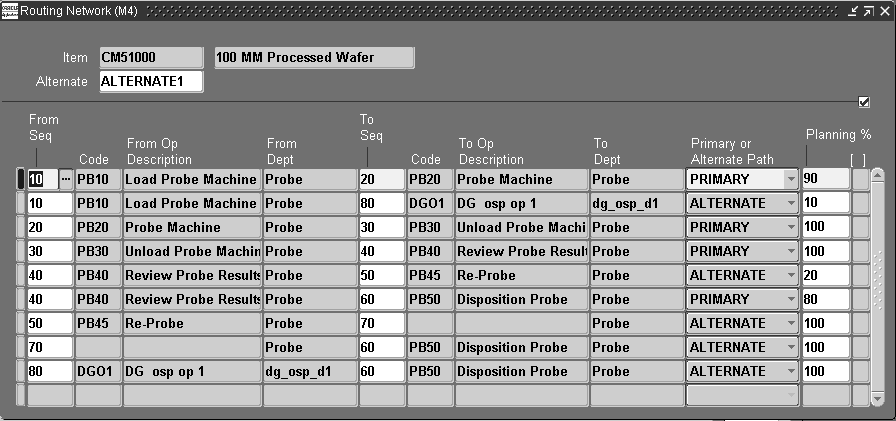
The Routing Network window displays the assembly item number and alternate number.
Note: If you do not save your record in the Routings window, then you cannot enter data on the Routing Network window.
-
Select or enter operation sequence information.
For standard operations, select the operation sequence code in the From Sequence field—operation code, description, and department automatically display.
For non-standard operations, enter the operation sequence code in the From Sequence field—the department automatically displays.
-
Select the operation sequence code in the To Sequence field—operation code, description, and department automatically display.
-
Select either primary or alternate path for this operation.
Primary indicates that this is a routing path used most often, while alternate indicates that it is used as a backup. This window validates that the primary path is a complete chain of operations from start to end.
You can have only one unique primary path. Loops are not permitted in the primary path but are in the alternate paths.
-
In the Planning % field, enter the percentage that this path is used.
Percentages for all the paths—originating from any node in the routing network, or ending on any node—must total 100 percent.
-
Repeat Steps 5 through 7 for all the operations in the routing network.
Only one first operation and one last operation are allowed in the routing network.
-
Save your work.
To specify serialization start operation sequence
-
Navigate to the Network Routing window.
-
Choose Routing Details.
-
Specify serial start operation in Serialization Start Op Seq field.
To define an operation effectivity
Navigate to the Routings window.
-
Enter information to define this item routing.
-
Select the Date Effectivity tabbed region.
-
For the first operation sequence, select a Disable Date and Disable Time
Note: The effectivity of an operation in a routing is determined by the job routing revision date, rather than the transaction date.

-
Save the change before enabling the new operation.
-
Enter the Effective Date for the new operation.
-
Save your work.
-
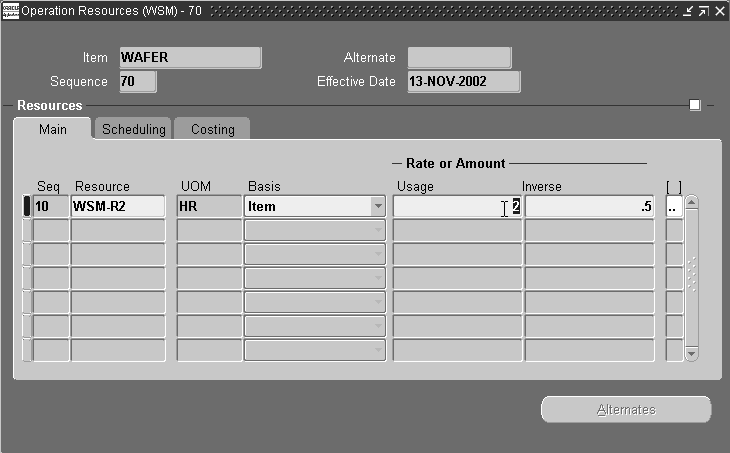
Choose Operation Resource to view the details on resource and resource usage at this operation.
-
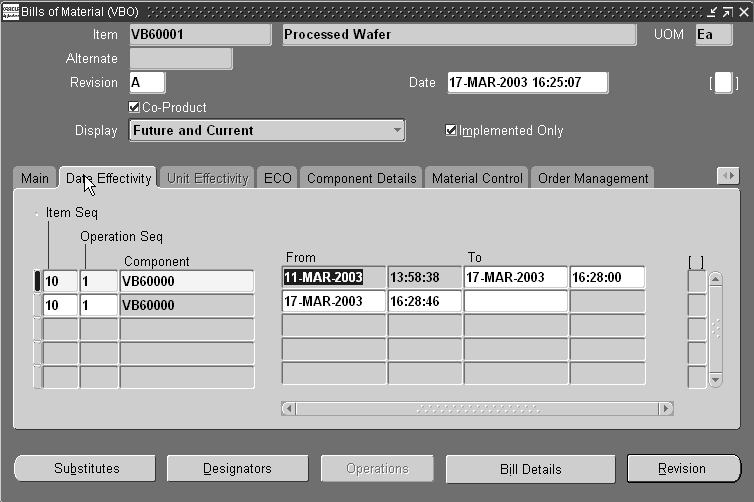
Navigate to the Bills of Material window.
-
Select values in the From and To Effectivity Date fields for the first component.
-
Select values in the From and To Effectivity Date fields for your new component.
-
Save your work.
-
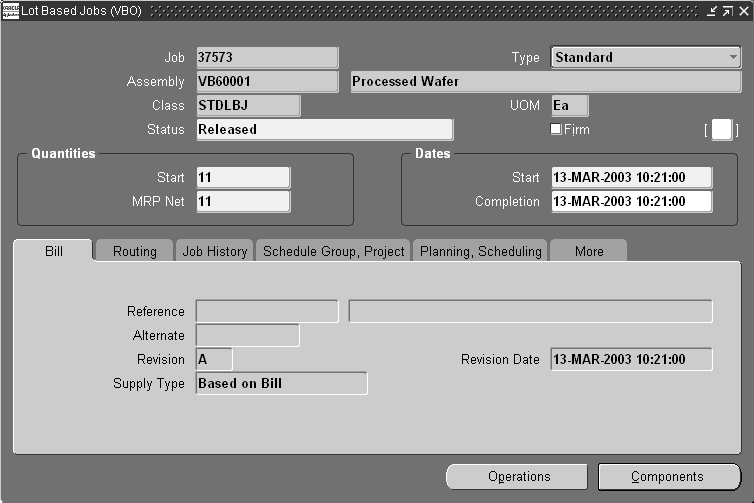
Navigate to Lot Based Jobs window.
Operation Effectivity and the Component Effectivity defined earlier can be seen when you create a lot based job using the revision date for the routing or Bill of Material.
If the system date is greater than the job start date, then the system date is used for the routing revision date and the BOM revision date
You can change this system default date to any date to implement the operation or component effectivity.
-
Save your work.
Note: Lot based jobs explode the material and resource requirement for the first operation only. At the time of job creation, the BOM revision and routing revision is copied into the job and the material.
Note: If you enter job completion date and not BOM revision date, then the BOM revision date will be defaulted with the completion date.
Modifying Network Routings
You can modify network routings in several different ways:
To add or modify a network routing
-
Navigate to the Routings window in the Oracle Shop Floor Management menu.
-
If you are adding a new operation, enter this operation in the Main tab of the Routings window.
-
Save your work.
-
Choose Routing Network.
The Routing Network window displays with the assembly item number and network.
-
Modify networks per your new requirements. Paths that are not required can be deleted— with the exception of the first or last operation of a network routing.
-
Save your work.
To delete network routing paths
-
Navigate to the Routing Network window.
Select the routing path you want to delete, and choose delete from the Edit menu.
Delete Standard operations from a routing in the Standard Operations window. See: Operations, Oracle Bills of Materials User's Guide.
You must enter a delete group before deleting operations from a network routing. In addition, if an operation from a network routing is being made ineffective or deleted, then OSFM checks for current jobs at that operation and displays a caution message if appropriate.
-
Save your work.
Note: You are not allowed to delete the first or last operation of a network routing, and the last operation of a network cannot be changed. Therefore, it is recommended that you model the last operation as a dummy operation to leverage and maximize the power of network routings.
If you set the WSM: Create Job Level BOM and Routing Copies profile option to No (Option 1), then modification to a network routing affects all open jobs. If you set the WSM: Create Job Level BOM and Routing Copies profile option to Yes (Option 2), then modifications to a network routing can be done at the job level. See: Mass Refresh of Open Jobs.
Importing Routings
Importing Operations in a Network Routing
The Routing Open Interface program enables you to import routing information. Imported routing details include routing revision, operation, instruction, and resource information. See: Importing Bills and Routings, Oracle Bills of Material User's Guide.
Importing Network Routings
You can import complete network routings and the primary and alternate network path definitions using Open Interface Tables. The BOM Business Objects API performs the necessary validations for network paths. You can also update the existing operations with the routing effectivity date changes, or implement time phased yield values for different operations of a routing. See: Bills of Material Business Object Interface, Oracle Manufacturing APIs and Open Interfaces Manual.
Related Topics
Primary and Alternate Routings, Oracle Bills of Material User's Guide
Routing Revisions, Oracle Bills of Material User's Guide
Operations, Oracle Bills of Material User's Guide
Creating a Routing, Oracle Bills of Material User's Guide
Completion Subinventory and Locator, Oracle Bills of Material Users Guide
Defining Alternate Resources for Standard Operations
You can define alternate resources while defining standard operations. Standard operations contain the alternate resources. Alternate resources connect to primary resources using a substitute group number. When an operation is referenced in the network routing, the application copies the alternate resources and primary resources to the routing operation. Oracle Advanced Planning also uses this data while planning for operations.
You can also assign substitute group numbers and replacement group numbers. See: Assigning Operation Resources, Oracle Bills of Material User's Guide.
To define alternate resources for standard operations
-
Navigate to the Standard Operations window.
-
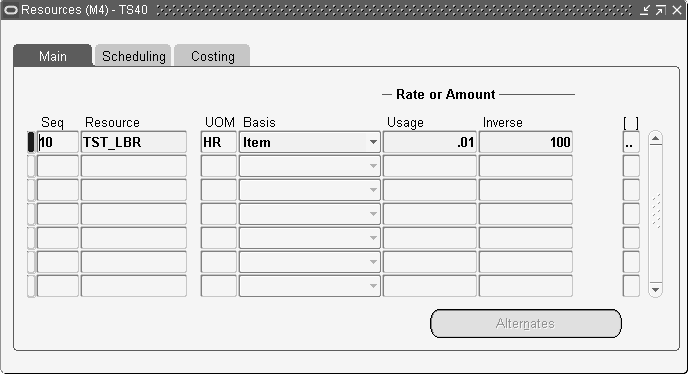
Select an operation and choose Operation Resources. The Resources window appears.
-
Choose Alternates. The Operation Alternate Resources window appears.
-
Select the resource Name.
You can add any resource that is assigned to the department of the operation you have selected. You can also add any multidepartmental resource.
-
Select a resource Basis. The options are as follows:
Item: Charge and schedule the resource on an item-by-item basis. Select Item when resource times and costs are dependent on the job or schedule quantity, such as when charging per unit labor costs.
Lot: Charge and schedule the resource on a one per job or schedule basis. Select Lot when resource times and costs are independent of quantity, such as when setting up a machine to run an entire job.
You cannot update the resource basis if you have charged against the resource.
-
Enter the Usage Rate or Amount Value or Inverse.
Value: Enter a Value if you know how much of the resource is consumed at the operation (per item or per lot) given the resource UOM. For example, if your manufacturing process consumes a mold (resource UOM=Ea) for every 5 items produced, enter a Value of 0.2 (1/5). When you enter the Value of 0.2, the Inverse is automatically calculated as 5. In other words, producing one unit consumes 0.2 of the mold.
Inverse: Enter an inverse amount if you know the number of units a resource can process given the resource UOM. For example, if you can process 10 units on a lathe (resource UOM = HR) in an hour, enter an inverse amount of 10. When you enter the inverse amount of 10, the value is automatically calculated as 0.1 (1/10). In other words, each unit takes 0.1 hours to process.
You cannot enter a quantity less than zero for resources with time-based units of measure. When you enter the usage rate or amount, the inverse usage rate or amount is automatically supplied.
-
Save your work.
Defining Operation Yield Values on Routings
To define yield values on a routing
-
Navigate to the Routings window and enter the item number.
This includes item number, alternate item number, revision, display option, operation sequence, operation code, department, and date ranges, see: Creating a Routing, Oracle Bills of Material User's Guide.
-
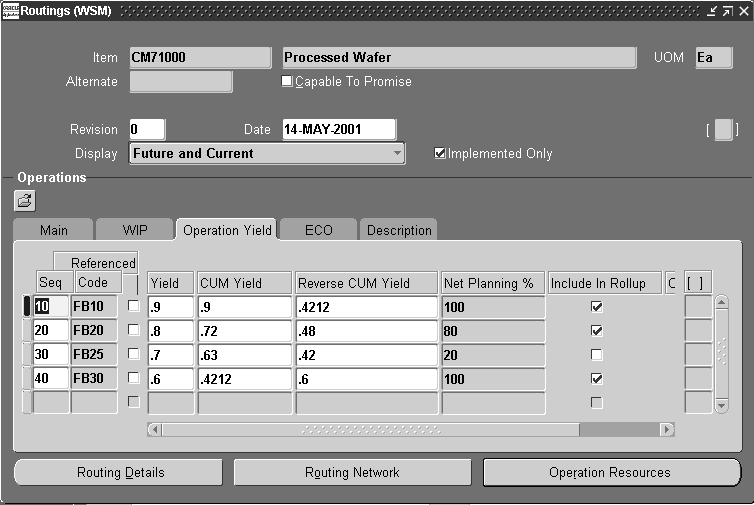
Choose the Operation Yield tab.
The values you entered for operation sequence and operation code number are displayed in this tab.
-
In the Yield field, enter a value for component yield for first operation.
This is the percent of the amount of a component required for an assembly plus the amount lost while building an assembly. For example, a yield factor of 0.90 means that only 90% of the usage quantity of the component on a bill actually becomes part of the finished assembly.
-
Check the Include in Rollup check box if you want the items, resources, and overhead in this operation to be included in the cost rollup. Otherwise leave the box unchecked.
The Include in Rollup check box defines if the operation is going to be included in the standard cost rollup. All operations, both primary and alternate, are defined on this form. You do not want all operations, both primary and alternate, to be included in the standard cost. When checking the box, make sure you want that operation to be included. If all operations are checked, including operations in the alternate paths, this would lead to an exaggerated standard cost and could create large variances.
Ideally, you should check the Include in Rollup flag for all operations on the primary path.
Note: Oracle Shop Floor Management only uses the standard costing method.
-
Select the Operation Yield indicator if you want this operation's yield to be calculated.
-
Repeat steps 3 through 7 for all the operations in the routing.
-
Save your work.
To calculate cumulative yield and reverse cumulative yield
-
Navigate to the Routings window and enter the item number.
-
Choose the Operation Yield tab.
-
Select Calculate Operation Yields from the Tools menu.
This will calculate cumulative yield and reverse cumulative yield for the routing. When the calculations are computed, a note will appear letting you know the process is complete. Choose OK in the Note window. The CUM Yield, Reverse CUM Yield, and Net Planning % fields are then populated.
-
Save your work.
Calculating Lead Times
You can calculate Manufacturing Lead Times and roll up Cumulative Lead Times from the Tools menu of the Routings form.
When you choose the responsibility: Shop Floor Manager, the Network Routings form will have two options such as Compute Lead Times and Rollup Lead Times by default in the Tools menu.
Note: You need not do any customizations to use these options. They appear by default. However, to remove these options from the default settings, switch to System Administrator responsibility and query on Shop Floor Manager responsibility. In the Function field of the Menus form, add Routings: LeadTimes followed by Bills of Material: LeadTimes. Save the form. Navigate to Routings form in the Oracle Shop Floor Management menu to continue your operation without these options in the Tools menu.
Computing Lead Times
You can use this option to calculate manufacturing lead times for the selected item in the Network Routings form. The calculation updates the lead time attributes of this manufacturing item, irrespective of whether you manually maintain this item's lead times or not. Changes to routing and resource usages can impact an item's lead times. After each change you make to a routing (adjusting usages, adding operations, etc.), recalculate the manufacturing lead time for the item.
To compute lead times
-
Navigate to the Routings window
-
Click Tools menu to select Compute Lead Times
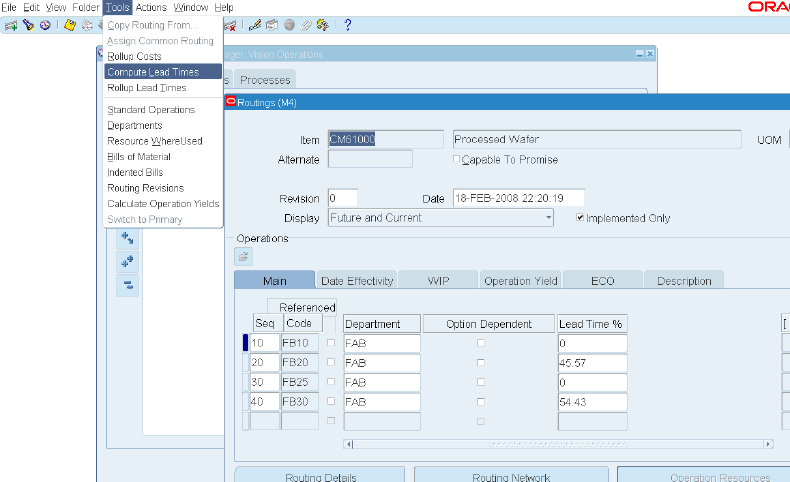
Caution: Lead time for items with network routings is calculated using resources only on the primary path, although this may not be the path with the least lead time.
Rollup Lead Times
You can use this option to roll up the cumulative lead times after every change made to a bill (adding components, assigning to a different operation, etc.) or the item lead times. Changes to the indented bill of material and component lead times can impact a parent item's cumulative lead times.
-
Navigate to the Routings window
-
Click Tools menu to select Rollup Lead Times
Note: This option is also available in the Tools menu of the Bills of Material form.
To calculate Manufacturing Lead Times and roll up Cumulative Lead Times using the concurrent request:
You can also calculate Manufacturing Lead Times and roll up Cumulative Lead Times for the same item (and more items) by using the concurrent request.
-
Navigate to Shop Floor Manager, Vision Operations: Manufacturing Manager
-
Double click Bills of Materials
-
Double click Routing
-
Click Lead Times
Submit a New Request page appears
-
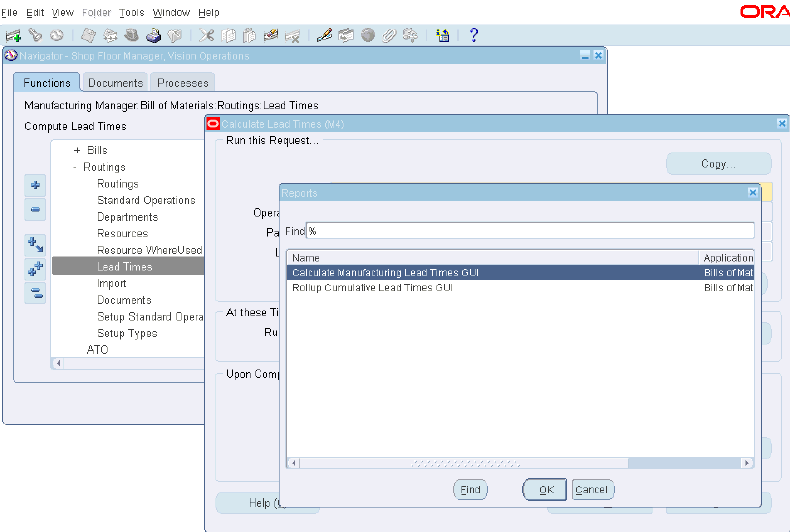
Select your option of Single Request or Request Set and click OK
Calculate Lead Times page appears.
-
Select Calculate Manufacturing Lead Times GUI from the list of values in the Names field to calculate Manufacturing Lead Times
-
Select Rollup Cumulative Lead Times GUI to roll up Cumulative Lead Times
Important: For all scheduled time elements, which are less than the standard workday, the system will compute the lead time day by dividing the lead time element by 24. Note that all the Item Lead Time attributes are in days. The standard workday is defined in the workday calendar.
Lead Time Settings in Network Routings form
When computing manufacturing lead times, operation and resource offsets are automatically assigned to a routing.
Lead Time Percent:
Optionally, you can enter the item's manufacturing lead time percent required to complete all previous operations on the routing. For example, if the manufacturing lead time equals 10 days and all previous operations combined require 2 days, the lead time percent for the current operation is 20%.
Offset Percent:
For example, a value of 50 means that you utilize the resource when the routing is 50% complete. This value is automatically calculated when you compute the lead time for the assembly.
Integration with Advanced Supply Chain Planning
If you set the WSM: Create Job Level BOM and Routing Copies profile option to No (Option 1), then Network Routings are captured in a snapshot and used to calculate and plan resource requirements for existing lot based jobs and planned orders. If you set the WSM: Create Job Level BOM and Routing Copies profile option to Yes (Option 2), then the job-level routing is looked at and not the network routing of the item.
This is accomplished using one the following methods:
-
The primary path
-
Cumulative percentages
-
Deriving the percentages based on resource availability
With the primary path method, orders are scheduled on the primary path. The cumulative percentages method takes advantage of the pre-calculated accumulated percentages from various paths on the network routing to guide scheduling. The third method, derives percentages based on resource availability, analyzes the current conditions on the shop floor and intelligently chooses alternate paths and determines the quantity which needs to be processed on each path.
The reverse cumulative yields specified at the operation sequence level are captured in a snapshot by Advanced Supply Chain Planning and used to derive the component requirements. Advanced Supply Chain Planning loads resources using the inflated quantities derived from reverse cumulative yields at different operation sequences.
Related Topics
Oracle Advanced Supply Chain Planning, Oracle Advanced Supply Chain Planning User's Guide .
Constraint Types, Oracle Adavanced Supply Chain Planning User's Guide.
Items, Oracle Advanced Supply Chain Planning User's Guide.
Manufacturing Resources, Oracle Advanced Supply Chain Planning User's Guide.
Integration with Outside Processing
Using Outside Processing (OSP), you can include supplier-sourced components and resources in the manufacturing process. An OSP operation requires one or more OSP resources, which in turn must be associated with departments with location. In addition, a separate OSP item must be created to receive and charge the outside work (this item is associated with the resource). When creating the OSP item, the Purchasing Tabs of the Item window must have OSP-related settings, i.e. Purchased, Purchasable, Outside Processing Item must be checked. The list price must be specified in the purchasing master organization for generating purchase orders. See: Outside Processing, Oracle Work in Process User's Guide. Features of outside processing for lot based jobs include:
-
Setup
-
Outside Processing Scenarios
-
Job Creation/Update
-
WIP Lot Transactions
-
Move Transactions
-
Defining Network Routings