Co-Products
This chapter covers the following topics:
- Overview of Co-Products
- Defining Co-Products
- Define Time Phased Split Percentages Window
- Substitute Components Window
- Component Details Window
Overview of Co-Products
Co-products are assemblies or products belonging to the same product family, and manufactured from the same primary component. When you define co-products, you specify the assemblies, their planning percentages, and the primary component. One of the assemblies is the primary co-product and the others are the non-primary co-products. When you define the co-product group, corresponding bill of materials are created using both the primary bill of material and non-primary bill (or common bill) components. When you create co-products:
-
Define an item as the primary component of several end items.
-
Define the expected distribution across all the end items. When you create this information in the Define Co-Products window, the Bills of Material of the end items are automatically created.
-
Associate a rank and a distribution percentage for the co-products.
Oracle Shop Floor Management is integrated with Oracle Planning enabling you to perform transactions such as implementing planned orders as lot based jobs and rescheduling existing lot based jobs from the Planner's Workbench.
Defining Co-Products
-
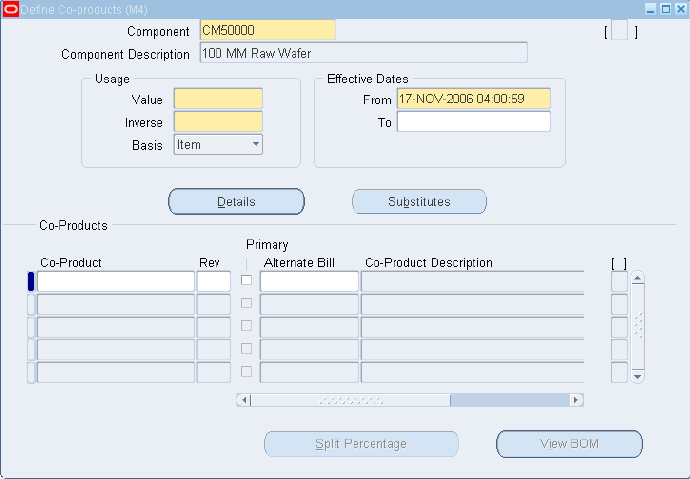
Navigate to the Define Co-Products window.
You can query an existing co-product relationship using the search criteria.
-
If you are searching for an existing co-product, choose Find and enter your search criteria.
-
If you are creating a new co-product, choose New from the File menu.
-
Select an item number in the Component field.
The assembly's description and, if existing, alternate designator displays.
-
In the Usage region, enter data in to the Value and Inverse fields to define the quantity used.
Value is the quantity of the component needed to create the assembly, that is, the quantity of the component needed for each of the co-products. The Inverse is automatically calculated. It is an inverse quantity, one quantity of the component will make that quantity of the co-product.
In the Basis field, enter the type of the Co-Product of the component to fix the material usage.
-
In the Effectivity Dates region, enter values From and To if this component is to be disabled at a future date.
Optionally, you can enter data to define an alternate or substitute component. See: Substitute Components Window.

-
You can view information in the Component Details window.
This window enables you to view Bill of Material information for the component. See: Component Details Window, .
-
In the Co-Products region, enter the Co-Product item name in the Co-Product field.
The item number's Revision level and Engineering Change Number displays.
-
If this is the primary co-product, then choose the Primary check box.
There should be only one primary co-product for a component. Non primary co-products are set up as common bills of material with the primary co-product's bill designated as the common bill. The primary co-product's bill may be an alternate or a primary bill.
-
Save your work.
The completed transaction creates a BOM for each of the co-products entered with the main item in the components header zone as the component.
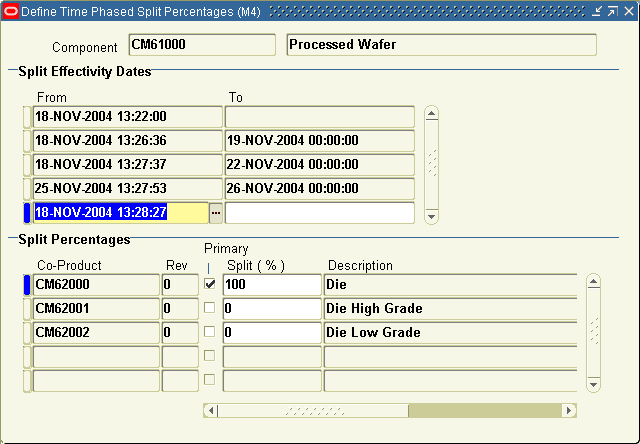
When committed, you can enter split percentages for the co-products in the Define Time Phased Split Percentages window. By default, 100% is populated for the primary co-product and 0% for the secondary co-products. The user can move to the split percentages zone by pressing the Split Percentage button.
Define Time Phased Split Percentages Window
Use this window to update co-product split percentages, or add split effectivity date range information.
In the manufacturing process, output of the final product can improve with time. For example, in the semiconductor industry, the quality of a wafer can improve during its life cycle. Early in the life cycle, the same component wafer may produce a lower percentage of high performance chips. Late in the life cycle, the same component item may produce a much higher percentage of high performance chips. You can model this process by providing different sets of planning percentages for resulting co-products from the same component over specific time periods.
To enter time phased co-products split percentages
-
From the Define Co-products window, choose Split Percentage. The Define Time Phased Split Percentages window appears.
-
Enter the Split Effectivity From date.
-
Enter the Split Effectivity To date.
-
Save the split percentages for a given range before entering percentages for a new range.

-
Enter split percentage values between 0 and 100.
-
Save the split percentages before entering percentages for a new range.
-
Save your work.
When you save split percentages, current date ranges displayed in the window can change as follows, depending on the effective and disable dates that you enter:
-
When the co-product definition is saved, for the time range from the date on which co-product definition is created till infinite date in future. This is to ensure that split percentage can be found for a co product on any date after the co-product is defined.
-
When the effectivity date entered should be greater than the current date.
-
If the new time range is overlapping with one or more existing time ranges, then the overlapping time range will have the split percentages entered against the new time range. Existing date ranges will be shortened so that the overlapping region falls under the new range.
-
If any existing range completely overlaps the new range, then split percentage data for this range will be deleted.
Note: If you want to add a new Secondary co-product, then use the Define Co-products window. You cannot add a new secondary co-product from the Define Time Phased Split Percentages window. The Define Time Phased Split Percentages window only lets you modify the split percentage of exiting co-products.
-
Substitute Components Window
To define substitute components
-
Navigate to the Define Co-products window.
-
Select an item number in the Component field.
-
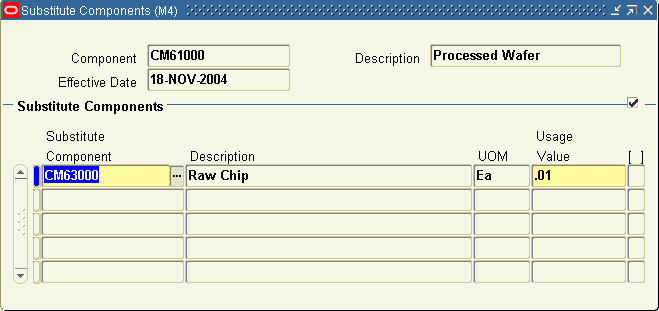
Choose Substitutes.
The Substitute Components window displays.

-
Default information default displays component item number, description, effective date, and alternate bill of material.
-
In the Substitute Components region, enter the item number in the Substitute Component field, and the quantity used in the Usage Value field.
-
Save your work.
Component Details Window
This window enables you to enter corresponding bill of material information for the component.
To define component details
-
Navigate to the Define Co-Products window.
-
Select an item number in the Component field.
-
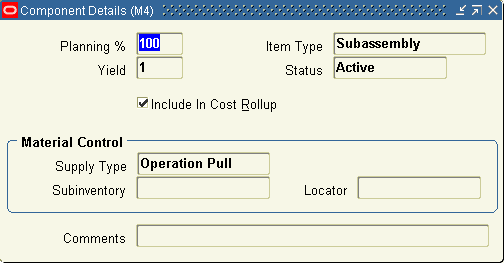
Choose Details.
The Component Details window displays default information for the Planning Percent, Yield, Item Type, Status, and Include in Cost Rollup fields and check box.

-
In the Material Control region—the Supply Type field defaults to Operation Pull, and the Subinventory and Locator fields default to the values set up for this item number.
Optionally, you can update the Subinventory and Comments fields. In the Comments field you can enter a notation about information on this window. For example, a comment about why this part is not considered in a cost rollup if that check box is not marked.
Note: Co-product component details, once entered, are updated on the corresponding bill of material window.