Shop Floor Execution
Overview of Shop Floor Execution
Oracle Shop Floor Management provides you with a functionality to carry out and view various transactions to track the progress of manufacturing of goods at the factory shop floor. It addresses the requirements of two different roles at the shop floor:
-
The shop floor operator: a human resource whose main task is to operate a particular machine and report progress made on it.
-
The shop floor supervisor: whose main task is to oversee the shop floor and help resolve issues relating to machine and human resources on the shop floor to meet the desired production and other set objectives.
Some of the tasks that you perform on a factory shop floor can be clearly assigned to one of the roles mentioned above, but there are other tasks which might be a part of both. With Shop Floor Execution system, you can actually configure the screens according to the user roles.
Oracle Shop Floor Management also provides you with a set of new screens and functionality for the Shop Floor Operator and a set of additional screens and functionality for the Shop Floor Supervisor. These screens for the shop Floor Operator helps the operator to carry out his duties in a cohesive fashion and in an easy way within a framework of logical screen flows. It helps the Shop Floor Supervisor to set the configurations in such a way to have a better control over the business practices in the organization and make the UIs more user friendly for the operators in his shop floor.
Shop Floor Modeling
Shop Floor Modeling provides you with better configuration capabilities. It provides you with improved shop floor control through
-
Granular access management for operators/supervisors
-
Better information availability at manufacturing operations
-
Improved management of individual operations
-
Availability of real-time information
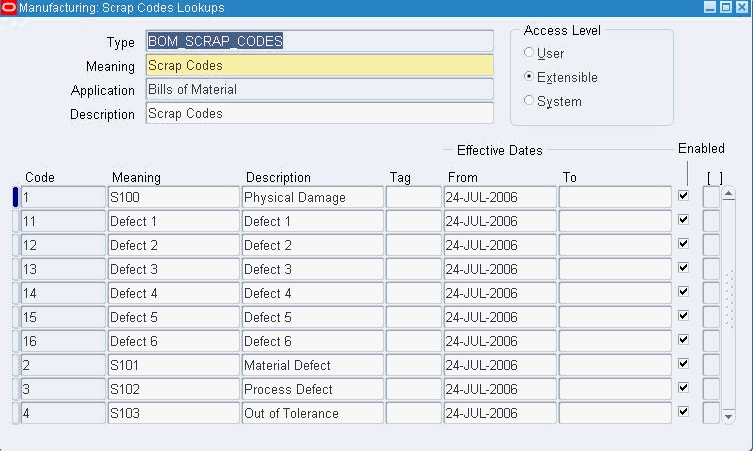
Defining Reason Codes
If a given standard operation has scrap codes defined, then the Show Scrap Code flag displays the scrap codes for you to enter the scrap quantity against each of the scrap code during Move Out.
To define Scrap Codes
-
Navigate to the Shop Floor Manager:Routings:Scrap Codes window.
-
Enter Code, Meaning and Description of the code in the Manufacturing: Scrap Codes Lookups window that appears.
Note: Enter numeric value in the Code field.
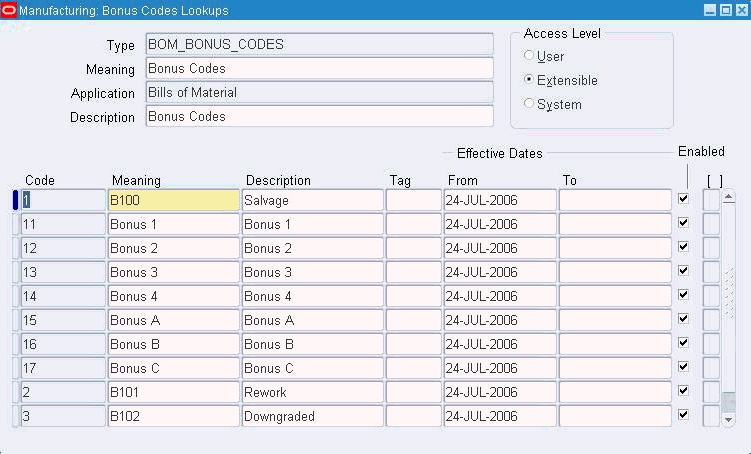
To define Bonus Codes
-
Navigate to the Shop Floor Manager:Routings:Bonus Codes window.
-
Enter Code, Meaning and Description of the code in the Manufacturing: Bonus Codes Lookups window that appears.
Note: Enter numeric value in the Code field.
To define Resource Down Codes
-
Navigate to the Shop Floor Manager:Routings:Resource Down Codes window.
-
Enter Code, Meaning and Description of the code in the Manufacturing: Resource Down Codes Lookups window that appears.
Note: Enter numeric value in the Code field.

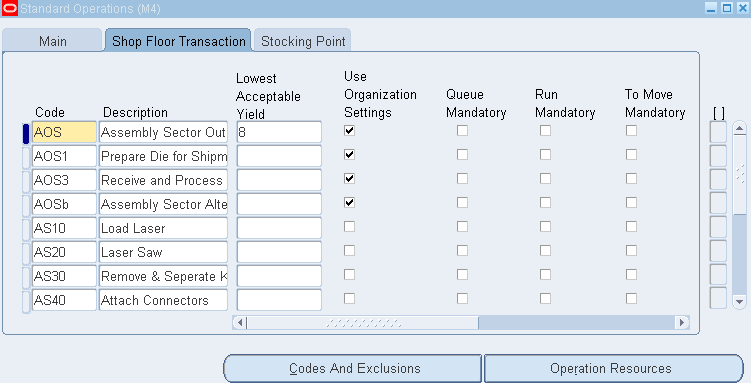
Low Yield Trigger
You can put a job on hold by defining the lowest acceptable yield for a given standard operation.
To define Low Yield Trigger
-
Navigate to the Standard Operations window.
-
Choose Shop Floor Transactions tab.
-
Select a Code and enter the Lowest Acceptable Yield.
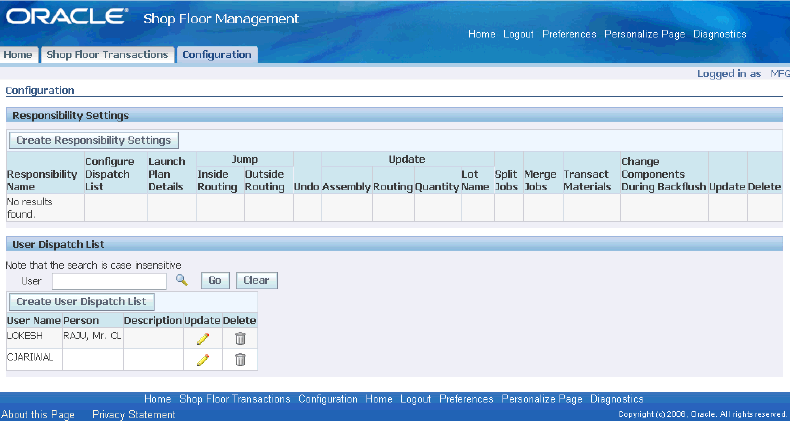
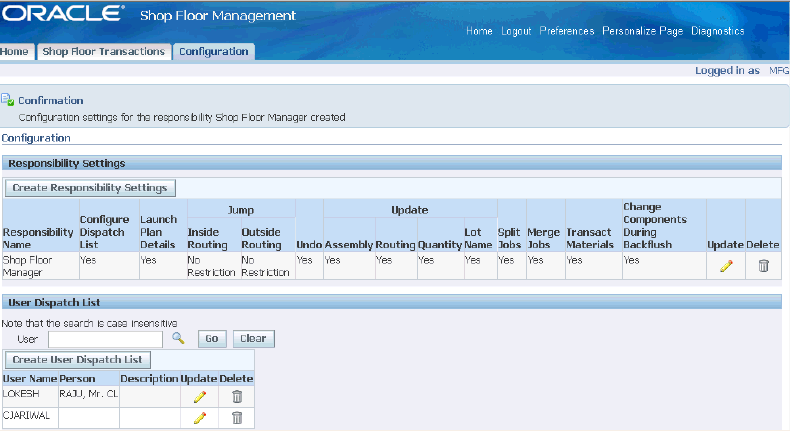
Responsibility Access Configuration
Shop Floor Modeling Configuration Capabilities enable you to query the responsibility of the user and configure the transaction settings accordingly.
To configure responsibilities for Shop Floor Manager and Operator
-
Navigate to MES Supervisor Workbench.
-
Choose Configuration tab.
-
Choose Create Responsibility Settings.
-
Enter the responsibility of the user in the Responsibility region.
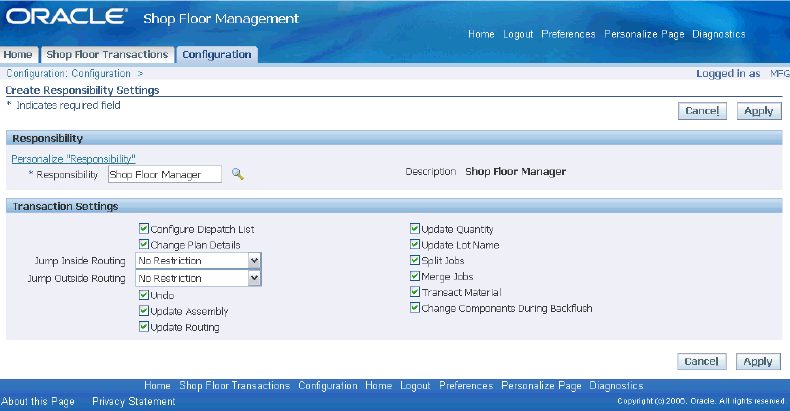
-
Select the transactions that you want this user to perform.
-
Click Apply.
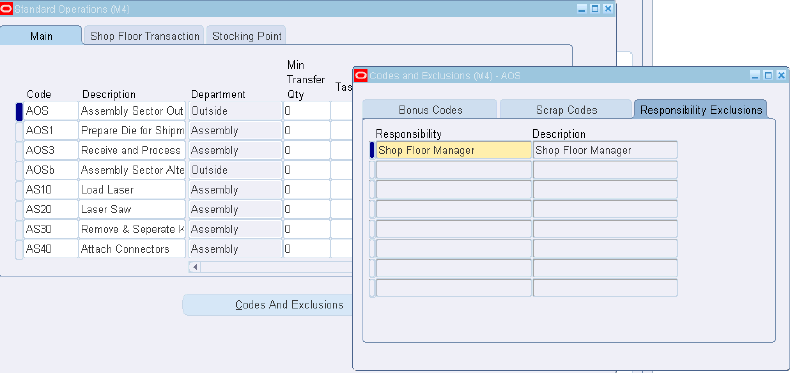
Responsibility Exclusion Configuration
With Shop Floor Modeling Responsibility Exclusions, you can list out responsibilities who are not allowed to perform transactions at a given standard operation.
To exclude responsibility
-
Navigate to Standard Operations window.
-
Choose an operation by clicking the Main tab.
-
Click Codes And Exclusions.
-
Choose Responsibility Exclusions tab on the Codes And Exclusions window that appears.
-
Choose the list of Responsibilities for exclusion.
Dispatch List Configuration
Shop Floor Modeling Configuration Capabilities allow you to list out a set of jobs or Work Orders for an operator to view and then execute in a given sequence on the shop floor.
To configure Dispatch List Search Criteria
-
Navigate to Shop Floor Manager: Supervisor Workbench.
-
Select Configuration tab.
-
Select Create User Dispatch List in the User Dispatch List region.
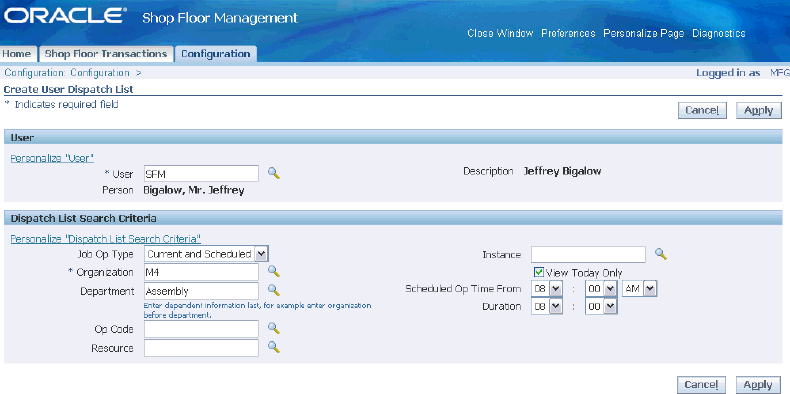
-
Enter the user.
-
Enter dispatch list details for individual users.
-
Click Apply

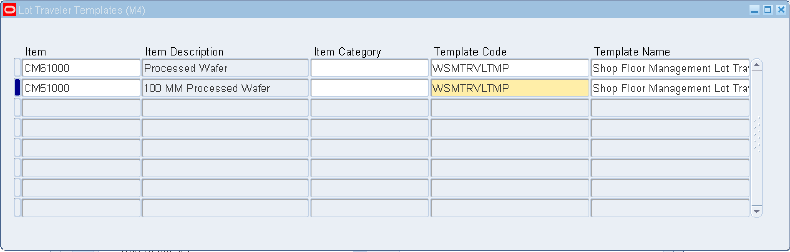
Lot Traveler Template Assignment
You can associate a Lot Traveler template for each Inventory Item or Inventory Item Category. When you create a lot based job, you can choose to view the lot traveler, save it, or print it. This is a look up between item or item category and the stored template. You can use this to generate the Lot Traveler.
Navigate to Lot Traveler Template windows to assign a Lot Traveler Template to an inventory item or item category.
Resource Context Configuration
If you configure resource as a context, then you can capture and view resource statuses like Up, Down, and Acknowledge Down.
Caution: Changing from one context to another will render deletion of all existing context definitions.
To define resource-based context details
-
Navigate to Shop Floor Manager: Supervisor Workbench.
-
Enter Organization.
-
Select Resource-Based as Context Type.
-
Click Add Context Details.

-
Enter Department, Resource, and Instance details.
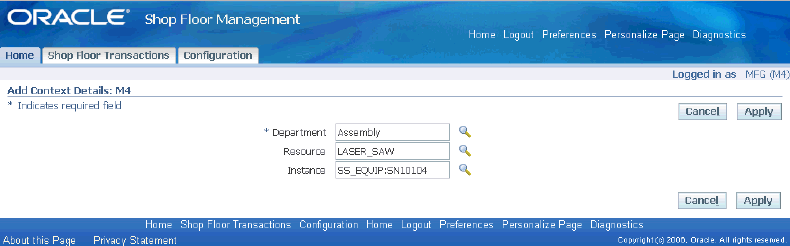
-
Click Apply.
Repeat steps 4 to 6 to add as many departments, resources, and instances as needed.
-
Click OK.
Operation-Based Context Configuration
With operation as a context configuration you can capture and view resource statuses like Up, Down, and Acknowledge Down and also see details for all resources defined for that operation.
To define operation-based context details
-
Navigate to Shop Floor Manager: Supervisor Workbench.
-
Enter Organization.
-
Select Operation-Based as Context Type.
-
Click Add Context Details.
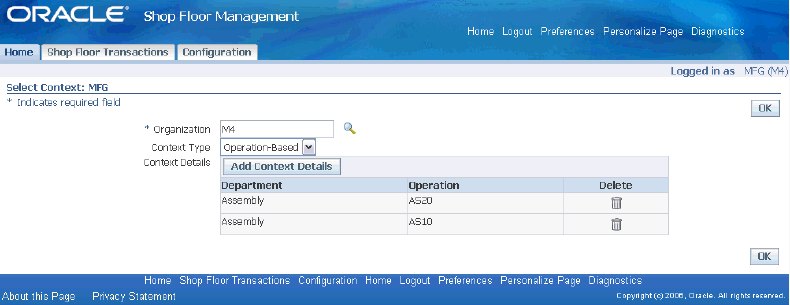
-
Enter Department and Operation details.
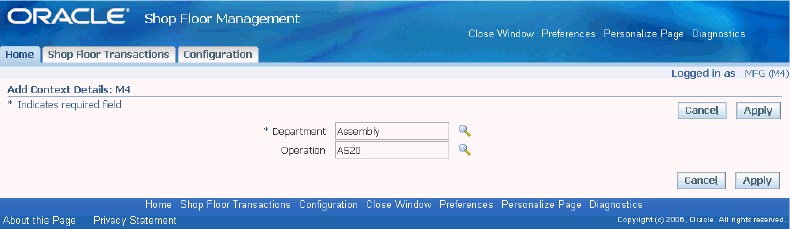
-
Click Apply.
Repeat steps 4 to 6 to add as many departments and operations as needed.
-
Click OK.
Overview of Shop Floor Intraoperation Transactions
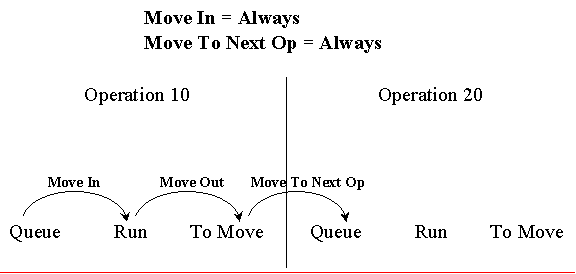
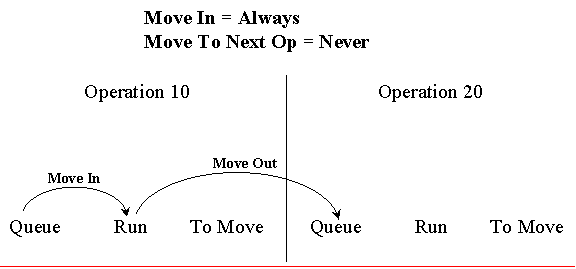
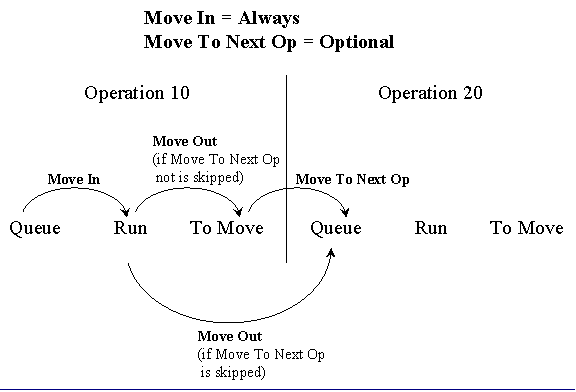
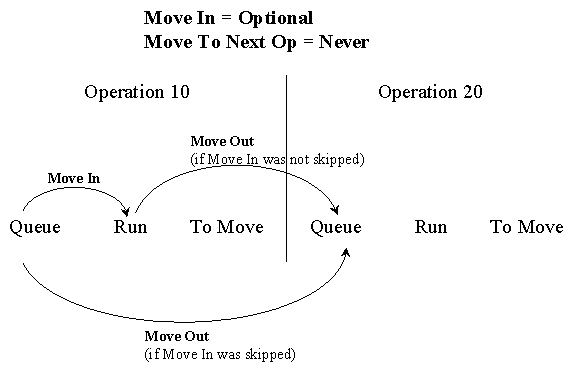
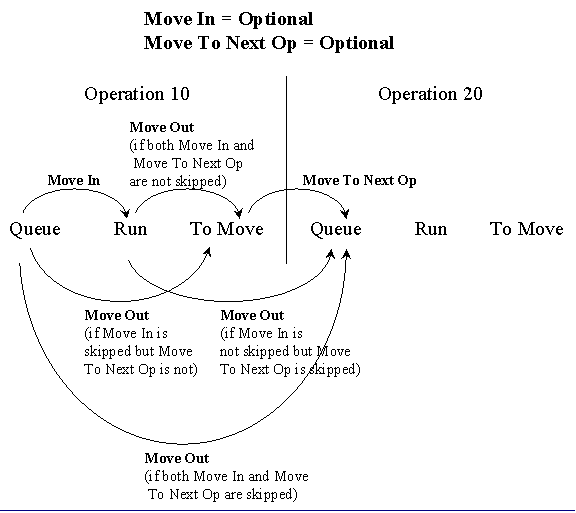
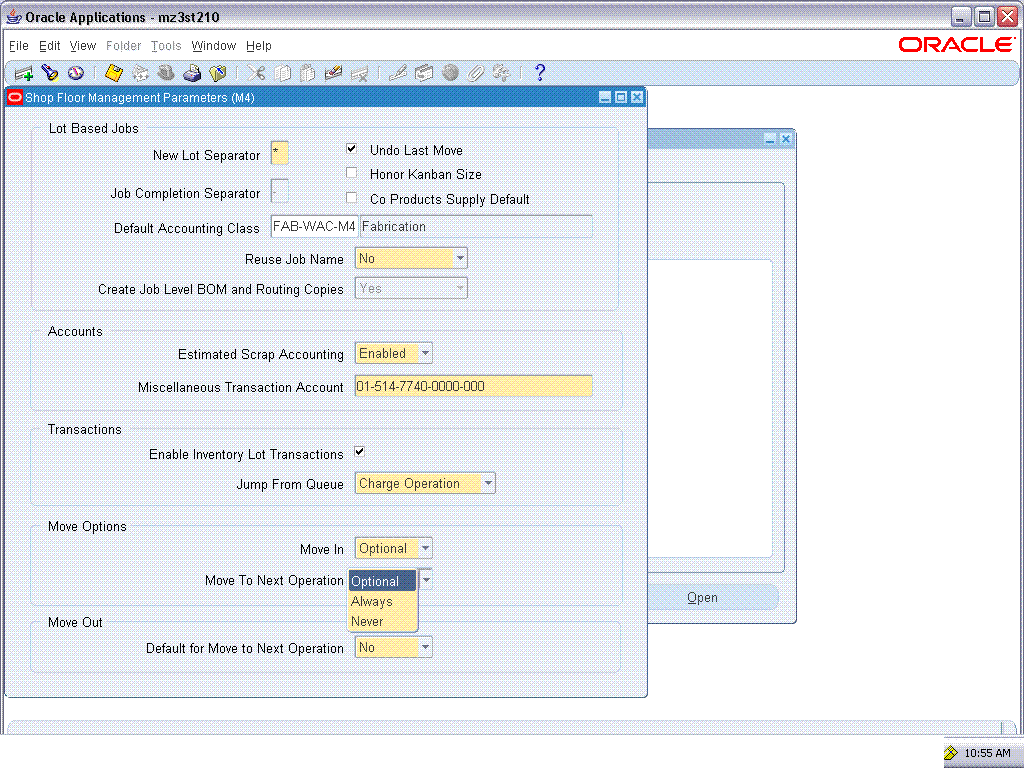
Shop Floor operations are driven by a process of Move In (pick up a lot from queue and start work), Move Out (complete work and report results) and Move To Next Operation (transfer lot to next operation).
Move Out is a required step to report results of the work done. You can choose Yes or No to track Move In and Move To Next Operation.
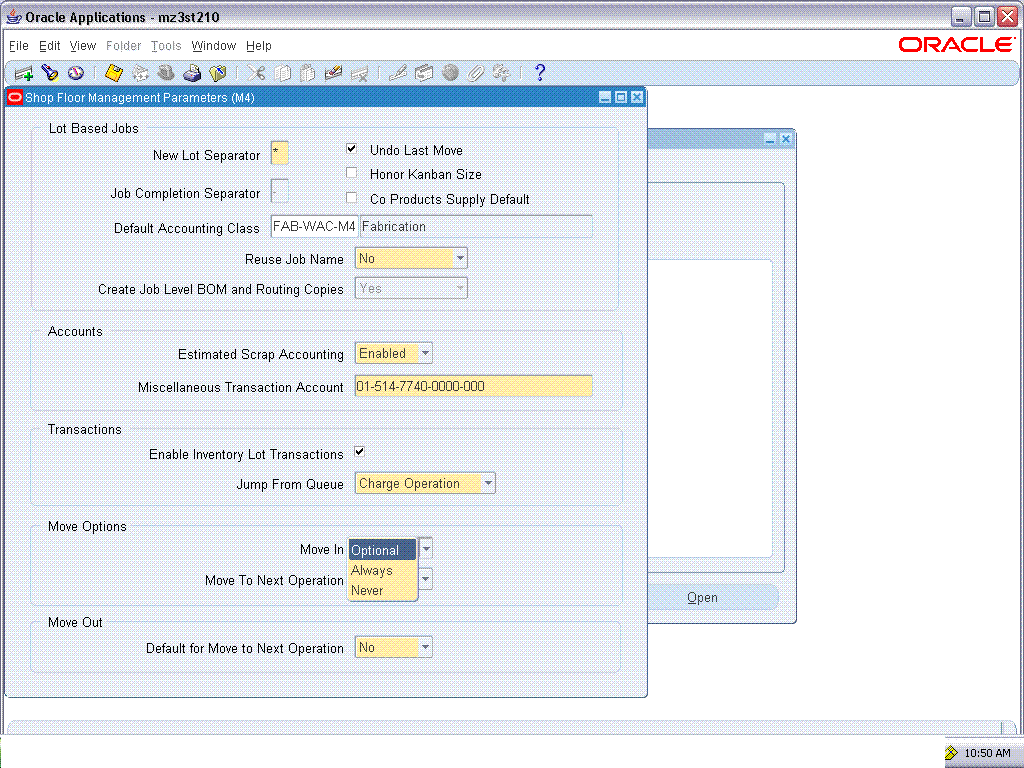
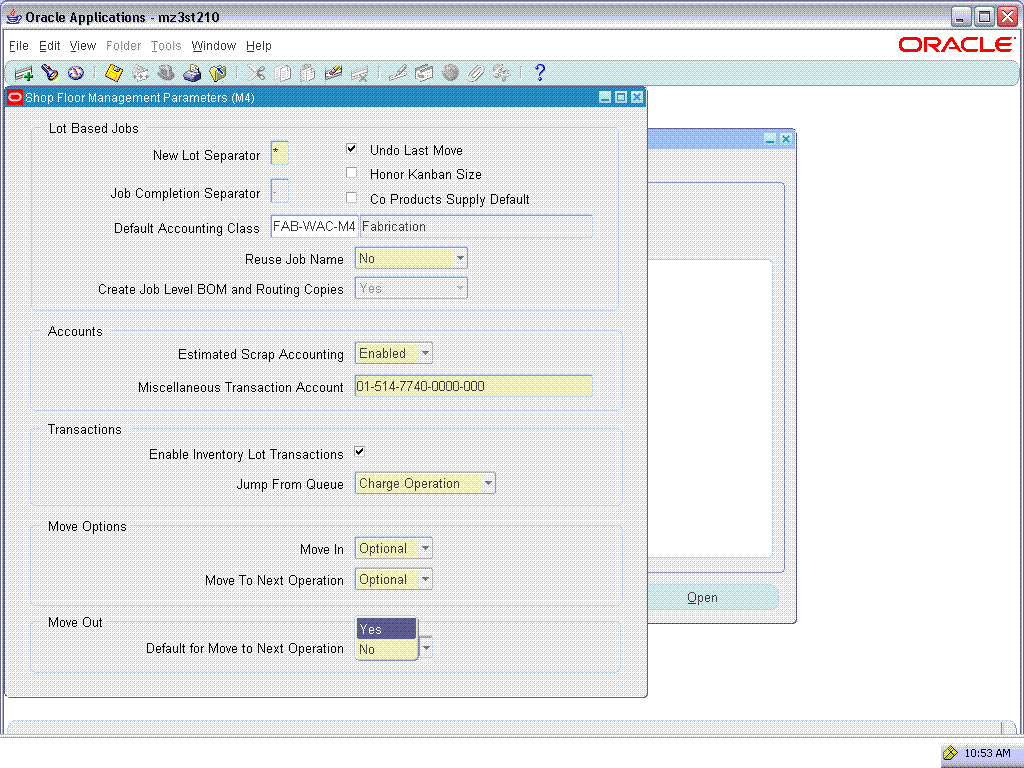
At the organization level, if Move In and Move To Next Operation are set to Always, then they are required steps for every operator. However, these settings can be overridden at the standard operation level through Organization Settings flag. If Move In is Optional, the operator can choose to perform Move In or directly perform Move Out transaction. If Move In is Never, then the operator will always directly perform Move Out transaction.
Likewise, if Move To Next Operation is Optional, during Move Out the operator can choose to stay at the current operation (to be followed by a separate Move To Next Operation transaction) or directly move to the next operation.
Move In and Move To Next Operation can be controlled at the standard operation level as well. If the checkbox for Use Organization Settings in the Standard Operations setup form is unchecked, then any settings at the standard operation level will supersede the settings at the organization level.
Since Move In, Move Out and Move To Next Operation correspond to movements between start and target intraoperation steps, standard operation level control is merged with pre-existing Mandatory Intraoperation step settings. To make a Move In transaction as a required step Always, the supervisor should select that standard operation's Run or Move In Mandatory Intraoperation Step checkbox. Leaving it unselected will make it Optional only when flag Use Organization Settings is not checked. Likewise, to make Move To Next Operation as Always, the supervisor should select the To Move or Move To Next Operation checkbox and unselect it for making it Optional.
Movements between Intraoperation Steps
Based on the settings for Move In and Move To Next Operation (Always or Optional or Never), which must be compatible with WIP Parameters Intraoperation step settings corresponding to Optional (checked) or Never (unchecked), the following are the possible cases for movements between intraoperation steps for a given operation:
Case 1
-
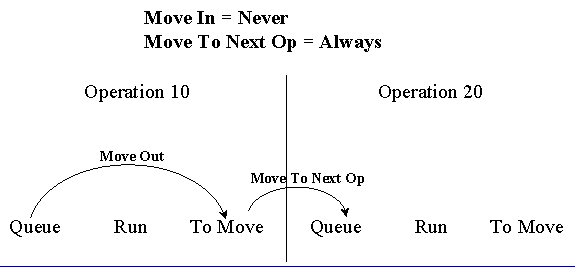
Move In set to Always at Organization or Standard Operation level
-
Move To Next Operation set to Always at Organization or Standard Operation level
-
Organization’s WIP Parameters Intraoperation Steps for Run and To Move are selected
Case 2
-
Move In set to Always at Organization or Standard Operation level
-
Move To Next Operation set to Never at Organization or Standard Operation level
-
Organization’s WIP Parameters Intraoperation Steps for Run are selected and To Move is not selected
Case 3
-
Move In set to Always at Organization or Standard Operation level
-
Move To Next Operation set to Optional at Organization or Standard Operation level
-
Organization’s WIP Parameters Intraoperation steps for Run and To Move are selected
Case 4
-
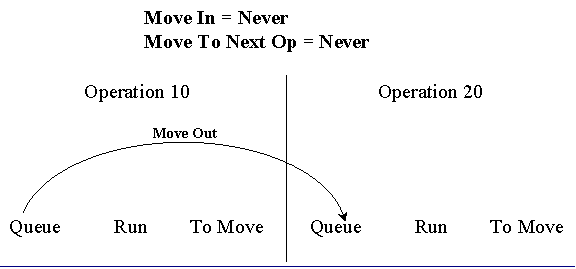
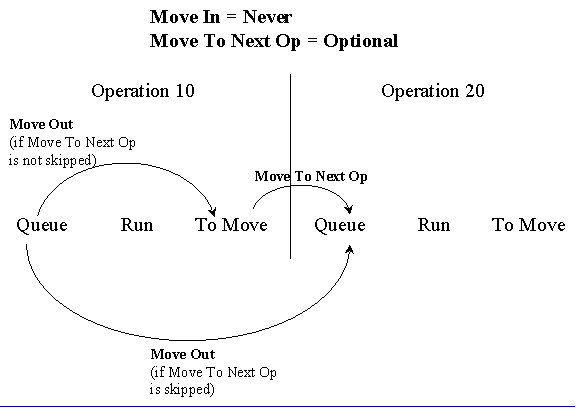
Move In set to Never at Organization or Standard Operation level
-
Move To Next Operation set to Always at Organization or Standard Operation level
-
Organization’s WIP Parameters Intraoperation Steps for Run are not selected and To Move is selected
Case 5
-
Move In set to Never at Organization or Standard Operation level
-
Move To Next Operation set to Neverl at Organization or Standard Operation level
-
Organization’s WIP Parameters Intraoperation Steps for Run and To Move are not selected
Case 6
-
Move In set to Never at Organization or Standard Operation level
-
Move To Next Operation set to Optional at Organization or Standard Operation level
-
Organization's WIP Parameters Intraoperation Steps for Run are not selected and To Move is selected
Case 7
-
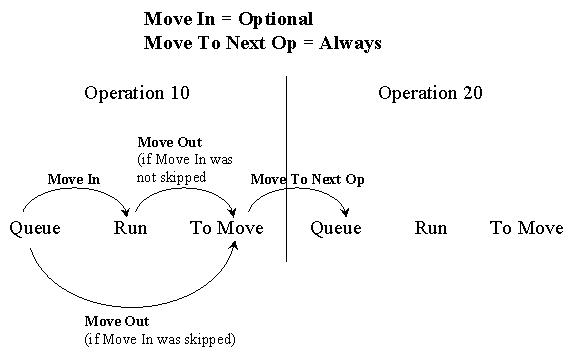
Move In set to Optional at Organization or Standard Operation level
-
Move To Next Operation set to Never at Organization or Standard Operation level
-
Organization’s WIP Parameters Intraoperation Steps for Run and To Move are checked
Case 8
-
Move In set to Optional at Organization or Standard Operation level
-
Move To Next Opertion set to Always or Optional at Organization or Standard Operation level
-
Organization’s WIP Parameters Intraoperation Steps for Run are selected and To Move is not selected
Case 9
-
Move In set to Optional at Organization or Standard Operation level
-
Move To Next Operation set to Optional at Organization or Standard Operation level
-
Organization’s WIP Parameters Intraoperation Steps for Run and To Move are selected
Intraoperation Definitions based on Shop Floor Execution Transactions
Move In
Move In: capture an action of putting a lot at the Run intraoperation from the ‘Queue’. This signifies an action when a machine actually starts working on the job. You have three options to control the requirement of a Move In transaction. For a given operation, the operator picks up a lot from his/her job queue, loads machines, and starts work on the job.
Move Out
Move Out: capture an action of transferring a lot from the Run intraoperation to the To Move intraoperation. This signifies an action when a machine completes working on the job. Based on this setting, by default you can either move to next operation's Queue intraoperation step or stay at this operation's To Move intraoperation step. You can still override the choice at the time of doing Move Out transaction. For a given operation, an operator completes work on the current job and notes any results.
Move To Next Operation
Move To Next Operation: capture an action of transferring a lot from the ‘To Move’ intraoperation to the ‘Queue’ of the next operation. It is an action signifying that a job is transferred to the next operation after the completion of the previous operation. You have three options to move a job to the next operation as a part of Move Out transaction: always or never or make it optional. If Never, then you must perform a separate Move To Next Operation transaction. If Optional, then you have a choice to perform a separate Move To Next Operation transaction based on the selection during Move Out.
Shop Floor Execution
Oracle Shop Floor Management provides enhanced Shop Floor execution capabilities that help you to generate more comprehensive and valuable reports for manufacturing operations. With its integration with Oracle Advanced Supply Chain Planning you can generate real-time information on the shop floor.
New HTML UIs are provided for Resource Context Definition, Responsibility and Dispatch List configuration, and Executing shop floor transactions, Lot Traveler, etc.
Supervisor Workbench
Using this function, a shop floor supervisor can perform the following:
-
View the status of the resource, resource instance
-
Search jobs by using search criteria
-
Configure responsibility settings and dispatch lists
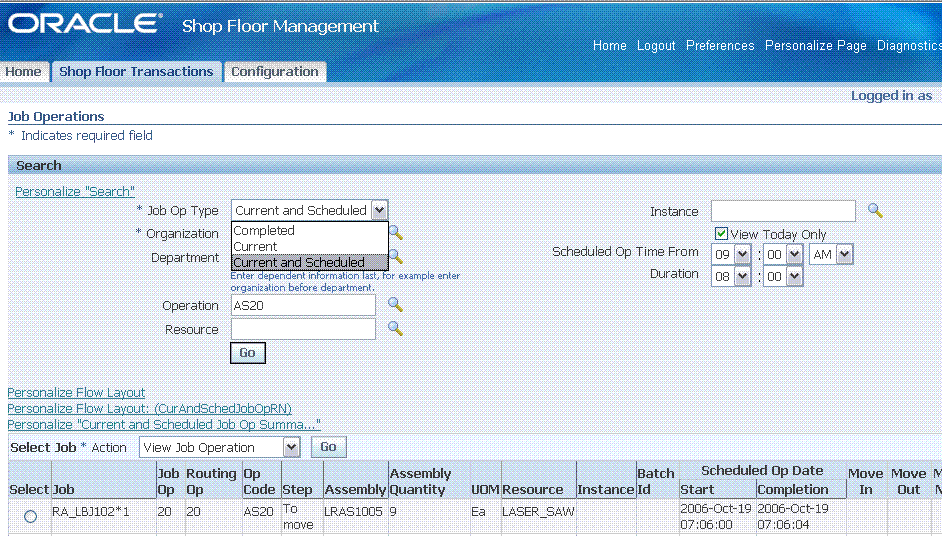
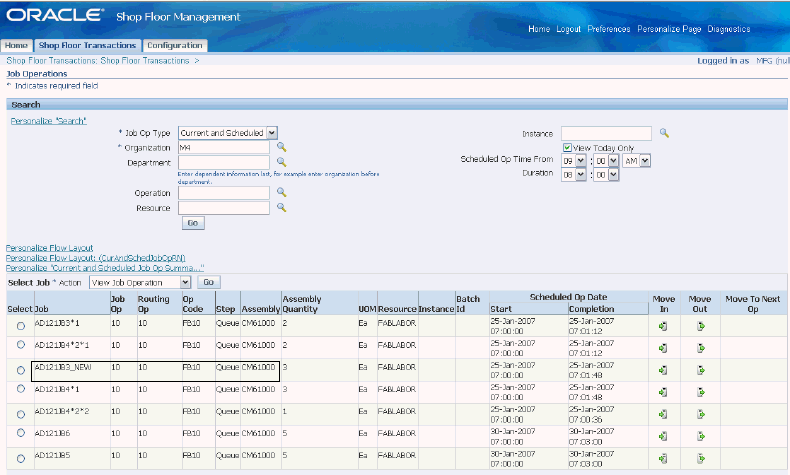
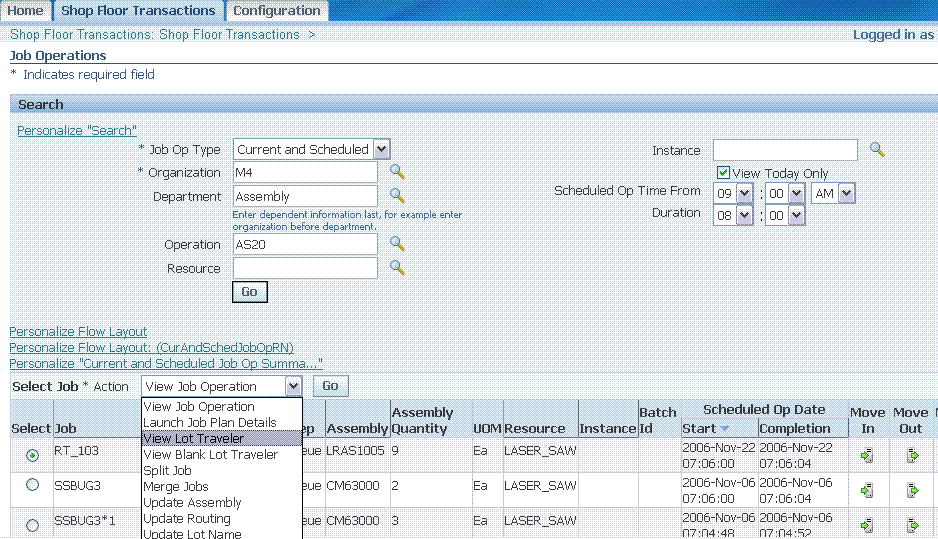
Dispatch List: Search Criteria
Dispatch List is a list of jobs or Work Orders that you can view and then execute on the shop floor in a given sequence. Your actions are based on the configuration of your responsibility.
You can also search dispatch lists based on resource or instance.
To search dispatch list
-
Navigate to MES Supervisor Current Resource Status. Current Resource Status page appears.
-
Choose Shop Floor Transactions. The Job Operations UI window appears.
-
Select a Job Op Type from the list.
-
Enter Organization.
-
Enter the department name.
-
Enter Operation or Resource.
For Resource, optionally enter specific Resource Instance.
For Current and Scheduled Job Op type, you can also search based on scheduled operation from and to dates. For each day in that range, specify start time and shift by selecting Scheduled Op Time and Duration fields. For Completed Job Op type, use actual dates.
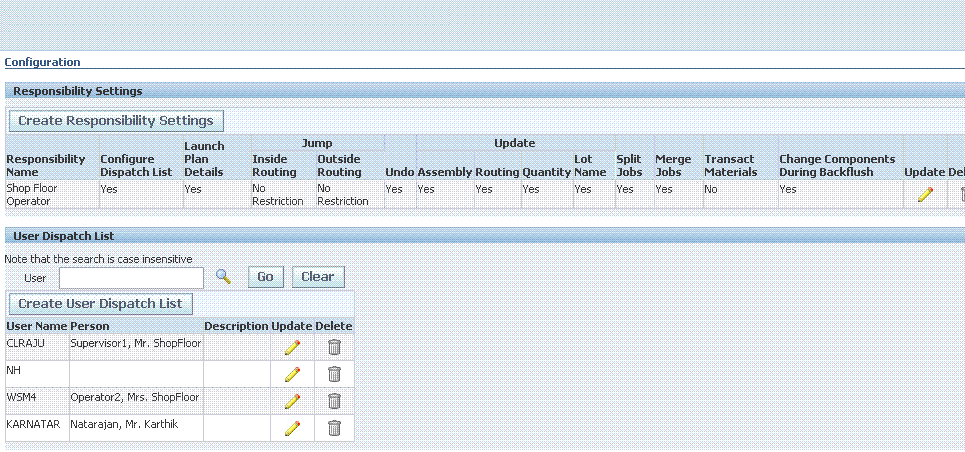
The supervisor can choose at the responsibility level if the Operator Responsibility has access for defining his or her own dispatch list. This is controlled by the Configure Dispatch List flag in the Responsibility Settings of the Supervisor Configuration page. If the flag is No, then the Operator cannot configure his own dispatch list. In that case, the supervisor configures dispatch list for each operator. If the flag is Yes, then the Operator can configure his own dispatch list by clicking the Change Dispatch List Options button on the Dispatch List.
Create Responsibility Settings: Access to various actions performed on the jobs for different responsibilities are set here.
Dispatch List configuration: Dispatch List Search Criteria are configured for users (especially operators).
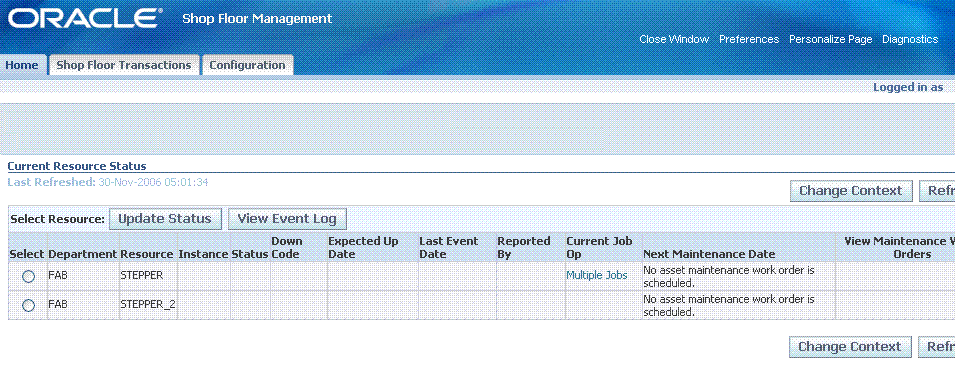
Current Resource Status
You can manage resources on the shop floor by recording Resource Down Time. You can update resource status, specify Down Code and enter operator details.
To update resource status
-
Navigate to MES Supervisor Current Resource Status.
-
Select a resource from the Current Resource Status page.
-
Select resource Update Status.
-
Update the Resource Status.
-
Choose Apply.

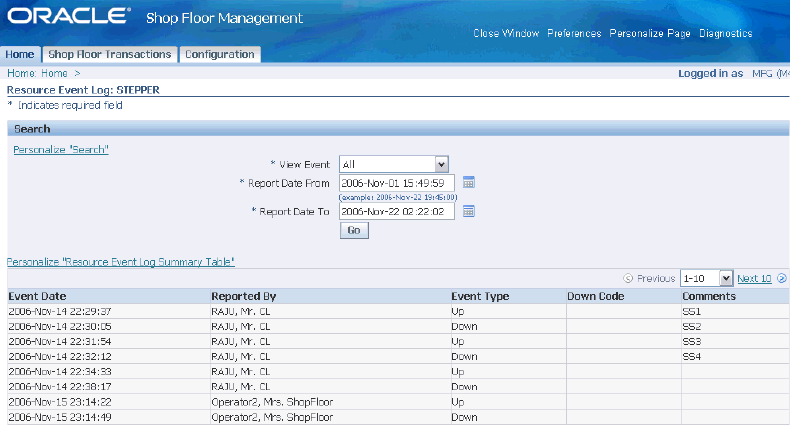
Event Log
You can view event log for a resource for Specific or All Resource Statuses or for a selected period.
To view event log for a resource
-
Navigate to MES Supervisor Current Resource Status
-
Select a resource.
-
Choose Event Log.
-
Select View Event and choose a possible value.
-
Select the From date from the calendar icon.
-
Modify the Report Date To. The current date is defaulted.
-
Select Go.
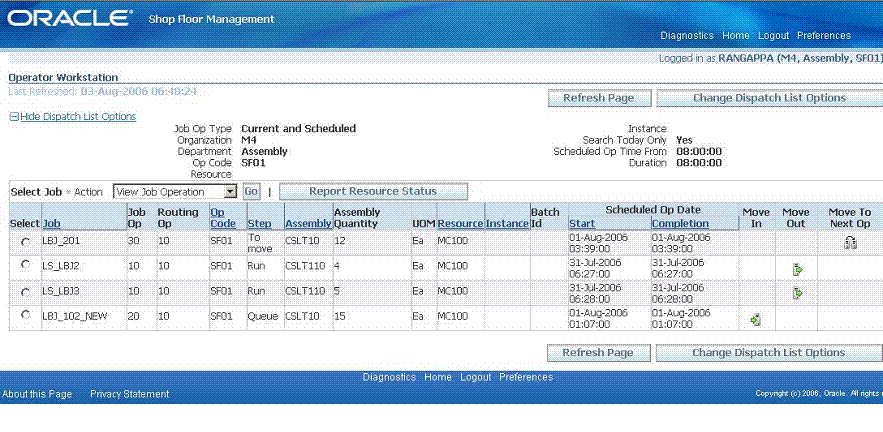
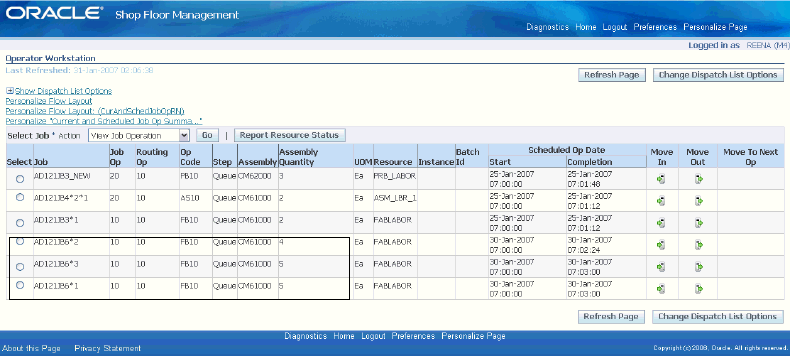
Operator Workstation
Using the Operator Dispatch List function, you can view the Dispatch List as configured by the supervisor. Operator can configure the Dispatch List as it is enabled for that responsibility (like Shop Floor Operator).
Operator can select jobs and then execute various actions as configured in the responsibility settings.
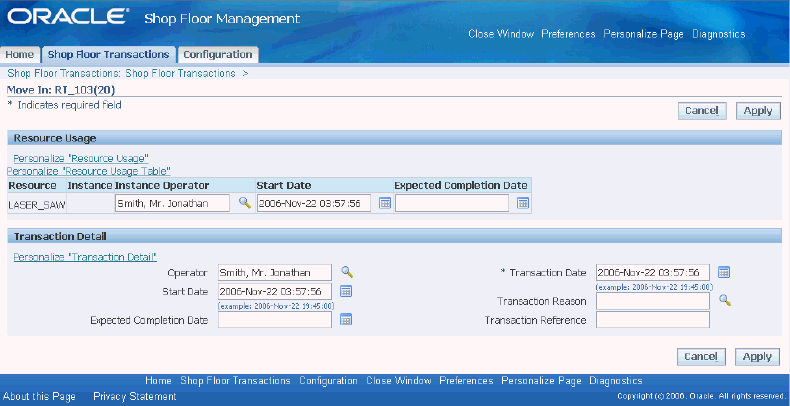
Move In transaction
You can move a job into an operation, that is, from Queue to Run. You can also capture data on Resource Instance Details, Operation Start and Expected Completion Date and Time, and the operator who worked on the Instance.
Resource Instance Details: capture the actual machine on which the job is done and the actual start and expected completion time of the resource used in doing the transaction.
Note: Actual completion time is recorded during Move Out transaction.
Operation Start and Expected Completion Date and Time: capture the actual start and expected completion time for each operation of the job.
Operator Details: capture the name of the person who executed the operation and the name of the person who captured the transaction data.
Note: You can update the data entered at this stage during a Move Out transaction.
To do a Move In transaction
-
Select a job in the Dispatch List.
-
Click on Move In link. The Move In page of the selected job appears with Resource Usage and transaction details.
-
Enter details and choose Apply.
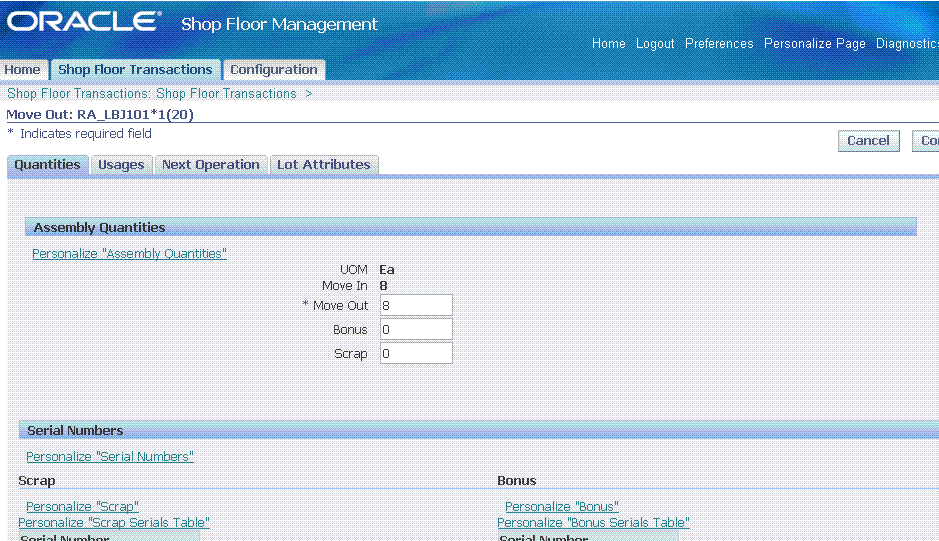
Move Out a transaction
You can move a job out of an operation, that is, from Run to To Move. You can also capture:
-
Operation Start and Completion Date and Time: capture actual start and completion time for each operation of the job.
-
Operator Details: capture the name of the person who captured the transaction data.
-
Job Quantity - Bonus: capture increase in job quantity, while executing a move transaction and specify the bonus quantity against each of the Bonus Code.
-
Job Quantity - Scrap: specify scrap quantity against scrap code.
To do a Move Out transaction
-
Select a job in the Dispatch List.
-
Click on Move Out link. The Move Out page of the selected job appears with assembly quantities, scrap, bonus and transaction details.
-
Enter details and choose Continue.
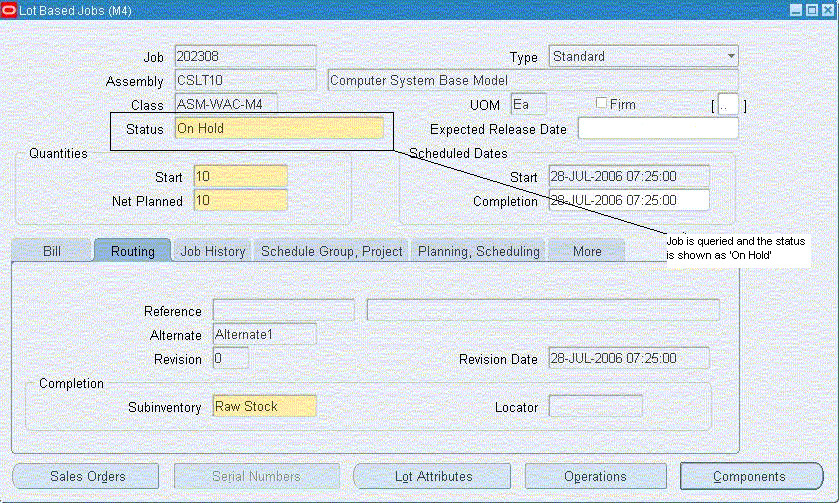
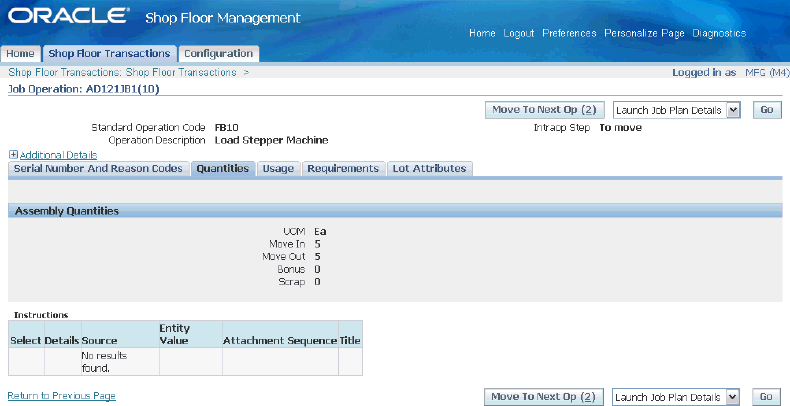
Alert for Low Yield during Move Out: If the yield goes below the Lowest Acceptable Yield set for that standard operation, then the job is put on hold. When you query, the status shows On Hold in the Lot Based Jobs window.
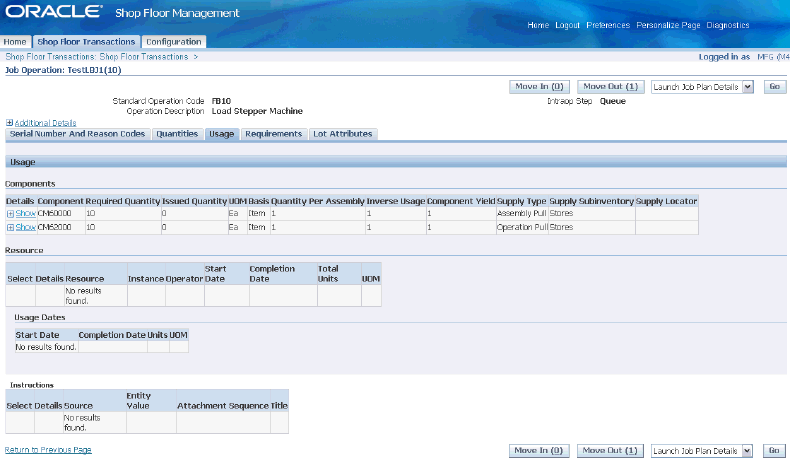
Select Usages tab to issue backflush components that are lot and/or serial controlled.
Select Next Operation tab to see the operations as per the network routing sequence. You can choose operations on primary or secondary path as defined.
Select Lot Attributes tab to enter or update lot.
Move to Next Operation
You can move a job to the next operation, that is, from To Move to Queue of next operation. You can capture transaction details and details of the next operation.
To do a Move To Next Operation transaction
-
Select a job in the Dispatch List.
-
Click on Move To Next Op. The Move To Next Op page appears with transaction and next operation details.
-
Enter details and choose Apply.

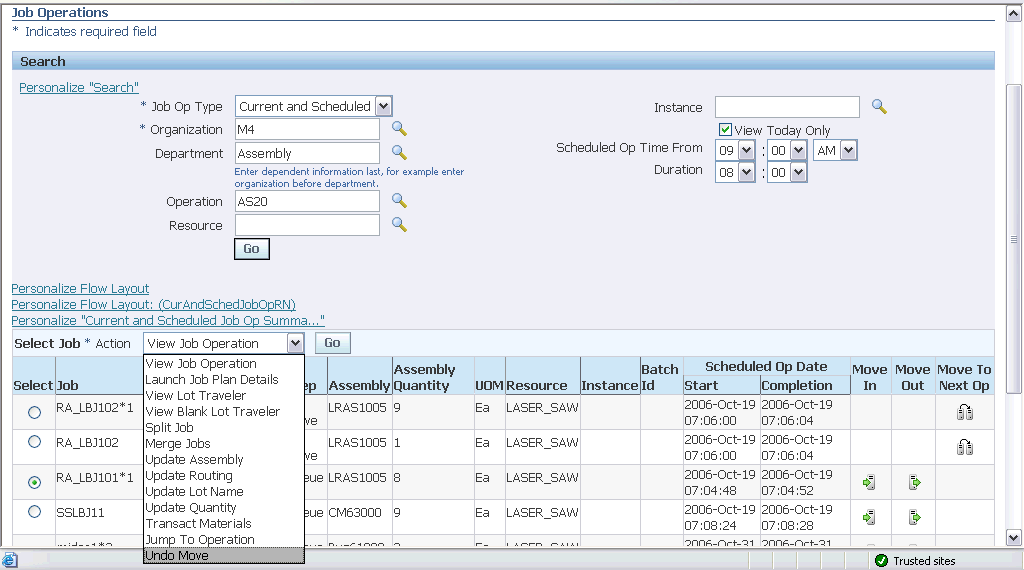
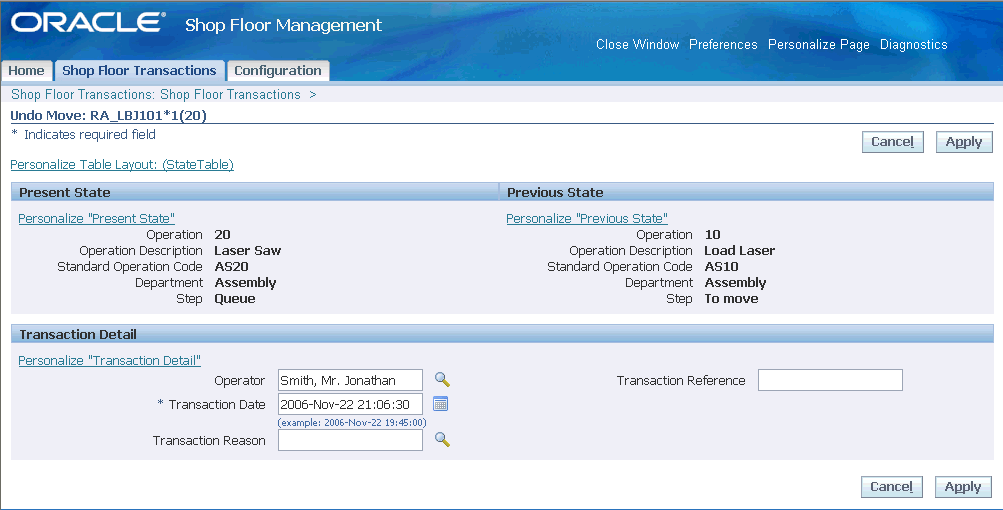
Undo Move
By Undo Move transaction, you can bring the job back to the previous operation. You can view the operator details, and the details of the present and previous operations. You can capture the transaction time and the name of the operator, performing the Undo Move.
Note: Move transactions performed in HTML UIs can alone be undone using the Undo Move transaction.
You can undo a transaction only for Job Move. You cannot undo immediately after you perform a WIP Lot transaction. Undo Move on a completed job returns the assembly from Inventory to WIP.
To do Undo transaction
-
Select a job in the Dispatch List.
-
Choose Undo Move as Job Action.
-
Click Go. Undo page appears with present and previous operation details and transaction details.
-
Enter transaction details and select Apply.
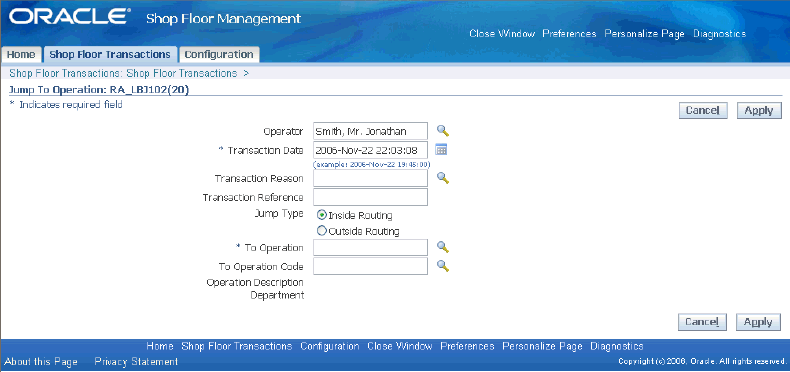
Jump To Operation
You can use the Jump To Operation to go to an operation, which is not the next operation in sequence as defined in the network routing. You can capture the name of the operator, the jump type, whether it is inside or outside routing and details of destination operation.
To Jump to an operation
-
Select a Job in the Dispatch List.
-
Choose Jump To Operation as Job Action.
-
Select Go. The Jump To Operation page appears.
-
Enter required operation changes and choose Apply.
WIP Lot transactions
Oracle Shop Floor Management provides you the ability to do WIP Lot transactions of split, merge, update quantity, update assembly, update routing and update lot name using HTML UIs.
To do a WIP Split Transaction
-
Navigate to Operator Workstation.
-
Select a Job in the Dispatch List.
-
Choose Split Job as Action to execute a WIP Split Transaction.
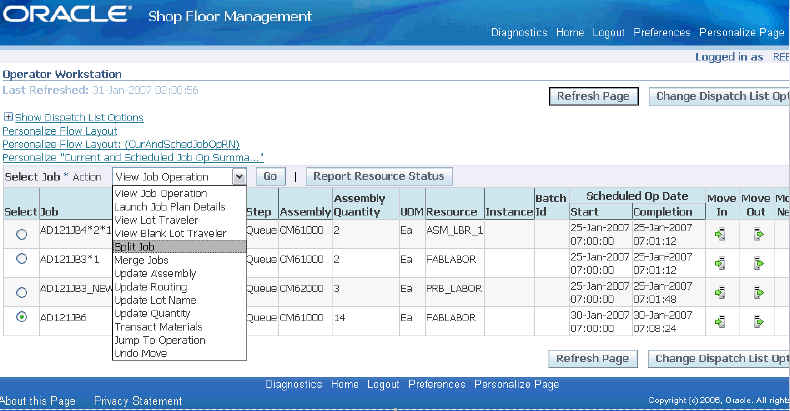
-
Click Go.
The Split HTML page appears.
-
Split the starting job into required number of resulting jobs.
-
Enter quantity details.

You can also update the assembly of the resulting job.
-
Click Apply.
You can see the split jobs in the dispatch list.
To do a WIP Merge Transaction
-
Navigate to Operator Workstation.
-
Select a Job in the Dispatch List.
-
Choose Merge Jobs as Job Action to execute a WIP Merge Transaction.
-
Click Go
The Merge HTML page appears.
-
Merge the required jobs into one job.

-
Click Apply.
You can see the merged job in the dispatch list. You can also make one of them as a representative job.
To update Job Quantity
-
Navigate to Operator Workstation.
-
Select a Job in the Dispatch List.
-
Choose Update Quantity as Job Action.
-
Click Go.
-
Update the quantity of the job in the Quantity field.
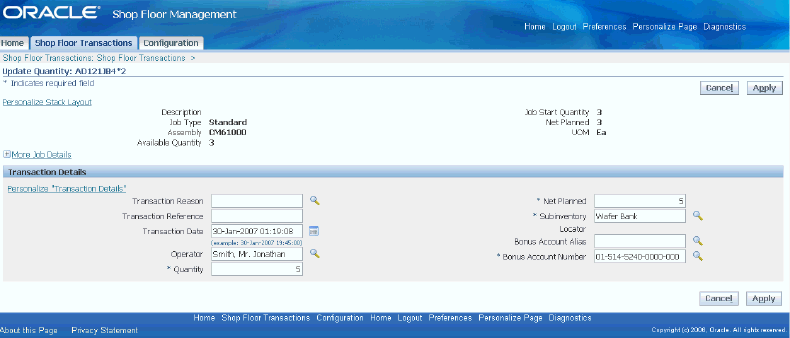
-
Click Apply.
You can see the job with the updated quantity in the Dispatch List.
To update Job’s Assembly
-
Navigate to Operator Workstation.
-
Select a Job in the Dispatch List.
-
Choose Update Assembly as Job Action.
-
Click Go.
-
Update the assembly of the job in the Assembly field.
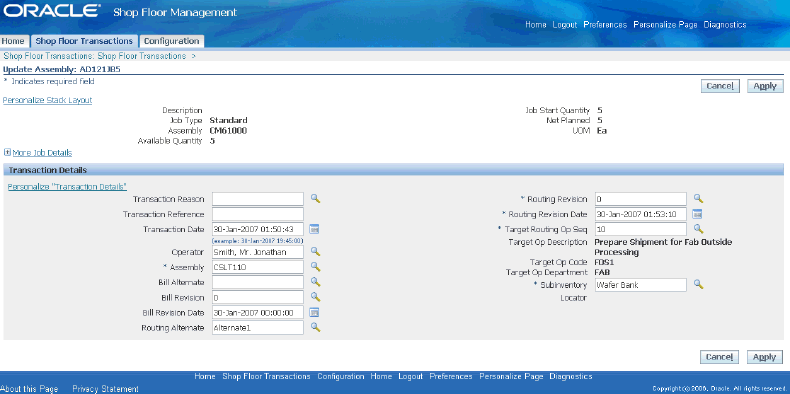
-
Click Apply.
You can see the job with the updated assembly in the Dispatch List.
Note: The job with updated assembly will show in the Dispatch List only if the target operation matches the dispatch list configuration for department, operation or resource.
To update Job’s Routing
-
Navigate to Operator Workstation.
-
Select a Job in the Dispatch List.
-
Choose Update Routing as Job Action.
-
Click Go.
-
Enter the Routing Alternate of the job in the Transaction Details region.
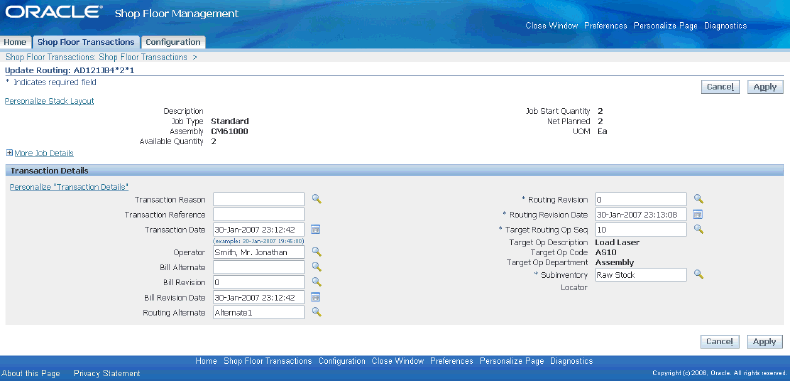
-
Click Apply.
To update Lot Name
-
Navigate to Operator Workstation.
-
Select a Job in the Dispatch List.
-
Choose Update Lot Name as Job Action.
-
Click Go.
-
Update the job name in the Job Name field.
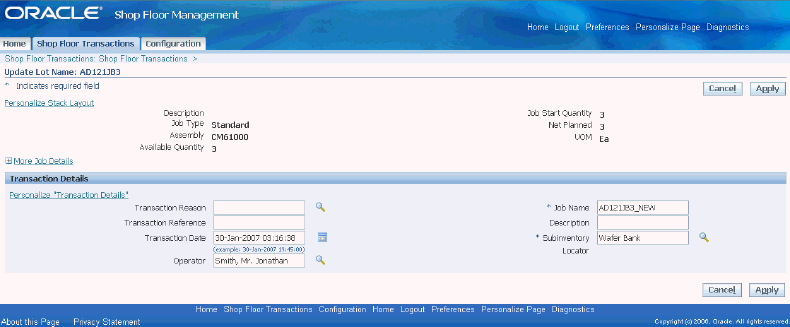
-
Click Apply.
You can see the job with the updated job name in the Dispatch List.
Material Transactions
You can transact materials in HTML UIs. You can perform Issue, Return, Negative Issue and Negative Return transactions
Backflush: issue component during Move Out. You can backflush lot and serial controlled components.
Material Issue: You can issue lot and serial controlled components. You can do Lot Creation only in windows and not in HTML UI.
To do a Backflush transaction
-
Navigate to Operator Workstation.
-
Select a job in the dispatch list.
-
Execute a Move Out transaction for the job selected.
The Move Out HTML page appears.
-
Choose Usages tab.
-
Select the component to be issued for the job.

To do a Material Issue transaction
-
Navigate to Operator Workstation.
-
Select a job in the dispatch list.
-
Choose Transact Materials as Job Action.
-
Click Go.
The Transact Material HTML page appears.
-
Select a component to be issued for this job.
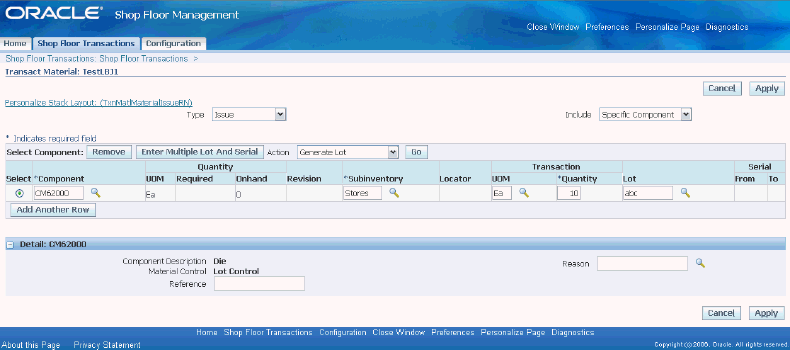
You can view these material transactions from the Job Operation HTML page in the Components region of the Usage tab.

You can perform transactions like material return, negative issue, negative return, and also enter multiple lot and serial details for the transacted components.
Job Operation Details
Oracle Shop Floor Management gives you detailed information of job operation. You can view the details of serial number and reason codes for a lot and serial controlled assembly, job quantity details, component and resource usage and requirement details, lot attribute details and job attachments in HTML UI page.
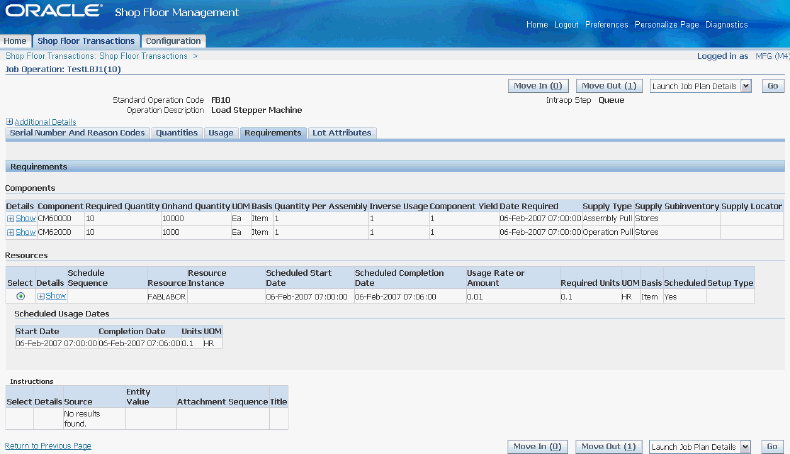
Job Operation Resource Requirements: You can view a complete list of resources required for the operation when a job is selected from a dispatch list or when you manually query.
Job Operation Component Requirements: You can view component requirements for each item in the dispatch list or for the lots selected using selected criteria, and view availability of the component.
Job Operation Progress: You can report on what you have accomplished on a particular job.
Attachments: In addition, you can also view attachment of a job. The attachment can be a text, a diagram, work instruction or specifications, which the operator can use as a reference on the shop floor.
To view job operation
-
Navigate to Operator Workstation.
-
Select a job in the dispatch list.
-
Choose View Job Operation as Job Action.
The Job Operation HTML page appears.
-
Select Quantities tab to view job quantity details.
-
Select Usage tab to view component and resource usage details.
-
Select Requirements tab to view component and resource requirement details.
Job Plan Details
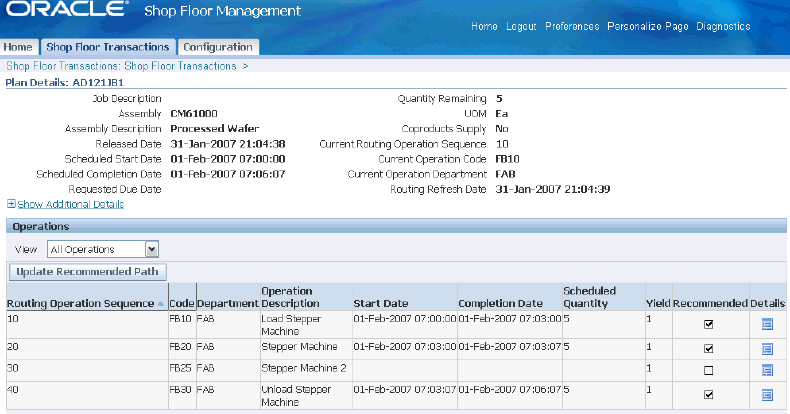
You can view the recommended path of the job, routing operation details, resource details, and component details in the Job Plan Details page.
To view job plan details
-
Navigate to Operator Workstation.
-
Select a job in the dispatch list.
-
Select Launch Job Plan Details to view Plan details.
The Plan Details HTML page appears.
-
Choose Update Recommended Path to update the recommended path in the Recommended field.
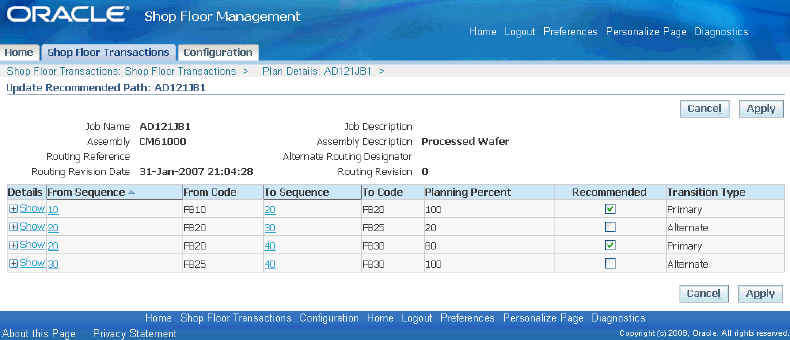
-
Click Details to view routing operation details of the required routing operation sequence.
The HTML page for the selected operation appears.
-
Select Resources tab to see the resource details of the routing operation.
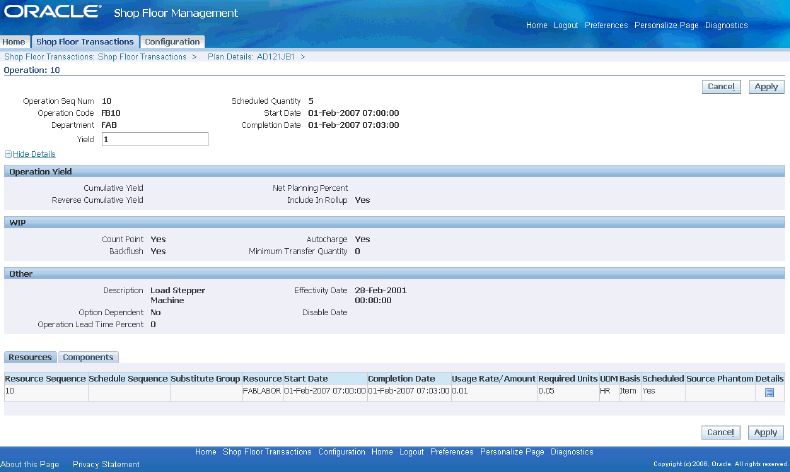
-
Select Components tab to view the component details of the routing operation, swap components, and change required quantity.
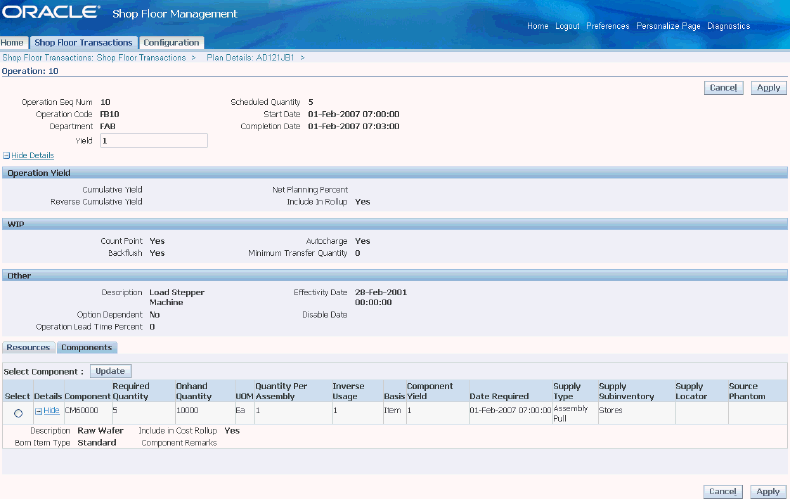
Note: The required quantity of a component with negative quantity per assembly is calculated considering the yield of the operation for which the component is required.
See: Calculating Required Quantity for Components with Negative Quantity Per Assembly
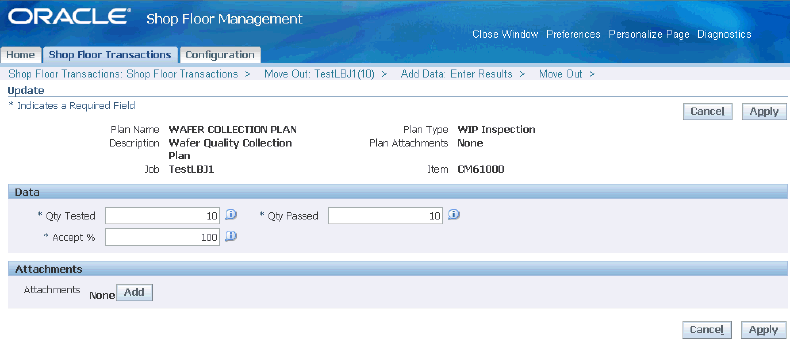
Quality Data Collection
You can define collection plan in quality module, invoke the plan during Move Out operation, specify quality data for the elements, and update or delete quality data during an operation.
To view, enter and update quality data
-
Execute a Move Out transaction.
-
Update quantities in the Move Out page that appears.
-
Click Continue.
-
Click on the link in the column Add Child Data.
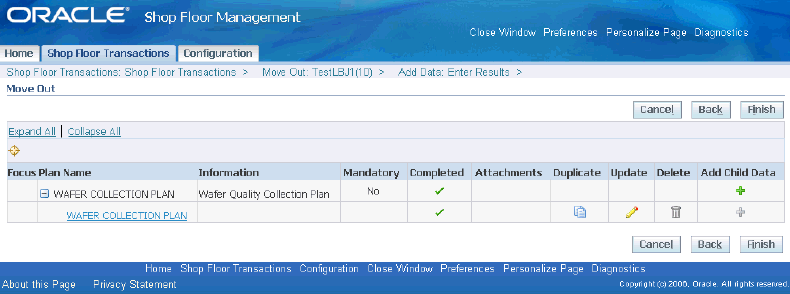
-
Specify quality data for the data elements in the Add Data page that appears.
Lot Traveler
You can generate Lot Traveler and Blank Lot Traveler for jobs that are Released, Under Execution and Completed.
A lot traveler is a snapshot of manufacturing data on the job progress. It gives you the complete data on operations, quantity, starting or completion date details that the lot has undergone.
You can view lot traveler from windows as well as HTML interfaces.
Viewing lot traveler from HTML UI
-
Select a job from the Dispatch List.
-
Select Job Action as View Lot Traveler.
-
Select View Blank Traveler for a blank template.
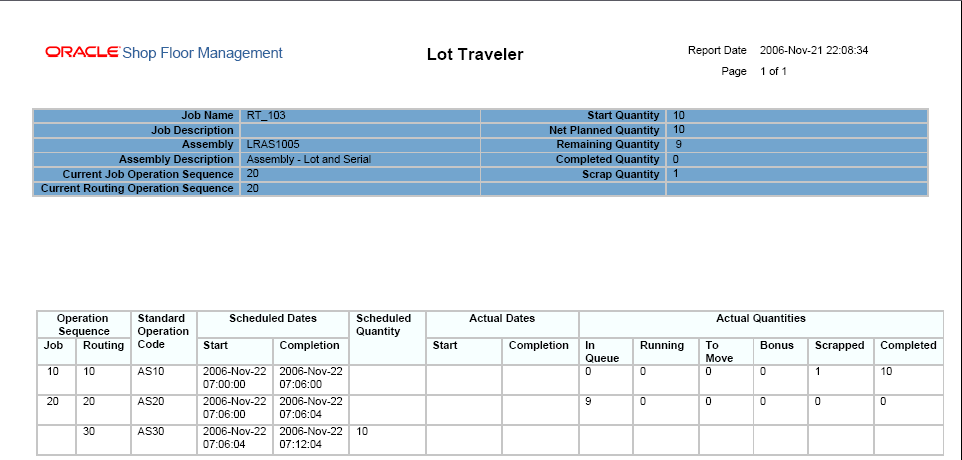
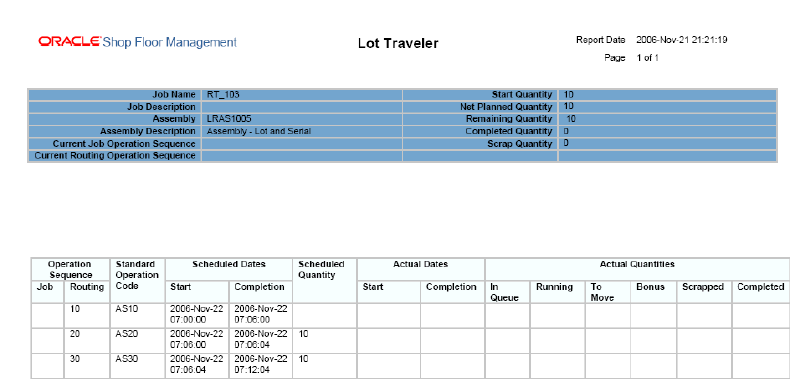
The Lot Traveler displays the details of the job and all the transactions the job has undergone.
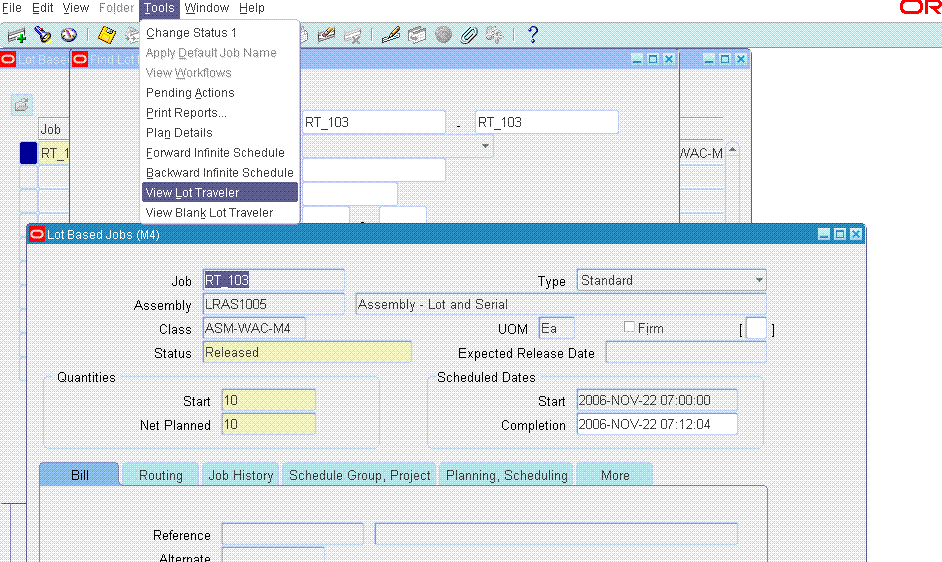
Viewing lot traveler from lot based jobs form
-
Navigate to Lot Based Jobs window and open a job.
-
Select View Lot Traveler from the Tools menu.
-
Select View Blank Traveler for a blank template.