Preserving Forecast Adjustments
This chapter covers the following topics:
- Persistent Forecast Adjustments
- Why Preserve Forecast Adjustments?
- Designating Data as Cycle Persistent
- Standard Versus Persistent Locks
- Cycle-Persistent Locks and the Planning Process
- Copying Data and Locks to Another Measure
- Accessing Advanced Locking Functionality
- Making Your Data Cycle-Persistent
- Applying Persistent Locks in Worksheets
- Removing Persistent Locks in Worksheets
- Using Standard Locks in Your Worksheets
- Resolving Locking Conflicts
- Preserving Locked Data for Submission to the Planning Manager
- Applying Previous Adjustments to New Planning Cycles
- Distributing Adjusted Forecasts with Cycle-Persistent Data
Persistent Forecast Adjustments
Demand planners can lock adjustments made to a forecast, submit the forecast, and have their adjustments saved and reapplied during the next cycle. The process relies on persistent locks to carry the adjustments to the next planning cycle and beyond.
The ability to specify data as being cycle-persistent is supported and enhanced by advanced locking functionality in Oracle Demand Planning. The use of advanced locking to create cycle-persistent data makes the forecasting process faster and more efficient in many business situations.
Advanced Locking is accessed via the Tools icon or via the worksheet through the right-click menu.
Why Preserve Forecast Adjustments?
Demand planners and managers want to be able to override a generated forecast for one or more planning cycles with known demand when customers have known sales volume, when there are promotions with known volume amount, or when special products have known volume amounts.
There may also be occasions when the business knowledge and experience of the planner or manager dictates that a forecast's modifications should be preserved from cycle to cycle.
Designating Data as Cycle Persistent
Planners and managers, while adjusting forecasts before submission, apply persistent locks to particular sets of data. Without cycle-persistent locks, after submission, the known demand adjustments are lost when the new forecast is generated for the next planning cycle.
With cycle-persistent locks, the data adjustments, locks, and comments are transferred to the shared database. The individual forecast Submission measure retains the locked values in the planning database even if the Planning Manager feels it is necessary to override the locked data in the consolidated measure.
In the next planning cycle, the System Administrator can reapply the previous cycle's preserved adjustments from the consolidated Submission measure to the new baseline forecast for a scenario.
Note: A planner who adds persistent locks to a measure shared with the Planning Manager should copy the data, locks, and comments to a personal copy of the measure in order to preserve the adjustments.
Note: Because formula measures are calculated when accessed, there is no stored value to lock. Locks can only be applied to stored measures.
Standard Versus Persistent Locks
Standard locks are set in a worksheet to prevent the values in locked cells from being affected when data is recalculated. You can lock single cells or blocks of cells and attach comments to them. Protecting the value in a cell also protects the child values.
Persistent locks are set in the worksheet to protect values from being affected when data is recalculated. They also to enable the data to span planning cycles -- the modified values, locks, and comments are transferred to the shared database.
A cycle-persistent lock is a lock on a measure tuple (set of interconnected dimension values). Setting the lock simultaneously accomplishes the following tasks:
-
It prevents the designated dimension values from being overwritten by worksheet operations during a planning cycle.
-
It prevents the values from being overwritten after the measure has been submitted into the shared database.
-
It prevents the values from being overwritten even after the measure is integrated into the forecast of a scenario during the next forecast cycle.
Persistent and standard locks behave identically in the planner database. However, during the submission process, persistent locks and comments are submitted, while standard locks are not.
Cycle-Persistent Locks and the Planning Process
The following list of events demonstrates the role of the preserve forecast adjustments feature in the overall demand planning process.
-
The System Administrator distributes the baseline forecast.
-
Planners recreate or modify the forecast and apply cycle-persistent locks to their modifications.
-
The Planner submits the modified forecast. Persistent locks and comments associated with the submitted measure are automatically submitted. The Planning Manager can make additional adjustments.
-
Adjustments are applied to the shared database.
-
The System Administrator creates the statistical baseline forecast for the next cycle and checks the Apply persistent locks and adjustments from Previous cycle for Scenario option in the Measure Wizard Properties tab. The persistently locked adjustments are applied.
-
The forecasts are distributed.
-
Demand planners receive the adjusted forecasts with their preserved adjustments and make modifications for the new data from the current cycle
-
The modified forecast is submitted.
Copying Data and Locks to Another Measure
Demand planners may copy persistent data and locks from one measure to another. This can become necessary during a planning cycle when a quick distribution is performed. Normal behavior during a quick distribution is that the lock states revert to those that were extant when the measure was initially distributed.
A demand planner might preserve modifications to a measure by copying the cycle-persistent data, with its locks and comments, into a temporary measure. The data, locks, and comments can then be reapplied to the original measure when it has been redistributed.
For example:
-
The measure "Booking History Forecast" is distributed by the System Administrator.
-
The planner makes adjustments and modifications to his personal copy of the scenario default measure, "Booking History Forecast," and sets cycle-persistent locks on specific dimension values.
-
The Planning Manager notifies demand planners that a "quick distribution" is imminent. If the quick distribution includes the measure on which the planner has put locks, it will overwrite the planner's private copy.
-
The planner creates a new temporary measure and specifies that the new measure should include cycle-persistent data (with its locks and comments) from the measure "Booking History Forecast."
-
The quick distribution occurs. Any updated values in "Booking History Forecast" are overwritten, and any modifications to cycle-persistent locks are lost.
-
To restore his locks and data, the planner edits the properties of the measure "Booking History Forecast," and specifies that any cycle-persistent data should be included from the temporary measure.
-
The data, locks, and comments are copied into "Booking History Forecast."
Procedure: Creating a Temporary Measure to Preserve Cycle-Persistent Locks
One way of preserving cycle-persistent locks is to create a temporary measure.
-
On the Navigation toolbar, click the New button.
-
From the command menu, choose New Measure.
-
From the submenu, choose Stored Measure.
-
Demand Planning displays the Measure Wizard.
-
In the Choose Method step, name the measure by entering a name in the text box below the Specify a name for your new measure label.
-
Choose the Copy measure option button and go to the next step.
-
In the box below the What measure do you want to copy your data from? label, select, from the drop-down list, the name of the measure containing the persistent locks.
-
Use the Next button to navigate to the Properties step.
-
To ensure that the cycle-persistent locks are transferred to the target measure, check the box labeled Make the measure editable in worksheets.
-
Check the box labeled Apply persistent locks and adjustments from.
-
Choose the Selected Measure option, and select the name of the name of the measure containing the persistent locks from the drop-down list.
-
Make sure that the Overwrite existing locked data in the target measure box is checked.
-
Navigate through the remaining steps of the wizard and create your measure.
Procedure: Restoring Data, Locks, and Comments After a Quick Distribution
After the quick distribution, you can then restore the data, locks, and comments in the measure that was overwritten.
-
The temporary measure that you created and saved is listed in the Navigation list in the Measure folder or some subfolder within it.
-
Select the name of the temporary measure and right-click.
-
From the popup menu, choose Edit.
-
Demand Planning enables you to access the re-entrant Measure Wizard for the temporary measure. The re-entrant wizard has all steps as tabs on a single dialog box.
-
Choose the Copy measure tab and make sure that you select, from the drop-down list, the name of the temporary measure in the What measure do you want to copy your data from? box.
-
Use the Next button to navigate to the Properties step.
-
Check the box labeled Apply persistent locks and adjustments from.
-
Choose the Selected Measure option, and select the name of the name of the temporary measure containing the persistent locks from the drop-down list.
-
Make sure that the Overwrite existing locked data in the target measure box is checked.
-
Navigate through the remaining steps of the wizard and choose Finish.
-
You have restored the data, locks, and comments in the measure that was overwritten by the quick distribution.
Accessing Advanced Locking Functionality
There are three ways for a demand planner or Planning Manager to access locking functionality in Demand Planning worksheets. These are described below.
-
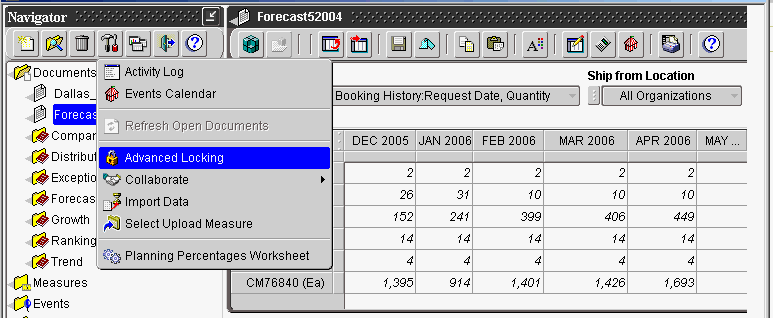
You can access the Advanced Locking dialog box from the Navigation toolbar, by way of the Tools menu.
This is the method that offers the most efficient method of locking large numbers of values because it enables you to use the Selector tools.
-
You can use the Modify Selected Data menu, available from the worksheet toolbar.
-
You can modify and lock small numbers of cells in the worksheet by selecting them manually and using the commands on the right-click popup menu.
Description of the Advanced Locking Dialog Box
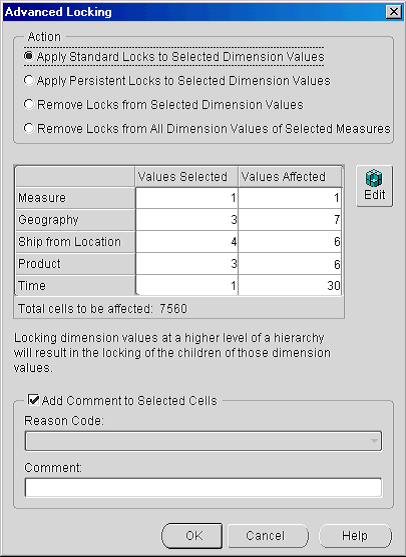
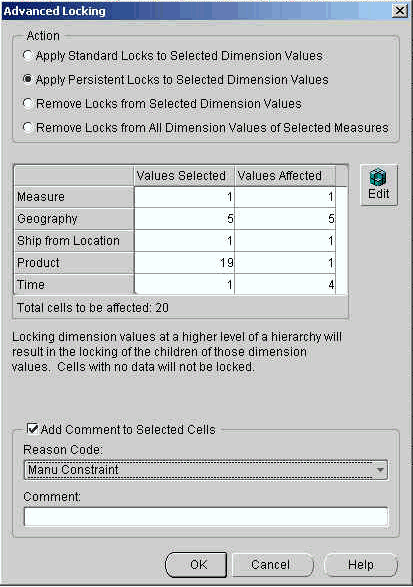
The Advanced Locking dialog box enables you to accomplish cell locking in a more efficient manner by using the Select Data dialog box and its full set of tools. You can do the following:
-
Set standard locks.
-
Set persistent locks.
-
Assign comments and reason codes to selected values.
Making Your Data Cycle-Persistent
There are two major steps to using cycle-persistent data.
-
You apply persistent locks, in the Advanced Locking dialog box, to the measure to be submitted.
-
You submit the measure with persistent locks.
During the next planning cycle, the cycle-persistent data, with its locks and associated comments, will be applied by the System Administrator and distributed as part of your assignment.
For more information on using persistent locks in your worksheets, refer to the following topics:
Applying Persistent Locks in Worksheets
The procedures that follow describe how to apply persistent locks in several ways.
Procedure: Applying Persistent Locks with Advanced Locking
You can apply persistent locks with the Advanced Locking feature.
-
From the Navigation toolbar, click the Tools icon.
-
From the Tools menu, select Advanced Locking.
Demand Planning displays the Advanced Locking dialog box.
-
In the Action frame choose Apply Persistent Locks to Selected Dimension Values.
-
In the Dimension Value Selections frame, choose the dimension values you intend to lock.
You can double-click in the Values Selected column for any dimension to access the Select Data dialog box, or you can choose Edit at the right of the frame.
Note: When you use the Select Data dialog box from the Advanced Locking dialog box, you will NOT (as a planner) see values that are above your assignment level. You see values at the planning value and below.
-
Once you are in the Select Data dialog box, you must select one or more values from every dimension that you can access in the Select values for box.
Because each dimension in the plan is dimensioned by all the other dimensions, you must create a "data cube" or "tuple" before you can lock specific values. Until you do this, the OK button in the Select Data dialog box is not enabled.
The Measure dimension will only include lockable stored measures, not their quantity and amount submeasures. You also cannot use advanced locking on formula measures, accuracy measures, or on planning percentages and dependent demand.
-
Choose OK in the Select Data dialog box. When you return to the Advanced Locking dialog box, the selections table is updated immediately -- your selections and the effects of those selections are visible.
-
If the values selected with explicit locks, plus the values that they affect, total more then 30,000 values, Demand Planning will display a warning. Although it will use significant system resources, the application will continue with the operation if that is your choice.
-
You should be aware that, because each measure being processed may have different allocation floors, the calculation of the number of dimension value combinations that is affected may be influenced in such a way that the total is less than the product of all Values Affected totals.
-
-
Decide whether you want to enter a comment to be applied to all of the selected locked values, describing the reason for the locking them.
If you want to add a comment, check the Add Comments to Selected Cells box.
-
If your System Administrator has created reason codes for comments, they will be available from the Reason Code list box. If reason codes are not available, you can still enter a comment in the Comment text box.
-
Choose OK to complete the locking operation.
Procedure: Applying Persistent Locks with the Modify Selected Data Tool
You can apply persistent locks with the Modify Selected Data tool.
-
Open a new or saved worksheet.
-
Select the cells that you intend to lock. They are highlighted.
-
From the Navigation toolbar, choose Modify Selected Data.
-
From the Modify Selected Data menu, select Lock Cells.
-
From the submenu, select Persistent Locks.
Demand Planning applies locking to the selected cell or cells, as reflected by the change in background color.
Note: Remember that you will not be able to apply locks to any values that are above your assignment level or the default level for the plan.
-
Adding a comment is always an optional activity, but you may be more likely to add one when you have locked an individual cell or a small number of cells without resorting to advanced locking.
To add a comment explaining why you have locked cells, you must select the locked cells again and then select the Comments command from the Modify Selected Data menu to access the Comments dialog box.
-
Enter a comment in the New Comment box.
-
Select a reason code, if one is available from the Reason box.
-
Choose Add.
-
Choose OK.
Note: Whether you add comments or not, you must save the worksheet for your locking operation to take effect.
-
-
Choose Save As from the Worksheet toolbar and save the worksheet.
Procedure: Applying Persistent Locks Manually
You can apply persistent locks manually.
-
Open a new or saved worksheet.
-
Select the cells that you intend to lock. They are highlighted.
-
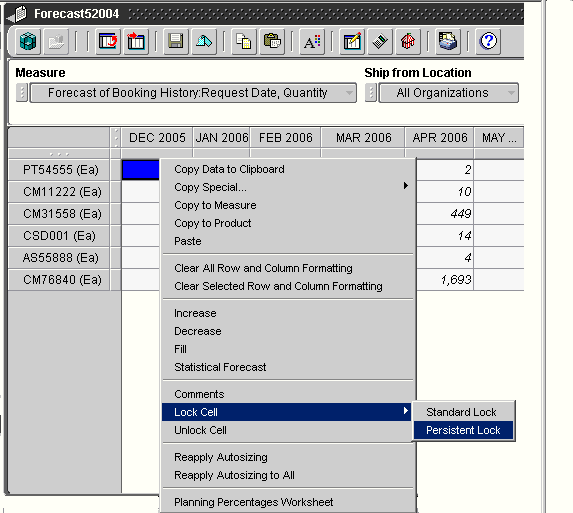
Right-click to access the worksheet commands popup menu.
-
Select Lock Cells.
-
From the Locking submenu, select Persistent Locks.
-
Demand Planning applies locking to the selected cell or cells, as reflected by the change in background color.
Note: Remember that you will not be able to apply locks to any values that are above your assignment level or the default level for the plan.
-
Adding a comment is always an optional activity, but you may be more likely to add one when you have locked an individual cell or a small number of cells without resorting to advanced locking.
To add a comment explaining why you have locked cells, you must reselect the locked cells. Then, select Comments from the worksheet commands popup menu to access the Comments dialog box.
-
Enter a comment in the New Comment box.
-
Select a reason code, if one is available from the Reason box.
-
Choose Add.
-
Choose OK.
Note: Whether you add comments or not, you must save the worksheet for your locking operation to take effect!
-
-
Choose Save As from the Worksheet toolbar and save the worksheet.
Removing Persistent Locks in Worksheets
The procedures that follow describe how to "unlock" data to which you have applied cycle-persistent locks. An "unlock" or remove operation affects your last modification of that kind (i.e., persistent versus standard).
Procedure: Removing Persistent Locks with Advanced Locking
This procedure explains how to remove persistent locks with Advanced Locking.
-
Open a worksheet containing locked cells. Cells that have cycle-persistent locks will be dark pink in color.
-
From the Navigation toolbar, choose the Tools icon.
-
From the Tools menu, select Advanced Locking.
Demand Planning displays the Advanced Locking dialog box.
-
In the Action frame, choose Remove Locks from Selected Dimension Values.
You will see that all of the non-measure dimensions are disabled in the Dimension Value Selections frame.
The contents in the grayed-out Values Selected and Values Affected columns (for non-measure dimensions) are set to (all).
-
Choose Edit.
Demand Planning displays the Dimension Value Selector for the Measure dimension. A list of the measures in which locks can be removed is displayed.
You can select the measure from which you want to remove locks.
-
Choose OK in the Dimension Value Selector.
Demand Planning removes the locks from the selected cell or cells, as reflected by the change in background color.
-
Choose OK in the Advanced Locking dialog box.
-
Choose Save As from the Worksheet toolbar and save the worksheet.
Procedure: Removing Persistent Locks with the Modify Selected Data Tool
This procedure explains how to remove persistent locks by using the Modify Selected Data tool.
-
Open a worksheet containing locked cells. Cells that have cycle-persistent locks will be dark pink in color.
-
Select the cells that you intend to unlock. They are highlighted.
-
From the Navigation toolbar, choose Modify Selected Data.
-
From the Modify Selected Data menu, select Unlock Cells.
-
From the submenu, select Persistent Locks.
Demand Planning removes the locks from the selected cell or cells, as reflected by the change in background color.
-
Choose Save As from the Worksheet toolbar and save the worksheet.
Note: You must save the worksheet for your unlocking operation to take effect!
Procedure: Removing Persistent Locks Manually
This procedure explains how to remove persistent locks manually.
-
Open a worksheet containing locked cells. Cells that have cycle-persistent locks will be dark pink in color.
-
Select the cells that you intend to unlock. They are highlighted.
-
Right-click to access the worksheet commands popup menu.
-
Select Unlock Cells.
-
From the Locking submenu, select Persistent Locks.
Demand Planning removes the locks from the selected cell or cells, as reflected by the change in background color.
-
Choose OK in the Advanced Locking dialog box.
-
Choose Save As from the Worksheet toolbar and save the worksheet.
Procedure: Removing All Locks
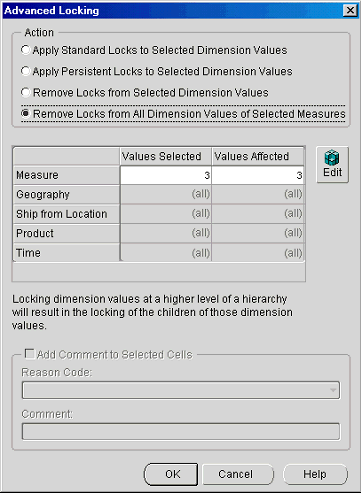
This procedure describes how to remove all locks in a measure using the Advanced Locking dialog box. It applies to both persistent and standard locks.
-
Open a worksheet containing locked cells. Cells that have cycle-persistent locks will be dark pink in color. Cells with standard locks have a light pink background color. Cells in which the numbers are in bold font have a comment attached.
-
From the Navigation toolbar, choose the Tools icon.
-
From the Tools menu, select Advanced Locking.
Demand Planning displays theAdvanced Locking dialog box.
-
In the Action frame, choose the Remove Locks from All Dimension Values of Selected Measures button.
You will see that all of the non-measure dimensions are disabled in the Dimension Value Selections frame.
The counts in the grayed-out Values Selected and Values Affected columns are set to (all).
The Add Comment to Selected Cells checkbox is disabled.
-
Choose Edit.
Demand Planning displays the Dimension Value Selector dialog box for the Measure dimension. A list of the measures in which locks have now been removed is displayed.
Demand Planning removes the locks from the selected cell or cells, as reflected by the change in background color.
-
Choose OK in the Advanced Locking dialog box.
-
Choose Save As from the Worksheet toolbar and save the worksheet.
Using Standard Locks in Your Worksheets
The procedures for applying standard locks in worksheets do not differ significantly from the procedures for applying persistent locks. Refer to the following procedures for these tasks:
-
Procedure: Applying Persistent Locks with the Modify Selected Data Tool
-
Procedure: Removing Persistent Locks with the Modify Selected Data Tool
The most important difference between applying standard and persistent locks is that standard locks can be applied to any of the values displayed in a worksheet, as long as the measure is editable. However, when you use advanced locking, persistent locks can only be applied at the planner's assignment level or below. This is enforced in the Select Data dialog box, when you access it from the Advanced Locking dialog box. You will not be able to see values that are above the assignment level.
When you access the Select Data dialog box from the Advanced Locking dialog box to apply standard locks, you will be able to see all values for each particular dimension.
Resolving Locking Conflicts
During the process of copying persistent data, locks, and comments from one measure to another, a conflict may occur between the source measure and the target measure.
Conflicts tends to arise because of one of two problems: either the target measure has locks on the same cells that the source measure is trying to overwrite, or else the source and target measures have different allocation and/or aggregation methods.
Locks are copied at the highest level in order to implicitly lock the child values.
The following rules apply in cases of locking conflicts between a source and a target measure:
-
If the target measure has an allocation floor, it must be equal to or lower than the allocation floor of the source.
-
You cannot copy data, locks, and comments between measures that have different aggregation methods.
-
You cannot copy data, locks, and comments between measures that have different allocation methods.
-
You cannot copy data, locks, and comments between measures with are dimensioned by different dimensions.
-
You cannot copy data, locks, and comments to a measure that has its allocation set to None.
In the event that a source measure with cycle-persistent data is copied to a target measure and the source measure has a higher allocation floor, the data of the allocation floor level children of persistent-locked cells is copied over and allocated down.
Preserving Locked Data for Submission to the Planning Manager
When a planner places persistent locks on worksheet cells, the data is preserved across planning cycles. This means that the locks are submitted along with the measures to which they apply. The locks, data, and associated comments may be copied into the scenario measure which is generated for the next planning cycle (if the System Administrator has selected that option in the Measure Wizard).
Submitting Cycle-Persistent Data
If you work as a demand planner and select a final forecast to submit to the shared database, the persistent locks currently associated with the measure are automatically collected when the data collection stage runs. The data is marked for consolidation in the shared database, where it will be reviewed by the Planning Manager.
Only cycle-persistent data, locks, and comments that fall within the bounds of a planner's write scope are submitted, just as with adjusted planning data. Cycle-persistent data, locks, and comments outside of an assignment's write scope, but within its view scope, are not included.
Before the Submission measure is uploaded, the Planning Manager can remove cycle-persistent locks that planners have placed on the submitted measures.
When you work as a Demand Plan Manager and select a forecast to upload to the Demand Planning Server, the persistent locks associated with the measure are automatically uploaded when the upload stage runs.
Collecting Cycle-Persistent Data
When the System Administrator collects assignments, a process in Oracle Workflow reads the contents of the planners' submitted measures into the Submission measure specified for a particular scenario. Contents of submitted cycle-persistent locks are imported, both explicit and implicit locks. Comments are also imported.
Applying Previous Adjustments to New Planning Cycles
Demand planners can apply the data of the explicitly cycle-locked cells and the child values that inherit those locks from a previous scenario's default measure. The cycle locked data is copied with the locks intact as well as any comments associated with the locked tuples.
Procedure: Applying Previous Adjustments to New Planning Cycles
To copy data from a previous planning cycle, follow the steps described below:
-
On the Navigation toolbar, click New.
-
From the command menu, choose New Measure.
-
From the submenu, choose Stored Measure.
Demand Planning displays the Measure Wizard.
-
In the Choose Method step, name your measure by entering a name in the text box below the Specify a name for your new measure label.
-
Choose Copy Measure and go to the next step.
-
In the box beneath the What measure do you want to copy your data from? label, select, from the drop-down list, the name of the measure containing the persistent locks.
-
Click Next to navigate to the Properties step.
-
To ensure that the cycle-persistent locks are transferred to the target measure, check the box labeled Make the measure editable in worksheets box.
-
Check Apply persistent locks and adjustments from.
-
Choose Previous cycle for scenario.
The box to the right of the option is now enabled. If there is only one measure available, the name will appear in the box.
-
If there are multiple measures, you can select one from a drop-down list.
-
Check Overwrite existing locked data in the target measure.
-
Navigate through the remaining steps of the wizard and create your measure.
Demand planners can also copy the data of explicitly cycle-locked cells and child values from a selected measure. The Measure Wizard is the vehicle for doing this, for more information refer to "Creating a Temporary Measure to Preserve Cycle-Persistent Locks."
Distributing Adjusted Forecasts with Cycle-Persistent Data
By using persistent locks to save forecast adjustments, the Demand Planning System Administrator can reapply the previous cycle's preserved adjustments to the new baseline forecast for a scenario.
When Distribution occurs, the previous cycle's data adjustments, locks, and comments are part of the distributed forecast.
The System Administrator specifies the inclusion of cycle-persistent data in the distribution of measures to assignments by modifying the properties of the measures that are distributed. The modification of measures is accomplished by using the procedure described in "Applying Previous Adjustments to New Planning Cycles."
The System Administrator can specify that, for any existing or newly-defined measure, its data can be overwritten with any cycle-persistent data found in another measure or the default measure of a specified scenario.
