Direct Item Procurement for eAM Work Orders
This chapter covers the following topics:
- Introduction
- Overview of Direct Item Procurement for eAM Work Orders
- Enabling Direct Item Procurement
- Automatically Creating Requisitions for Direct Items
- Manually Entering Requisitions for Direct Items
- Creating Purchase Orders from Requisitions
- Manually Entering Purchase Orders for Direct Items
- eAM Direct Procurement Accounting
Introduction
Enterprise Asset Management (eAM) Direct Item Procurement enables you to order items directly to your maintenance organization. This chapter contains the following topics:
Overview of Direct Item Procurement for eAM Work Orders
One of the most important features included in Enterprise Asset Management (eAM) is Work Management (See: Overview of eAM Work Management). Work Management enables you to create Work Requests when an asset is problematic. After the Work Request is approved, a Work Request can associate with a Work Order. A Work Order includes a listing of all maintenance activities are performed on an asset. Material requirements for a Work Order (See: Defining Material Requirements) may include stocked, non-stocked direct items, services, and direct items (description-based items). Stocked items are those that are either used frequently, or the criticality of short lead time to obtain replacement parts mandates that they be stocked in inventory. Non-stock direct items can be included in the internal catalog, but the decision is made to not maintain an inventory balance. These items are not transactable, not stockable, but you can procure them. Direct items are either non-stock or description-based. Non-Stock Direct Items can represent items that are not stocked in inventory, or services that need to be purchased from a supplier. Non-Stock Direct Items are not stocked in inventory but are defined in the Item Master as an inventory item, purchaseable, and purchase but not stockable (See: Inventory Attribute Group, Oracle Inventory User's Guide). Direct Items are contrived as "one-off", bought directly from a vendor for a specific Work Order and Operation. They are delivered directly to the Shop Floor from maintenance Work Order execution. You can add Planned Direct Items to a Work Order's Bill of Material (BOM) or an Activity BOM. Planned Direct Items must first be created in the Item Master as Non-Stockable and Purchasable inventory items (See: Non-Stock Direct Item Setup). A purchase requisition is optionally automatically created for these items, when the Work Order is released.
If you have Oracle iProcurement installed, all item types may be included in your internal catalog. A planner can procure Direct Items from the Maintenance Workbench (See: Using the Maintenance Workbench). Purchase requisitions and purchase orders of such items capture the Work Order for which they are required. If the Work Order is project related, then the project and task information is captured in the purchase requisition. You can procure Non-Stock and Description-based Direct Items, without accessing iProcurement, as well.
The following diagram illustrates the integration between Enterprise Asset Management and Procurement. First, a maintenance Work Order is created. If the Asset and/or Maintenance BOM that is associated with the asset includes Direct Items, those Direct Items are automatically part of the Work Order's material requirements. You can also manually add Direct Items (Non-Stock, Description-based, and Services) to a Work Order. When the Work Order is released, a purchasing requisition is created for the Direct Items that are included in the material requirements and that have the Auto Request Material check box selected. This check box setting defaults from the Asset and/or Maintenance BOM setup, but you can update it on the Work Order. The requisition is linked to the Work Order, and then approved. A purchase order is created from the requisition, and then approved. You can create a purchase order manually, without first creating a requisition. In both cases, the purchase order needs approval. The items are received using a standard receipt routing, and delivered to the maintenance Work Order. The cost on the Work Order records as the actual purchase order price.
Direct Item Procurement for eAM Work Orders Process

This section includes the following topics:
Enabling Direct Item Procurement
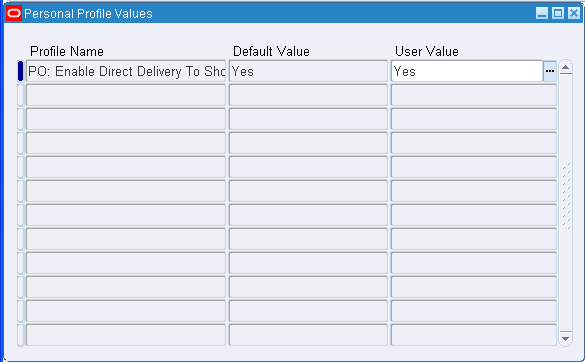
To enable direct item (both supplier catalog and non-catalog items) procurement for eAM Work Orders directly from an eAM Work Order, set the PO: Enable Direct Delivery To Shop Floor profile option to Yes. When this value is set to Yes, you can create an eAM-related requisition or purchase order. You can enter eAM specific information, such as Work Order and operation reference numbers, as well as identify a requisition line as having a Shop Floor destination. Requisitions are created automatically for Direct Items (Non-Stock and Description-based), after a Work Order with those Direct Items on its material requirements listing is released.
To enable direct item procurement
-
Navigate to the Personal Profile Values window.
Personal Profile Values
-
Select PO: Enable Direct Delivery To Shop Floor from the Profile Name list of values.
-
Select Yes from the Default Value list of values.
-
Save your work.
Related Topics
Purchasing Profile Options, Oracle Purchasing User's Guide
Automatically Creating Requisitions for Direct Items
First, a maintenance work order is created. If the asset or maintenance BOM that is associated with the work order includes direct items, those direct items are automatically part of the work order material requirements. You can also manually add direct items (Non-Stock and Description-based) to a work order. When the work order is released, a purchasing requisition is created for the direct item that is included in the material requirements and that have the Auto Request Material check box selected. This check box setting defaults from the asset or maintenance BOM setup, but you can update it on the work order. The requisition is linked to the work order, and then approved. A purchase order is created from the requisition, and then approved. You can also create a purchase order manually, without first creating a requisition. In both cases, the purchase order needs approval.
Important: You cannot automatically create one requisition for multiple direct items on a work order. If a work order includes multiple direct items, you must manually create the requisition. You must clear the Auto Request Material check box on the Maintenance BOM or the work order direct item line.
To automatically create requisitions
-
Navigate to the Work Orders window.
-
Choose New.
The header information displays general information about the Asset Number and the type of work required.
-
The work order number is assigned, but you can update it.
-
Enter an Asset Number requiring maintenance. The Asset Group defaults (See: Defining Asset Numbers).
-
Select an Asset Activity. Asset activities associated with this asset number are available.
Note: If this work order was previously created, you can add an asset activity, as long as the work order is at an Unreleased or Draft status, or an asset activity was not previously defined. If any tasks, material, or resource requirements exist, these must be deleted before adding an asset activity to a pre-existing work order.
After selecting an asset activity, the associated maintenance BOM (material) (See: Setting Up Maintenance Bills of Material) and maintenance route (resources), associated with the activity (See: Defining Maintenance Routes), attach to the work order. After an asset activity is saved to a work order, you can no longer change or delete it.
-
Enter a Class code to represent the charge (expense) accounts associated with the Asset Number. This defaults from the Asset Number (See: Defining Asset Numbers); you can update it.
-
Enter the Status. For example, Unreleased, Released, On Hold, and Draft. Certain transactions update this status automatically, including Work Order Completion, for example (See: eAM Work Order Statuses).
-
If this is a child work order in a work order network and Parent Child is populated in the Relationship Type field, the parent work order is populated in this field.
-
In the Scheduled Dates region, enter the scheduled Start date for the work order if it is based on a forward schedule. The scheduling process uses this date as a starting point to calculate the scheduled end date and duration for allocated resources and material. If the material or resources are not available by this date, the scheduling process moves the start date forward (See: eAM Scheduling).
-
Enter a scheduled Completion date for backward scheduling. This date indicates the requested end by date for the work. The scheduling process uses this date as a starting point to calculate the scheduled start date and duration for allocated resources and material. If the material and resources are not available by that date, the scheduling process moves the start date backwards to ensure completion by the required end date (See: eAM Scheduling).
-
Within the Main tab, the Department defaults from the selected Asset Number (See: Defining Asset Numbers). This indicates the persons or department responsible for this Asset Number.
-
Optionally select a Priority. For example, High, Medium, or Low.
-
Optionally select a Work Order Type. Work order types enable you to differentiate work orders, for example, Routine, Preventive, Rebuild, Emergency, or Facilities. Maintenance management can use this information to sort and monitor work activities for reporting and budgeting. Work order types are referenced in the work order. For information on how to create valid values, See: Work Order Types.
-
The Shutdown Type defaults from the activity. This helps the planner group work orders that may require shutdowns, so that they are planned together.
-
If the Firm check box is selected, planning and scheduling does not adjust the schedule, regardless of material or resource availability (See: Overview of Planning and Scheduling). This check box defaults as selected or cleared, depending on the Auto Firm On Release check box setting, established in the Enterprise Asset Management Parameters setup for the current organization (See: Defining eAM Parameters). This defaults after the work order is released.
If the check box is selected, the end date is calculated, based on the work order duration. The scheduler automatically calculates the duration based on the operations (resource duration setup) on the work order. You can update this check box for Work Orders at Draft, Released, Unreleased, On-Hold, or Cancel statuses (See: eAM Work Order Statuses).
-
Optionally select the Notification Required check box.
-
Optionally select the Tagout Required check box to indicate that the area needs to be secured for operations required to execute this work order. Tags are generally printed and placed on an asset, warning the plant that it is shutdown and should not be started. This check box helps the planner isolate those jobs that require a tagout.
To store tagout documents using the Attachments feature
-
Select the paperclip Attachments icon to attach relevant tagout documents. You can attach URL, file, or text attachments. See: Defining Work Order Documents.
-
The Planned check box is selected if the current work order was created from forecasted work orders (See: Preventive Maintenance Work Orders).
-
Optionally select the Enable Material Issue Requests check box to enable eAM to manage material availability for the current work order. Material is physically available to a work order via the material request and verification process. This check box is selected by default if it is selected on the eAM Parameters window. This check box is disabled when the work order is at a Released status.
-
Optionally select the Activity tab.
-
Optionally select an Activity Type. This code indicates the type of maintenance for this Activity and is used when defining a job or a standard job, for example, Inspection, Overhaul, Lubrication, Repair, Servicing, or Cleaning. This value defaults from the Activity (See: Defining Activities).
-
Optionally select an Activity Cause to specify what situation caused this work to generate, for example, Breakdown, Vandalism, Normal Wear, or Settings. This value defaults from the Activity (See: Defining Activities).
-
Optionally select an Activity Source to specify reasons Activities need execution, for example, Warranty Compliance, OSHA Compliance, or Military Specification Requirements. This value defaults from the Activity (See: Defining Activities).
-
-
Optionally select the Project tab. This tab is enabled if Project Manufacturing is installed and enabled.
-
Optionally select a Project.
-
Optionally select a Task.
-
-
You can select the Rebuild tab if this work order is created for a rebuildable item. See: Rebuild Work Orders.
-
Optionally select the Maintenance Request tab to display service and work requests associated with this work order. You can add service and work requests to a work order by selecting a service request or request number, respectively. Work requests at an Awaiting Work Order status and Maintenance Type Service Requests at an Open status are available for association. You may associate multiple work requests to a single work order, and one work order can associate with a service request. You can associate a service request to multiple work orders. You can dissociate a work and service request from a work order.
-
Select the Bill, Routing tab to select alternate, predefined BOMs and Routings. See: Setting Up Maintenance Bills of Materialand Defining Maintenance Routes.
After the alternate BOM and routing are selected, the system uses the associated items and assigns the associated resources needed to execute the work order.
-
Optionally choose Operations to prepare necessary operations. These operations default from the maintenance route (See: Defining Maintenance Routes) associated with the current Activity, but you can update and add to them (See: Preparing Work Order Operations).
-
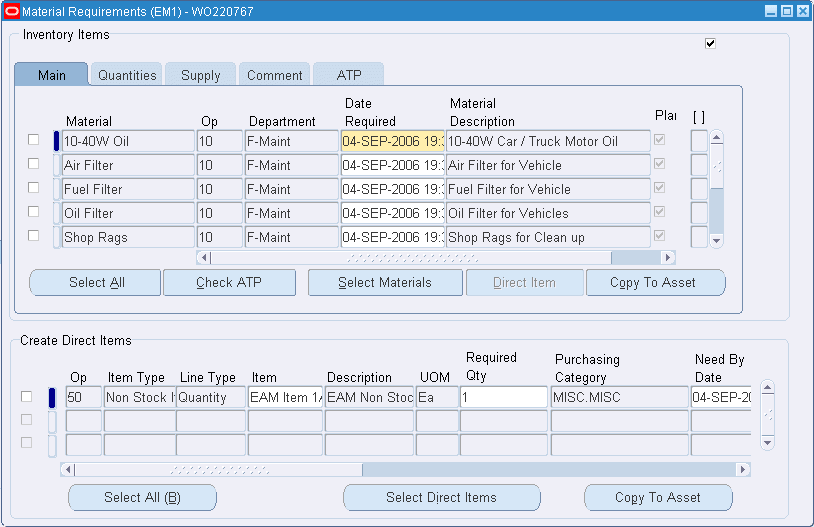
Optionally choose Materials to view or update the material requirements for this purchase order (See: Defining Material Requirements). When this work order is Released, purchase orders or requisitions are created for the material requirements' Direct Items if the Auto Request Material check box is selected (viewed by scrolling right). These items defaulted from the Maintenance BOM; they are referenced in the Direct Items region. The Supplier and Price information was established within the Bills of Material window when adding the direct items to the asset or maintenance BOMs. This information defaults into the work order.
Material Requirements
-
Optionally choose Resources to view, add, or update the resources assigned to each operation. See: Defining Resource Requirements.
-
Optionally choose Relationships to manage work order schedules and view work order details. See: Work Order Relationships.
-
Optionally choose Asset Route to view the asset route associated with the asset group for the current work order. You might need to perform one activity on multiple asset numbers. To eliminate the possibility of creating multiple work orders for the same activity, you can define asset routes. See: Defining Asset Routes.
You can choose Asset Route if an Asset Route is associated with the current Asset Number.
-
Optionally choose Costs to view the costs of work orders falling in the specific accounting periods, specified in the Accounting Information by Period region. Accounting Periods are defined within Oracle General Ledger. See: Defining Period Types, Oracle General Ledger User's Guide and Defining Calendars, Oracle General Ledger User's Guide.
-
Optionally select a work order, then choose Value Summary to view a summary of the actual, estimated, and variance costs for labor hours, equipment hours, and material against the current work order.
-
Actual Costs: This is the accumulation of all costs for material and resource transactions for the associated maintenance work orders based on a specified period.
-
Estimates: A BOM (material parts list) and routing (resources) can associate with a work order. When you select the Estimates tab, the estimated costs of all material and resources associated with a work order appear, enabling you to budget costs. Direct Items that are included in the material requirements are considered.
-
Variances: The difference between the actual costs recorded and estimated costs.
-
Material: All material and material overhead transaction costs.
-
Labor: All employee resource and resource overhead transaction costs.
-
Equipment: All material resource and resource overhead transaction costs.
-
-
Optionally choose Details to view actual, estimated, and variance costs for labor hours, equipment hours, and material for specific operations of the current work order.
-
-
Save your work.
To view the purchasing requisition created
-
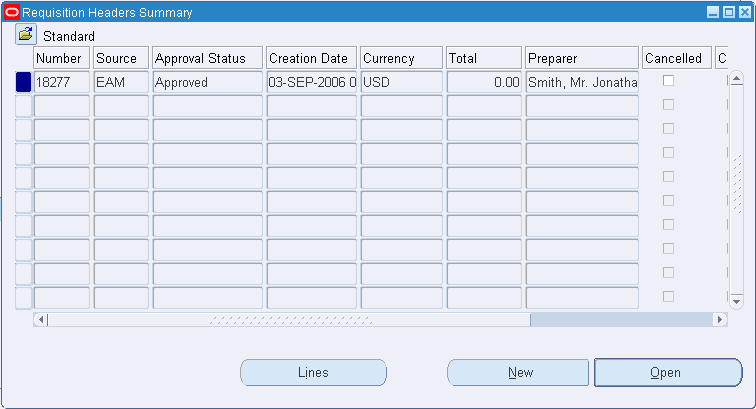
Navigate to the Find Requisitions window (Purchasing > Requisitions > Requisition Summary).
-
Select the maintenance Work Order number from the Reference Num list of values.
-
Choose Find. The maintenance work order appears. The Source reads EAM.
Requisition Headers Summary
Additional Information: You can also create requisitions automatically using the web-based user interface, See: Work Orders.
Manually Entering Requisitions for Direct Items
You can manually create requisitions for Direct Items within iProcurement or Purchasing. If you have Oracle iProcurement installed, you can access supplier catalog items directly from an eAM Work Order. If you create a requisition within iProcurement, the Work Order and operation information generates as you proceed to checkout. You can access a link to Direct Items using the Maintenance Workbench (See: Using the Maintenance Workbench), or within the Work Order window. You can procure Non-Stock and Description-based Direct Items, without accessing iProcurement, as well. You can also create requisitions using the web-based user interface. See: Work Orders.
Important: You cannot automatically create one requisition for multiple direct items on a work order. If a work order includes multiple direct items, you must manually create the requisition.
To enter requisitions for direct items using Oracle iProcurement
-
Navigate to the Work Orders window.
-
Select a Work Order number (See: eAM Work Order Statuses).
-
Choose Materials to view or update the material requirements for this purchase order (See: Defining Material Requirements). After purchase orders or requisitions related to Direct Items are created for this Work Order, they are referenced in the Direct Items region.
Note: Purchase orders and requisitions are not referenced within the forms application. You can reference them using the Maintenance Super User responsibility. See: Work Orders.
Material Requirements
-
Choose Direct Item to purchase items directly from supplier and non-supplier catalogs, using Oracle iProcurement, or enter the direct items to purchase within the Create Direct Items region (See: Defining Direct Item Material Requirements).
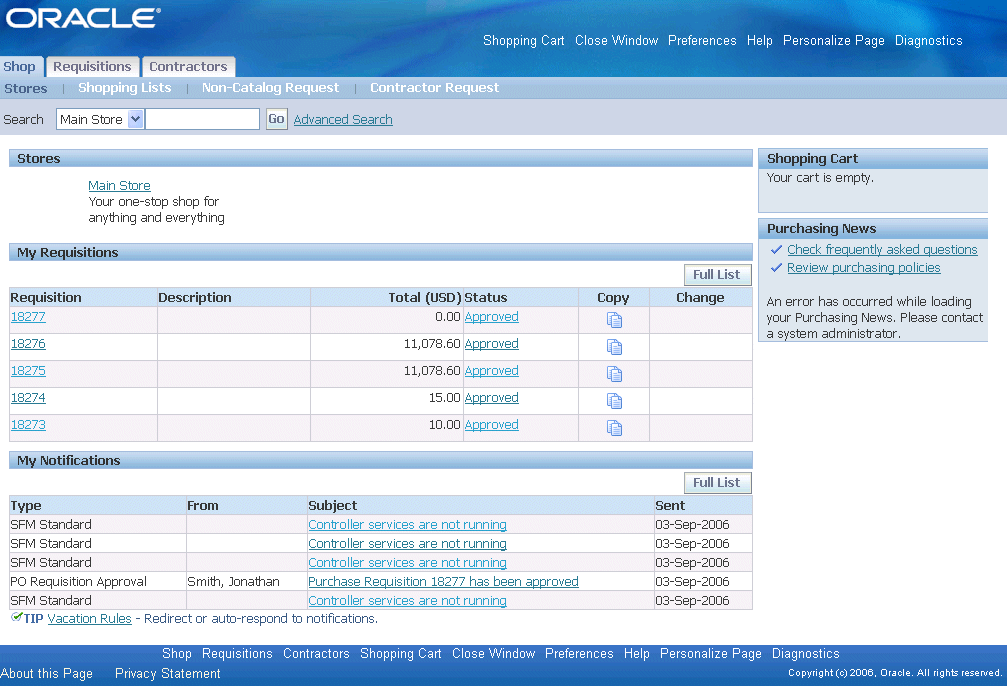
All procured Non-Stock, Service, and/or Description-based requisition numbers appear in the My Requisitions region.
-
Buy necessary items and check out. These items are automatically associated with your Work Order.
-
Save your work.
To manually enter requisitions for direct items via Oracle Purchasing
In addition to procuring Direct Items directly from a Work Order (See: Defining Direct Item Material Requirements), you can access Direct Item procurement functionality using Purchasing. This functionality is available if you have Enterprise Asset Management installed.
You can enter a requisition within both the forms application and Maintenance User. When entering a requisition within the forms application, this is performed directly within the Requisitions window, and not from the eAM Work Order, as in Maintenance User. See: Work Orders
-
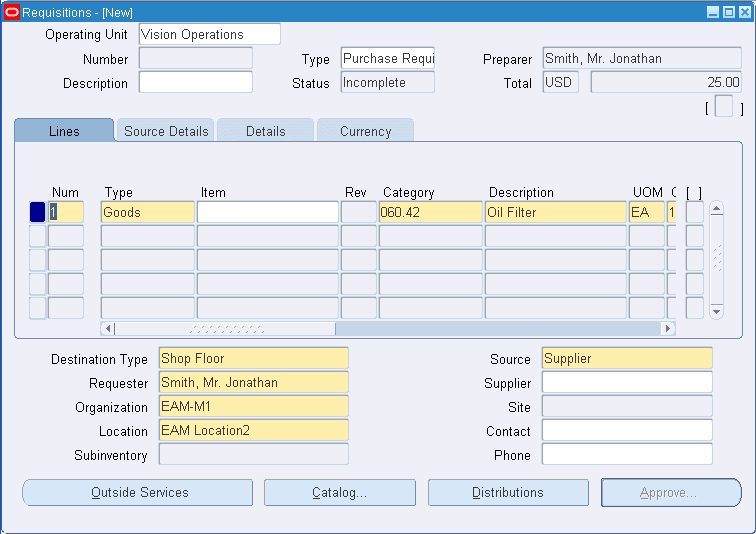
Navigate to the Requisitions window (Purchasing > Requisitions > Requisitions).
Requisitions
-
Optionally enter a requisition Description.
-
Select the Lines tab.
-
Select Goods or Services from the item Type list of values.
-
Optionally select an Item to purchase. Items that are defined in Inventory, with the Stockable check box cleared, are available for selection. See: Inventory Attribute Group, Oracle Inventory User's Guide
-
Select the purchasing Category of the item you want to purchase. See: Defining Categories, Oracle Inventory User's Guide. You can specify labor or equipment, as well as material accounts, to charge on a Work Order by assigning the category to the requisition line. This enables you to bypass the outside processing setup if the outside resource service is a one-time situation. The purchase order can include several cost elements.
-
Enter the item's Description. This description should be meaningful because it is used to procure the item. If this item is not inventoried, this is how an internal person understands what item you are attempting to procure.
-
Select a UOM. The unit of measure qualifies the quantity you enter on the purchase order line. When you choose a line type, its default unit of measure populates this field. If you choose an item, its default unit of measure overwrites the line type default. You can change the UOM until the item is received, billed, or encumbered.
-
Enter a Quantity to purchase.
-
Select a Need-By date.
-
Select Shop Floor from the Destination Type list of values, for all direct item and non-stock item, eAM related requisitions. You can select a destination type of Shop Floor for all purchasable items that are not selected as Stockable in the Item Master (See: Defining Items, Oracle Inventory User's Guide).
When you select a destination type of Shop Floor, eAM recognizes this as a requirement to deliver the direct item to the maintenance Work Order.
-
The Destination Organization list of values displays those organizations where the item is non-stockable, if the Destination Type is Shop Floor.
Note: For information on all remaining fields on this window, See: Entering Requisition Lines, Oracle Purchasing User's Guide.
-
Choose Outside Services. You can access this window from the Requisition, Purchase Order, and Release windows. This is enabled if the Destination Type previously specified is Shop Floor.
Outside Services
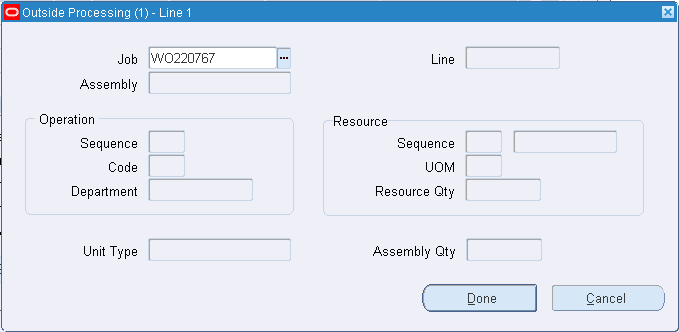
-
Select a Work Order from the Job list of values. Released maintenance Work Orders are available. After you select a Work Order, any eAM project and task information associated with the Work Order is copied to the corresponding Project and Task fields, within the Project tab in the requisitions or purchase order Distributions window.
-
Select an Operation Sequence. The purchased material is associated with this operation on the current Work Order. Purchasing displays the operation Code and the Department.
-
Choose Done.
Note: For information on all remaining fields on the Outside Processing window, See: Entering Outside Processing Information, Oracle Purchasing User's Guide.
-
Save your work.
-
The requisition needs approval (See: Creating Process Definitions in Oracle Workflow Builder, Oracle Workflow Guide). After the requisition is approved, it appears on the eAM Work Order and is viewed in Purchasing.
Related Topics
Entering Requisition Headers, Oracle Purchasing User's Guide
Entering Requisition Lines, Oracle Purchasing User's Guide
Entering Requisition Distributions, Oracle Purchasing User's Guide
Creating Purchase Orders from Requisitions
After a requisition is created and approved, you can execute an AutoCreate process to create purchase orders.
To create purchase orders
-
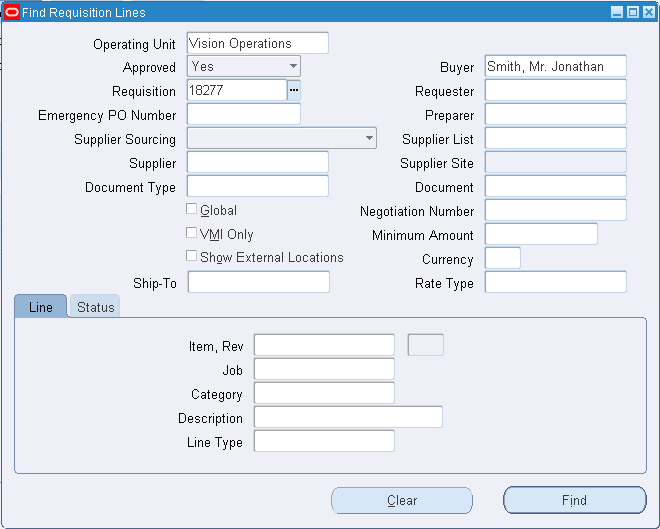
Navigate to the Find Requisition Lines window (Purchasing > AutoCreate).
Find Requisition Lines
-
Enter the Requisition number. This requisition is created into a purchase order.
-
Choose Find.
-
Choose Automatic.
New Document
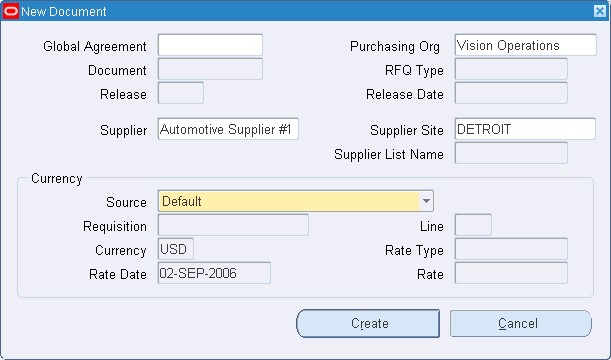
-
Select a Supplier.
-
Choose Create, and then make a note of the purchase order number created.
-
Verify that the item is of Type Goods.
-
Choose Shipments.
-
Choose Receiving Controls.
-
Select a Receipt Routing. This is the receipt routing to which you are assigning the procured items: Direct Delivery, Standard Receipt, or Inspection Required. See: Receiving Controls, Options, and Profiles, Oracle Purchasing User's Guide.
-
Choose OK.
-
From the Shipments window, choose Distributions. Verify that the destination Type field is populated with Shop Floor, and the Subinventory is blank.
-
Choose Outside Services. Verify the Job and Operation Sequence.
Note: For information on all remaining fields within the Outside Processing window, See: Entering Outside Processing Information, See: Entering Outside Processing Information, Oracle Purchasing User's Guide.
-
Choose Done.
-
Save your work.
-
Choose Approve.
-
Within the Approve Document window, choose OK. After the purchase order is approved, the purchase order is received within Purchasing.
Related Topics
Entering Purchase Order Distributions, Oracle Purchasing User's Guide
Manually Entering Purchase Orders for Direct Items
You can create purchase orders for direct items within Purchasing.
You must manually create requisitions or purchase orders for work orders that require multiple direct items.
To enter purchase orders for direct items via Oracle Purchasing
-
Navigate to the Purchase Orders window.
Purchase Orders
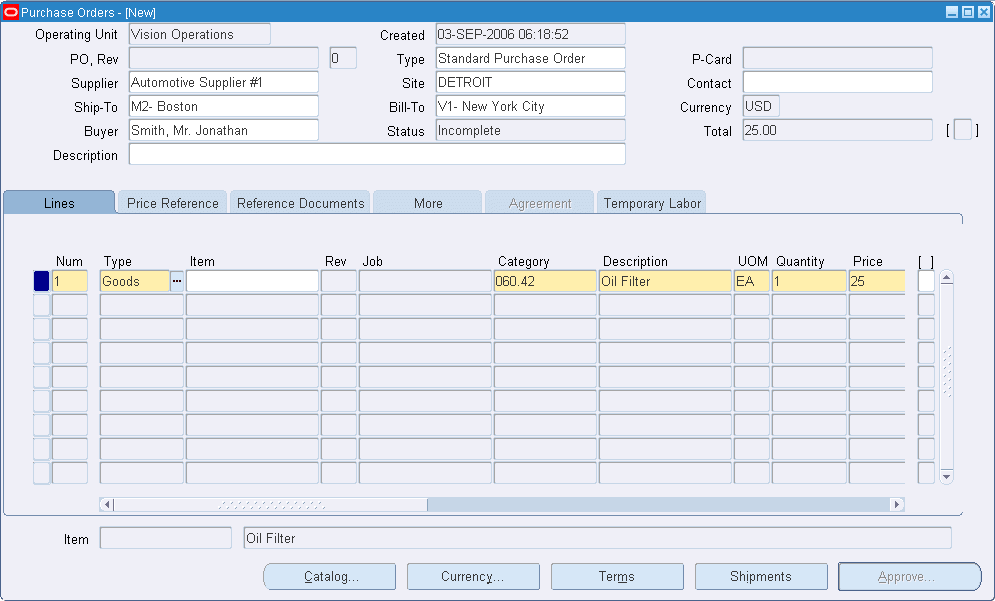
-
If you did not choose automatic purchase order generation in the purchasing options (Numbering tab), enter a unique PO (purchase order) number. Otherwise, the number generates when you save your work. See: Defining Purchasing Options, Oracle Purchasing User's Guide. The Rev (revision) appears to the right of the number.
-
Select Standard Purchase Order from the Type list of values. You can modify the document type names in the Document Types window (See: Defining Document Types, Oracle Purchasing User's Guide).
-
Optionally select a Supplier. A supplier must be provided for approval.
-
Select the supplier Site. A site must be provided for approval. After the purchase order is approved, you can change the supplier site if the PO: Change Supplier Site profile option is set to Yes (See: Purchasing Profile Options, Oracle Purchasing User's Guide).
-
Optionally select a Contact. This is the name of the contact at the supplier site.
-
Optionally enter the Ship-To and Bill-To locations for the purchase order. If you entered a supplier site, the location values you assigned to the supplier or supplier site default into these fields. See: Purchase Order Defaulting Rules, Oracle Purchasing User's Guide
-
If the Enforce Buyer Name option in the Purchasing Options is set to yes, your name appears as the Buyer. Otherwise, you can enter the name of any buyer. See: Defining Control Options, Oracle Purchasing User's Guide
-
Enter a Description for the purchase order. This description does not print on the purchase order, and is for internal use. If you want to add unlimited notes, use the attachments feature (See: Attaching Notes to Purchasing Documents, Oracle Purchasing User's Guide
-
Select the Lines tab. For new purchase order lines, Purchasing displays the next sequential line Num (number) available. You can accept this number or enter any line number that does not already exist. This number is used for all tabs in this window.
-
Select the a Goods or Services line Type. Purchasing automatically copies the corresponding defaults, based on the selected line type. See: Defining Line Types, Oracle Purchasing User's Guide.
-
Optionally select an Item to purchase. Items that are defined in Inventory, with the Stockable check box cleared, are available. See: Inventory Attribute Group, Oracle Inventory User's Guide.
-
Select the purchasing Category of the item you want to purchase. See: Defining Categories, Oracle Inventory User's Guide.
-
Enter the Description of the item. This description should be meaningful, because it is used to procure the item. If this item is not inventoried, this how an internal person understands what item you are attempting to procure.
-
Enter the Quantity you are purchasing.
-
Select a UOM. The unit of measure qualifies the quantity you enter on the purchase order line. When you choose a line type, its default unit of measure populates this field. If you previously chose an item, its default unit of measure overwrites the line type default. You can change the UOM until the item is received, billed, or encumbered.
-
Enter the unit Price for the item.
-
Choose Shipments to enter multiple shipments for standard and planned purchase order lines, and to edit shipments Purchasing automatically created for you (See: Entering Purchase Order Shipments, Oracle Purchasing User's Guide).
-
Select the More tab.
Shipments Window
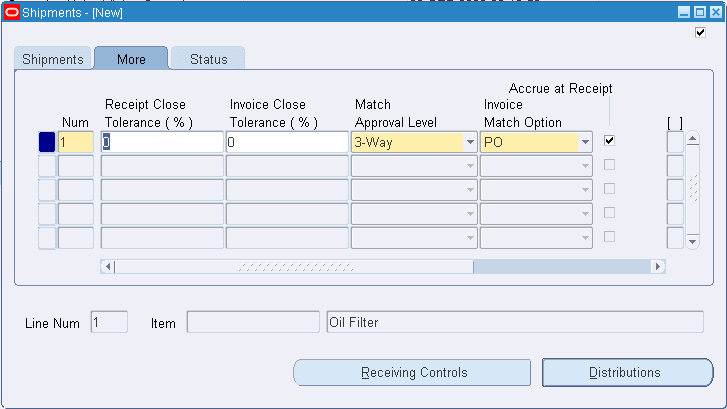
-
Select the Accrue at Receipt check box to indicate that the items on this purchase order line accrue at receipt.
-
-
Choose Distributions to enter distribution information for purchase order shipments, or to view distributions that Purchasing automatically created for you. You can enter multiple distributions per shipment line, and enter information regarding paper requisitions (See: Entering Purchase Order Distributions, Oracle Procurement User's Guide).
-
Choose Outside Services to associate this purchase order with a maintenance Work Order.
-
Select a maintenance Work Order from the Job list of values. After a Work Order is selected, any eAM project and task information associated with the Work Order copies to the corresponding Project and Task fields within the Project tab in the requisitions or purchase order Distributions window.
-
Select an Operation Sequence. The purchased material is associated with this operation on the current Work Order. Purchasing displays the operation Code and the Department.
-
Choose Done.
-
Save your work.
-
The purchase order needs to be approved (See: Creating Process Definitions in Oracle Workflow Builder, Oracle Workflow Guide). After the purchase order is approved, it will appear on the eAM Work Order, and is viewed in Purchasing.
Related Topics
Entering Purchase Order Headers, Oracle Purchasing User's Guide
Entering Outside Processing Information, Oracle Purchasing User's Guide
Entering Purchase Order Lines, Oracle Purchasing User's Guide
eAM Direct Procurement Accounting
You can charge Direct Items (Non-Stock and Description-based) to a selected appropriate Purchasing Cost Elements by selecting a Purchasing Order Category. To bypass the outside processing setup because the outside resource service is a one-time event (See: Setting Up Outside Service Processing), you can charge labor, equipment, and material accounts to a Work Order by assigning a category to the requisition line (See: Setting Up Purchase Order Category Associations for Direct Items).
For all requisition or purchase order distribution lines with a destination type of Shop Floor (not related to outside processing), the amount (quantity * purchase price * exchange rate) charges to the eAM Work Order Material account.
The receiving process creates the following accounting entries:
| Account | Debit | Credit |
|---|---|---|
| Receiving Inspection | XXX | - |
| Accounts Payable Accrual | - | XXX |
The material delivery process creates the following entries:
| Account | Debit | Credit |
|---|---|---|
| Work Order Material | XXX | - |
| Receiving Inspection | - | XXX |