Oracle iSetup Framework Interface Registration
Oracle iSetup Framework Interface Registration
This chapter explains how to register an Oracle iSetup Framework (BC4J) API through iSetup Interface Repository and create an Extract for the registered API. The API registration process is explained with an example using SYSADMIN as the user and the API "Currency". Please note that Currency is an Oracle iSetup framework (BC4J) API which is available as a part of Oracle E-Business Suite. You can find the class files for the Currency API under
$JAVA_TOP/oracle/apps/gl/ispeed/currency/server
Security Setup for Registering the Oracle iSetup Framework (BC4J) API
Follow these instructions for the security setup of the API.
For more information on managing security, see the manual Oracle E-Business Suite System Administrator's Guide - Security.
To assign the iSetup Super User Role to a User
-
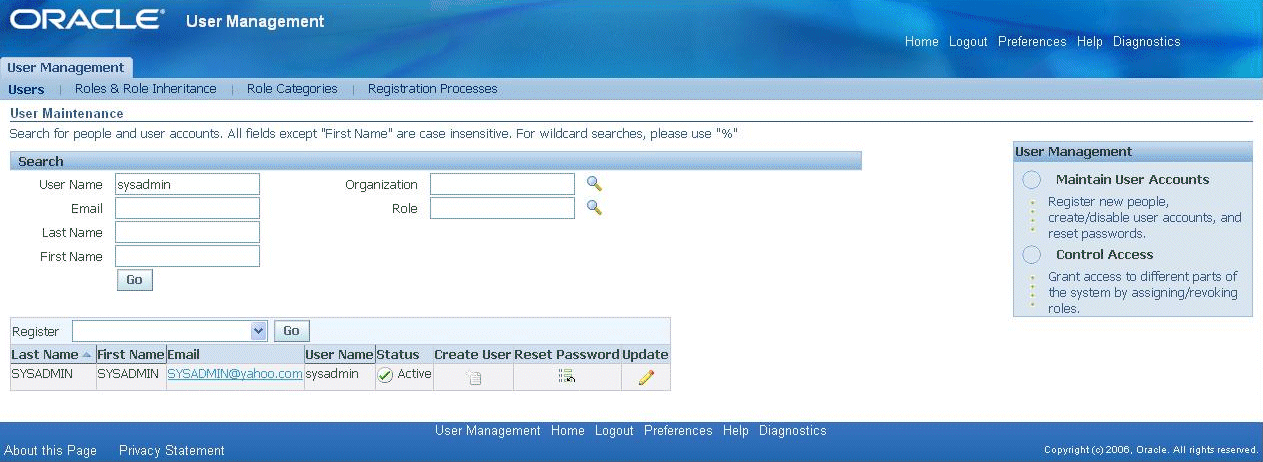
Log in to Oracle E-Business Suite as a system administrator with the User Management responsibility and the Functional Administrator responsibility.
-
Go to the User Management responsibility > User.
-
Search for the username SYSADMIN and click Update.
-
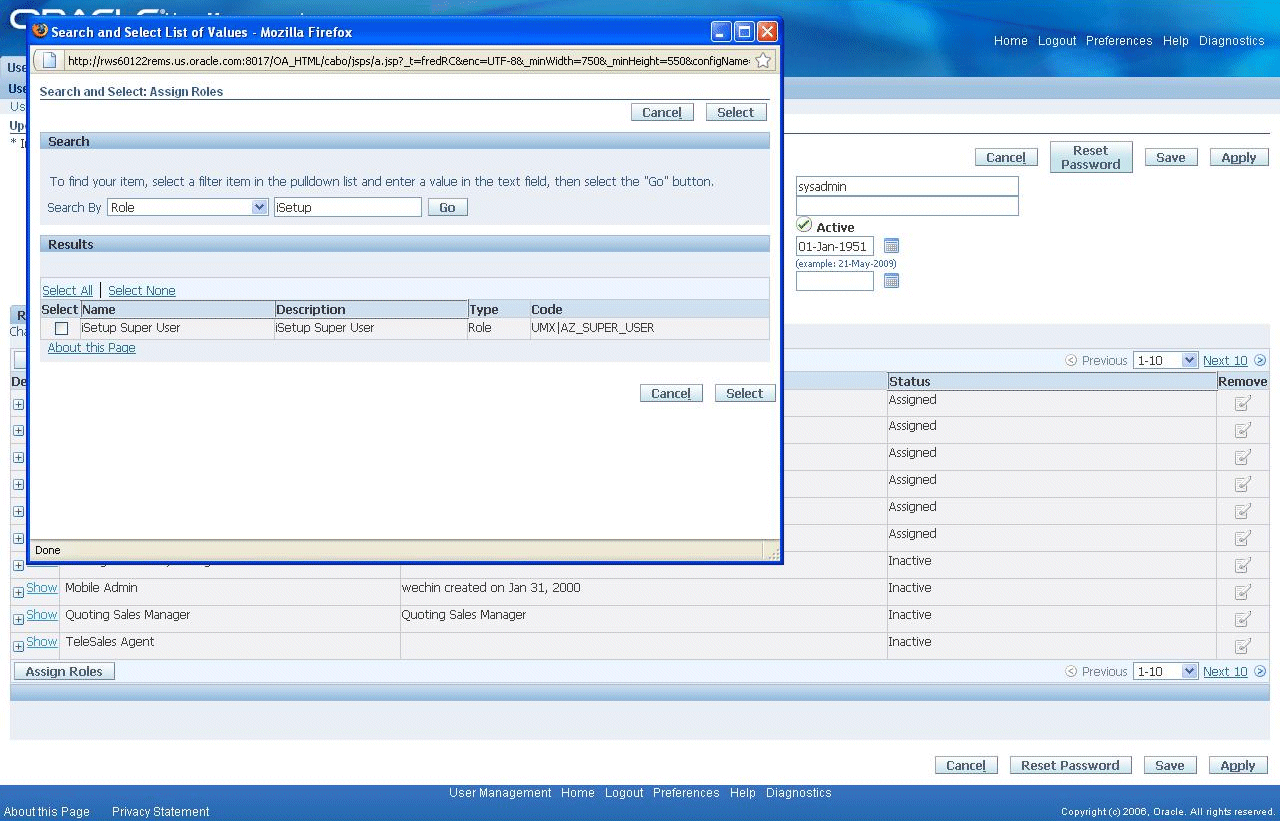
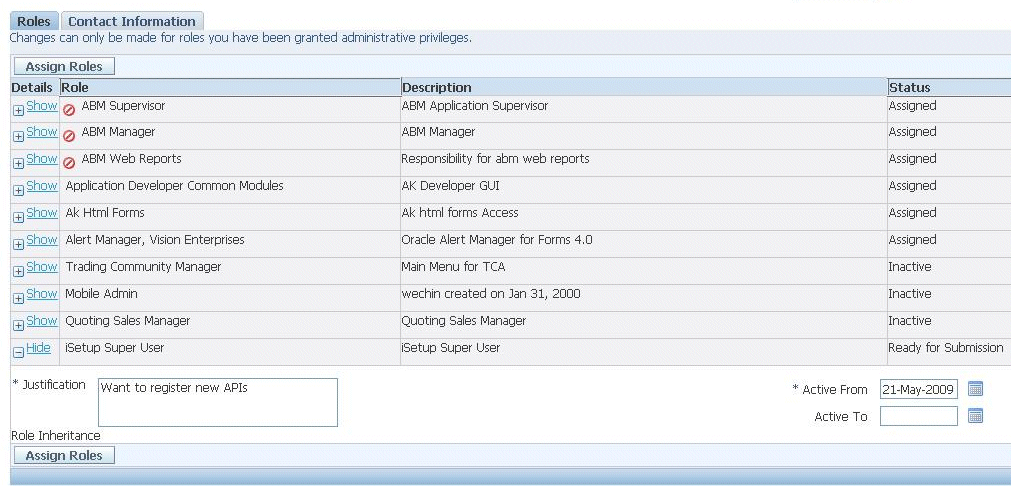
Assign the role to the user. Click on Assign Roles. In the LOV search window, search for iSetup Super User and select it.
-
Provide a justification to add the role and click Apply. Return to the main menu.
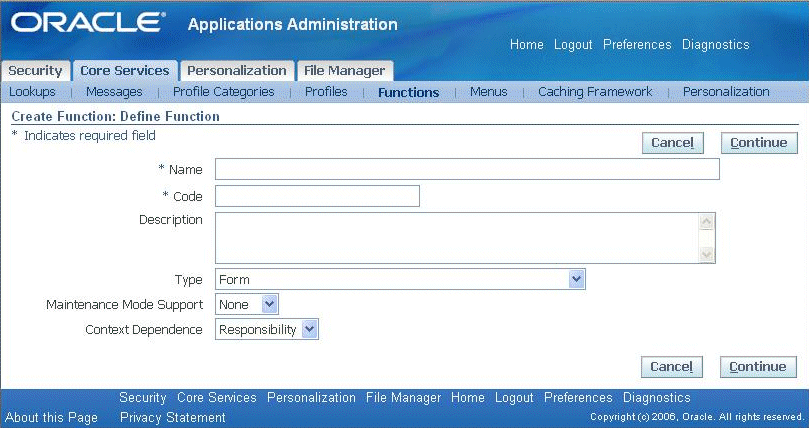
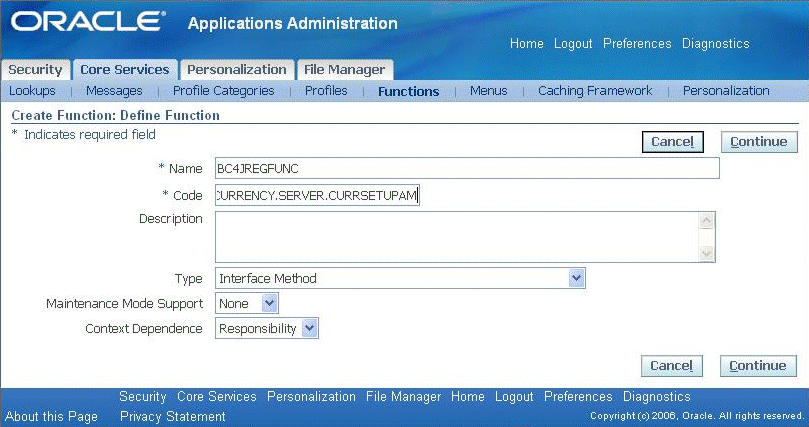
To Create a Function
-
Navigate to Functional Administrator.
-
Navigate to Home > Core Services > Functions > Create Function.
-
Enter the following details:
-
Name: BC4JREGFUNC (Name of your choice)
-
Code: BC4J:oracle.apps.gl.ispeed.currency.server.currsetupam. Prefix BC4J: with the Java class path to the Application Module that you have created. The code is not case sensitive; ultimately, it will be converted to uppercase by the application.
-
Type: Interface Method
-
-
Click Continue.
-
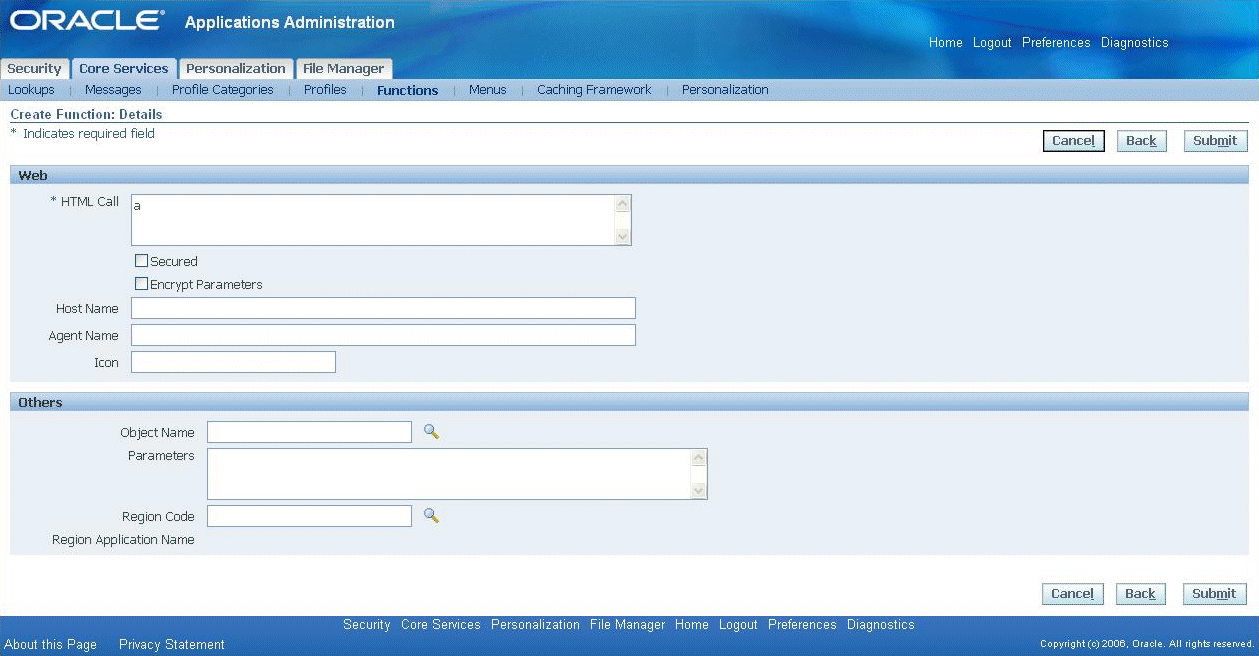
Add a dummy character in the HTML Call field.
-
Click Submit.

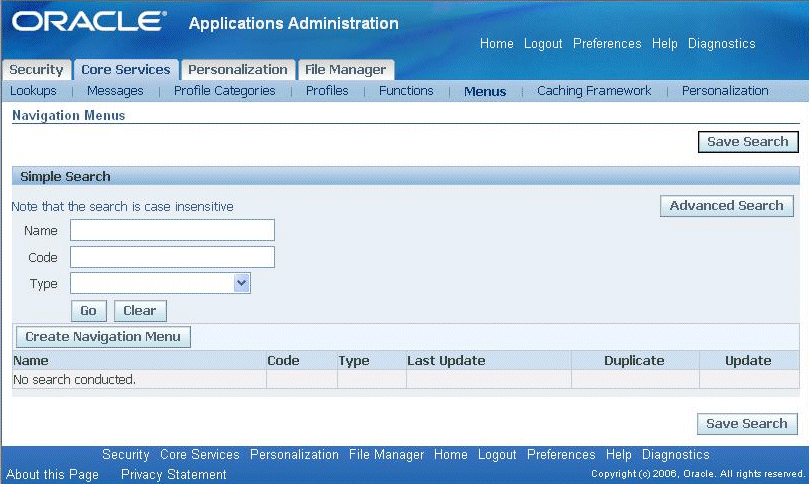
After creating the function, you can add it to a menu. You can directly proceed to that task by clicking on Menu in the subtab.
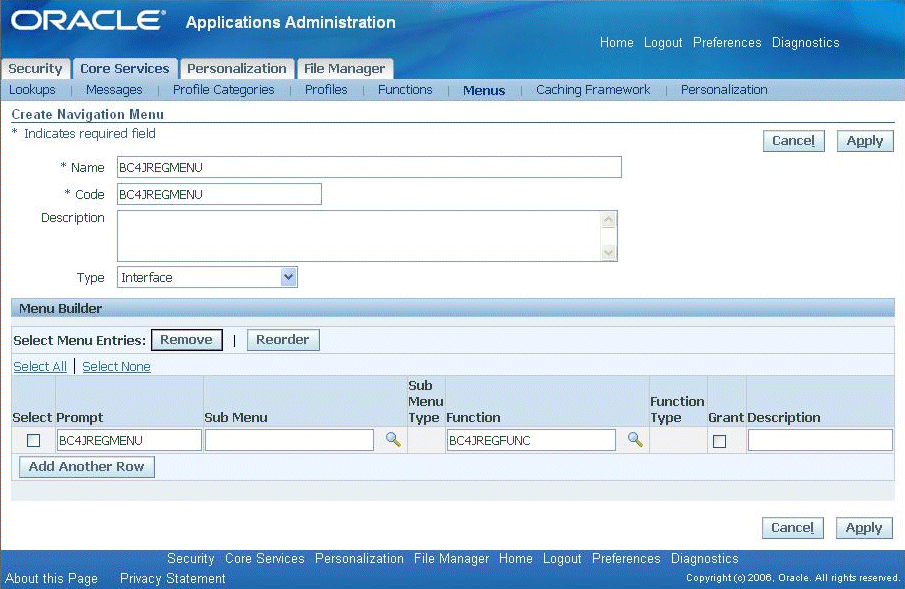
To Create a Menu
-
Click on Create Navigation Menu.
-
Enter the following details.
-
Name: BC4JREGMENU (Name of your choice)
-
Code: BC4JREGMENU (Code of your choice)
-
Type: Interface
Click Add Another Row. Add the following:
-
Prompt: BC4JREGMENU
-
Function: BC4JREGFUNC (Registered function)
-
Grant: Deselect the box.
Click Apply.
-
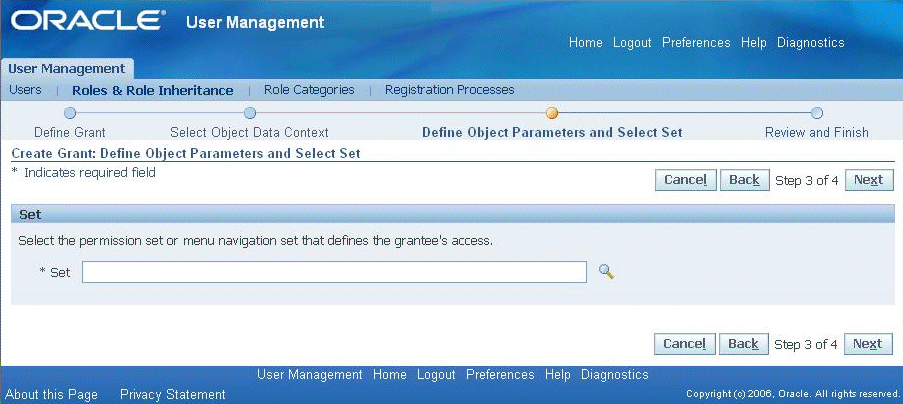
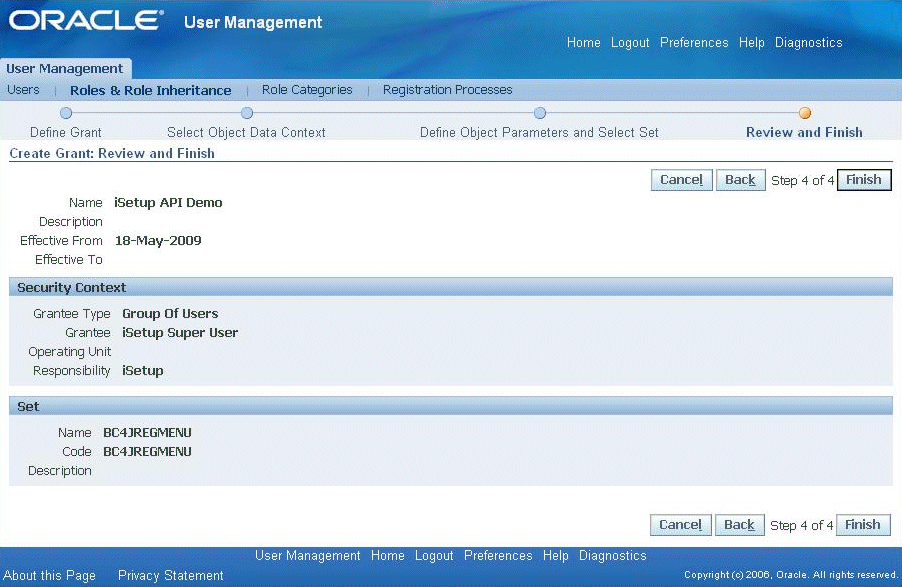
To Create a Grant
-
Navigate to Home > User Management > Role & Role Inheritance.
-
Search for the iSetup Super User role.
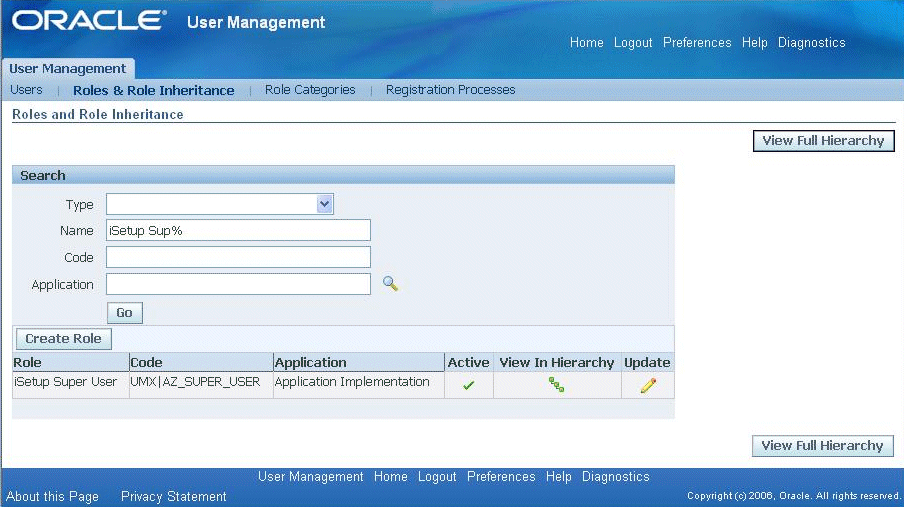
-
Click the Update icon.
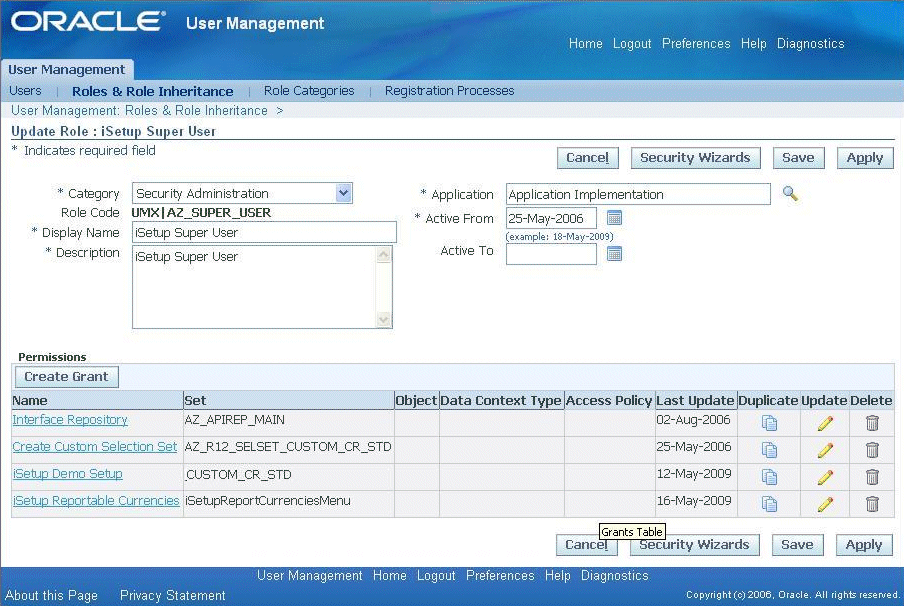
-
Click Create Grant.
-
Enter the following:
-
Name - iSetup API Demo
-
Responsibility - iSetup
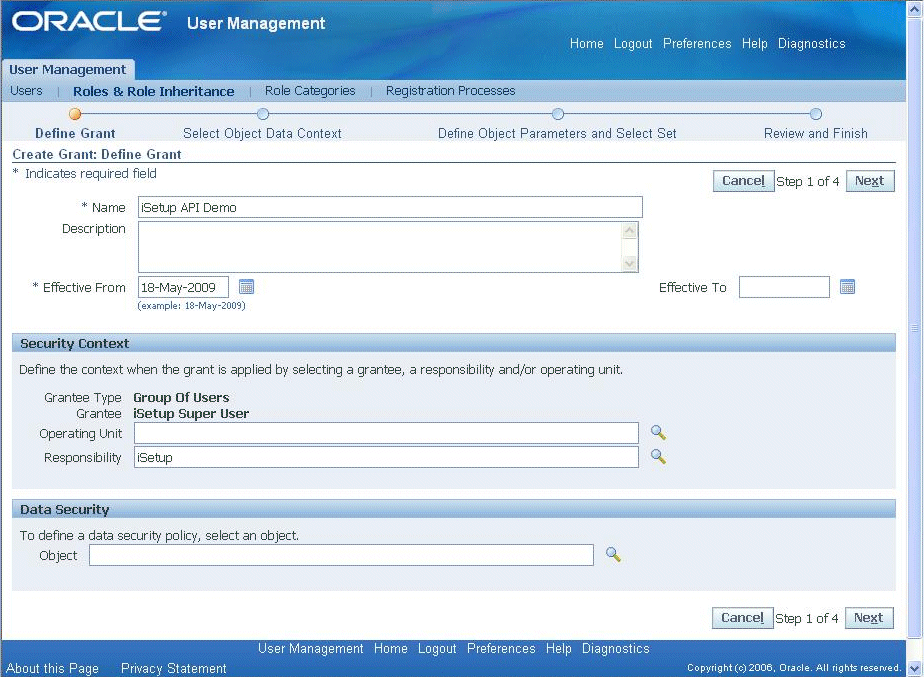
-
-
Click Next.
-
Add the Menu name to the Set field.
Set: BC4JREGMENU
-
Click Next.
-
Click Finish.
Registering the iSetup Framework (BC4J) API
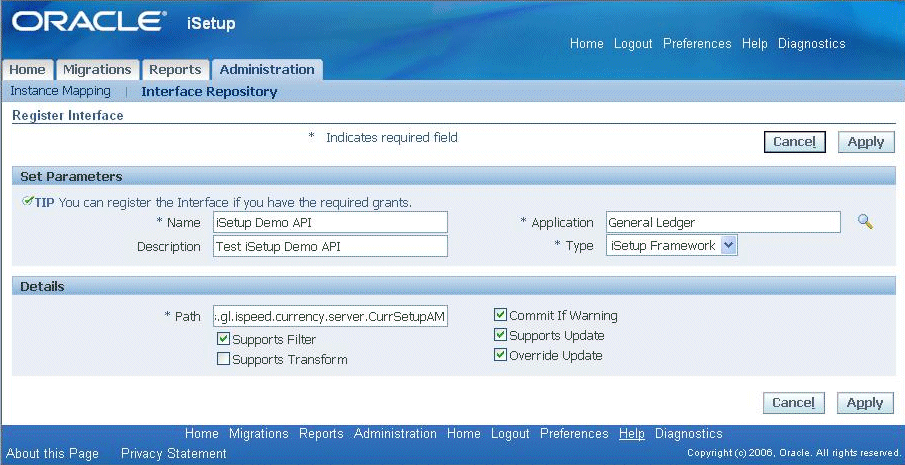
The following are descriptions of the fields used in registering an interface.
-
Name - This field refers to the name of the Interface to be registered. This name has to be unique to get registered.
-
Description - The description refers to the description of the API to be created.
-
Application - This field refers to the application which owns the interface being registered.
-
Type - This field refers to the type of the interface to be created. This field would be read/display only in the Update flow. For example, the interface defined above has the type "iSetup Framework".
-
Path - The path of the application module. For example, in the API defined above the path is:
oracle.apps.gl.ispeed.currency.server.CurrSetupAM
'CurrSetupAM' should be physically present in the above-mentioned Java path.
Details:
-
Supports Filter - This flag indicates if iSetup could enable filtering support for the interface being registered. If this option is checked, then Oracle provides a filtering icon in front of this interface in the iSetup UI shipped with Oracle E-Business Suite.
-
Supports Transform - This flag indicates whether the API supports transformation on any attributes. This flag does not need to be set for a Reportable API.
-
Commit If Warning - This flag indicates whether the transaction could be committed in the case of a warning while validating the data at the time of loading using the interface. This flag does not need to be set for a Reportable API.
-
Supports Update - This flag indicates whether the API supports updates to preexisting records. That is, at the time of loading the extracted data into the target instance, if the interface finds any record already existing in the instance, then based on the business logic it should be able to update the record. This flag does not need to be set for a Reportable API.
-
Override Update - This flag would be functional only if the "Support Update" flag is checked. Support Update and Override Update flags go hand in hand. This flag indicates if user has a choice to make a call to override the existing record in the target instance. This flag does not need to be set for a Reportable API.
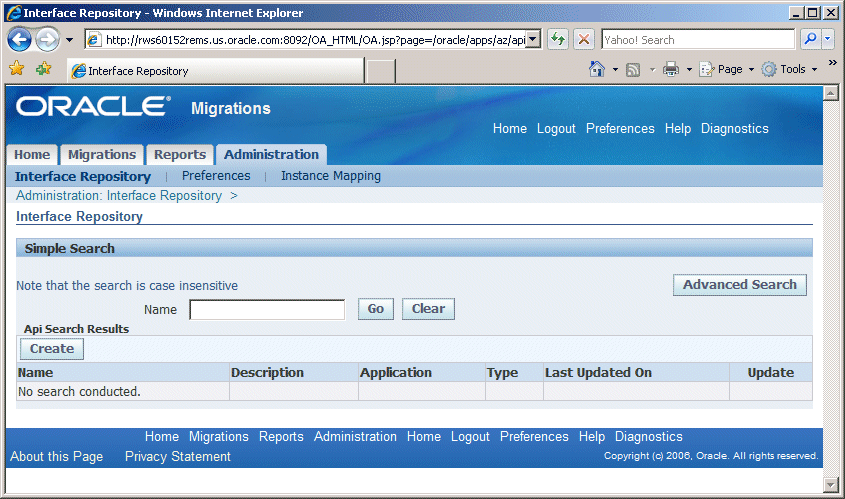
The steps to register an interface are:
-
Navigate to Home > iSetup > Administration.
-
Click Administration.
-
Navigate to Interface Repository.
-
Click on Create and fill in the following details:
-
Name: iSetup Demo API.
-
Application: General Ledger
-
Type: iSetup Framework
-
Path: oracle.apps.gl.ispeed.currency.server.CurrSetupAM
Click Supports Filter, Commit If Warning, Supports Update, Override Update (Depending on what the API can do).
Note: The actual file 'CurrSetupAM' should be physically present under $JAVA_TOP in path the oracle.apps.gl.ispeed.currency.server in the instance where the API is registered. The reason for this requirement is that when the API is registered, the system does not validate that the given file physically exists in the path; however, during extraction the system will try to instantiate the file ('CurrSetupAM' in this case) and if the file is not found, the system will return an error.
-
-
Click Apply.
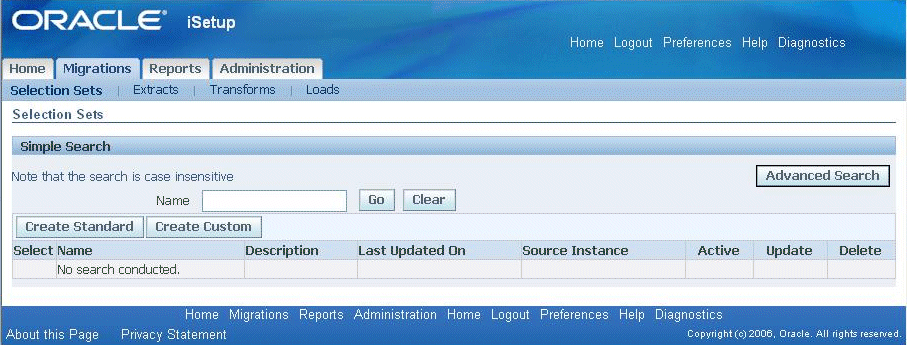
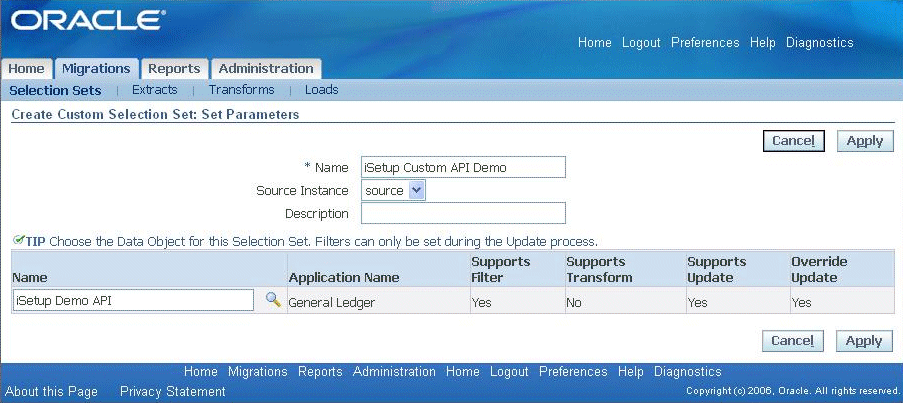
To Create a Custom Selection Set
-
Navigate to Migration > Selection Set.
-
Click on Create Custom and enter the following details:
-
Name - iSetup Custom API Demo.
-
Source Instance - Choose 'source'.
-
LOV Field Name - iSetup Demo API.
-
-
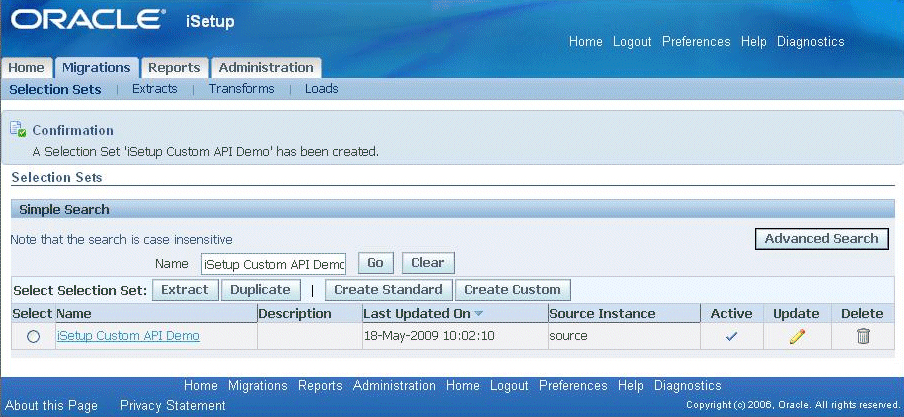
Click on Apply. The Selection Set is created successfully.
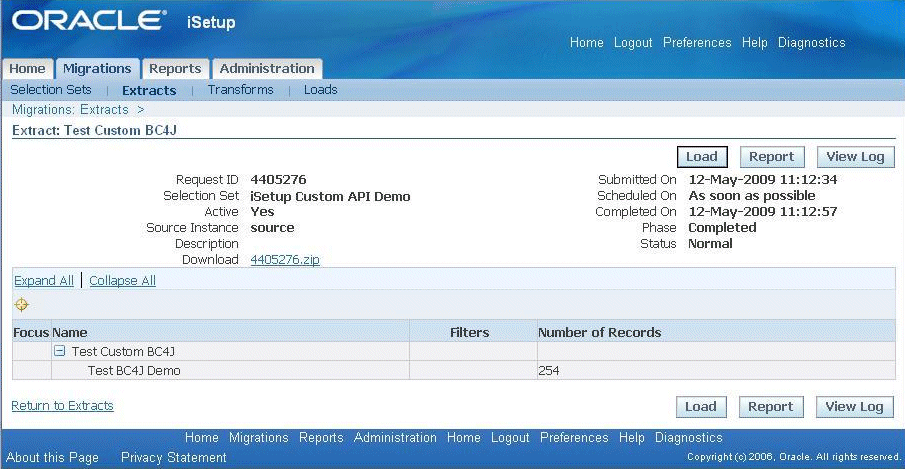
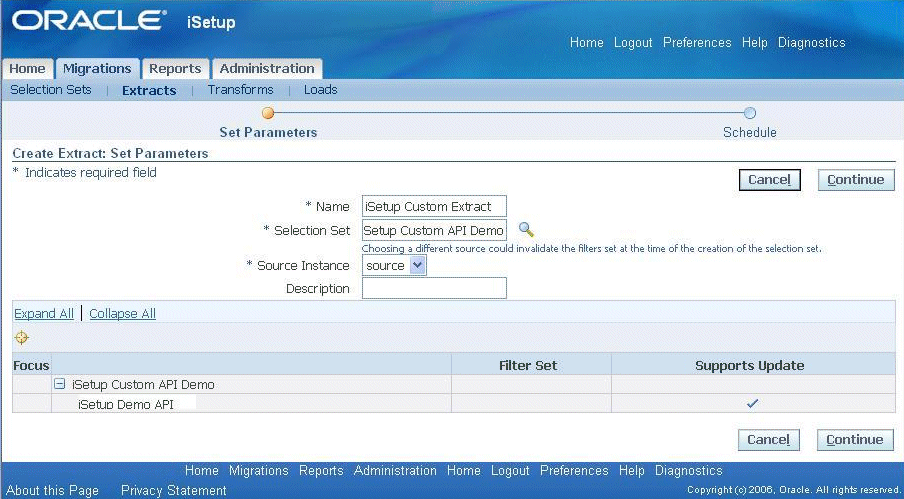
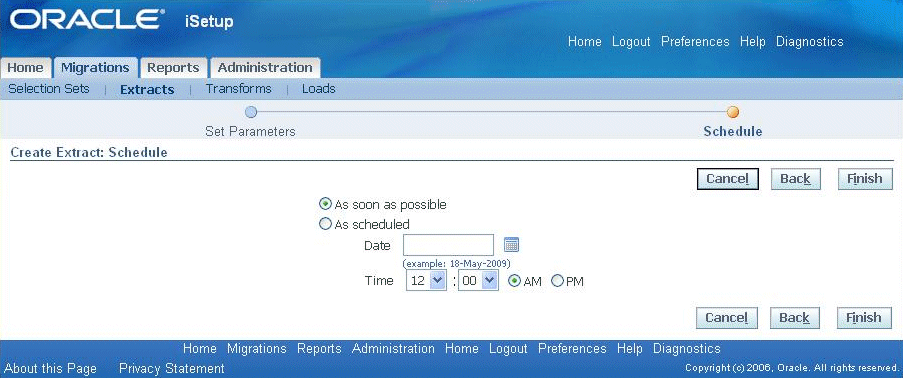
To Create an Extract
-
Navigate to iSetup > Migrations > Selection Set. Search for iSetup Custom API Demo, select it, and click on Extract.
-
Click on Continue and Finish.
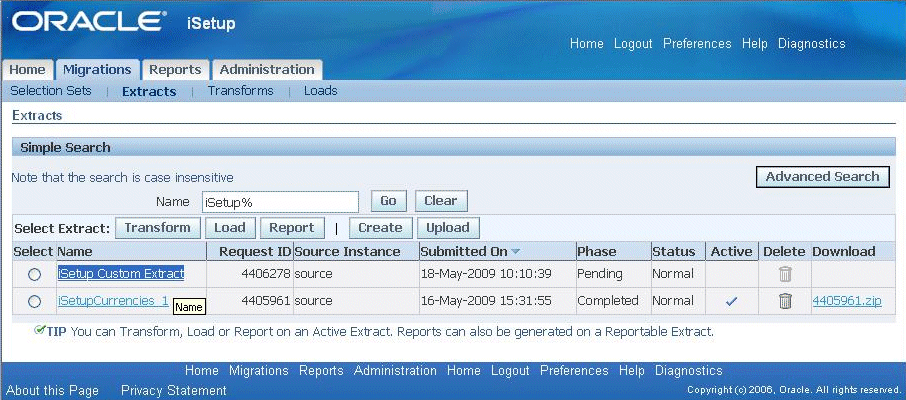
-
Search for iSetup Custom Extract and click on the iSetup Custom Extract link.
-
Wait for the Phase to be marked as Completed. Click on the Refresh button to confirm that it is Completed.
Note: You need to follow the same steps and register the API on the Central Instance and the Target Instance.