Other Security Features
Managing Users
Creating or Modifying a User
You can create additional users to work within the component you own.
Warning: When passing sensitive information (uid/password) to new users, be sure to use a secure mechanism (not just email).
To create or modify a user
-
Log on to the Business Modeler as described in “Logging onto the Business Modeler”.
-
Click Security > Create/Modify User. Or click the Create/Modify User button.
The Create/Modify User dialog box appears.
-
Next:
-
To create a new user, click the New User button, and then click OK.
-
To modify a user, click the button of that user then click OK. Or double-click the icon of the user whose details you want to modify.
The User Details dialog box appears.
-
-
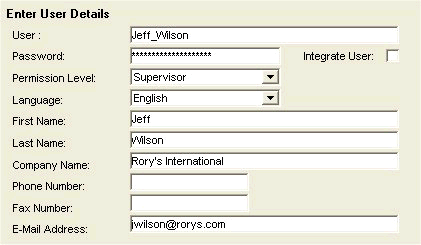
Specify basic user details as follows:
-
Under Enter User Details, type the following information in the appropriate boxes (or select from the drop down lists):
-
The user name, password, permission level, and the language in which the system will be operated. Each user name must be unique within your Demantra implementation.
-
The first and last name of the user, the company name, phone and fax number, and the email address. If you set up automated email within workflows, it is important to make sure the email address is correct here.
-
For Permission Level, see “Permission Levels”.
-
Click Next.
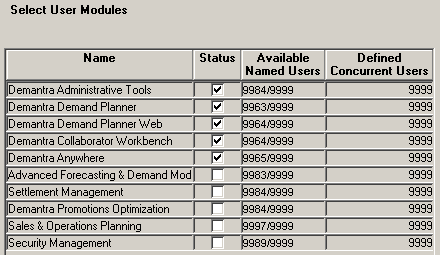
The User Modules dialog box appears. Here you specify which Demantra user interfaces this user can access.
-
-
-
Click the check box next to each module that the user needs to work with. Then click Next.
If you are logged in as the component owner and the user’s permission level is ‘System Manager’, then the following two options will be enabled:
-
Demantra Administrative Tools – Select this option if you want the user to be able to access the Business Modeler, Engine Administrator, Chaining Management, and Member Management applications.
-
Security Management - Select this option if you want the user to be able to create new or modify existing users or user groups. Note that users assigned to this option will not be able to create new users and give them access to Administrative Tools and/or Security Management, nor will they be able to, copy, modify or delete any existing users that have access to these tools.
Note that these options are disabled for all users except the component owner.
Users with access to ‘Security Management’ will be able to:
-
Maintain (create, copy, modify, and delete) any users with the same or lower module access then they have themselves. For example, if User A does not have access to the Demand Management module, then that user will not be able to maintain other users that do have access to that module.
-
Maintain Series, User Filters, and User Groups for the Users that they can maintain. This is true regardless of the series, User Filters, and User Groups that they have access to. For example, even if User A does not have access to the Series “Mfg Profit,” User A can still grant access to that series to other Users.
The New User - Select User Series dialog box appears. This dialog box allows you to determine what data series will be active for the new user, from the entire set of series in this component. Each list is a collapsible list of series groups and the series in them.
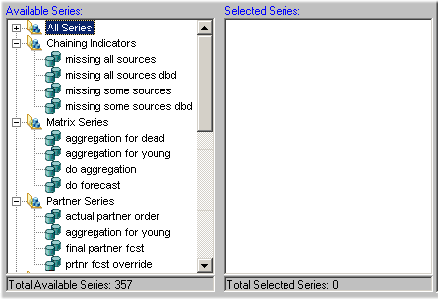
If a series is not active for a user, it is not available when the user creates worksheets and is not viewable in existing worksheets to which the user has access.
-
-
Specify the series that a user can see, as follows:
-
Move all series that you want into the Selected Series list. To do so, either double-click each series or drag and drop it.
-
Remove any unwanted series from the Selected Series list.
Note: You can also move an entire series group from one list to the other in the same way.
-
When you are done specifying series, click Next.
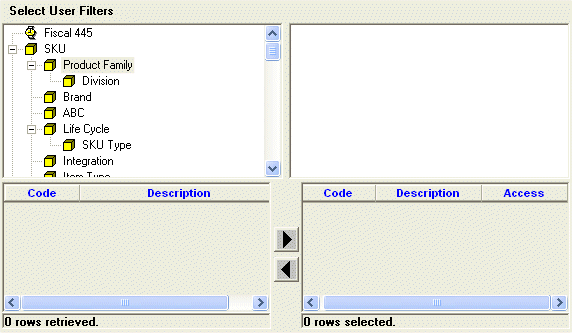
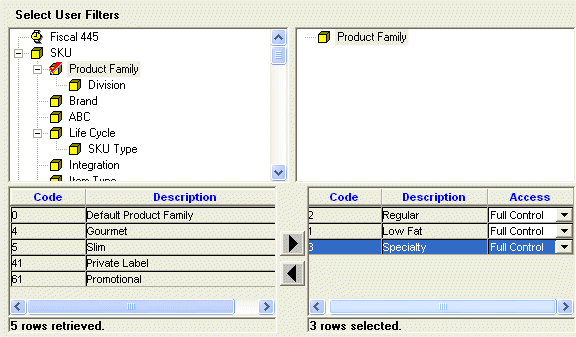
The New User - Select User Filters dialog box appears. This dialog box lets you filter the data that the user can see; specifically, you control which levels and which members of those levels the user can see.
-
-
Filter the data that the user can see, as follows:
-
Click a level in the left side of the dialog box and drag it to the box on the right. Or double-click a level in the left side.
-
Now specify which members of this level the user can see. To do so, click a member in the list, and then click the right arrow button. Or double-click the member you want to filter out.
The system moves the selected members to the box on the lower right side, as in this example:
-
-
Now the user can see only the selected members of this level. In the preceding example, the user can see only data that is associated with the Rainbow brand.
Note: The Selected Members list cannot include more than 200 members.
In the lower right, refine the security settings that control the access that the user has to each member. To do so, in the Access column, click one of the following:
-
Full Control (user can view, edit, create, and delete within this member)
-
Read & Write (the user can view or edit this member)
-
Read only (the user can view this member but cannot make any changes)
-
No access (the user does not have access to this member; this option is equivalent to not including this member in the filter)
-
System Default (use the default permission controlled by the DefaultContentSecurityAccess parameter)
-
-
Repeat the preceding steps for each filter you want to add. Each filter automatically limits the choices available in subsequent filters.
When you have appropriately filtered data for the user, click Next.
The New User - Select User Groups dialog box appears. This dialog box allows you to select the group or groups to which the new user will belong.
-
Specify the collaboration groups to which a user belongs, as follows:
-
Move all groups to which the user should belong into the Selected Groups list. To do so, either double-click each group or drag and drop it.
Note: You can also select and move multiple groups with the standard Ctrl+click or Shift+click actions.
-
Remove any unwanted groups from the Selected Groups list.
-
Click Next.
-
-
Click Finish.
See also
API to Create, Modify or Delete Users, Implementation Guide
Copying a User
If you need to create multiple similar users, it is useful to create one of those users and then copy it to create the other users.
-
Log on to the Business Modeler as described in “Logging onto the Business Modeler.”
-
Click Security > Create/Modify User. Or click the Create/Modify User button.
The Create/Modify User dialog box appears.
-
Click the button of the user you want to copy, and then click Create Copy.
The User Details dialog box appears. Some of the information, such as user name, is blank. Other details, such as the company name, are copied from the original user.
-
Specify the user name and password for the new user.
-
Make other changes as needed.
-
Do one of the following:
-
Click Next to continue editing information for the new user. Demantra initially uses all the same values as for the original user.
-
Click Finish.
Demantra also copies menu permissions of the original user; see “Specifying Permissions for Menu Items”.
See also
“Creating or Modifying a User”
-
Deleting a User
Warning: When a user is deleted, the current session is not immediately stopped. To stop the user from continuing operation, use the web user management page to log out the user and terminate their session.
To delete a user
-
Log on to the Business Modeler as described in “Logging onto the Business Modeler.”
-
Click Security > Create/Modify User. Or click the Create/Modify User button.
The Create/Modify User dialog box appears.
-
Click the button of the user you want to delete, and then click Delete.
A question box appears, inquiring if you are sure you want to delete the selected user.
-
To delete the selected user, click Yes.
See also
“Creating or Modifying a User”
Creating or Modifying a User Group
Demantra uses user groups for several purposes:
-
Group members can collaborate, within Collaborator Workbench.
-
The Workflow Engine can send tasks to groups (as well as to users).
-
Groups can be authorized to view and edit notes attached to worksheets.
-
Groups can authorized to use menu items.
Groups are visible in all components. Note that the users in a group can belong to different components.
To create or modify a group
-
Log on to the Business Modeler as described in “Logging onto the Business Modeler.”
-
Click Security > Create/Modify Group. Or click the Create/Modify User Group button.
The Create/Modify Group dialog box appears.
-
Next:
-
To create a new group, double-click the New Group button.
-
To modify a group, click the button of that group then click OK. Or double-click the icon of the group whose details you want to modify.
The system prompts you for information about the group.
-
-
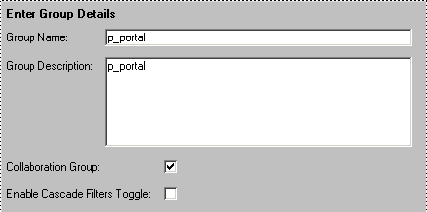
Specify group details as follows:
-
Under Enter Group Details, type a name and optional description in the appropriate boxes. Each group name must be unique within your Demantra implementation.
-
If users of this group should be able to see either other in the Who's Online pane in Collaborator Workbench, make sure the Collaboration Group check box is checked. To access the Workflow Manager, a User Group must be assigned to the workflow.group parameter (in the Business Modeler). For details, refer to Providing Access to the Workflow Editor.
The users will also be able to send tasks to each other.
If you clear this check box, users of the group will not see one another.
-
Check or clear the Enable Cascade Filters Toggle check box.
Click this option to enable users in the group to toggle between cascade and non-cascade filter modes. If not selected, the user will have cascade filtering only.
In cascade mode, users see only members that have combinations with the previously selected members. Members that do not have combinations will not be available in the list. It is generally easier to work with filters in cascade mode.
In non-cascade mode, users see all the members of the selected level regardless of the previously selected members from other levels.
-
Click Next.
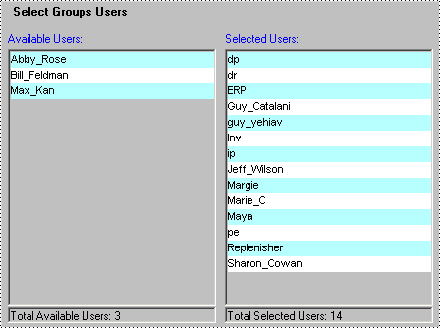
The New Group - Select Group Users dialog box appears. This dialog box allows you to select existing users who will belong to the new group.
-
-
Specify the users in a group, as follows:
-
Move all users that should be in this group into the Selected Users list. To do so, either double-click each user name or drag and drop it.
Note: You can also select and move multiple users with the standard Ctrl+click or Shift+click actions.
-
Remove any unwanted users from the Selected Users list.
-
Click Next.
-
-
Click Finish.
See Also
“Data Security”
“Deleting a Group”
Deleting a Group
-
Log on to the Business Modeler as described in “Logging onto the Business Modeler.”
-
Click Security > Create/Modify Group. Or click the Create/Modify Group button.
The Create/Modify Group dialog box appears.
-
Click the button of the group that you want to delete.
A box appears, inquiring if you are sure you want to delete the selected group.
-
Click Delete.
See also
“Data Security”
“Creating or Modifying a User Group”
Logging Out Users
Demantra provides a tool that you can use to log out users whose sessions have hung due to network or other problems. This applies only to the users of the Web-based products
Note: A user with permission level below System Manager can log into this tool and end his or her own session. Other users will not be visible.
To log a user out of Demantra
-
Browse to the following case-sensitive URL:
http://server name/virtual directory/portal/userManagement.jsp
For example:
http://frodo/demantra/portal/userManagement.jsp
A login page appears.
-
Type your username and password and then click Log on.
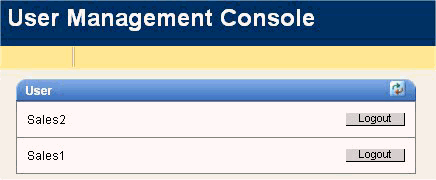
Demantra displays the following screen:
-
Click Logout in the row corresponding to the user you want to log out.
Changing Your Password
You can log into the Business Modeler and change your own password. If your permission level is lower than System Manager, your password is the only information you can access.
Note: You can also change your password by using the Administration link in Collaborator Workbench.
To change your password
-
Log into the Business Modeler. If you do not have access to this tool, contact your Oracle Demantra system administrator.
-
Click Security > Change Password. Or click the Change Password button.
The Business Modeler displays the Change Password screen:

-
Type your current password in the Old Password field.
-
Type your new password in the New and Confirm New fields.
-
Click OK.
Password Policy
You can set up Demantra to enforce password policies and ensure that passwords are well-formed and are changed frequently. By default, Demantra password policies are enforced. An administrator can change this by modifying the system parameter .PasswordRulesEnforcedGlobal, Implementation Guide For details about this parameter, see Non-Engine Parameters.
Once enabled, the password polices are:
-
Password length must be 8 to 12 characters.
-
At least one character must be in UPPER CASE.
-
At least one digit or special character must be used in the password.
-
At least one digit or special character must be used in the password.
-
Password should NOT be a Security Dictionary Word (please contact your administrator for details).
-
Password should NOT be the same as User name.
-
Password should NOT be the same as current password.
If a user attempts to create a new password that does not follow these policies, a message notifies the user of the password policies.
If the user attempts to login and fails, a message similar to the following appears:

The number of tries allowed by the password policy is determined by the system parameter “AccountLockoutThreshold”. (see System Parameters).
If the user is locked out because of too many failed attempts, the following message appears:
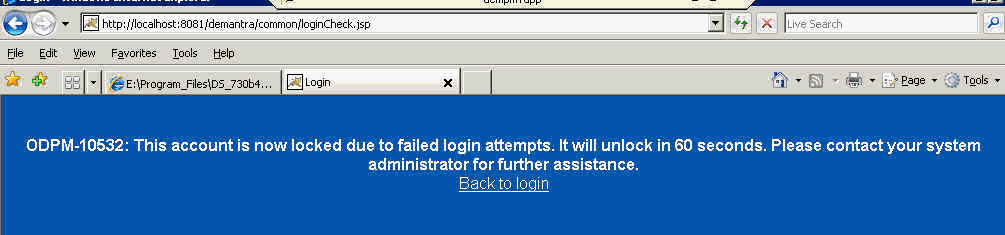
An administrator can unlock the user’s account by logging into Business Modeler, navigating to Security > Create/Modify User, and then deselect the Locked check box. If the component owner is locked out, they can log into the Business Modeler and unlock themselves.
If an administrator explicitly locks a user’s account, a different message appears, saying that the account is locked and to please contact your system administrator.
Note that this locking applies to Collaborator Workbench, Workflow Manager, Administrator Login, Demand Planner Web, Dynamic Open Link (DOL) , Demantra Anywhere.Locking does not apply to the Business Modeler, Member Management, or Chaining Management.
When a user’s password expiration date is within 10 days, a message displays prompting the user to change his password.
For more information see these system parameters:
-
PasswordHistoryCount
-
PasswordRulesEnforcedGlobal
-
AccountLockoutThreshold
-
AccountLockoutDuration
-
PasswordResetTime
Mutual Authentication
The following system parameter can be used for configuring mutual authentication (taken from the System Parameters table in the Demantra Implementation Guide).
| Parameter | Location | Default | Details |
| client.ssl.authentication | System Paramete rs > Applicati on Server > DP Web | false | This parameter controls two-way (mutual) SSL authentication. |
Logging Messages of the Application Server
By default, the Application Server writes logs into the directory Demantra_root/Collaborator/virtual_directory/portal/logs. These logs record activity of the server and clients.
To change the behavior of this logging, edit the file Demantra_root/Collaborator/virtual_directory/portal/conf/logconf.lcf. In this file, you can specify items such as the following:
-
Name and location of the log file
-
Maximum size of the log file
-
Number of log files to keep
-
Information on user login/logout events
For details, see the comments in Demantra_root/Collaborator/virtual_directory/portal/conf/logconf.lcf.
Important: If the default language uses a non-ASCII character set (such as Korean, Japanese, Chinese, Russian) then the text editor for viewing server log files must support the UTF-8 character set. Otherwise the text may not display correctly.
collaborator.login.user
This parameter is set in the logconf.lcf file. Users can turn on this log category and the following information will print out to the collaborator.log file:
-
date/time : User “username” logged in, “number” users online."
-
date/time : User “username” has been brutally logged out, “number” users online.
-
date/time : User “username” logged out, “number” users online.
Viewing the Workflow Process Log
The workflow process log displays information on all the workflow instances that have run or that are running.
To view the process log
-
On the bottom of the Workflow Management page, click Process Log.
The Process Log page appears.
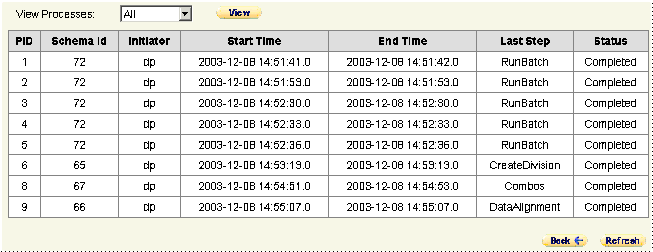
To filter process log entries
-
Select the required filter from the View Processes drop-down menu.
-
Click View.
The filtered processes are shown.
See also:
“Viewing Workflow Status”
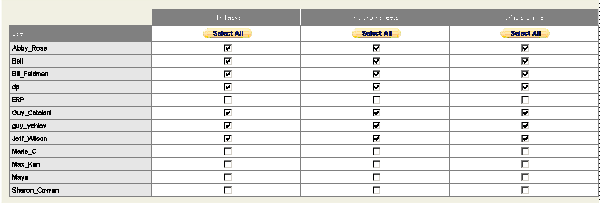
Specifying Content Pane Security
You can control access to the different Collaborator Workbench panes (My Tasks, My Worksheets, and Who's Online).
To specify access to Collaborator Workbench panes
-
Log into the Collaborator Workbench Administrator. See "Logging onto the Collaborator Workbench Administrator".
The Administration page appears.
-
Click Define Content Security.
The system displays a table with one row for each user. Here you specify which panes to make available to each user.
-
Do one of the following:
-
Check the check box for a pane to grant user access to the user.
-
Clear the check box for a pane to deny access to the user.
-
-
Click Finish.
See also
"Configuring the Pane Configuration"
Checking the Log Files and Tables
To check the installation logs:
-
Check the basic installer log file: C:\tmp\Demantra-install.log.
-
Check the database log files written by the Installer. Depending on the installation, the Installer writes some or all of the following log files into Demantra_root\Demand Planner\Database Objects\database_type_name:
-
import.log (Information on the import process of the dump file)
-
For Oracle: run_build_procedures.LST (Information on the loading of the procedures into the new user.) and other *.LST files.
-
-
Check the db_exception_log table.
If you upgraded the database user, also check the following:
-
The upgrade.log file provides details on the database upgrade process. This file is in the same directory as the other Installer log files.
-
version_detail table is updated to the new version only if the upgrade procedure finishes successfully.