| Skip Navigation Links | |
| Exit Print View | |

|
Oracle Solaris 10 9/10 Installation Guide: Solaris Flash Archives (Creation and Installation) |
| Skip Navigation Links | |
| Exit Print View | |

|
Oracle Solaris 10 9/10 Installation Guide: Solaris Flash Archives (Creation and Installation) |
What's New in the Oracle Solaris 10 9/10 Release
Oracle Solaris Auto Registration
Does Auto Registration Impact Solaris Flash Archives?
How Does Auto Registration Impact Solaris Flash Archives?
What's New in the Solaris 10 10/09 Release
Installing Clone Systems With an Initial Installation
Updating Clone Systems With a Solaris Flash Differential Archive
3. Creating Solaris Flash Archives (Tasks)
4. Installing and Administering Solaris Flash Archives (Tasks)
The Solaris Flash installation feature enables you to use a single reference installation of the Solaris OS on a system, which is called the master system. Then, you can replicate that installation on a number of systems, which are called clone systems. You can replicate clone systems with a Solaris Flash initial installation that overwrites all files on the system or with a Solaris Flash update that only includes the differences between two system images. A differential update changes only the files that are specified and is restricted to systems that contain software consistent with the old master image.
Oracle Solaris Auto Registration is new in the Oracle Solaris 10 9/10 release. When you install or upgrade your system, configuration data about your system is, on rebooting, automatically communicated through the existing service tag technology to the Oracle Product Registration System. This service tag data about your system is used, for example, to help Oracle enhance customer support and services. You can learn about service tags at http://wikis.sun.com/display/ServiceTag/Sun+Service+Tag+FAQ.
You can use this same configuration data to create and manage your own inventory of your systems. By registering with your support credentials using one of the registration options below, you have a straightforward way to inventory your systems, by recording and tracking the service tags for the systems and for the software products installed on the systems. For instructions about tracking your registered products, see http://wikis.sun.com/display/SunInventory/Sun+Inventory.
You may elect to have your configuration data sent to the Oracle Product Registration System anonymously. An anonymous registration means that the configuration data sent to Oracle has no link to the name of a customer. You, also, have the option to disable Auto Registration.
For an overview of Auto Registration, see Oracle Solaris Auto Registration in Oracle Solaris 10 9/10 Installation Guide: Planning for Installation and Upgrade.
If you create a Solaris Flash archive based on a master system that was installed with a release prior to the Oracle Solaris 10 9/10 release, that archive does not include Auto Registration. Auto Registration has no impact on your work with that archive.
If you create a Solaris Flash archive based on a master system that was installed with the Oracle Solaris 10 9/10 release or a later release, that archive does include Auto Registration unless it was specifically disabled on the master system. For details, see the next section.
For any archive based on the Oracle Solaris 10 9/10 release or a later release, Auto Registration is enabled by default unless it was specifically disabled on the master system. When you install the Solaris Flash archive or upgrade a clone system with the differential flash archive, configuration data about that installed or upgraded system is, on rebooting, automatically communicated through the existing service tag technology to the Oracle Product Registration System.
Auto Registration uses support credentials and proxy information that you provide before or during an installation or upgrade. The means of providing that credential and proxy information depends on which installation method is used, as shown in the following table.
Table 1-1 Auto Registration Impact
|
For further information, including instructions about how to disable Auto Registration, see Oracle Solaris Auto Registration in Oracle Solaris 10 9/10 Installation Guide: Planning for Installation and Upgrade.
Starting with the Oracle Solaris 10 9/10 release, this document now includes instructions about how to create a Flash Archive recovery image that can be used to restore a system to “factory fresh” condition. See Chapter 5, Creating and Using a Disaster Recovery Image. This chapter provides the simplest instructions to create a Flash Archive image that can be loaded onto the target system to recover from a failed disk drive.
Starting with the Solaris 10 10/09 release, you can set up a JumpStart profile to identify a flash archive of a ZFS root pool.
A Flash archive can be created on a system that is running a UFS root file system or a ZFS root file system. A Flash archive of a ZFS root pool contains the entire pool hierarchy, except for the swap and dump volumes, and any excluded datasets. The swap and dump volumes are created when the Flash archive is installed.
You can use the Flash archive installation method as follows:
Generate a Flash archive that can be used to install and boot a system with a ZFS root file system.
Perform a JumpStart installation of a system by using a ZFS Flash archive.
Note - Creating a ZFS Flash archive backs up an entire root pool, not individual boot environments. Individual datasets within the pool can be excluded by using the flarcreate and flar command's -D option.
For detailed instructions and limitations, see Installing a ZFS Root File System (Oracle Solaris Flash Archive Installation) in Oracle Solaris ZFS Administration Guide.
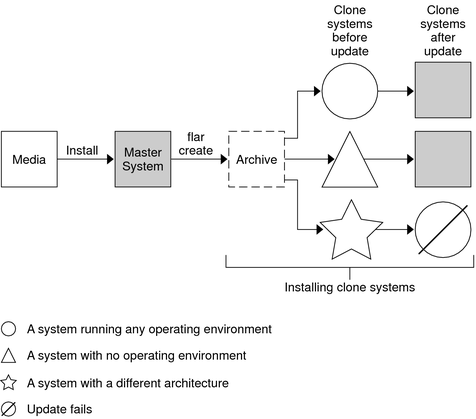
You can install a master system with a Solaris Flash archive for an initial installation by using any installation method: Solaris installation program, custom JumpStart, Solaris Live Upgrade, or WAN boot. All files are overwritten. The Solaris Flash installation is a five-part process.
Install the master system. You select a system and use any of the Solaris installation methods to install the Solaris OS and any other software.
(Optional) Prepare customization scripts to reconfigure or customize the clone system before or after installation.
Create the Solaris Flash archive. The Solaris Flash archive contains a copy of all of the files on the master system, unless you excluded some nonessential files.
Install the Solaris Flash archive on clone systems. The master system and the clone system must have the same kernel architecture. For further information, see Installing a Sun4U Flash Archive on a Sun4V Machine.
When you install the Solaris Flash archive on a system, all of the files in the archive are copied to that system. The newly installed system now has the same installation configuration as the original master system, thus the system is called a clone system. Some customization is possible:
Scripts can be used for customization.
You can install extra packages with a Solaris Flash archive by using the custom JumpStart installation method. The packages must be from outside the software group being installed or a third-party package.
(Optional) Save a copy of the master image. If you plan to create a differential archive, the master image must be available and identical to the image installed on the clone systems.
For step-by-step instructions, see Installing the Master System.
Figure 1-1 shows an installation of clone systems with an initial installation. All files are overwritten.
Figure 1-1 Solaris Flash Initial Installation

If you have a clone system and want to update that system, you can create a differential archive that contains only the differences between two images, the unchanged master image and an updated master image. When you update a clone system with a differential archive, only the files that are in the differential archive are changed. You can choose to install a Solaris Flash differential archive with the custom JumpStart installation method or Solaris Live Upgrade. An update is a five-part process.
Prepare the master system with changes. Before changes are made, the master system should be running a duplicate of the original archive.
Note - If the master system is not running a duplicate of the original archive, the differences between the two system images might result in a large differential archive. Consequently, installing the differential archive could be time consuming. Use an initial installation with a full archive in this case.
(Optional) Prepare customization scripts to reconfigure or customize the clone system before or after installation.
Mount the directory of a copy of the saved-unchanged master image. This second image is to be used to compare the two system images. Access the image by the following methods.
Mounted from a Solaris Live Upgrade boot environment
Mounted from a clone system over NFS
Restored from backup by using the ufsrestore command
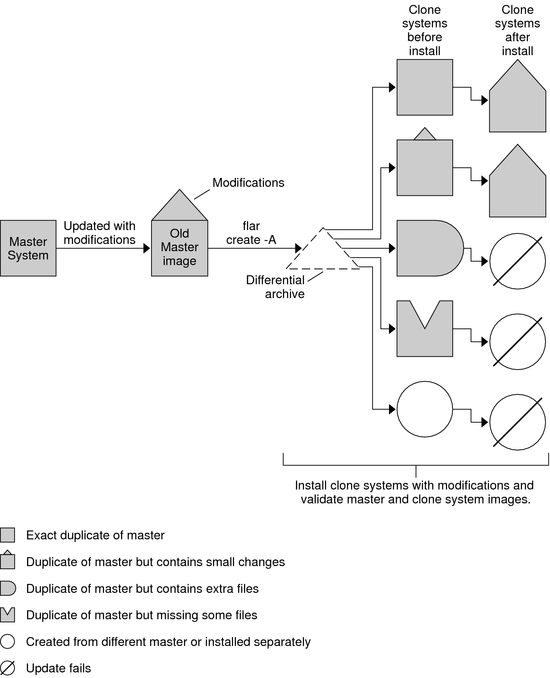
Create the differential archive with the -A option of the flarcreate command.
Install the differential archive on clone systems with custom JumpStart. Or, you can use Solaris Live Upgrade to install the differential archive on an inactive boot environment.
Figure 1-2 shows the creation and installation of a differential archive. A master image is updated with some modifications. These modifications could be as simple as the addition, reconfiguration, or deletion of a few files, or as complex as propagating patches. The updated master image is compared to the unchanged master image. The differences between the two images become the differential archive. The archive can be used to update other clone systems that are currently using the unchanged master image. If the clone system has already been modified or is not running the unchanged master image, the update fails. If you have many changes to make on the clone systems, you can do an initial installation at any time.
Figure 1-2 Solaris Flash Update
