| Oracle® Communications ASAP Order Control Application User's Guide Release 7.2 E18881-01 |
|
 Previous |
 Next |
| Oracle® Communications ASAP Order Control Application User's Guide Release 7.2 E18881-01 |
|
 Previous |
 Next |
Create new work orders in the New Work Order window, accessed through the Order Control Application (OCA) console window.
To complete a work order, you must perform the following steps:
Select the OCA session for work order provisioning.
Add header information.
Add Common Service Description Layer (CSDL) commands.
Add required CSDL parameter values.
Specify work order details including extended work order parameters.
Add global parameters.
Submit the work order for the required operation.
If your system is configured for multiple Oracle Communications ASAP instances, select the OCA session to provision the new work order. If you do not choose a session, the work order is provisioned in the first session listed in the OCA configuration file.
To select a session:
In the OCA Console, from the Provisioning Management menu, select New Work Order.
The New Work Order window appears.
From the File menu, select Select Session.
The Select Session dialog box appears.
From the Please select a session list, select the session you require.
Click OK.
The session for work order provisioning is selected.
The Header Information section of the New Work Order window identifies the general work order parameters.
Table 2-1 Work Order Header Fields
| Field | Definition |
|---|---|
|
WO ID |
The work order identifier. A default work order ID is automatically generated by the system. If required, you can modify the work order ID. Maximum length: 80 characters. |
|
Due Date |
The date and time that you want the work order processed. The due date defaults to the current system date and time. |
|
Priority |
The priority of the work order. The default is High. Other valid values are Normal and Low. |
|
Operation |
The operation ASAP is going to apply to the work order. The values are:
|
To add header information:
If required, edit the automatically generated work order identifier in the WO ID field of the New Work Order window.
Do one of the following to select the date and time for the work order to be processed:
If you use the default date and time, from the Operation list, select the operation that you want to perform on the work order.
Do the following to enter a new date and time for the work order to be processed:
Click the ellipsis button next to the Due Date field.
The Date/Time Properties dialog box opens. The default is the current system date and time.
Select the month from the list.
Select the year from the list.
To select a date, click the number on the calendar.
To select the time, click the time and then use the arrows.
To change from AM to PM if you have selected a 12-hour, click AM or PM and then use the arrows. For information on selecting different time formats, see "Changing the Date or Time Format".
Click OK.
The new date and time are entered in the Due Date field.
From the Priority list, select the required value.
From the Operation list, select the operation that you want to perform on the work order.
After completing the header information for the new work order, you can add CSDL information.
The CSDL is a generic language for ASAP commands that are associated with particular actions from a work order. You must add one or more CSDLs to a work order.
To add CSDL information:
In the New Work Order window, from the CSDL menu, select Add.
The Select CSDLs dialog box appears.
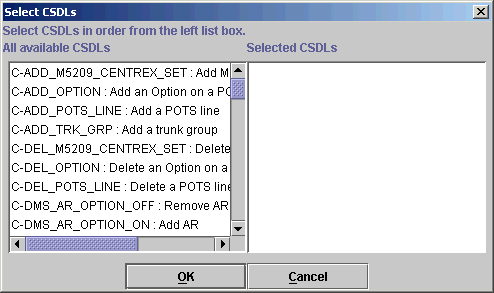
In the All available CSDLs list, click the required CSDLs.
The ones you choose are automatically placed in the Selected CSDLs section.
To deselect a CSDL, click the CSDL in the Selected CSDLs section.
Each selected CSDL is automatically placed in the All available CSDLs list.
Click OK.
The names and descriptions of the selected CSDLs appear in the CSDL Information tab.
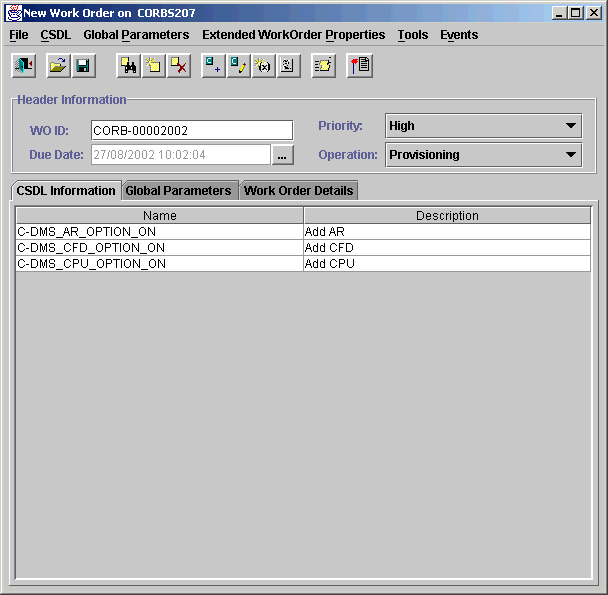
(Optional) To reorder the CSDL, select a CSDL that you want to move and do the following:
From the CSDL menu, select Resequence.
The CSDL Resequence dialog box appears.
Click on the CSDLs in the left panel in the order in which you want them resequenced.
As each CSDL is clicked, it appears in the right panel in the new sequence.
To remove a CSDL from the new sequence (to correct an error), click on it in right panel.
CSDLs consist of parameters that are defined when ASAP is installed and configured on your system. The OCA displays the parameters that are associated with a specific CSDL. You can define the values for the CSDL parameter that are required for provisioning, but you cannot add new CSDL parameters.
You can, however, add non-provisionable CSDL parameters and values. Non-provisionable CSDL parameters are any CSDL parameters that are not used by ASAP or defined elsewhere in the provisioning translation process, but may be required to perform activities (for instance, queries) that are not directly related to provisioning. Non-provisionable CSDL parameters may be derived from upstream systems and require representation at the CSDL level.
You must add values for the required parameters before provisioning. Indexed and compound parameters are exceptions. You must add elements to them before adding the parameter values. An index parameter has a '++' following the parameter label; for example, OPT++.
The following section includes:
Adding CSDL parameter values used in provisioning
Adding elements to indexed and compound CSDL parameters
Adding non-provisioning CSDL parameters
To add CSDL parameter values:
In the CSDL Information tab of the New Work Order window, select the CSDL that you want to add parameter values to.
From the CSDL menu, select Update.
The CSDL dialog box appears.
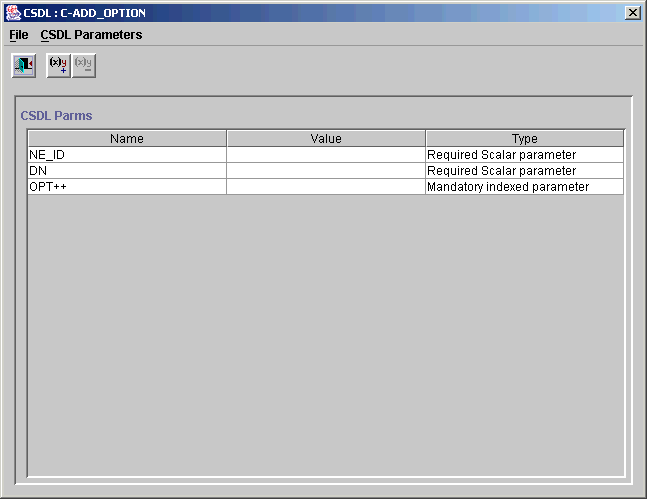
In the Value field for the selected CSDL, do one of the following:
Enter the value for each CSDL parameter.
For the MCLI parameter, select the applicable value from the Value list.
|
Tip: You can CTRL+click a selected CSDL to unselect it. |
From the File menu, select Exit.
To add elements to indexed and compound parameters:
In the CSDL dialog box, click the Value field for the indexed or compound parameter.
From the CSDL Parameter menu, select Add Element.
The Add Element for Index Parameter dialog box appears.
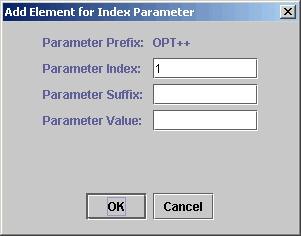
The system-generated index number appears in the Parameter Index field. Entering a value into this field is not allowed by the system.
In the Parameter Suffix field, enter the appropriate number, to insert an indexed compound parameter element.
The maximum is 80 characters.
In the Parameter Value field, enter the value.
The maximum is 255 characters.
Click OK.
The new element name, value, and type appear in the CSDL dialog box below the CDSL index parameter.
To add non-provisionable CSDL parameters:
In the CSDL Information tab of the New Work Order window, select the CSDL that you want to add non-provisionable parameter values to.
From the CSDL menu, select Update.
The CSDL dialog box appears.
From the CSDL Parameters menu, select Add Non-Provisionable Parameter.
The Add Non-Provisionable Parameter dialog box appears.
In the Name field, enter the parameter name.
In the Value field, enter the parameter value.
Click OK.
The non-provisionable parameter name and value appear in the CSDL parameter dialog box. The value in the Type field is Optional parameter, indicating that the parameter is not required for provisioning.
After you have added the required CSDLs for the work order and their parameters, you must specify work order details. In the Work Order Details tab, you can set the work order details that you require. In the Work Order Details tab, use the Extended Work Order Properties section to create work order property names and values that suit your requirements. Table 3 contains the field names and their definitions.
To specify work order details:
In the New Work Order window, click the Work Order Details tab.
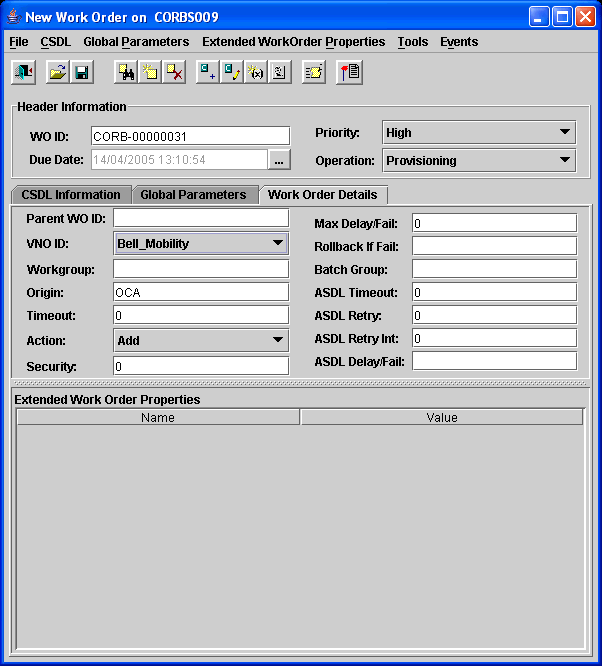
Enter or select the applicable values in the required fields.
Table 2-2 Work Order Detail Fields
| Field | Definition |
|---|---|
|
Parent WO ID |
If applicable, the ID of the work order that must be provisioned before the displayed work order is provisioned (maximum 16 characters). |
|
VNO_ID |
The ID of the virtual network operator. This field and its value represents an ASAP Extended Work Order Property that appears only if VNO_ENABLED is set to 1 in the ASAP.cfg file. The default value for this field is configurable based on the OCA SRP using VNO_ID_DEFAULT and VNO_ID_STRIP in the Service Activation Request Manager (SARM) section of ASAP.cfg. For more information on both of these attributes, refer to ASAP System Administrator's Guide. |
|
Workgroup |
The work group to which the work order belongs (maximum eight characters). |
|
Origin |
The user or system from which this work order originated. The data is user-defined. If you do not enter a value, the system records “Unknown” in the field (maximum 64 characters). |
|
Timeout |
The work order timeout interval used for this work order instead of the system-wide SARM default. |
|
Action |
The default value is Add. The action is used to decide the order of provisioning for future-dated orders set for the same time. The provisioning order from first to last is: Remove, Change, Add. |
|
Security |
Set the security feature. Possible values are:
|
|
Max Delay/Fail |
The number of ASDL delayed failures before failing a batch order. |
|
Rollback if Fail |
In the event of failure, this identifies whether this work order is to be rolled back. |
|
Batch Group |
A unique number that represents the batch order. The categories of batch orders are:
|
|
ASDL Timeout |
The ASDL timeout interval to be used on this work order instead of the system-wide SARM default. |
|
ASDL Retry |
The number of times the ASDL is retried in the event of failure instead of the system-wide SARM default. |
|
ASDL Retry Interval |
The time period in seconds between ASDL retries used on this work order instead of the system-wide SARM default. |
|
ASDL Delay/Fail |
Y (Yes) or N (No). Indicate whether or not hard errors encountered on the work orders are to be treated as delayed failures, therefore allowing the order to finish processing before failing. |
Extended work order properties are work order properties that you create. They are different from the work order properties that are already specified as a standard part of the work order (for example, work order timeout, retry, action). Extended work order properties are only applicable to the work order where they are defined.
To define extended work order properties:
In the New Work Order window, click the Work Order Details tab.
From Extended Work Order Properties, select Add.
The Add Extended Work Order Property dialog box appears.
In the Name field, enter the name of the work order property.
The maximum is 80 characters.
|
Note: If VNO_ENABLED = 1 in ASAP.cfg, then VNO_ID is a reserved work order property name. |
In the Value field, enter the value of the work order property.
The maximum is 255 characters.
Click OK.
The new work order property name and value are added to the Extended Work Order Property section of the Work Order Details tab.
After you specify work order details, you can add basic or indexed global parameters. Global parameters apply particular parameter values to all CSDLs in a work order that have the same parameter. If the same parameter exists in a CSDL, the CSDL parameter is used instead of the global parameter value.
An indexed global parameter contains a sequential index element indicating that the same operation should be performed for all occurrences of that index. An indexed global parameter is identified by '++' following the parameter name. For example, OPT++.
To add a global parameter:
In the New Work Order window, click the Global Parameters tab.
From Global Parameters menu, select Add.
The Add Parameter dialog box appears.
In the Name field, enter the global parameter name.
In the Value field, enter the applicable global parameter value.
In the Type list, select the global parameter and then click OK.
The global parameter name, value, and type are added to the Global Parameters tab.
Repeat steps 2 through 5 for each global parameter you want to add.
To add a global parameter using an existing CSDL parameter:
In the CSDL Information tab of the New Work Order window, select the CSDL.
From CSDL menu, select Update.
The CSDL window appears.
Select the CSDL parameter that you want to make global.
From the CSDL Parameter menu, select Make Global.
The selected parameter is automatically added to the Global Parameters tab.
Click the Global Parameter tab, and in the Value field, enter the value for each CSDL parameter you have made global.
To add an indexed global parameter:
In the New Work Order window, click the Global Parameters tab.
From the Global Parameters menu, select Add.
The Add Parameter dialog box appears.
In the Name field, enter the indexed global parameter name.
|
Note: When you add a global index type, the Value field is disabled. |
In the Type list, select one of the optional or mandatory indexed types and then click OK.
The indexed global parameter name, value, and type appear on the Global Parameters tab in the New Work Order window.
To add an element to the indexed global parameter that you created:
In the Global Parameters tab, select the indexed global parameter you created.
From the Global Parameters menu, select Add Indexed parameter element.
The Add Element for Index Parameter dialog box appears. The system-generated index number appears in the Parameter Index field. You cannot edit this field.
In the Parameter Suffix field, enter the appropriate number.
The maximum is 80 characters.
In the Parameter Value field, enter the value.
The maximum is 255 characters.
Click OK.
The new element appears below the index parameter name in the Global Parameters tab. The name of the element is a combination of the parameter name and the index number.
To change the numbering of the indexed global parameters while still retaining the same indexed global parameter order:
From the Global Parameters menu, select Renumber indexes.
The indexed global parameters are renumbered.
If you notice that the work order contains errors, you can clear the information and start the work order over again. The Clear Work Order function clears all CSDL information, work order details, and global parameters.
To clear new work order information:
In the New Work Order window, from the File menu, select Clear Work Order.
A message appears confirming that you want to clear the work order.
Click Yes.
The new work order information is cleared.
When you have provided the appropriate information for the work order, you can submit it. OCA validates all work orders. A warning message appears if any required values are missing. Before the work order can be successfully submitted, you must provide any missing information.
To submit a work order:
In the New Work Order window, from the File menu, select Submit Work Order.
Do one of the following:
If the work order is accepted, a confirmation message appears. Click OK. The work order is submitted.
If the work order is rejected, a rejection message appears. Make the necessary changes and resubmit the work order.
|
Note: The successful submission of a work order indicates that the order has been accepted for further processing. You can check the Work Order Query window for further status updates on this work order. |
Do one of the following:
To create another work order by clearing the information from the work order you have just submitted, from the File menu, select New Work Order. A message appears asking you to confirm that you want to reset the work order. Click Yes. The WO ID field in the New Work Order window displays the new work order ID, and all other work order information is cleared.
If you do not want to submit any more work orders, from the File menu, select Exit.
After you submit a work order for provisioning, you can use the information for subsequent work orders. The Similar Work Order function maintains the CSDLs used in the work order, including the CSDL parameter values, but assigns a new work order ID number.
|
Note: For a similar work order, the due time is set to the current time. If the source work order, however, is future-dated and still in the Initial status, the due time is the same future time indicated on the source work order. |
To create a similar work order:
In the New Work Order window, from the File menu, select Similar Work Order.
The Similar Work Order dialog box appears.
In the Enter a Work Order ID field, enter the ID of a submitted work order and then click OK.
A message appears confirming that you want to reset the order.
Click Yes.
A new work order ID appears and the new work order includes the CSDLs, associated parameters, and work order details of the copied work order.
To follow the progress of a submitted work order, you can use the Events component of the OCA. You can subscribe to work order events notifications based on event type, as they occur on a specified ASAP system through the Event Management dialog box. The Events Message Board window displays all the events that occurred during the work order processing. You access the Events Message Board window from the Events menu of the OCA Console window.
When you no longer require work order event notifications, unsubscribe by selecting Events, then Event Management.
For more information on work order events subscription, see "Setting Up Event Notifications in the Order Control Application".
The OCA does not retain event subscription information after you log off. When you start a new session, you must resubscribe to the Events component of the OCA.
When you create a work order, you can save it as a template with default values for common static work order entry parameters. You can then use the template as a basis for other work orders with similar parameters. All templates are defined within a single ASAP instance.
The templates that you create are used in the Order Entry Wizard where you can submit new work orders by editing only the required parameters. You can save a template as a user or as a global template. A user template is accessible only to the user who creates the template, whereas a global template is available to all users. In addition, you can edit and delete a template.
You can also create a work order template from an existing work order. For more information, see "Saving a Work Order as a Template".
For more information on the Order Entry Wizard, see "Using the Order Entry Wizard".
To create a work order template:
In the New Work Order window, from the File menu, select Save as Template.
The Template window appears.
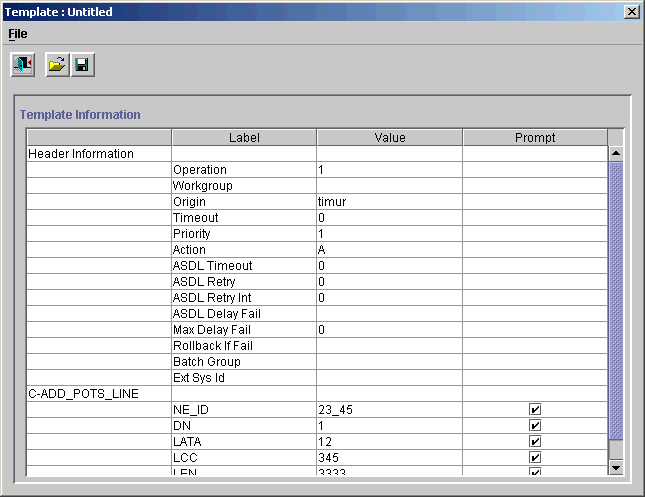
The Template window displays the work order header information, CSDLs, and the parameters for each CSDL. To designate the CSDL parameters that can be modified in the Order Entry Wizard, enable the corresponding Prompt.
From the File menu, select Save As Template, to save a template.
The Save Template As dialog box appears.
Do one of the following:
To restrict access to the template to yourself, click User.
To allow all users to have access to the template, click Global.
In the Template field, enter the template name and then click OK.
The name of the template appears in the title bar of the Template window.
In the Template window, from the File menu, select Exit.
In the New Work Order window, from the File menu, select Exit.
To create a template from an existing work order:
Search for the work order that you want to use as a template.
For instructions on searching for work orders, see "Searching for Work Orders".
To delete work order templates:
In the OCA Console window, from the Provisioning Management menu, select New Work Order.
The New Work Order window appears.
Select Tools, then select Template Editor.
The Template window appears.
From the File menu, select Delete Template.
The Delete Template dialog box appears.
Select the appropriate template from the list and then click OK.
A message confirming the deletion appears.
Click Yes.
The template is deleted.
The Order Entry Wizard guides you through the work order entry process. You use the templates that you have created as a basis for a new work order. To customize the new work order information, you can change global and CSDL parameters as defined by the template you created. All other parameters you predefined when you created the template.
The Order Entry Wizard dialog box consists of the following panels:
Select Wizard Template: Select the template to base your new work order on.
Edit Work Order Details: View and edit the header information.
Edit Global Parameters: Change the global parameters for the work order as designated in the template.
Edit CSDL Parameters: Change the CSDL parameters for the work order as designated in the template.
Submit Work Order: View a summary of the new work order details and submit or edit the work order. If you choose to edit the work order, the New Work Order window appears, and you can make additional changes as required before submitting the work order.
To create new work orders using the Order Entry Wizard:
In the New Work Order window, select Tools, then select Order Entry Wizard.
The Order Entry Wizard dialog box appears.

To select the required template, enable Global or User and then select the template you want to use.
Click Next.
The work order header information is displayed on the right.
If required, edit the work order header information and click Next.
The global parameter details appear.
If required, edit the work order global parameters and then click Next.
Each CSDL that is defined in the template is shown one at a time, and the name of the CSDL you are editing appears above the parameter information. Only CSDL parameters that you designated as prompted in the Template Editor are shown.
If required, edit the CSDL parameters and then click Next. The work order information summary appears.
The work order summary displays the information shown in the previous panels. Click Show all parameters to view all information pertaining to the work order. Click Back to go to a previous panel and edit the required information.
Click Submit.
The Submit Work Order message box appears, stating the work order has been successfully submitted.