| Skip Navigation Links | |
| Exit Print View | |

|
Oracle GlassFish Server 3.1 Security Guide |
1. Administering System Security
2. Administering User Security
3. Administering Message Security
4. Administering Security in Cluster Mode
5. Managing Administrative Security
6. Running in a Secure Environment
7. Integrating Oracle Access Manager
About OAM Security Provider for Glassfish
Obtaining Oracle Access Manager Group Information
Understanding OAM Security Provider Use Cases
Use Case: Authentication for Web Resources Via Access Gate
Use Case: Identity Assertion for Web Resources via WebGate
Use Case: Authorization Checks Based on Policy Manager
Configuring the OAM Security Provider
Determining Which Authentication Method is Used
Integrating OAM Security Provider with Oracle Access Manager 10g
Integrating OAM Security Provider with Oracle Access Manager 10g
Integrating OAM Security Provider with Oracle Access Manager 11g
Integrating OAM Security Provider with Oracle Access Manager 11g
This section describes how to integrate the OAM Security Provider with Oracle Access Manager 11g and a WebGate.
For your convenience, this self-contained section includes the steps required to configure Oracle Access Manager for use with the OAM Security Provider and a WebGate. If you have already followed the steps described in Integrating OAM Security Provider with Oracle Access Manager 11g to configure Oracle Access Manager, you need only tailor your configuration as described in this section.
In addition to having to configure the Oracle HTTP Server and the Oracle HTTP Server WebGate, the most significant differences in the procedure are the changes to the OAM Security Provider properties.
Note - You are not required to install the Oracle Access Server SDK or configure the Access Gate (on the system hosting GlassFish Server) in this use.
This procedure explains how to integrate the OAM Security Provider with Oracle Access Manager 11g and a WebGate.
See the Oracle Fusion Middleware Administrator's Guide for Oracle Access Manager with Oracle Security Token Service for detailed instructions on Access Manager tasks.
The procedure was tested on Microsoft Windows and the file names are those of the Windows version.
If you have not already done so, install a version of Oracle HTTP Server (OHS) that is compatible with your Oracle Identity and Access Management installation.
OHS is available from Oracle Middleware Downloads page. Look for “Web Tier Utilities” under “Required Additional Software.” Note that you need to install the complete Web Tier Utilities bundle because OHS is not available separately.
If you have not already done so, create an OAM Server instance.
Under System Configuration, from the left navigation pane select Server Instances and then click the Create command button in the tool bar. The Create: OAM Server page appears.
When you create an OAM Server instance, you specify the transport security mode to use between an OAM Agent and this OAM Server instance, from the following choices. See “Securing Communication Between OAM 11g Servers and WebGates” in the Access Manager online help for a description of these modes and how to use them.
Open
Simple
Cert
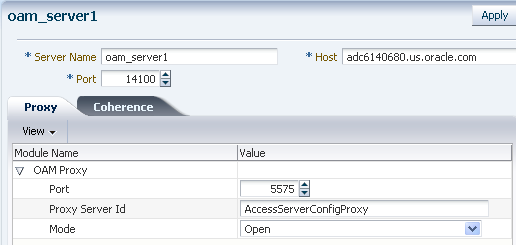
For example, consider the OAM Server instance shown in Figure 7-25.
Figure 7-25 OAM Server Instance
From the System Configuration tab, select Data Sources. Expand Data Sources and click User Identity Stores. Click the Create command button in the tool bar.
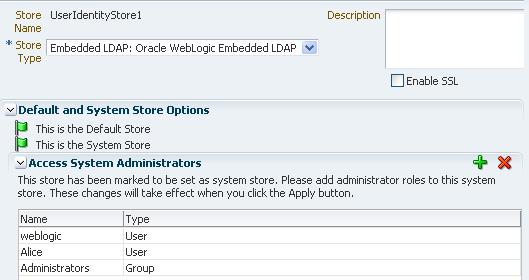
The User Identity Store specifies the LDAP provider it is associated with, as shown in Figure 7-26. This LDAP provider can be the Oracle WebLogic embedded LDAP provider, or another supported provider from the drop-down menu that you have previously configured.
Figure 7-26 LDAP Provider of Identity Store
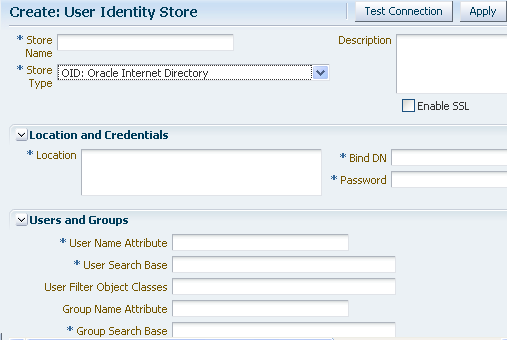
For LDAP providers other than the embedded LDAP provider, when you create a User Identify Store based on one of these LDAP providers, you specify identifying properties, such as the User Search Base and the User Name Attribute that you will need later in this procedure to configure the GlassFish Server LDAPRealm. For example, Figure 7-27 shows the User Identity Store screen for the Oracle Internet Directory LDAP Provider.
Figure 7-27 OID LDAP Provider
For the embedded LDAP provider, the identifying properties are not available from the Access Manager user interface. You therefore need to use some other LDAP tool to configure these properties when you create a user in the next step.
Create a group and user in the LDAP provider who will have access to the protected resource.
Later in this procedure you need to configure the GlassFish Server LDAPRealm, and to do this you will need identifying LDAP properties that are not available for the embedded LDAP provider from the Access Manager user interface.
If you want to use the embedded LDAP provider, you will therefore need to use some other LDAP tool to configure these properties. For example, you might use LDAP commands to add the user and group, and to search the LDAP database for them:
ldapadd -x -h cieqalnx01.us.oracle.com -p 7001 -D"cn=Admin"
-w welcome1 -f gadd.ldif
ldapadd -x -h cieqalnx01.us.oracle.com -p 7001 -D"cn=Admin" -w welcome1 -f uadd.ldif
ldapsearch -x -h   cieqalnx01.us.oracle.com -p 7001 -D"cn=Admin" -w welcome1 -s sub
-b "ou=people,ou=myrealm,dc=oam_domain"
ldapsearch -x -h   cieqalnx01.us.oracle.com -p 7001 -D"cn=Admin" -w welcome1 -s sub
-b "ou=groups,ou=myrealm,dc=oam_domain"
In this example, the contents of the “user add” file uadd.ldif that adds the user Glassfish might be as follows:
# GlassFish, people, myrealm, oam_domain
dn: uid=GlassFish,ou=people,ou=myrealm,dc=oam_domain
objectclass: top
objectclass: person
objectclass: organizationalPerson
    objectclass: inetOrgPerson
objectclass: wlsUser
cn: GlassFish
sn: GlassFish
uid: GlassFish
description: GlassFish User
wlsMemberOf: cn=GlassFish_Group,ou=groups,ou=myrealm,dc=oam_domain
userpassword: GlassFish
The contents of the “group add” file gadd.ldif that adds a GlassFish_Group might be as follows:
dn: cn=GlassFish_Group,ou=groups,ou=myrealm,dc=oam_domain
objectclass: top
objectclass: groupOfURLs
objectclass: groupOfUniqueNames
cn: GlassFish_Group
description: OAM GlassFish Group
memberURL: ldap:///ou=people,ou=myrealm,dc=oam_domain??
sub?(&(objectclass=person)(wlsMemberOf=cn=GlassFish_Group,ou=groups,ou=myrealm,
dc=oam_domain))
Make a note of sufficient properties to uniquely identity the user, such as wlsMemberOf, as you will need them later in this procedure when you configure the LDAPRealm.
From the System Configuration tab, select Authentication Modules. Expand Authentication Modules and select LDAP Authentication Modules. Click the Create command button in the tool bar.
Specify a name for this Authentication Module, and select the User Identity Store you previously created, as shown in Figure 7-28
Figure 7-28 LDAP Authentication Module

Create an authentication scheme for each challenge method (BASIC, Form, and X.509) that you want to use to protect the resource.
From the Policy Configuration tab, expand the Shared Components node, and then select Authentication Schemes. Click the Create command button in the tool bar.
The Authentication Module must already exist.
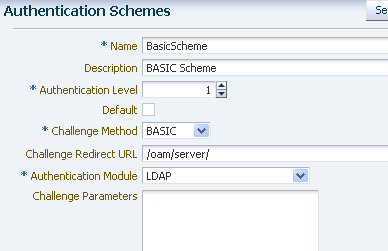
Figure 7-29 shows an example BASIC over LDAP authentication scheme.
Figure 7-29 BASIC Over LDAP Authentication Scheme
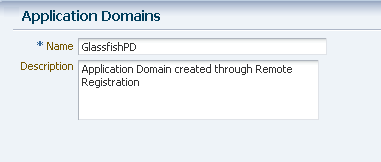
From the Policy Configuration tab, select Application Domains. Click the Create command button in the tool bar to create an Application Domain. An example Application Domain is shown in Figure 7-30.
Figure 7-30 Application Domain
Before an application domain can control access to your resources, you must now identify those resources and specify how you want to protect them:
From the Policy Configuration tab, expand Application Domains and select the domain you just created. Select Resources, and click the Create command button in the tool bar. On the Create resource page:
Select HTTP as the resource type.
Select the host identifier (described in Step 5) for the system that hosts the resource to be protected.
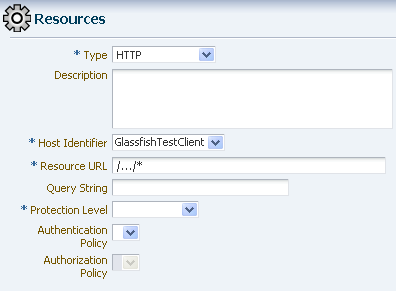
Specify the resource URL for the Web resource. The URL value of a resource must begin with a forward slash (/), for example /BasicAuthen/SecureServlet, and must match a resource value for the chosen host identifier. To protect all of the resource URLs, append "/.../*". For example, /BasicAuthen/SecureServlet/.../*.
Figure 7-31 shows an example of creating a resource that uses a host identifier named GlassfishTestClient.
Figure 7-31 Creating a Resource
From the Policy Configuration tab, expand Application Domains and select the domain you just created. Select Authentication Policies, and click the Create command button in the tool bar. On the Create Authentication Policies page:
Name this Authentication Policy.
Select a named authentication scheme you previously configured.
Select the resources you want to protect with this Authentication Policy.
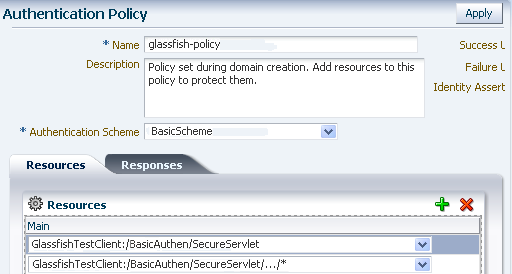
Figure 7-32 shows an example of creating an Authentication Policy that uses the BasicScheme authentication scheme.
Figure 7-32 Authentication Policy
You configure the Oracle HTTP Server WebGate on the system where the Oracle HTTP Server is installed.
Oracle HTTP Server WebGate is a Web server plug-in that is shipped out-of-the-box with Oracle Access Manager. The Oracle HTTP Server WebGate intercepts HTTP requests from users for Web resources and forwards them to the Access Server for authentication and authorization. Oracle HTTP Server WebGate installation packages are found on media and virtual media that are separate from the core components.
For complete instructions, see Installing and Configuring Oracle HTTP Server 11g Webgate for OAM.
Edit mod_wl_ohs.conf to configure the redirect host and port (WebLogicHost and WebLogicPort, respectively) to point to the GlassFish Server instance in which the secured application will run. Consider the following example:
<Location /BasicAuthen/SecureServlet>
SetHandler weblogic-handler
WebLogicHost host-name-where-GlassFish-running
WebLogicPort 8080
DebugConfigInfo on
</Location>
After you have edited the file, restart Oracle HTTP server.
Ensure that oam-integration.jar is in <Glassfish>\lib.
You can use either the Administration Console or the create-message-security-provider(1) subcommand to do this. Consider the following example:
<message-security-config auth-layer="HttpServlet">
          <provider-config provider-type="server" provider-id="MySAM"
                 class-name="com.sun.glassfish.oamsam.OAMAuthenticatorSAM">
            <property name="oam.base.dn" value="ou=people,ou=myrealm,dc=oam_domain"></property>
            <property name="oam.ext.header"
               value="OAM_REMOTE_USER"></property>
            <property name="IdentityAsserterMode"
               value="true"></property>
          </provider-config>
        </message-security-config>
The OAM Security Provider acts as an Identity Asserter only when IdentityAsserterMode is set to true. This example also shows the (OAM_REMOTE_USER) header. The value of the base-dn must point to the user's base-dn you configured in Step 5.
You do this by defining the httpservlet-security-provider attribute in the glassfish-web.xml file corresponding to your application.
Set the value of the attribute to the name you assigned to the OAM Security Provider in Step a. For example, MySAM.
The group name you specify must match the group name you specified in the LDAP provider. For example, GlassfFish_Group.
<?xml version="1.0" encoding="UTF-8"?>
<!DOCTYPE sun-web-app PUBLIC "-//Sun Microsystems, Inc.//DTD Application
Server 9.0
Servlet 2.5//EN" "http://www.sun.com/software/appserver/dtds/
sun-web-app_2_5-0.dtd">
<sun-web-app error-url="" httpservlet-security-provider="MySAM">
<context-root>/BasicAuthen</context-root>
<security-role-mapping>
<role-name>glassfish</role-name>
<group-name>GlassFish_Group</group-name>
<group-name>cn=GlassFish_Group,ou=groups,ou=myrealm,dc=oam_domain</group-name>
</security-role-mapping>
<class-loader delegate="true"/>
<jsp-config>
<property name="keepgenerated" value="true">
<description>Keep a copy of the generated servlet class' java code.</description>
</property>
</jsp-config>
</sun-web-app>
Configure the LDAPRealm in GlassFish Server to point to the Access Manager LDAP provider and group you specified to authenticate the user.
GlassFish Server directly contacts this LDAP provider for group information.
The properties you enter here must match that of the LDAP provider.
For example, you can use the Administration Console or the create-auth-realm command to add the following entry:
<auth-realm classname="com.sun.enterprise.security.auth.realm.ldap.LDAPRealm"
name="ldaprealm">
          <property name="jaas-context" value="ldapRealm"></property>
          <property name="base-dn" value="ou=people,ou=myrealm,dc=oam_domain"></property>
          <property name="directory" value="ldap://cieqalnx01.us.oracle.com:7001"></property>
          <property name="group-search-filter" value="cn=%s"></property>
          <property name="group-target" value="wlsMemberOf"></property>
          <property name="search-bind-dn" value="cn=Admin"></property>
          <property name="search-bind-password" value="welcome1"></property>
</auth-realm><security-service default-realm="ldaprealm">
Restart GlassFish Server and access the protected resource, such as http://hostname.domainname:8080/BasicAuthen/SecureServlet.
In addition to the procedure described in Integrating OAM Security Provider with Oracle Access Manager 11g and WebGate, there are additional steps required if you want to use certificate authentication to protect your resource.
As described in Use Case: Identity Assertion for Web Resources via WebGate, the WebGate challenges the user for credentials based on the type of Oracle Access Manager authentication scheme configured for the resource, which is client-cert in this use case. In response, the client application needs to send its own certificate.
The underlying WebLogic Server implementation is the Web container and must trust the application's certificate. WebLogic Server can trust this certificate either because the certificate is explicitly in the truststore, or because the certificate has a valid cert path to a trusted certificate.
You must therefore perform the following actions or satisfy their requirements by some other method:
Select the certificate you want the client to use. If you do not already have a private certificate, you can use a tool such as OpenSSL to generate a self-signed one for development and testing purposes.
Import your certificate into your browser. For Firefox, choose the 'Ask me every time' option in the browser (for choosing a Personal Certificate). Also make sure that SSL 3.0 is checked in the browser. Choose analogous options for other browser types.
The X.509 certificate you use for authentication must map to a valid user. To do this, create a user in the Access Manager LDAP provider whose CN attribute matches that of the subject.CN from the certificate.
Consider the following example, which adds the user Alice. The subject.CN from the certificate must therefore be Alice.
#ldapadd -x -h cieqalnx01.us.oracle.com -p 7001
-D"cn=Admin" -w welcome1 -f uadd.ldif
In this example, the contents of uadd.ldif are as follows:
#contents of uaddalice.ldif
# GlassFish, people, myrealm, oam_domain
dn: uid=Alice,ou=people,ou=myrealm,dc=oam_domain
objectclass: top
objectclass: person
objectclass: organizationalPerson
objectclass: inetOrgPerson
objectclass: wlsUser
cn: Alice
sn: Alice
uid: Alice
description: GlassFish End User
wlsMemberOf: cn=GlassFish_Group,ou=groups,ou=myrealm,dc=oam_domain
userpassword: Alice
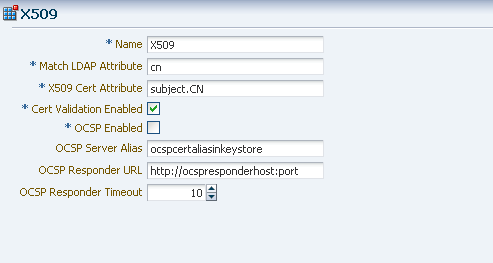
Create an X509 Authentication Module. Make sure that the Match LDAP Attribute is set to cn, and that the X509 Cert Attribute is Subject.CN. Set CertValidationEnabled to true. Consider the following example.
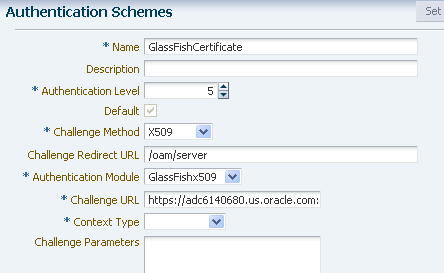
Create an Authentication Scheme that uses the X509 Challenge Method, and the X509 Authentication Module you just created.
Remember that the WebGate challenges the user for credentials based on the type of OAM Server authentication scheme configured for the resource.
Set the Challenge URL to the SSL port of OAM server. For example, https://<oam_server>:<ssl_port>/oam/CredCollectServlet/X509.
Note - To work around a known problem, the name of the Authentication Scheme must contain either or both of the (case sensitive) words “X509” and “Certificate”.
Consider the following example.
Configure WebLogic Server for Custom Identity and Custom Trust, as described in Configure Identity and Trust.
Import the root and intermediate certificates for your generated certificate into a custom keystore and truststore.
keytool -import -keystore  /scratch/mytruststore -storepass (...)
-file root.cer -alias alice_root

keytool -import -keystore  /scratch/mykeystore -storepass (...)
 -file root.cer -alias alice_root

keytool -import -keystore  /scratch/mytruststore -storepass (...)
-file ca.cer -alias alice_root_1

keytool -import -keystore  /scratch/aime1/mykeystore -storepass (...)
-file ca.cer -alias alice_root_1
Copy the custom keystore and truststore to the WebLogic Server system.
Configure WebLogic Server to use this custom keystore and truststore, as described in Configure Identity and Trust.
Restart the Oracle Access Manager and the Oracle HTTP Server.
When the same application is used by different user identities, GlassFish Server ensures that the same session is not used by the new user.
Specifically, when a user logs in using the BASIC, FORM or CLIENT-CERT authentication schemes after authentication from Oracle Access Manager, both an Oracle Access Manager session and a GlassFish Server HTTP session are established. When the Oracle Access Manager session is then cleared, the GlassFish Server HTTP session is not automatically cleared.
Therefore, after clearing the Oracle Access Manager session:
If a user logs in through the OAM Security Provider, and
The user principal differs from the principal in the previous HTTP session, then
The previous HTTP session is cleared and a new session is created.