
 Read more...
To create the declarative component layout, you will use design tools such as the visual editor,
Component Palette, and the Property Inspector. Then you will deploy the project to an ADF Library JAR file. For an
application to consume the declarative component, you will use the Resource Palette to add the
deployed JAR, then add the deployed JAR to the project that contains JSF pages. To make use of the declarative component,
you will add it to a simple JSF page, edit the pre-defined attributes, create a method and attach it to
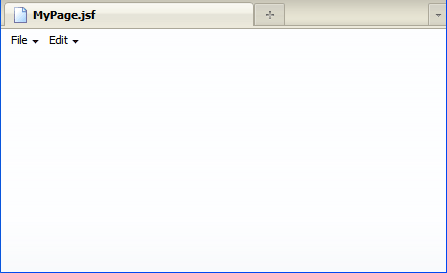
the declarative component. When you run the application, the page will look similar to this:
| Purpose | Duration | Application |
|---|---|---|
This tutorial shows you how to create ADF declarative component metadata, add
ADF Faces components that make up the composite component, and use the declarative component on a JSF page. To see the complete applications you will create, click the Download button to download a zip of the final applications, and then unzip them in your JDeveloper mywork folder. |
40 minutes |  |
From the main menu, choose File > New. In the New Gallery, expand the General category and select Applications. Then in the Items list, select Fusion Web Application (ADF) and click OK.

To follow along with the example, enter
MyWebAppas the application name.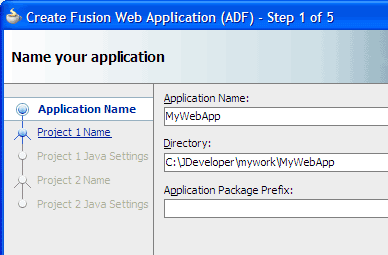
Accept the defaults and click Finish.
The Application Overview window opens by default in the editor window area when you create a new Fusion web application. You can optionally close the window, since you will not be using it to create objects for this application.

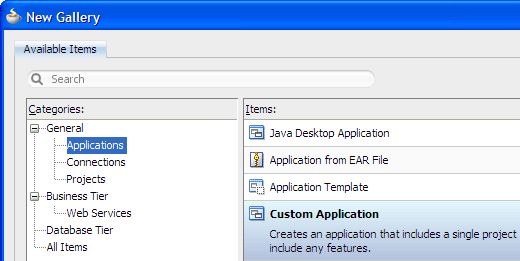
From the main menu, choose File > New again. In the New Gallery, expand the General category and select Applications. Then in the Items list, select Custom Application and click OK.
Enter the application name
DeclarativeComponentsand click Next.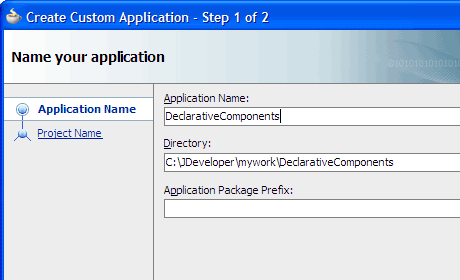
Enter the project name
DeclarativeComponents, then click Finish.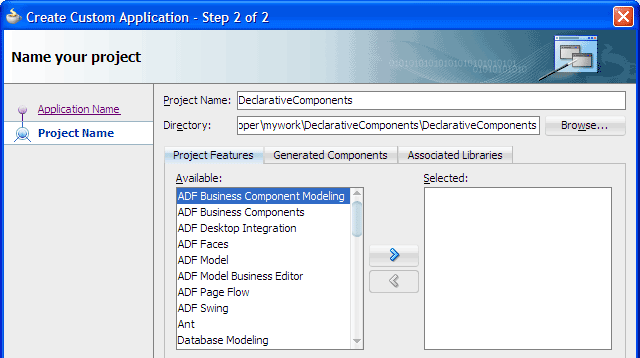
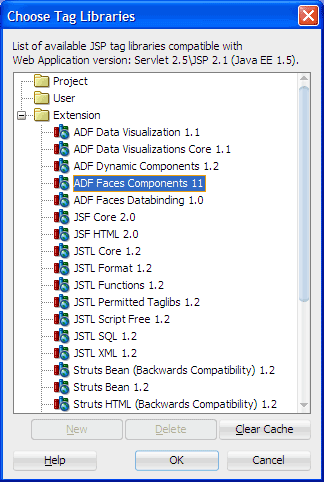
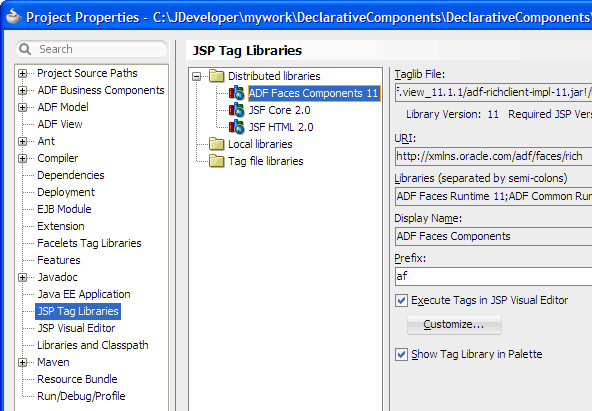
In the Application Navigator, double-click the project you just created to open the Project Properties dialog. Select JSP Tag Libraries and Distributed libraries, then click Add.
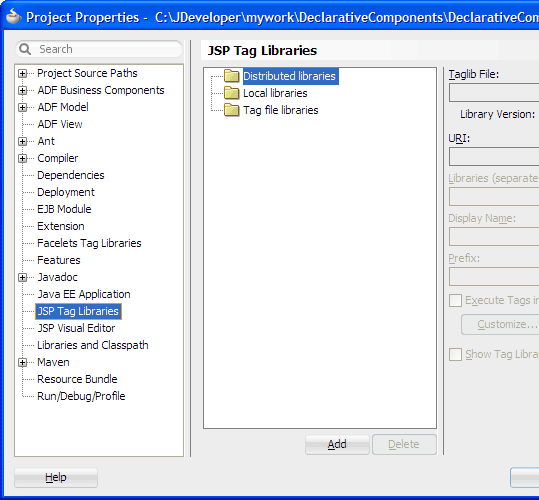
In the Choose Tag Libraries dialog, select ADF Faces Components 11 and click OK twice to close both dialogs.
Click
 Save All to save your work.
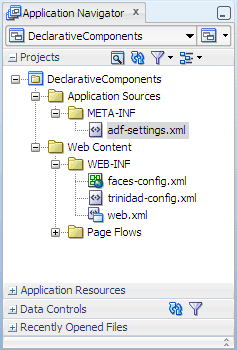
The Projects panel of the DeclarativeComponents application in the Application Navigator should look like this:
Read more...
At the same time, it keeps track of your projects and all
environment settings.Based on prebuilt templates, a JDeveloper application allows you to specify a predefined type of environment, depending on the type of application you want to create (web application, Java application, and so on). Application templates provide you with a quick way to create the project structure for standard applications with the appropriate combination of features already specified. The application template also filters the work you do in JDeveloper such that the choices available are focused only on the features you are working with.
In this tutorial, you will create two applications, one for your declarative components, and another one for your application that will use the declarative components. For the declarative components application, you will use the Custom Application template, which makes available objects associated with all the features that JDeveloper supports in a single project. For the application that will use the declarative components, you will use the Fusion Web Application (ADF) template that is configured for building a databound ADF web application.
Once you have created an application using a suitable template, you can still add new projects to the application and specify what features are to be included. To do this, in the Application Navigator, right-click the application name and choose New Project. In the New Gallery, you can select any type of project in the Items list.
Read more...
The project or projects in the application define the associated features.
A JDeveloper project, which is used to logically group files that are related, keeps track of the source files, packages, classes, images, and other elements that your program may need. Projects manage environment variables such as the source and output paths used for compiling and running your program. Projects also maintain compiler, runtime, and debugging options so that you can customize the behavior of those tools per project.
You can add multiple projects to your application to easily access, modify, and reuse your source code. Different projects might contain files representing different tiers of a multi-tier application, for instance, or different subsystems of a complex application. These files can reside in any directory and still be contained within a single project.
Read more...
The Checklist steps you through the building of a Fusion Web application, according to Oracle recommended best practices. It optionally walks you through the entire process of configuring and building your application, with links to specific dialogs and wizards. Each step is also designed to teach you about the architecture, tools and resulting files using a combination of links to step-by-step instructions, relevant sections of the Developer's Guides, and descriptions of what happens in the IDE as a consequence of doing the work in a step.
Read more...
ADF Faces provides the ADF Faces Components JSP tag library. When you add the ADF Faces Components tag library, JDeveloper adds the name and location of the tag library descriptor (TLD) file, the unique identifier of the tag library, the Java library names required to execute tags from the tag library at runtime, and the preferred value for the prefix of tags when the library is used in a JSF page.
By default, JDeveloper will display the ADF Faces tags on the ADF Faces page of the Component Palette, and execute all tags in the tag library in a simulated JSP/Servlet container available in the JSP visual editor. To customize the tags that should be executed during design time, select the tag library in the JSP Tag Libraries page of the Project Properties dialog, and click Customize.
Read more...
Projects are displayed as the top level in the hierarchy in the
Application Navigator.
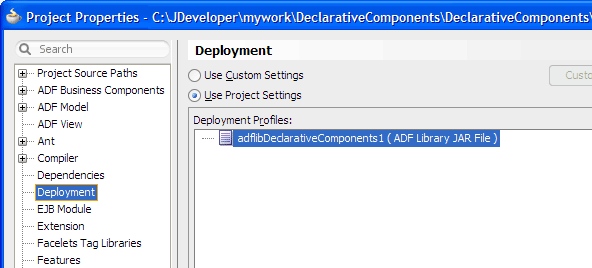
The Custom Application template that you used for the DeclarativeComponents application creates one project using the project name you entered. You will create a declarative component definition in the DeclarativeComponents project, and then deploy the project.
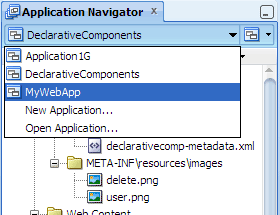
To switch to the MyWebApp application, select MyWebApp from the Applications dropdown list in the Application Navigator:
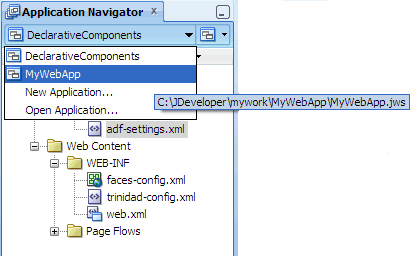
The Projects panel in the Application Navigator for the MyWebApp application should look similar to this:

The Fusion Web Application (ADF) template that you used for your web application partitions your application into two projects: Model and ViewController. You will create a JSF page in the ViewController project.
In the Application Navigator you can collapse and expand any panel. You adjust the size of panels by dragging the splitter between two panels. To group and sort items in the Projects panel, use the
JDeveloper has the capability of recognizing many different file types, displaying each in its appropriate viewer or editor when you double-click the file in the Application Navigator. Closing an application or project closes all open editors or viewers for files in that application or project and unloads the files from memory.
Note: Nodes in italics in the Application Navigator mean that the elements have not yet been saved. A project node is bold when a file in the project is selected.
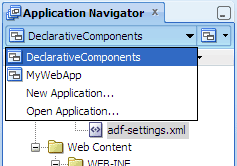
If necessary, select DeclarativeComponents from the dropdown list in the Application Navigator to switch to the DeclarativeComponents application.
-
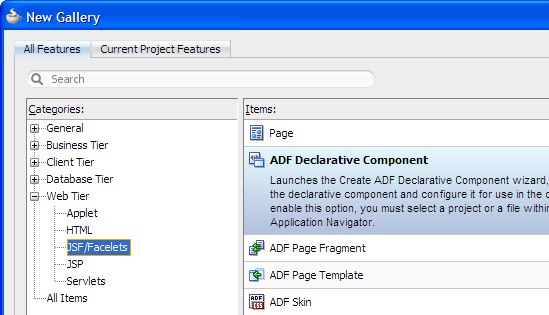
In the Application Navigator, right-click the DeclarativeComponents project and choose New > Web Tier > JSF/Facelets > ADF Declarative Component, then click OK.
Enter
myMenubaras the declarative component name.-
Select Facelets as the document type, and accept the default file name, directory name and package name.
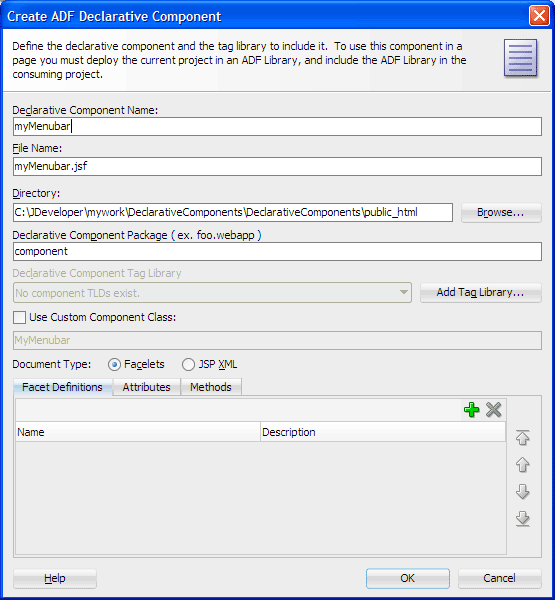
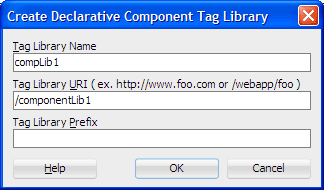
Click Add Tag Library to open the Create Declarative Component Tag Library dialog.
-
Replace or enter the following values, then click OK.
Field Value Tag Library Name MyDeclComponentsTag Library URI /mycomponentsTag Library Prefix mc -
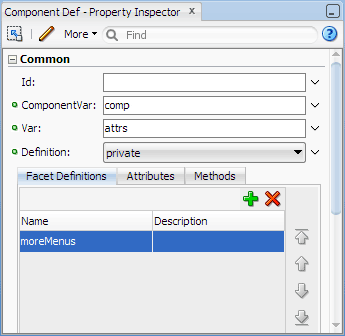
In the Create ADF Declarative Component dialog, with the Facet Definitions tab in front, click
 to add a placeholder for future content. Enter
 moreMenusin the Name field.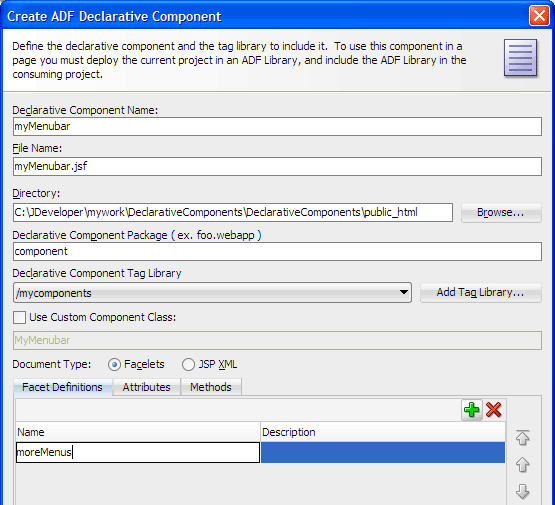
Click Attributes to bring the tab to the front, then click
to add an attribute for setting on the declarative component later. Enter menuLabelin the Name field. Acceptjava.lang.Stringas the default type.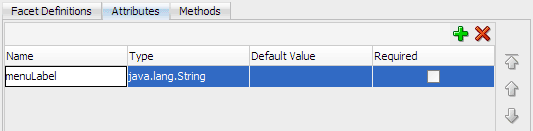
Click Methods to bring the tab to the front, then click
to add a method for registering on the declarative component later. Accept method1as the default method name. Entervoid method(javax.faces.event.ActionEvent)in the Method Signature field.
Click OK.
By default JDeveloper opens the new declarative component definition file in the visual editor.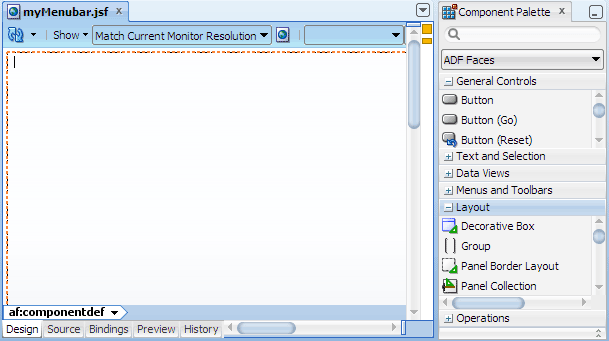
Click
Save All to save your work.
Read more...
Declarative components can be used as a basis for building different portions of a page or multiple pages, with different content or the same content. For instance, if there is a series of buttons that is common across different portions of a page or across multiple pages, you can create a declarative component comprising those buttons and then use that declarative component on the pages that need the common functionality.
Declarative components cannot be used in the same project where the components are defined. In other words, you have to create your declarative components in one project, and create your pages that use the declarative components in another project.
Read more...
as well as the name of the Java class generated for the component tag. Only alphanumeric characters are allowed in the name for
the declarative component, for example, sampleName or sampleName1. The declarative component package
name is used by JDeveloper later when creating the Java class for the declarative component.
By default, JDeveloper also uses the declarative component name as the XML file name for the declarative component definition file, such as
sampleName1.jsf. A declarative component is described in two sections inside the component definition file:
a metadata section that contains all the metadata for the component (such as the component's display name and tag library
information), and a layout section that contains all the individual ADF Faces components that make up the composite declarative component.
Read more...
The tag library URI and prefix specify the declarative component tag library namespace and prefix, respectively, which JDeveloper will use in the JSF page that consumes the declarative component. For example:
<!DOCTYPE html PUBLIC "-//W3C//DTD XHTML 1.0 Transitional//EN"
"http://www.w3.org/TR/xhtml1/DTD/xhtml1-transitional.dtd">
<f:view xmlns:f="http://java.sun.com/jsf/core"
        xmlns:af="http://xmlns.oracle.com/adf/faces/rich"
xmlns:mc="/mycomponents">Like ADF page templates, ADF declarative components can have facets, attributes, and methods that enable page authors to configure how the declarative component is used on different pages or different portions of a page. For instance, you might add attributes to allow page authors to change the labels of individual buttons in a declarative component.
Depending on the composite component functionality you are providing, you might not have to add facet definitions, attributes, or methods when you create the declarative component metadata. This is because it is not required that a declarative component include any facet definition, attribute, or method. However in the tutorial you will add one of each type.
Like page templates, facets in declarative components are areas defined within the composite component where content can be added by page authors when they use the declarative components to create portions of a page. If you wish to allow page authors to add their own content into a declarative component, then you would define one or more facets as placeholders for future content.
For instance, if your declarative component includes a panel header component and you want page authors to add their own content anywhere within the panel header, you might add a facet definition with the name
pheader-contents.
Then when you design the declarative component's layout, to allow page authors to drop content into the panel header component,
you would insert the af:facetRef tag into the af:panelHeader component and reference
the pheader-contents facet name. For example:
<af:panelHeader text="panelHeader 1" id="dc_ph1">
   ...
   <af:facetRef facetName="pheader-contents"/>
</af:panelHeader>For instance, if you want page authors to set their own title on the panel header component, you might add an attribute with the name
pheader-title and the type java.lang.String. Then when you design the declarative component's
layout, to allow page authors to set their own panel header title, you would insert an EL expression that uses the declarative
component's var attribute to reference pheader-title on the text attribute of af:panelHeader.
For example:<af:panelHeader text="#{attrs.pheader-title}".../>
Read more...
For instance, if your declarative component includes a command button and you want page authors to attach their own action listener method, you might add a method with the name
method1 and the method signature
of void method(javax.faces.event.ActionEvent). Then when you you design the layout of the declarative component,
you would insert an EL expression that uses the declarative component's componentVar attribute to
reference method1 on the actionListener attribute of the af:commandButton component. For example:
<af:commandButton text="commandButton 1" id="dc_cb1"

                  actionListener="#{comp.handleMethod1}"/>>
myMenubar.jsf should look like this, if the af:componentDef node is expanded:
Read more...
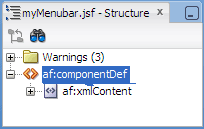
The entire declarative component definition is contained within the
af:componentDef element, which is divided into
two parts: the af:xmlContent element, and the components outside of af:xmlContent that define the
layout of the declarative component. At this point there are no components outside of af:xmlContent.
The
af:xmlContent element contains the metadata that describes the declarative component's name, facet, attribute,
associated method signature, and tag library details. Any components you insert outside of af:xmlContent (but still
within af:componentDef) will constitute the layout of the composite declarative component.
You can modify the metadata of the declarative component at any time, including adding facets, attributes, and methods. In the Structure window, select
af:componentDef or any element within af:xmlContent. Then use the Property
Inspector to edit the metadata. Note that you cannot modify tag library details such as the name and prefix in the Property
Inspector.
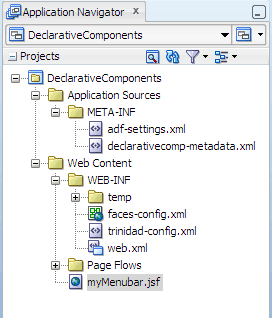
In the Application Navigator, the
declarativecomp-metadata.xml file is a special file created by JDeveloper to
keep track of all the declarative components you create in the definition project:
The
declarativecomp-metadata.xml file contains the names and paths to the declarative component definition files,
and the information for the tag libraries that will contain the declarative components. For example:
<declarativeCompDefs xmlns="http://xmlns.oracle.com/adf/faces/rich/declarativecomp">
  <declarativecomp-jsp-ui-def>/myMenubar.jsf</declarativecomp-jsp-ui-def>
  <declarativecomp-taglib>
    <taglib-name>MyDeclComponents</taglib-name>
    <taglib-uri>/mycomponents</taglib-uri>
    <taglib-prefix>mc</taglib-prefix>
  </declarativecomp-taglib>
</declarativeCompDefs>-
In the Component Palette, ADF Faces page, Menus and Toolbars panel, drag
 Menu Bar
and drop it on the blank page in the visual editor.
Menu Bar
and drop it on the blank page in the visual editor.
When you drag the component to the visual editor, you should see a target rectangle with the name Component Def on the page; this means the component you are dragging will be inserted inside that target component.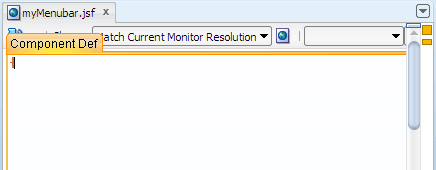
A Menu Bar component
A Menu component inside the Menu Bar
Two Menu Item components inside the Menu component
-
Drag and drop
Menu
into the menu bar you just added. -
In the Property Inspector for menu, Common section, change the Text attribute value to
File.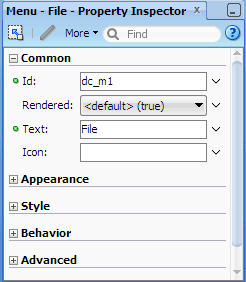
-
In the Component Palette, Menus and Toolbars panel, drag and drop
 Menu Item
into the menu component you just added.
Menu Item
into the menu component you just added. -
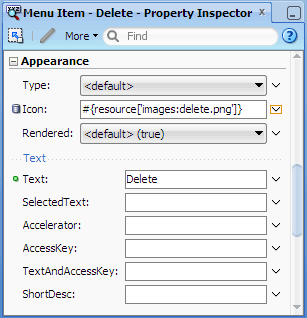
In the Property Inspector, Common section, change the Text value to
Delete.
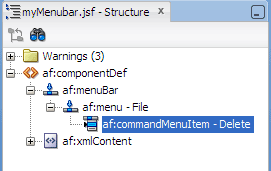
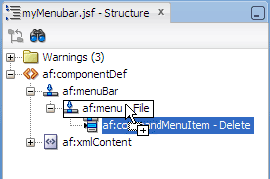
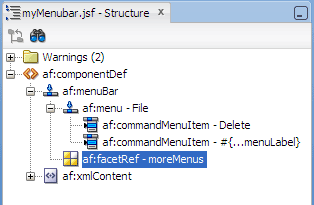
You should see the three components you have added so far in the Structure window.
-
In the Property Inspector for the menu item, Appearance section, choose Edit from the
 dropdown menu next
to the Icon field. Then use the dialog to locate and select an image.
dropdown menu next
to the Icon field. Then use the dialog to locate and select an image. 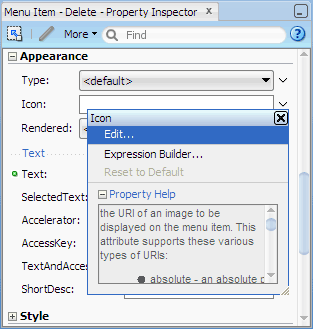
-
Click OK. When prompted, click Yes to add the icon image under the resources directory, then click Save.
You should see#{resource['images:delete.png']}in Icon field in the Property Inspector.
-
In the Component Palette, Menus and Toolbars panel, drag and drop
Menu Item
into the af:menu - File element in the Structure window.
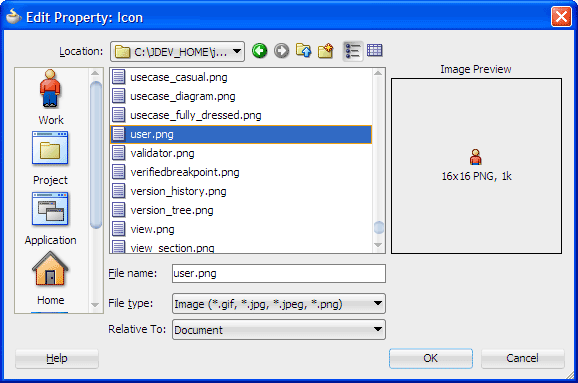
In the Property Inspector for the new menu item, Appearance section, choose Edit from the
dropdown menu next
to the Icon field. Then use the dialog to locate and select another image (for
example, user.png) for the menu item component you just added.
-
Click OK. When prompted, click Yes to add the icon image under the resources directory, then click Save.
In the Property Inspector for the same menu item, delete the default value in the Text field, then choose Expression Builder from the
dropdown menu.
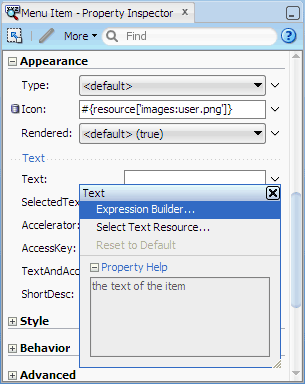
In the Expression Builder, expand Scoped Variables, then expand attrs. Click menuLabel to create the expression
#{attrs.menuLabel}. Then click OK.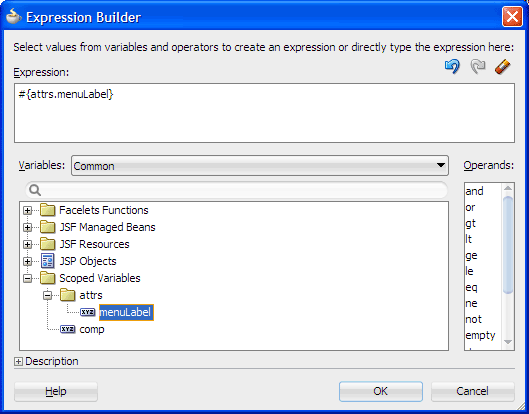
-
In the Property Inspector, Common section, under Menu Action, choose Edit from the
dropdown
menu next to the ActionListener field. -
In the Edit Property: ActionListener dialog, select Declarative Component Methods.
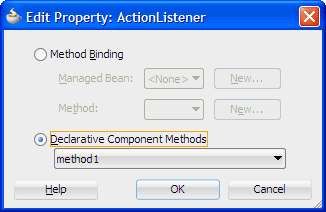
Confirm that method1 is shown in the dropdown, then click OK.
You should see the expression#{comp.handleMethod1}in the ActionListener field in the Property Inspector.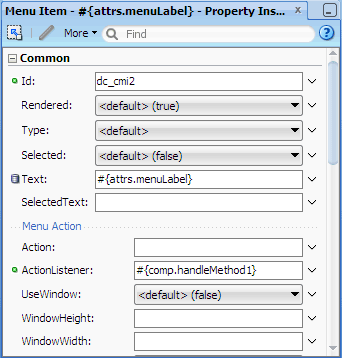
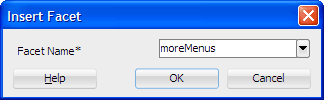
In the Component Palette, Layout panel, Core Structure section, drag and drop
 Facet
into the af:menuBar element in the Structure window. In the Insert Facet Ref dialog,
select moreMenus from the dropdown list. Then click OK.
Facet
into the af:menuBar element in the Structure window. In the Insert Facet Ref dialog,
select moreMenus from the dropdown list. Then click OK.
Click
Save All to save your work.
The page in the visual editor should look similar to this: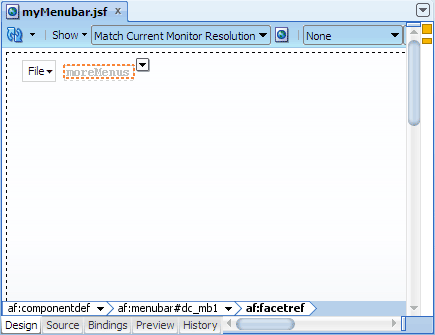
Read more...
Typically, you would first add a layout or container component such as Panel Group Layout, and then insert the other components into the layout or container component.
Adding components to a declarative component layout is similar to adding components to a JSF page. You can use any combination of design tools to create your declarative component layout. For instance, you will use the visual editor, Property Inspector, and Component Palette to create a menu bar.
In the layout part of the declarative component definition, you will insert the following ADF Faces components:
<jdev_home>/jdeveloper/ide/lib/ folder
and double-click oicons.jar to open it.
Read more...
Then navigate to oracle/javatools/icons and select the image file delete.png.
 Read more...
Recall that the entire declarative component definition is contained with the
af:componentDef element.
Within af:componentDef are the individual components that make up the declarative component's layout, as well as
the af:xmlContent element that contains declarative component metadata such as attributes and methods.
By default, JDeveloper assigns the values of
attrs and comp to the var
and componentVar attributes of af:componentDef, respectively, as shown here:
<af:componentDef var="attrs" componentVar="comp">
The
var attribute specifies the EL variable name to use to access the declarative component's own attributes.
The componentVar attribute specifies the EL variable name to use when referring to the declarative component
instance itself.
To specify where an attribute should be used in the declarative component, on the appropriate property of a component in the declarative component layout, you use an EL expression that references the
var EL variable and the attribute name. For example,
to enable page authors to enter their own label for a menu item, you insert an EL expression for the text property of the command menu item component:
<af:commandMenuItem id="dc_cmi2"

                    text="#{attrs.menuLabel}".../>
...where
menuLabel is the attribute name defined in the metadata.
To specify where a method should be used in the declarative component, on the appropriate property of a component in the declarative component layout, you use an EL expression that references the
componentVar EL variable and the method name. For example,
to enable page authors to enter their own action listener method for the menu item, you insert a method expression on the actionListener property of the command
menu item component:
<af:commandMenuItem id="dc_cmi2"

                    actionListener="#{comp.handleMethod1}".../>
...where
method1 is the method name defined in the metadata.
Read more...
This enables page authors who use the declarative component to add additional menus after File, if they wish. The Facet Ref tag references the facet name already defined in the declarative component metadata.
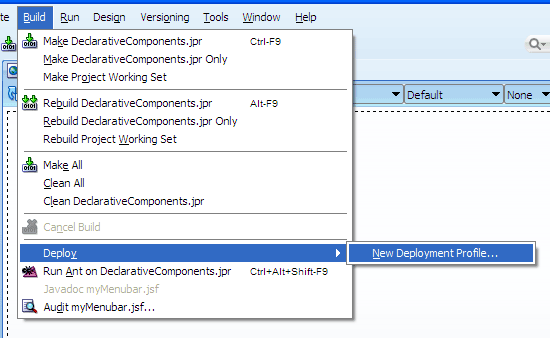
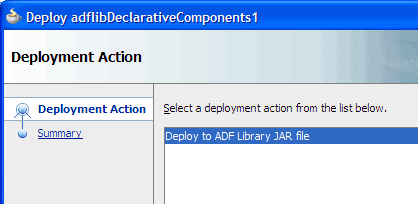
In the Application Navigator, select the DeclarativeComponents project. From the main menu choose Build > Deploy > New Deployment Profile.
-
In the Create Deployment Profile dialog, make sure ADF Library JAR File is the profile type. Enter
adflibDeclarativeComponents1as the deployment profile name, then click OK.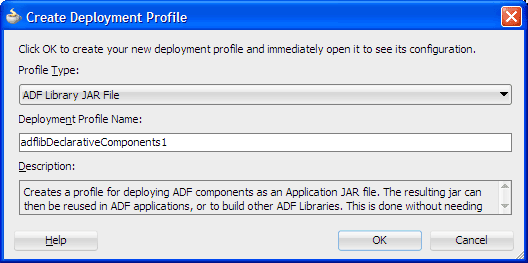
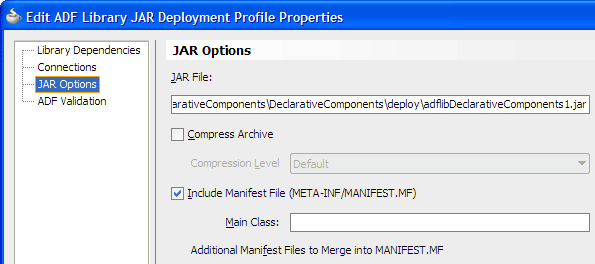
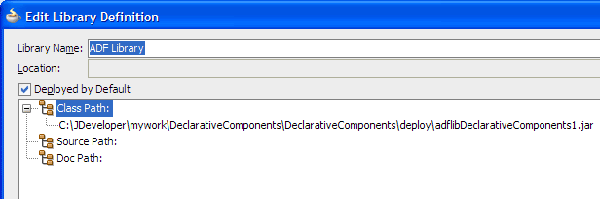
In the Edit ADF Library JAR Deployment Profile Properties dialog, click JAR Options to verify the JAR file name, then click OK.
Click
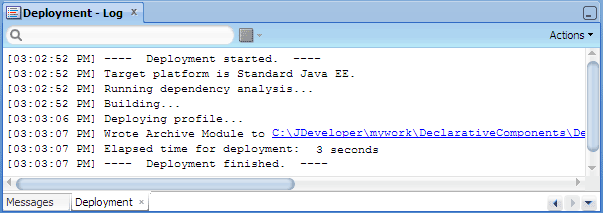
Save All to save your work.In the Application Navigator, right-click the DeclarativeComponents project and choose Deploy > adflibDeclarativeComponents1. In the Deploy wizard, make sure Deploy to ADF Library JAR file is selected. Click Finish to start deployment.
-
In the Deployment - Log window, note the location of the deploy folder that contains the ADF Library JAR file.
Read more...
To share or reuse declarative components, first you will have to deploy the project that contains those component definitions
to an ADF Library JAR file. If you have more than one definition project, each project must be deployed to one ADF Library JAR.
Read more...
By default JDeveloper will use the deployment profile name as the name for the generated ADF Library JAR. If you didn't enter a profile name but instead accepted the default value, JDeveloper will generate a JAR name for you, using the format adflibNNN, where NNN is an automatically generated number.
In addition, JDeveloper will place the ADF Library JAR in the default
deploy folder under your project folder in the file system.
To change the name and location of the default folder for deployed JAR files, from the Tools main
menu choose Preferences. Then on the Deployment page, modify
the relative or absolute project-level deployment output directory.
If you wish to change the location and file name of the ADF Library JAR after creating a deployment profile, double-click the project to open the Project Projects dialog. On the Deployment page, select the profile and click Edit.
Then in the Edit ADF Library JAR Deployment Profile Properties dialog, JAR Options page, modify the file name or location of the JAR file.
Note: The file name of the ADF Library JAR should follow any naming conventions your development team might have, and be descriptive of the content functionality. For instance, if you are creating an ADF Library JAR that contains only declarative components for the HR application, then you might use a name such as
mycompany.HRApp.DeclComps.jar.
Read more...
creates the necessary artifacts and control files, and packages the relevant project files (such as any image files) into a JAR.
The JAR also includes the tag library descriptor file (.tld file), and component and tag classes created for the
declarative component.
ADF Library JAR files provide a convenient way to package and reuse components within an application or across different applications. The JAR files can be shared by developers in the same team, across different teams, and across departments within the same organization. The modularity of ADF Library JAR files also means that when the reusable components such as declarative components are modified, the definition projects must be redeployed.
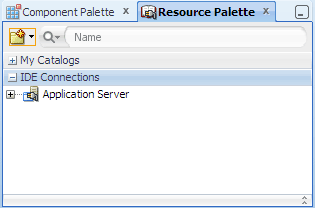
If not already open, choose View > Resource Palette from the main menu to open the Resource Palette. Expand the IDE Connections panel.
-
From the
 New
dropdown menu, choose New Connection > File System.
New
dropdown menu, choose New Connection > File System.

In the Create File System Connection dialog, enter
DeclarativeComponentsas the connection name.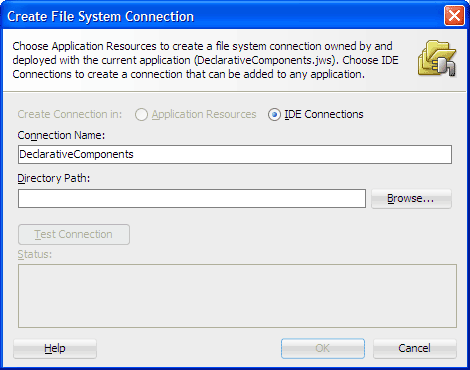
Click Browse next to the Directory Path field, then use the dialog to locate and select the deploy folder.
The deploy folder contains the ADF Library JAR you created in the previous step when you deployed the declarative component definition project.
When you return to the Create File System Connection dialog, you should see the directory path to the deploy folder.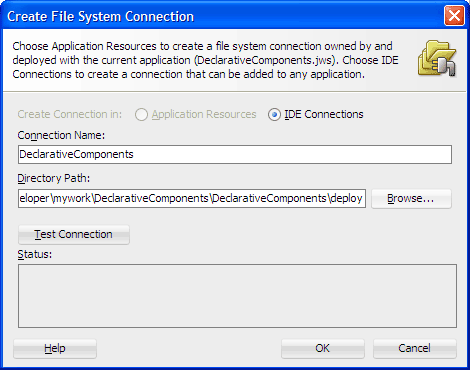
Click Test Connection. When you see the message Success!, click OK.
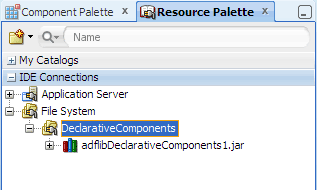
In the Resource Palette, expand File System | DeclarativeComponents to show the deployed ADF Library JAR file, adflibDeclarativeComponents1.jar.
In the Application Navigator, select MyWebApp from the dropdown list to switch to the application that will consume the declarative component.
In the Application Navigator, select the ViewController project that will contain your JSF pages.
In the Resource Palette, right-click adflibDeclarativeComponents1.jar and choose Add to Project.

-
In the Confirm Add ADF Library dialog, click Add Library.
The ViewController project name in the Application Navigator changes from standard font to italics because the project has been modified but not yet saved.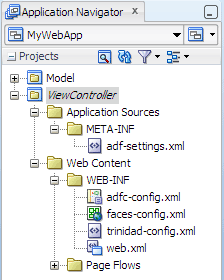
Read more...
The Resource Palette provides an easy and efficient way to distribute and use ADF Library JAR files.
As a developer of reusable components, after you package all the artifacts of a project into an ADF Library JAR, you add the JAR to a reusable component repository through JDeveloper's Resource Palette. The Resource Palette provides multiple connections to access different sources, and it has a structure tree view for displaying different connections and ADF Library JAR component types. You will create a file system connection for storing and sharing the ADF Library JAR. Once the ADF Library JAR is added to the Resource Palette, other developers will be able to search for it and add it to their projects.
As a consumer of reusable components, you use the Resource Palette to search and browse for the ADF Library JAR that contains declarative components. Then you add the ADF Library JAR to the project that will consume the declarative components. By adding the JAR to the project's set of libraries, at design time the JAR is added to the project's class path and available for reuse. At runtime, the reused component runs out of the JAR file by reference.
Read more...
Thus you will create your web pages in the ViewController project in the MyWebApp application.
Read more...
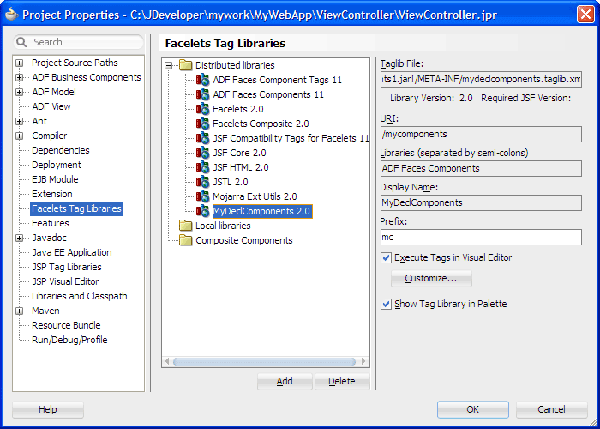
When you add the ADF Library JAR to a consuming project, JDeveloper adds the tag library that contains the declarative component to the project's list of Facelets tag libraries, as shown on the Facelets Tag Libraries page of the Project Properties dialog:
JDeveloper also creates an ADF Library definition in the project and adds ADF Library to the project's class path, as shown on the Libraries and Classpath page of the Project Properties dialog:
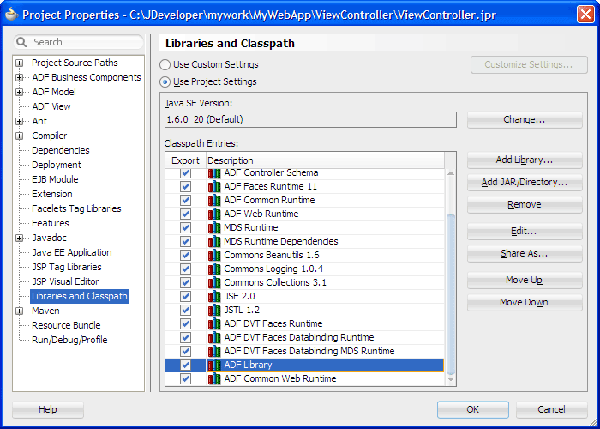
When you click Edit, you should see the ADF Library JAR in the class path.
By default, the ADF Library Deployed by Default option is selected. This means when you archive or build the application into a WAR file, JDeveloper will copy the contents of the ADF Library JAR to the archive or WAR file.
When you design a JSF page, the declarative component tag library will appear in the Component Palette, and the declarative component will be available for selection from the palette.
In the Application Navigator, ViewController project, double-click adfc-config.xml to open the default page flow diagram.
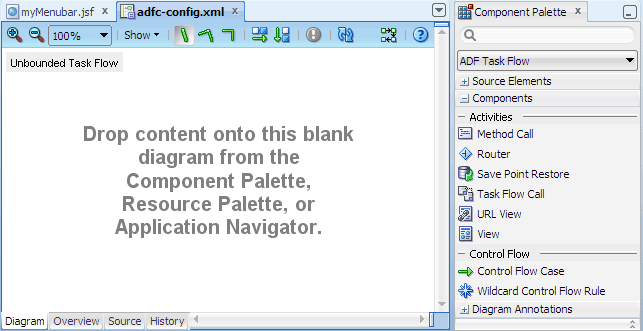
In the Component Palette, ADF Task Flow page, Components panel, click
 View
and then click on the diagram to add a page icon to the diagram. Change the default page name to
View
and then click on the diagram to add a page icon to the diagram. Change the default page name to MyPage.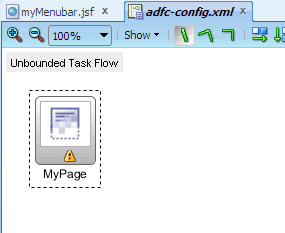
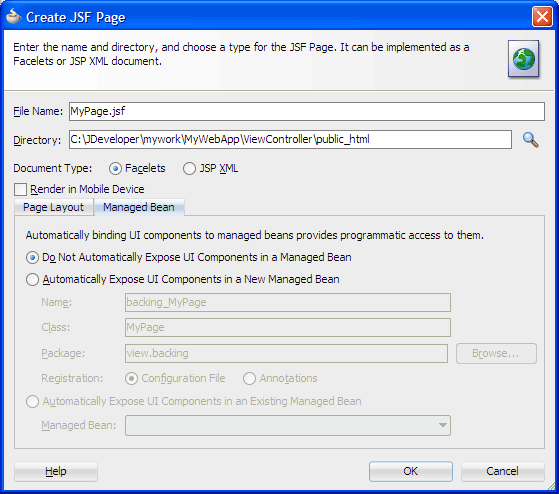
On the diagram, double-click the page icon you just added to open the Create JSF Page dialog.
Select Facelets as the document type and accept the default file name (for example,
MyPage.jsf).
On the Page Layout page, select Blank Page.
Click Managed Bean and select Do Not Automatically Expose UI Components in a Managed Bean.
Click OK.
JDeveloper displays the page in the visual editor.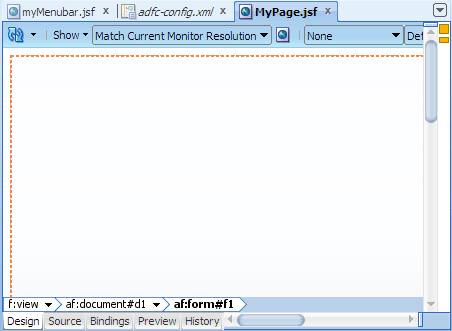
In the Component Palette, ADF Faces page, Layout panel, drag
 Panel Group Layout
and drop it on the blank page in the visual editor.
Panel Group Layout
and drop it on the blank page in the visual editor.In the Property Inspector, Common section, change the Layout attribute value to scroll.
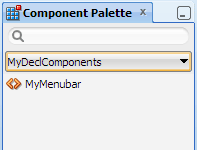
In the Component Palette, select MyDeclComponents (the tag library you created previously) from the dropdown list.
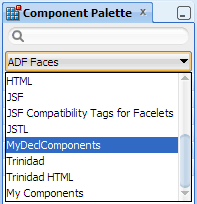
Drag and drop the declarative component MyMenubar into the panel group layout component on the page.
Click
Save All to save your work.
The page in the visual editor should look similar to this: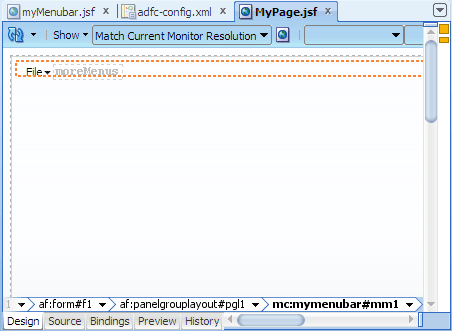
Read more...
By default JDeveloper creates an empty unbounded task flow (source file
adfc-config.xml) when you create a
Fusion web application using the Fusion Web Application template. On the diagram you typically define activities and control flow rules
that interact to allow a user to complete a task. In the tutorial you will simply define one View activity to represent the JSF page you will create.
Read more...
The yellow warning symbol indicates that the View activity is not yet associated with any physical page file (for example, MyPage.jsf). Once the page file
is created, the yellow warning symbol on the page icon will be removed.
Read more...
By default components are not exposed to managed beans. If you wish to bind components to managed beans, select one of the automatic binding options on the Managed Bean page in the dialog.
The option to bind to an existing managed bean is enabled only if the application has a managed bean already configured.
If you choose to automatically expose UI components in a managed bean, JDeveloper automatically creates a backing bean for any new JSF page that you create. When you drop a component on the page, JDeveloper inserts a bean property for each component, and uses the
binding attribute to bind component instances to those properties, allowing the
bean to accept and return component instances.
Note: If you intend to add ADF bindings to a page, do not use the automatic binding feature. If you use the automatic binding feature, you will have to remove the managed bean bindings later, after you have added the ADF bindings.
Read more...
<!DOCTYPE html PUBLIC "-//W3C//DTD XHTML 1.0 Transitional//EN"
 "http://www.w3.org/TR/xhtml1/DTD/xhtml1-transitional.dtd">
<f:view xmlns:f="http://java.sun.com/jsf/core"
        xmlns:af="http://xmlns.oracle.com/adf/faces/rich"
        xmlns:mc="/mycomponents">
  <af:document title="MyPage.jsf"..>
    <af:form..>
      <af:panelGroupLayout layout="scroll"..>
        <mc:myMenubar id="mm1">
          <f:facet name="moreMenus"/>
        </mc:myMenubar>
      </af:panelGroupLayout>
    </af:form>
  </af:document>
</f:view>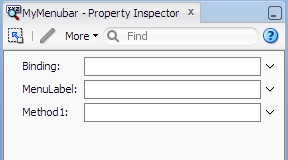
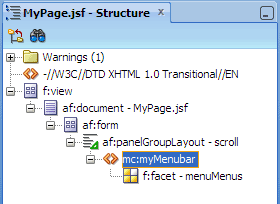
In the Structure window, you should see the declarative component mc:myMenubar inside af:panelGroupLayout. If you expand mc:myMenubar, you should see the moreMenus facet in the folder MyMenubar facets.
In the Structure window, select the declarative component mc:myMenubar.
In the Property Inspector, enter
Helloas the MenuLabel attribute.From the
dropdown
menu next to the Method1 field, choose Edit.
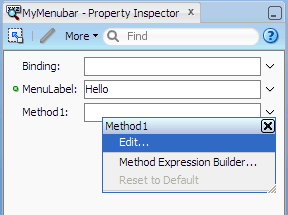
In the Edit Property dialog, click New next to the Managed Bean dropdown list.
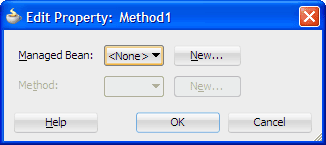
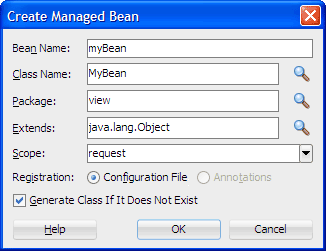
In the Create Managed Bean dialog, enter or select the following values, then click OK.
Field or Option Value Bean Name myBeanClass Name MyBeanExtends java.lang.ObjectScope request Registration Configuration File Generate Class If It Does Not Exist selected application: The bean is available for the duration of the web application. This is helpful for global beans such as LDAP directories.session: The bean is available to the client throughout the client's session.request: The bean is available from the time it is instantiated until a response is sent back to the client. This is usually the life of the current page.none: The bean is instantiated each time it is referenced. This is helpful if the bean is referenced within another bean.-
backingBeanScope: Is the duration from when an HTTP request is made until a response is sent back to the client. Use this scope for managed beans associated with page fragments and declarative components where there may be more than one page fragment or declarative component on a page. To prevent collisions, any values must be kept in separate scope instances. -
pageFlowScope: Memory scope for passing data between activities within the ADF bounded task flow. This scope defines a unique storage area for each instance of an ADF bounded task flow. Its lifespan is the ADF bounded task flow, which is longer thanrequestscope and shorter thansessionscope. -
viewScope: If specified, JDeveloper retains objects used on a page as long as the user continues to interact with the page. The objects are automatically released when the user leaves the page. -
In the Edit Property dialog, click New next to the Method dropdown list to open the Create Method dialog.

Enter
myMethodin the Method Name field and click OK.
The Edit Property dialog should now look like this: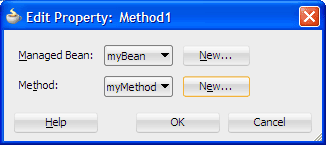
Click OK to close the Edit Property dialog.
You should see the expression#{myBean.myMethod}in the Method1 field in the Property Inspector.Double-click MyBean.java in the Application Navigator to open the file. (If already open, click the MyBean.java document tab at the top of the editor window to bring the source editor forward.)
-
In the generated method, add code to print out the text "Hello World".
For example, you can copy and paste the sample code should in bold: -
In the editor window, click the MyPage.jsf document tab to bring the visual editor forward.
-
In the Component Palette, select ADF Faces from the dropdown list. From the Menus and Toolbars panel, drag and drop
Menu
into the moreMenus facet in the visual editor or in the Structure window. -
In the Property Inspector, Common section, enter
Editas the Text value and press Enter. -
In the Component Palette, drag and drop
Menu Item
into the menu component you just added. In the Property Inspector, Common section, enter Cutas the Text value. -
Drag and drop another
Menu Item
into the af:menu - Edit element in the Structure window. In the Property Inspector, Common
section, enter Copyas the Text value for the second menu item and press Enter.
The page in the visual editor should look similar to this: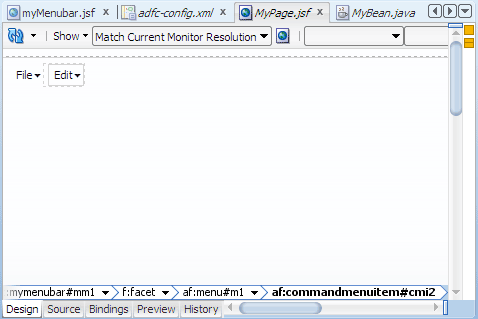
In the editor window, click the adfc-config.xml document tab to bring the page flow diagram forward. On the diagram, right-click the MyPage page icon and choose Run.
If the Create Default Domain dialog displays, enter the default password, for exampleweblogic1, in the Password and Confirm Password fields, then click OK.
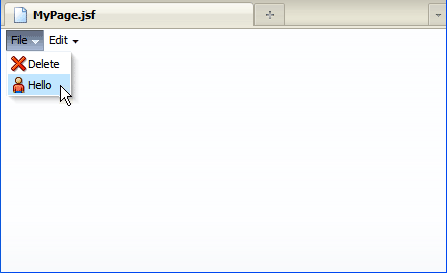
The page in the browser should look similar to this:Starts Integrated WebLogic Server, if not already running.
Compiles and deploys the application to Integrated WebLogic Server.
Launches the application in your default browser using the following default address:
http://<your_machine_IP_address>:<http_port>/<your_application_name>-<your_project_name>-context-root>/faces/<path_to_the_page>Click the Edit and File menus on the page in the browser to display the menu items.
The Edit menu looks like this: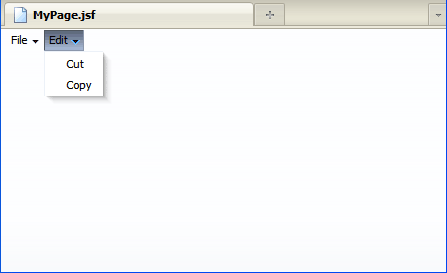
On the File menu, select Hello.
menuLabel), a method definition (method1), and a facet definition (moreMenus).
Read more...
To allow page authors to enter their own label for a menu item, you inserted the EL expression
#{attrs.menuLabel}
on the text property of a command menu item component. At page design time, when you edit the menuLabel
attribute on the declarative component, you are essentially supplying a text value to the command menu item.
To allow page authors to enter their own action listener method for the menu item, you inserted the method expression
#{comp.handleMethod1} on the actionListener property of the command menu item component.
At page design time, when you edit the method1 attribute on the declarative component, you are attaching an action listener on the
command component via a method expression. Then to define what should be done when the application user selects a menu item,
you add the method code in the JavaBean class that is registered as managed bean in the application.
To allow page authors to add additional menus on the menu bar, you inserted a Facet Ref tag that referenced
moreMenus in the panel menu bar component. In a later step you will edit the moreMenus facet
to add one more menu in the menu bar.
faces-config.xml.
Read more...
In an application that uses ADF data bindings and ADF task flows, managed beans should be registered in either the configuration file adfc-config.xml or a task flow definition file.
When the application starts up, it parses the configuration file (or files) and the beans are made available. Whenever a managed bean is referenced (for example in an EL expression as a value for a component's tag attribute - called a value expression), the Managed Bean Creation Facility instantiates the bean by calling the default constructor method on the bean. If any properties are also declared, they are populated with the declared default values.
A managed bean is registered using the
<managed-bean> element in the configuration file. You can add managed
beans to your configuration file either by editing the XML in the file manually, by using the overview editor for
adfc-config.xml or faces-config.xml, or by using the Create Managed Bean dialog.
 Read more...
You use the symbolic name to identify the bean when you need to refer to the bean's properties and methods. Because you are
using a symbolic name rather than referring to the bean directly, the presentation is kept separate from the application
logic, which means that you can change the model without affecting the view.
Read more...
You use the symbolic name to identify the bean when you need to refer to the bean's properties and methods. Because you are
using a symbolic name rather than referring to the bean directly, the presentation is kept separate from the application
logic, which means that you can change the model without affecting the view.
The scope of a managed bean determines the scope within which the bean is stored. The following are the valid scopes for a bean:
backingBeanScope, pageFlowScope and viewScope are not standard JSF scopes.
EL expressions must explicitly include the scope to reference the bean. For example, to reference the TheBean managed bean
from the backing bean scope, your expression would be #{backingBeanScope.TheBean}.
When viewed in the XML editor, the managed bean registration in the configuration file looks like this:
<managed-bean>
  <managed-bean-name>myBean</managed-bean-name>
  <managed-bean-class>MyBean</managed-bean-class>
  <managed-bean-scope>request</managed-bean-scope>
</managed-bean>// Add event code here...
System.out.println("!!! Hello World !!!");
}
af:group. For example:
Read more...
<af:menuBar>
  <af:menu text="A"/>
  <af:menu text="B"/>
  <af:group>
    <af:menu text="C"/>
    <af:menu text="D"/>
  </af:group>
</af:menuBar>A B | C D
But no separator lines will be drawn when you use groups within the
moreMenus facet, such as:
<f:facet name="moreMenus">
  <af:group>
    <af:menu text="C"/>
    <af:menu text="D"/>
  </af:group>
</f:facet> <mc:myMenubar menuLabel="Hello" method1="#{myBean.myMethod}"..>
<f:facet name="moreMenus">
<af:menu text="Edit"..>
<af:commandMenuItem text="Cut"../>
<af:commandMenuItem text="Copy.."/>
</af:menu>
</f:facet>
</mc:myMenubar>Integrated WebLogic Server is a Java EE runtime service for packaged archive deployment. Based on zero-copy deployment, Integrated WebLogic Server lets you run and test an application and its projects as a Java EE application in a Java EE container. No special connection setup is required to use Integrated WebLogic Server. You can run the entire application, a project, or individual JSF pages.
When you run a JSF application in the IDE, JDeveloper automatically:
Note: Terminating the application stops and undeploys the application from Integrated WebLogic Server but it does not terminate Integrated WebLogic Server.
Read more...
You added the Edit menu component and two command menu item components (Cut and Copy)
in the moreMenus facet of the declarative component.
Read more...
!!! Hello World !!!
The File menu and Delete menu item were specified in the declarative component definition, in addition to a
menuLabel attribute
and a method1 method. You added the Hello label and hooked up the method that prints out the text by editing
the declarative component at page design time.
- Use JDeveloper wizards and dialogs to create applications and projects
- Define attribute, facet and method metadata for a declarative component, and the declarative component layout
- Define the tag library that will contain the declarative component
- Create a deployment profile for an ADF Library JAR
- Deploy the project that contains the declarative component definition to an ADF Library JAR
- Share the ADF Library JAR by adding a file system connection in the Resource Palette
- Add the ADF Library JAR to the application and project that will make use of the declarative component
- Add and modify the declarative component on a JSF page
- Use the Create Managed Bean dialog to add and attach a managed bean method
- Use Integrated WebLogic Server to run an ADF Faces application