| Oracle® Real-Time Decisions Base Application Decision Management Applications User's Guide Release 3.1 Part Number E19024-01 |
|
|
View PDF |
| Oracle® Real-Time Decisions Base Application Decision Management Applications User's Guide Release 3.1 Part Number E19024-01 |
|
|
View PDF |
This chapter contains the following topics:
Section 2.1, "Introduction to Oracle RTD for Marketing Optimization"
Section 2.3, "Allocating Product Features to Marketing Organization Job Roles"
Section 2.4, "Job Role Oriented Example of Oracle RTD for Marketing Optimization Tasks"
This section contains the following topics:
In any marketing organization, there can be many requirements to take into consideration when determining what is "the best" offer to present to a given customer. Depending on the scope of the products and services that are being marketed, there could be a considerable number of types and categories of offers, as well as the actual products and services being offered, and in what campaigns. There could also be a number of different ways that these offers could be presented and displayed to customers on web pages, as part of the marketing campaigns.
The Oracle RTD Decision Management application RTD for Marketing Optimization defines a set of marketing concepts and their relationships, as they appear in the following diagram:
Figure 2-1 Marketing Concepts and Relationships

The relationships are represented by the arrowed lines, according to the following conventions:
The direction of the arrow indicates a one-to-many relationship.
A solid line represents a mandatory relationship, and a broken line represents an optional relationship
So, for example (with the relationships described as generically as possible):
Each campaign consists of zero, one, or more offers
Each offer must belong to exactly one campaign
Each offer consists of zero, one, or more creatives
A creative can be thought of as specific content used to deliver an offer. For example, text content and image content could be two types of creative for the same offer.
Each channel is related to zero, one, or more creatives
Each creative must belong to exactly one offer and must be associated with exactly one slot type
Each creative may be associated with one (and only one) channel, but does not have to be
A perspective is a subset of your marketing objects of interest, which also shows how they are inter-related. Each perspective represents a portion of your data that is convenient to view and process as a unit.
For each object, designers may decide whether all the objects of a particular type are to be available (for example, all campaigns) or a subset of a type (for example, only the campaigns whose approval status is Draft).
The perspectives defined in the RTD for Marketing Optimization application consist of four "general" subsets of data and three "filtered" subsets.
The four "general" views, with no qualifying conditions on any object, are as shown in the following diagram:
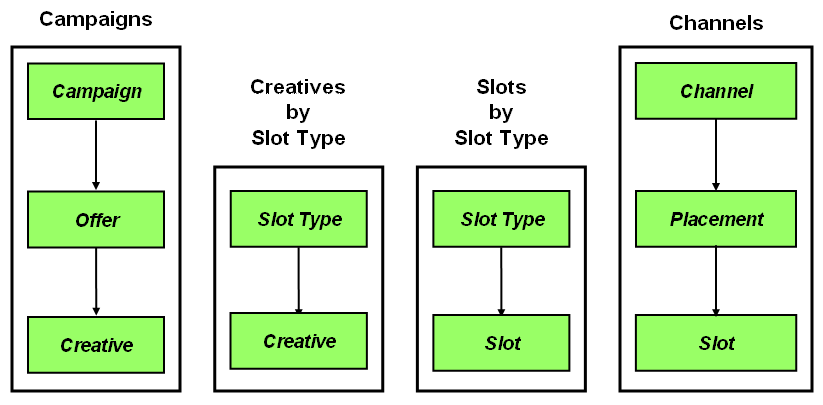
The following diagram shows examples of the four general perspectives, as displayed in Decision Manager:
Figure 2-2 Examples of General RTD for Marketing Optimization Perspectives

The following diagram shows the three "filtered" perspectives, each of which is similar to the Campaigns perspective, except that each filtered perspective only exposes the campaigns with a particular approval status:
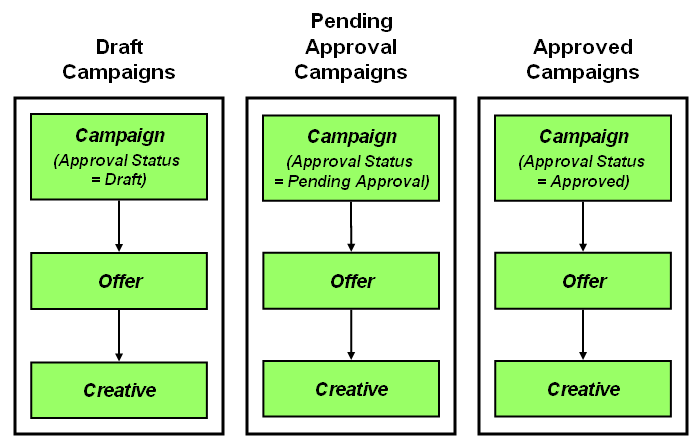
Users can be granted permissions to work on different perspectives. In this way, perspectives can be designed and directed towards particular functional roles in your organization. For a possible function-to-job-role breakdown in a marketing organization, see Section 2.3, "Allocating Product Features to Marketing Organization Job Roles."
Terminology:
The general terms used throughout this section and other sections to cover all the marketing objects of interest are choices, choice types, and choice groups (the latter two terms are used interchangeably).So, campaigns, offers, channels are all different choice types or choice groups. An individual Deep Discount campaign and a Sixty-Percent-Off-Everything offer are examples of specific choices.
General Note:
This section contains a combination of general choice management options and examples oriented to the choices available in RTD for Marketing Optimization.The convention used in this section is that the general descriptions appear in standard font, while the examples and descriptions oriented specifically to RTD for Marketing Optimization appear in italics.
More general information is also available in Appendix A, "Decision Manager User Interface Schematic."
For each of the functions listed in this section, it is assumed that you have been granted the correct permission or permissions by your Oracle RTD Decision Management administrator to perform the operation described for that function.
For general information about the layout of the user interface screens and screen areas, see Section A.1, "Decision Manager User Interface Schematic."
A Decision Management application can be set so that either multiple users can update a choice, or users can operate in a special "ownership=on" mode, which is basically a "single-user-update" mode.
In this mode, there is a provision for users who are granted the special "own" permission, such as system administrators or managers, to be able to override the single user mode and perform choice updates. In this "ownership=on" mode, the choices appear with an extra attribute Owner. Some of the screenshots in this section show choices with this extra attribute.
The following scenario includes the implicit provision that two different departments/users can edit the same choice. Decision Management application designers can set up applications either to allow multi-user updating of the same choice, or to enforce single-user update mode of a choice.
For more information on ownership, see the section "Config XML File" in Oracle Real-Time Decisions Base Application Decision Management Installation and Configuration Guide.
This section contains the following topics:
Section 2.2.3, "Viewing, Searching and Adding Audit Trail Information for Projects"
Section 2.2.8, "Viewing, Searching and Adding to Choice Audit Trail Comments"
Note:
A project is a unit of work processing, that stores a set of pending changes to the Main Repository.The Main Repository is the database containing the dynamic choices that may be accessed by and used for processing Oracle RTD decisions in customer applications. This set of choices is updated each time a project is committed.
You can create, edit, and delete choices in a project. While recorded as significant actions within the project, these pending changes will only take effect in the Main Repository when you commit the project. If you discard the project (also known as deleting the project), all the changes in that project are discarded.
[For general information about creating projects, see Section A.7, "Create Project."]
Your context can be either Main Repository or an active project.
Click New Project.
Note:
If you do not see the New Project icon, either expand your Decision Manager window, or click the chevron to the left of "Search" near the top of the screen, and select New Project from the dropdown list that appears.In the Create Project window, enter the project Name and optionally Description and Audit Trail Comment.
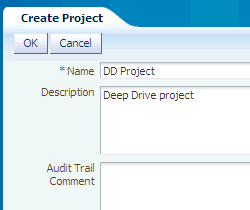
Click OK.
After the project is created, the context is automatically switched to the new project, as displayed in the View box, and appears as an active project in the View Projects tab.
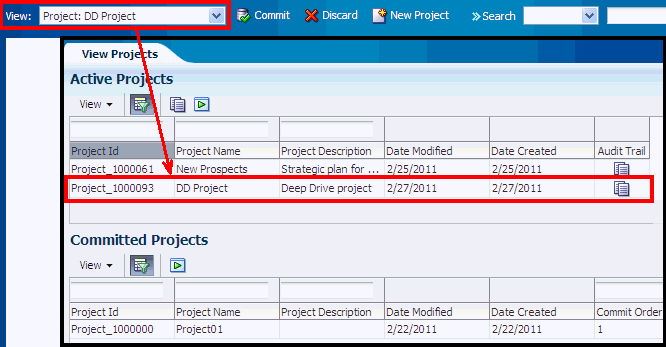
[For general information about viewing projects, see Section A.8, "View Projects."]
The standard way to access and view projects and project details is through the View Projects.
Note:
If you do not see the View Projects icon, either expand your Decision Manager window, or click the chevron to the left of "Search" near the top of the screen, and select View Projects from the dropdown list that appears.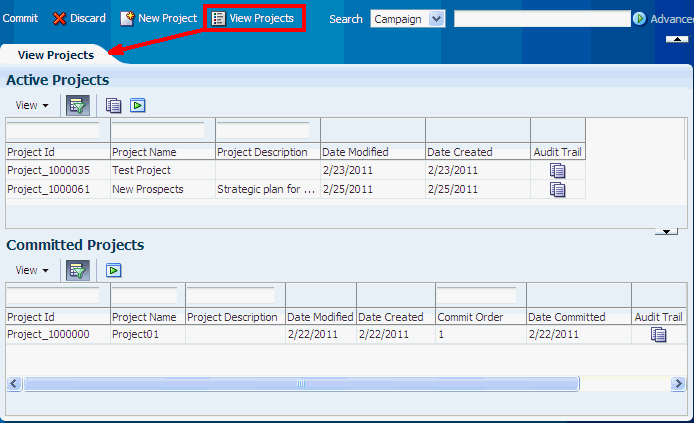
In both the Active Projects and Committed Projects areas, you can:
Customize project searches by clicking the appropriate View button, then selecting, suppressing or reordering the project search columns that appear
Search for projects by entering search parameters in the empty boxes above the column names, then clicking the Search (green arrowhead) icon
If the search boxes are not visible, click the Query By Example (wineglass) icon.
For search parameters, asterisk ("*") acts as a leading wild card, and there is no need to specify a trailing asterisk. So, for example:
The two character search string *c searches for values that contain the letter "c"
The search string *c*es searches for values that contain "c" and later "es"
You can also click on the Audit Trail icon for any active or committed project, to view and search the audit trail comments for that project.
The standard way to access audit trail comments is to click the Audit Trail icon for either an active or a committed project in the View Projects tab.
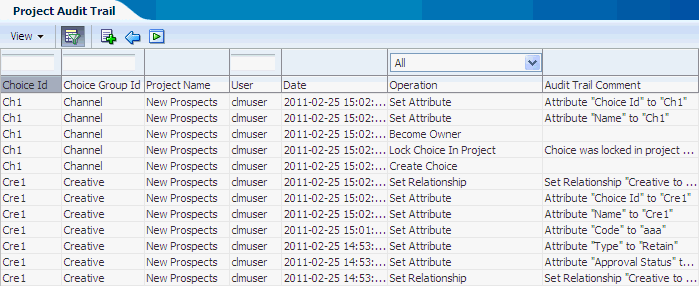
In the Project Audit Trail area, you can:
Customize searches by clicking the View button, then selecting, suppressing or reordering the project audit trail search columns that appear
Search the audit trail by entering search parameters in the empty boxes above the column names, then clicking the Search (green arrowhead) icon.
If the search boxes are not visible, click the Query By Example (wineglass) icon.
Note:
You can search for audit trail comments on particular choices and choice types by entering search parameters for Choice Id and Choice Group Id respectively.For search parameters, asterisk ("*") acts as a leading wild card, and there is no need to specify a trailing asterisk. So, for example:
The two character search string *c searches for values that contain the letter "c"
The search string *c*es searches for values that contain "c" and later "es"
You can also add an audit trail comment by clicking the green Plus icon and entering your comment. This comment will be associated with the rightmost choice that appears in the breadcrumbs line near the top of the Decision Manager window.
From the Project Audit Trail tab, you can return to the View Projects tab by clicking the blue back arrow icon.
If you have the necessary permission, you can commit a project. Committing a project will transfer all the pending choice changes in that project to the Main Repository.
To commit a project, select the project from the dropdown View list in the Repository/Context area, then click the Commit button, and confirm that you want to commit the project. You may optionally enter an audit trail comment in the confirmation box.
After the project is committed, the context is automatically switched to the Main Repository, as displayed in the View box.
If you click View Projects, the newly-committed project appears in the Committed Projects area. You can click the Audit Trail icon for the project to see a list of all the operations that occurred when the project was active, and the users that performed those operations.
If you have the necessary permission, you can discard a project, which discards all changes in the project.
To discard a project, select the project from the dropdown View list in the Repository/Context area, then click the Discard button, and confirm that you want to discard the project. You may optionally enter an audit trail comment in the confirmation box.
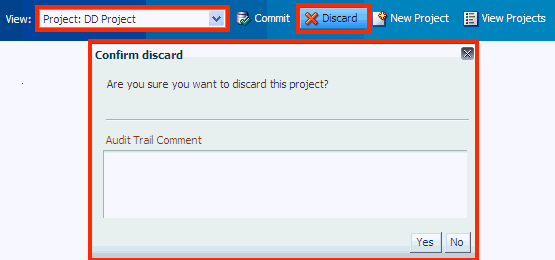
After the project is discarded, the context is automatically switched to the Main Repository, as displayed in the View box.
[For general information about creating choices, see Section A.9, "Create Choice."]
Note:
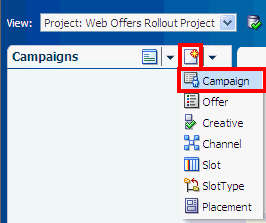
When you create a choice in a project, the choice does not get added to the Main Repository until you commit the project. You can undo the choice creation in the project before you commit the project by discarding the newly-created choice, as described in Section 2.2.6.1, "Discarding Choice Additions in a Project."Click the Create icon (in the header of the current perspective panel).
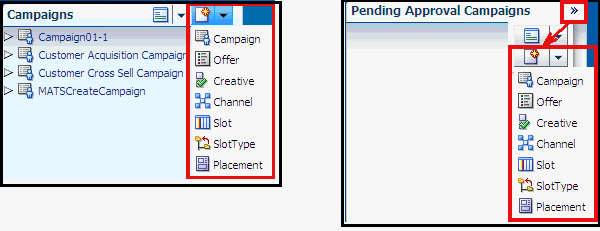
Note:
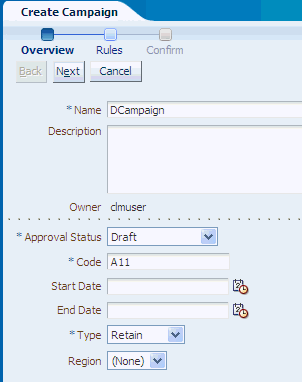
If you do not see the Create icon, either expand your Decision Manager window, or click the chevron to the right of the perspective name, then select the Create icon, which will open a list of the choices.In the Overview dialog, enter or select values for all mandatory fields (marked with an asterisk), and as many of the optional fields as you require.
The following shows a Create Campaign example:
In addition to specifying values for the attributes of the choice you are creating, you may have to select attribute values for choices related to the current choice.
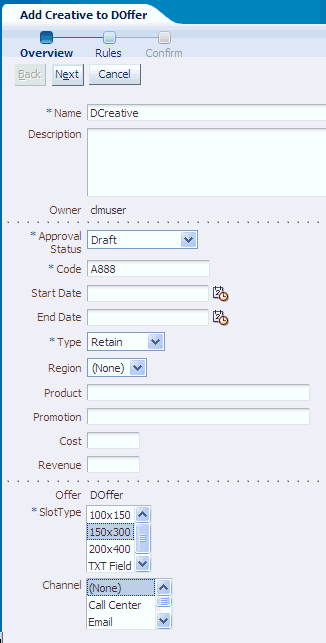
For example, as each Creative choice must have a Slot Type and may be associated with a Channel, you will have to select a SlotType value (which is marked with an asterisk) during the creation of the Creative choice. You may select a Channel at this point, or add the Channel value in a later edit session.
The following shows an example of creating a Creative by adding it to an Offer:
Click Next to proceed to the Rules dialog.
In the Rules dialog, optionally enter the rules for your choice in the Rule Editor frame that appears.
For detailed information about entering rules, see Section 12.10, "Using Rule Editors" in Oracle Real-Time Decisions Platform Developer's Guide.
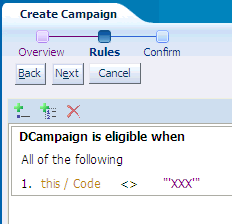
The following shows an example of a rule added to a Campaign, specifying that the Code must not be equal to XXX:
Click Next to proceed to the Confirm dialog, then click OK.
Depending on the choice you have created, you may continue to add further choices (using steps 2 to 5 as described in this section) as follows:
After creating a Campaign choice, click Add Offer
After creating an Offer choice, click Add Creative
After creating a Channel, click Add Creative or Add Placement
After creating a Slot Type, click Add Creative or Add Slot
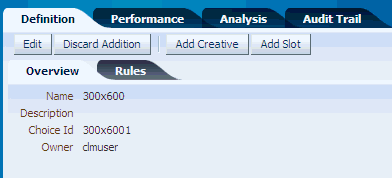
The following shows an example of the Choice details area immediately after the successful creation of a Slot Type:
When you are working in a project, you can discard the choice that you created in the project, before the project has been committed to the Main Repository - in effect, this "deletes" the choice from the project. This option is known as Discard Addition.
To discard a choice that was added in a project, first access the choice as described in Section 2.2.7, "Viewing and Searching for Choices." The details screen for the choice will include a Discard Addition button.
The following shows an example of the details screen for a campaign HM Campaign:
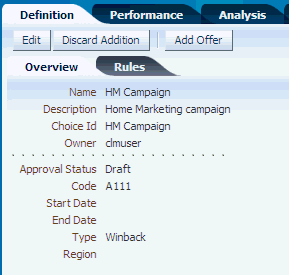
Click the Discard Addition button, then confirm that you want to delete the choice from the project. You may optionally enter an audit trail comment in the confirmation box.
The net effect of a Discard Addition depends on the configuration of the relationships with other choices:
For relationships that are "orphan delete", related choices are not deleted, and only the selected choice is deleted
For relationships that are "cascade delete," then an attempt will be made to delete the choice and all lower-level related choices (as, for example, deleting a campaign will attempt to delete all of its offers, and all creatives under those offers). If any of the choices in the cascade delete hierarchy is locked in another project, the delete will fail. If any of the choices in the cascade delete hierarchy is owned by any other user and you do not have "own" permission on that choice, the delete will fail.
For more information on delete options, see the section "Choice Groups and Relationship Types XML Files" in Oracle Real-Time Decisions Base Application Decision Management Installation and Configuration Guide.
Note:
After a choice is deleted in a project, you can still view audit trail information about the choice through the project audit trail. For details, see Section 2.2.3, "Viewing, Searching and Adding Audit Trail Information for Projects."The standard ways to access and view choices and choice details are either through perspectives or by searching for choices.
Note:
You must have the necessary permissions to view and search for choices. For more information of how these are configured, see the section "Security XML Files" in Oracle Real-Time Decisions Base Application Decision Management Installation and Configuration Guide.Using perspectives, you can expand choice hierarchies in the Perspectives panel tree, or select other perspectives and explore their choice tree structure in the Perspectives panel. When you click a choice in the Perspectives panel, and then the Definition tab, this will display the choice details in the main body of the Decision Manager window.
You can search for your choice or choices using one or more of the Search options described in Section A.5, "Search Options Area." If your application is in the special mode "ownership=off", then a basic search searches on name and description. In "ownership=on" mode, the basic search is on name, description, and owner.
The search takes place in the context of either the Main Repository or an active project, as appears in the View box near the top left of the screen:
A search in an active project context will search in both that project and the Main Repository
A search in the Main Repository context will search in only the Main Repository
After a successful search, the resulting choices appear in the Search Results panel. You can click any choice there to display the details in the main body of the Decision Manager window.
The following shows an example of the search results for the word "Image" in Creative names and descriptions, in the context of the active project New Prospects:

The second result contains "Image" directly in the Creative name. The first result has "Image" only in the Creative description, which appears if you mouse-hover over the Creative name.
As both search results appear in standard font, this indicates that they were found in the Main Repository (any objects found in the New Prospects project would have appeared in red italics).
You can also view audit trail information for choices - see Section 2.2.8, "Viewing, Searching and Adding to Choice Audit Trail Comments."
You can view audit trail information for choices in two ways:
You can view audit trail information for choices directly from the choice details screen, by clicking the Audit Trail tab for the choice.
The following shows an example of the Audit Trail tab just after the creation of a campaign HM Campaign, showing all the audit trail columns:

The audit trail search options are similar to those described in Section 2.2.3, "Viewing, Searching and Adding Audit Trail Information for Projects."
If you add an audit trail comment from the choice Audit Trail tab, it is automatically associated with the current choice in the choice details area.
You can view audit trail information for choices indirectly, by viewing project audit trail information, then using choice information as a search parameter in the Project Audit Trail tab. For more details, see Section 2.2.3, "Viewing, Searching and Adding Audit Trail Information for Projects."
Note:
When you edit a choice in a project, either a newly created choice or a choice that exists in the Main Repository, all the changes you make are within the project only - they do not reach the Main Repository until you commit the project.To change a newly created choice, you simply edit the choice. This you can do many times before project committal. If you want to prevent the new choice from going to the Main Repository, you discard the choice addition, as described in Section 2.2.6.1, "Discarding Choice Additions in a Project."
You can also edit a Main Repository choice many times before project committal. If you want to undo all the changes made to that choice in the project, you discard the choice changes, as described in Section 2.2.9.1, "Discarding Changes to a Main Repository Choice."
To edit a choice, access the choice as described in Section 2.2.7, "Viewing and Searching for Choices." The details screen for the choice will include an Edit button.
Click the Edit button.
The following shows an example of the Overview tab for a campaign HM Campaign, ready for editing:
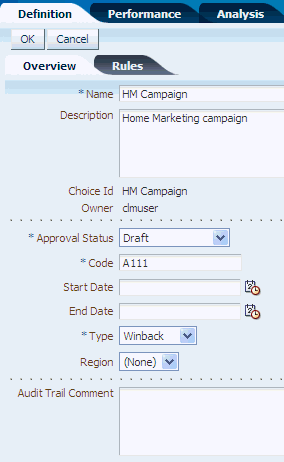
You can edit the choice attributes in the Overview tab, and the rules for the choice in the Rules tab.
For detailed information about editing rules, see Section 12.10, "Using Rule Editors" in Oracle Real-Time Decisions Platform Developer's Guide.
When you have finished, click OK.
When you are working in a project, you can edit Main Repository choices. Before you commit these changes to the Main Repository, you may decide to undo the changes you made in that project - this will revert the choice back to its original Main Repository version. This option is known as Discard Changes.
To discard a change to a Main Repository object, first access the choice as described in Section 2.2.7, "Viewing and Searching for Choices." The details screen for the choice will include a Discard Changes button.
The following shows an example of the details screen for a creative West Coast Properties, that exists in the Main Repository, but has just been edited in the Showcase Upgrade project:
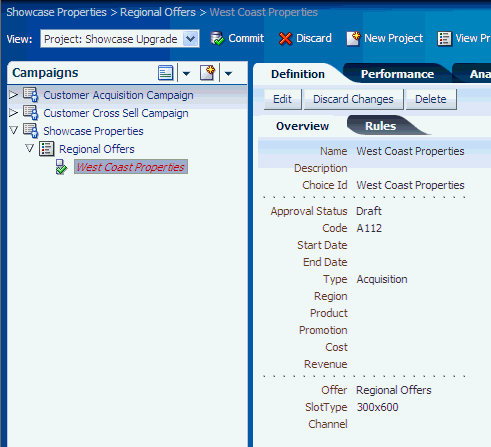
Click the Discard Changes button, then confirm that you want to discard the changes made in the project. You may optionally enter an audit trail comment in the confirmation box.
To delete a choice from the Main Repository, you must first be working in an active project. You may have edited the choice in that project or not.
In the project, you effectively prepare to delete a choice. As with all changes in a project, the actual choice deletion does not occur in the Main Repository until you commit the project. For example, you may decide to undo your choice deletion before you commit the project (see Section 2.2.10.1, "Discarding Deletions").
To start the process of deleting the choice from the Main Repository, first access the choice as described in Section 2.2.7, "Viewing and Searching for Choices." The details screen for the choice will include a Delete button.
The following shows an example of the details screen for a creative West Coast Properties, that has not yet been edited in the Showcase Upgrade project:
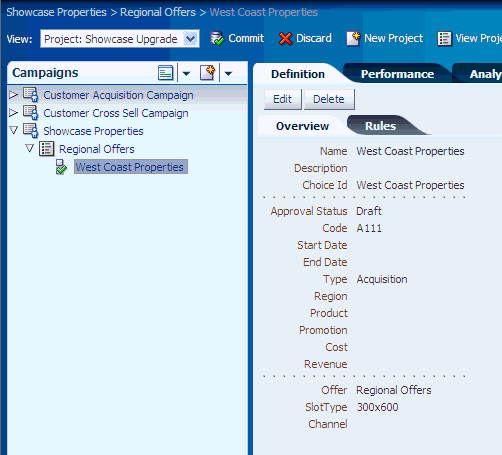
The following shows an example of the details screen for a creative West Coast Properties, after it has been edited in the Showcase Upgrade project:

Click the Delete button, then confirm that you want to delete the choice from the Main Repository. You may optionally enter an audit trail comment in the confirmation box.
The choice deletion does not occur in the Main Repository until the project is committed. The final net effect of an undiscarded delete after the project is committed depends on the configuration of the relationships with other choices:
For relationships that are "orphan delete", related choices are not deleted, and only the selected choice is deleted
For relationships that are "cascade delete," then an attempt will be made to delete the choice and all lower-level related choices (as, for example, deleting a campaign will attempt to delete all of its offers, and all creatives under those offers). If any of the choices in the cascade delete hierarchy is locked in another project, the delete will fail. If any of the choices in the cascade delete hierarchy is owned by any other user and you do not have "own" permission on that choice, the delete will fail.
For more information on delete options, see the section "Choice Groups and Relationship Types XML Files" in Oracle Real-Time Decisions Base Application Decision Management Installation and Configuration Guide.
If you have signalled your intention to delete one or more choices from the Main Repository, as described in Section 2.2.10, "Deleting Choices from the Main Repository," you can undelete or discard pending choice deletions through the Project Changes panel.
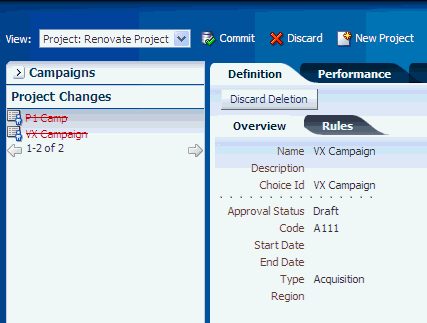
Click the Project Changes bar, to expose the changes you made in the project. The choice deletions appear as red, crossed-out choice names.
To discard a deletion, click the crossed-out choice that you want to undelete. The details window that appears has a Discard Deletion button.
The following shows an example of the Project Changes panel for the project Renovate Project, where two choices, P1 Camp and VX Campaign have been marked for deletion, and the VX Campaign selected for undeletion.
Click the Discard Deletion button.
The choice disappears from the Project Changes tab, and is available once again as a standard unedited choice in all appropriate perspectives.
Note:
If you deleted many choices at once as part of a cascade delete, you have to undelete them one by one, starting with the lowest-level choices. For instance, if you deleted a campaign and it deleted offers and creatives under it, first undelete the creatives, then undelete the offers, then undelete the campaign.While each marketing organization has its own unique departmental structure, this section illustrates one possible way by which you can allocate the tasks available for RTD for Marketing Optimization users to job roles in a marketing organization.
The basic principle is that individual users are allocated specific permissions, at several levels: perspective, project and choice type (also known as choice group). Without the right permissions, you will not be able to perform particular tasks on particular objects in the application.
The details of setting up permissions are not described in this manual, but the basic principles indicate how these permissions could be used in the process of allocating tasks to job roles (for more information about how permissions are configured, see the section "Security XML Files" in Oracle Real-Time Decisions Base Application Decision Management Installation and Configuration Guide).
The basic types of permission are as follows:
Perspective level
You must have View permission on a perspective to see the perspective. You will need further permissions if you want to create, update, or delete choices in a perspective.
Choice group level
For any choice group, you need individual Read, Create, Update, and Delete permissions to perform the associated view, create, update, and delete tasks on a choice of that particular choice type.
Project level
The individual permissions at the project level are Create Project, Update Project, Discard Project (this allows you to delete a project, and all the changes in that project), Commit Project (this allows you to commit the project changes to the database).
Assume that there are four departments concerned with the overall process of creating and committing projects to add choices to your database:
Administration
Responsible for setting up and managing RTD for Marketing Optimization projects
Marketing
Responsible for setting up and managing choice content for the RTD for Marketing Optimization projects
Display Control
Responsible for setting up and managing the layout of the external sites that display choice information
Approvals
Responsible for changing the approval statuses of choices
An example of the breakdown of the permissions for particular organization roles could be as follows:
Note:
The following scenario includes the implicit provision that two different departments/users can edit the same choice. Decision Management application designers can set up applications either to allow multi-user updating of the same choice, or to enforce single-user update mode of a choice. For more details, see the "ownership" option in the section "Config XML File" in Oracle Real-Time Decisions Base Application Decision Management Installation and Configuration Guide.The example here assumes that different users (in effect, different departments) can edit the same choice.
The Administration department users will have the following permissions:
Create Project, Update Project, Discard Project, Commit Project
Read, Create, Update, and Delete permissions on all the choice groups
The Marketing department users will have the following permissions:
View permissions on all the perspectives
Read, Create, Update, and Delete permissions on the choice groups Campaign, Offer, and Creative
The Display Control department users will have the following permissions:
View permissions on the perspectives Channels, Slots by Slot Type, and Creatives by Slot Type
Read, Create, Update, and Delete permissions on the choice groups Slot, Slot Type, Channel, and Placement
Update permission on the Creative choice group
The Approvals department users will have the following permissions:
View permissions on the perspectives Draft Campaigns, Pending Approval Campaigns, and Approved Campaigns
Read and Update permissions on the choice groups Campaign, Offer, and Creative
This section illustrates the use of some RTD for Marketing Optimization tasks, following the example of job roles and permissions described in Section 2.3, "Allocating Product Features to Marketing Organization Job Roles."
As an example, assume that the ZaxisZen Corporation wants to expand its core business of marketing large-site properties by running a test Showcase Properties campaign on the West Coast.
The ZaxisZen application design team has allocated the permissions to their specific ZXS department users as outlined in general in Section 2.3, "Allocating Product Features to Marketing Organization Job Roles," and has created the following outline specifications for how the project and choice tasks are to be performed using RTD for Marketing Optimization:
ZXS_Administration department
Create the Web Offers Rollout (WORP) project
ZXS_Marketing department
Create Campaign Showcase Properties, with a rule that the end date is to be January 1, 2012
Create Offer Regional Offers
Create Creative West Coast Properties, with slot type 200x400.
Set the approval status of all three choices to Draft
ZXS_Display_Control department
Create Slot Type 300x600
Update Creative West Coast Properties, setting slot type to 300x600
ZXS_Approvals department
View the Draft campaigns perspective, and update the campaign Showcase Properties, changing the approval status to Approved
ZXS_Administration department
Commit the Web Offers Rollout (WORP) project changes
(Optionally, view audit trail information for Web Offers Rollout Project)
The rest of this section contains the following topics:
To set up the project, a ZXS_Administration department user (for example, clmadmin) logs into RTD for Marketing Optimization, and then performs the following steps:
Click New Project.
Enter the Name and optionally a Description for the project.
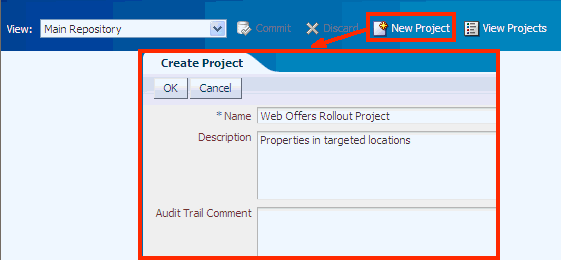
Click OK.
The View box shows the new active project, which also appears in the View Projects tab.
To create the Showcase Properties campaign, a ZXS_Marketing department user (for example, clmadmin1) logs into RTD for Marketing Optimization, and then performs the following steps:
For the View, select the project Web Offers Rollout Project.
Click the Create icon, and select Campaign.
Stage 1: Overview
In the Overview screen of the Create Campaign tab, enter the campaign details for the Showcase Properties campaign, selecting Draft for the Approval Status.
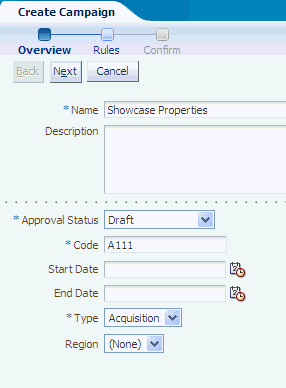
Click Next.
Stage 2: Rules
The Rules screen appears, displaying the Rule Editor.
In this screen, set up the rule that the campaign End Date is to be 1/1/2012, as follows:
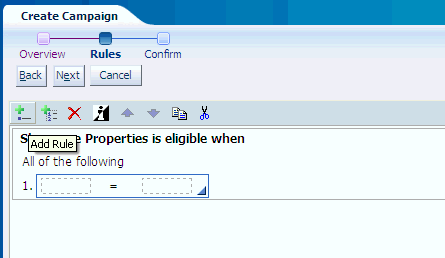
Click the Add Rule (leftmost) icon in the Rules Editor toolbar.
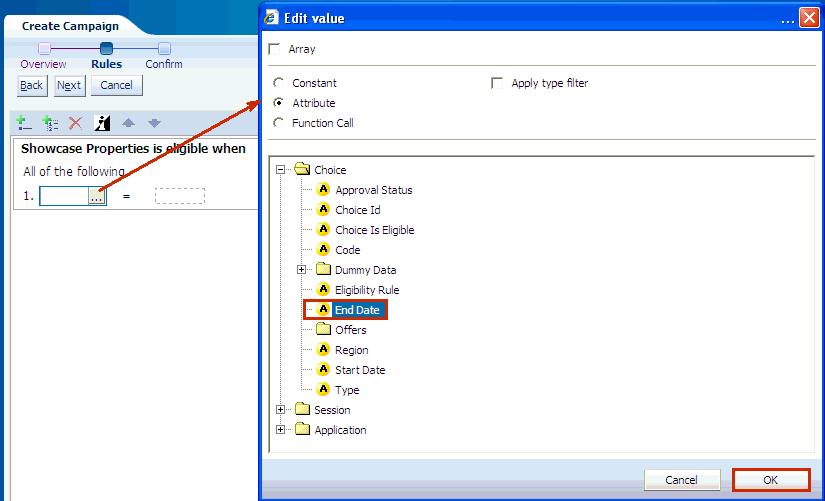
Click the ... button in the first box, then select Attribute, End Date, and click OK.
Click the ... button in the second box.
Select Constant, then Data Type = Date.
Select January 1, 2012 in the Date window.
For Display As, select Date only.
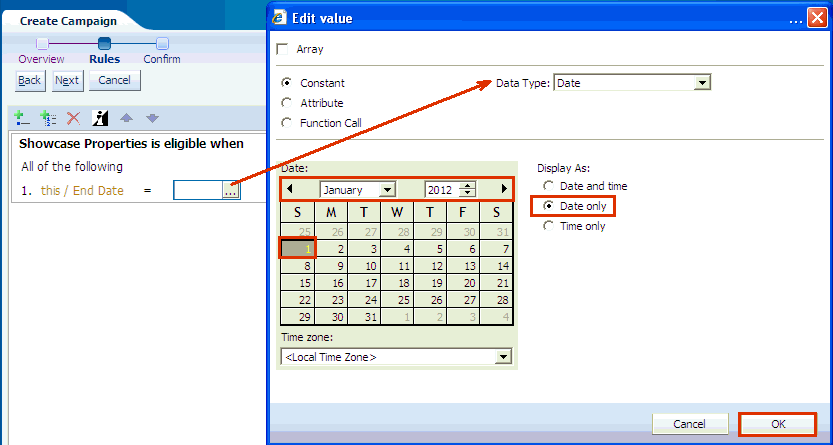
Click OK.
The full condition appears in the Rule Editor.
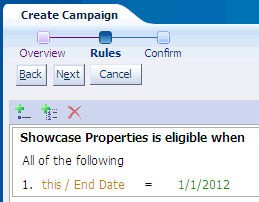
Click Next.
Stage 3: Confirm
The Confirm screen appears.
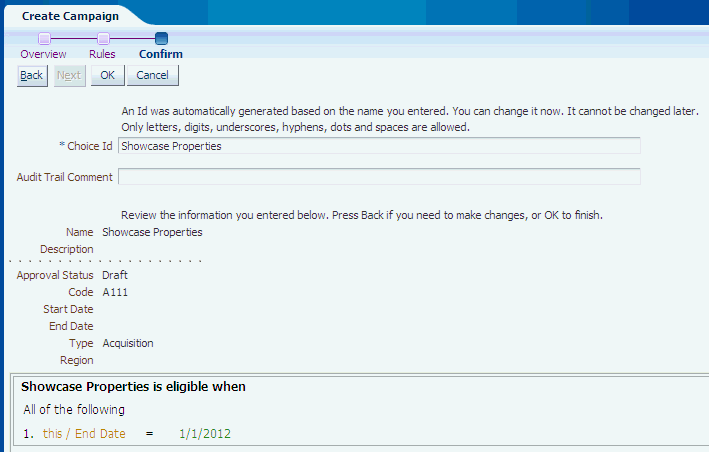
Click OK.
The newly-created campaign Showcase Properties appears in the left-hand perspective panel, in red italics. The main body of the screen shows the campaign details.

To create the offer Regional Offers, the ZXS_Marketing department user continues by performing the following steps:
Click Add Offer.
Enter details for the Offer Regional Offers, setting the Approval Status to Draft.
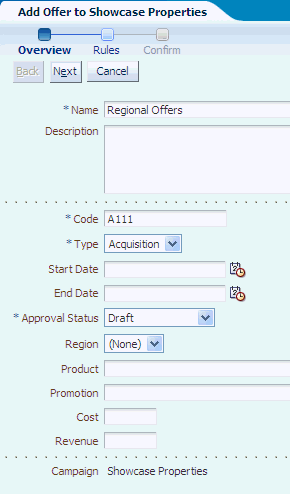
Click Next twice, then OK, to complete creating the Offer Regional Offers.
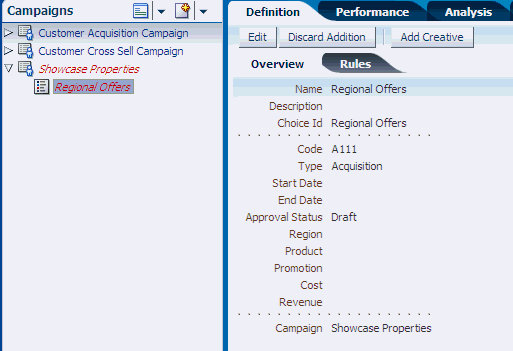
To create the West Coast Properties creative, the ZXS_Marketing department user continues by performing the following steps:
Click Add Creative.
Enter details for the Creative West Coast Properties, setting the Approval Status to Draft, and selecting 200x400 for the SlotType.
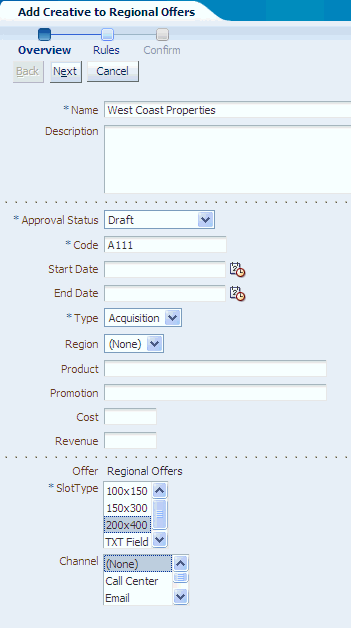
Click Next twice, then OK, to complete creating the Creative West Coast Properties.
To create a new slot type and update the West Coast Properties creative, a ZXS_Display_Control department user (for example, clmauthor) logs into RTD for Marketing Optimization, and then performs the following steps:
For the View, select the project Web Offers Rollout Project.
Create Slot Type 300x600
Click the Create icon, and select SlotType.
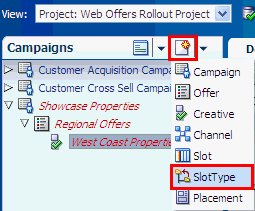
Enter 300x600 for the Slot Type Name.
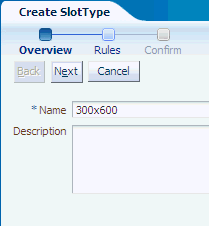
Click Next twice, then OK, to complete creating the Slot Type 300x600.
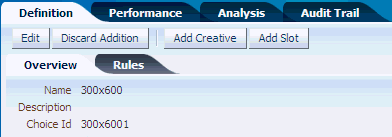
Change Slot Type of West Coast Properties to 300x600
To change the slot type of the West Coast Properties choice, first click the West Coast Properties choice in the left-hand perspective panel.
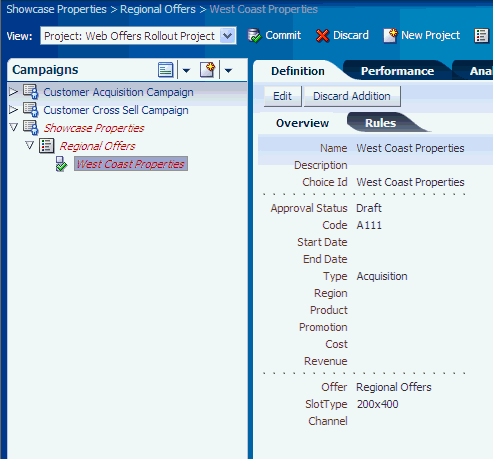
Click Edit, then select 300x600 for the SlotType.
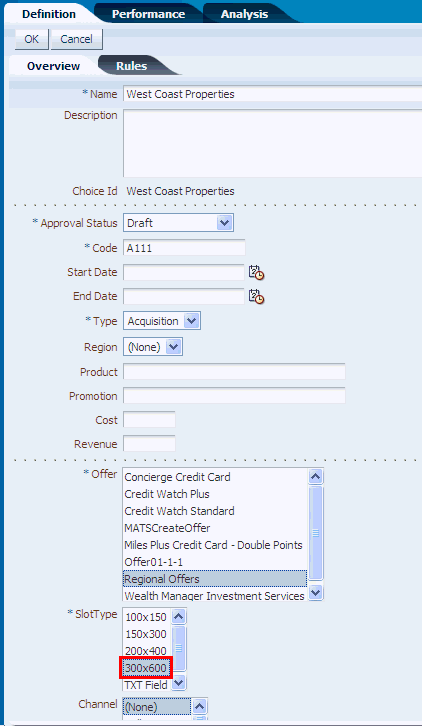
Click OK.
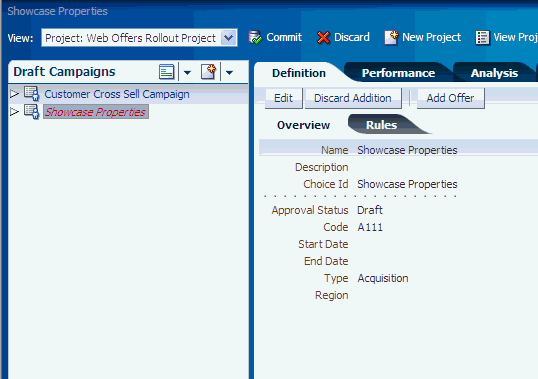
To approve the Showcase Properties campaign, a ZXS_Approvals department user (for example, clmauthor2) logs into RTD for Marketing Optimization, and then performs the following steps:
For the View, select the project Web Offers Rollout Project.
For the perspective, select Draft Campaigns.

Click Edit, then change the Approval Status to Approved.
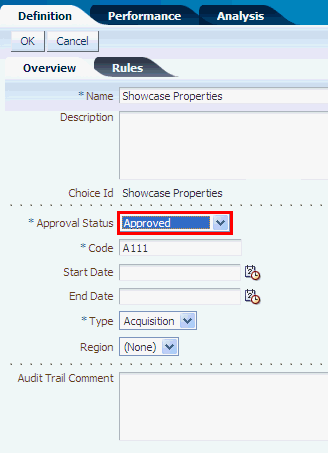
Click OK.
The Showcase Properties choice now does not appear in the Draft Campaigns perspective panel.
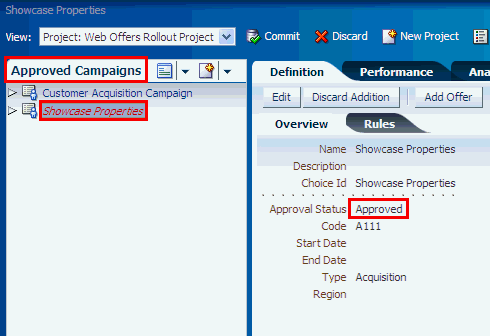
To check that it does appear in the Approved Campaigns perspective panel, select the Perspectives icon, then Approved Campaigns.
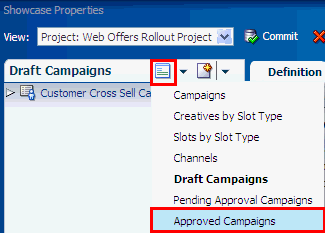
The Showcase Properties choice now appears in the Approved Campaigns perspective panel, with the choice details confirming that the Approval Status is Approved.
To commit the project, a ZXS_Administration department user (for example, clmadmin) logs into RTD for Marketing Optimization, and then performs the following steps:
For the View, select the project Web Offers Rollout Project, then click Commit.

The project is committed to the Main Repository, the View changes to Main Repository, and the newly-committed project appears in the Committed Projects area of the View Projects tab.
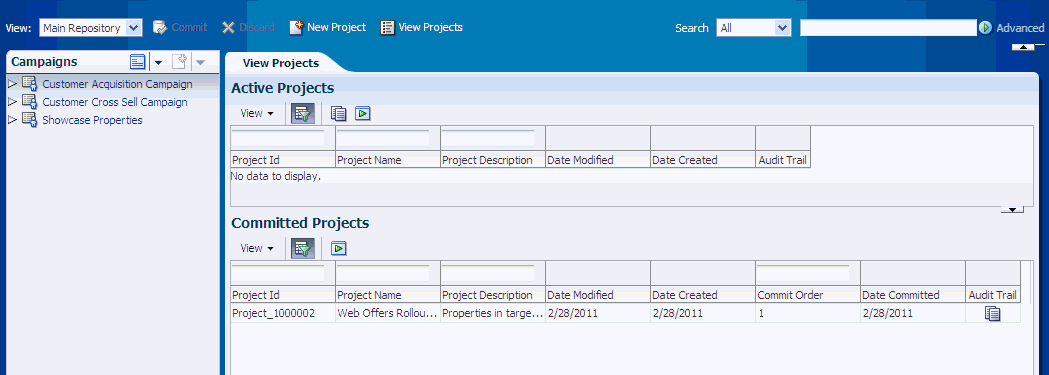
To see a history of all the operations performed in Web Offers Rollout Project, click the Audit Trail icon for the project.
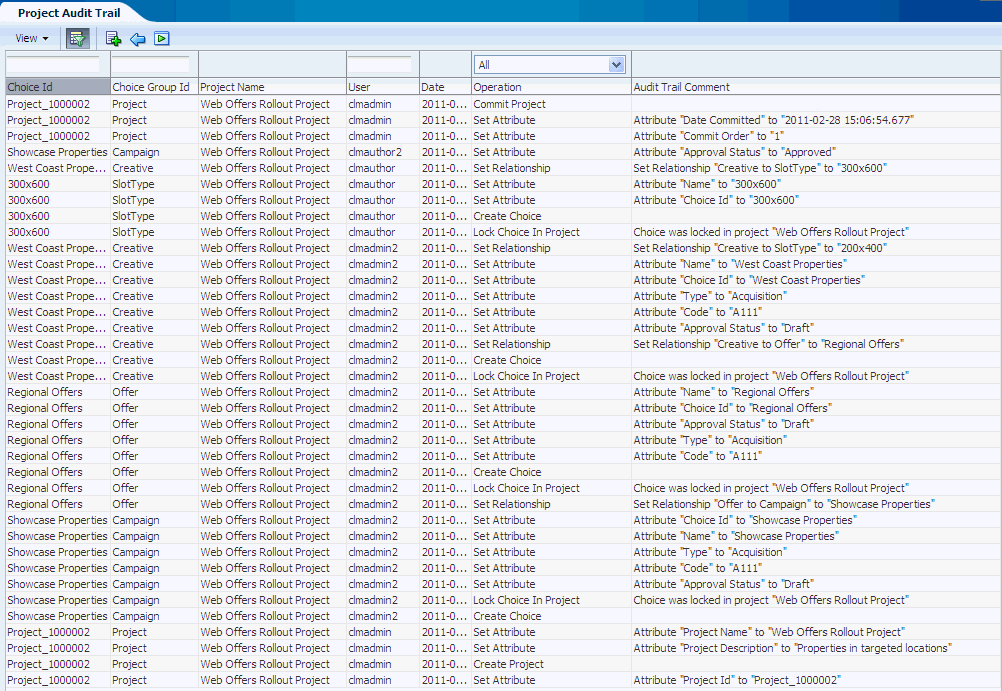
The Audit Trail for the project displays which operations were performed on which choice, and by which user.