Certificate Objects
If you are using remote administration, the certificate for the Screen and the certificate for the remote Administration Station were already created and the hashes exchanged during the installation procedure.
If you want to use encryption for traffic from the Screen (source address), you must either create a self-generated certificate, or use an existing certificate, and add a certificate for each address (destination address) to which the Screen will send traffic.
If you want to use encryption for traffic to the Screen (destination address) from an address on another network (source address), you must add the issued public key for each address (source address) from which the Screen will receive traffic. The hash or public key must be sent to the destination address so that the traffic from the Screen can be decrypted.
Certificates can be combined into groups for ease of use and convenience.
Note -
Store the diskette that contains the certificate safely and securely. It contains sensitive information that is not encrypted.
To Generate Screen Certificates
Note -
Use the Installed On field in the Certificate dialog window to choose the Screen where you want to add the certificate to the SKIP database. The default choice is the Screen to which users are connected. This is the choice you should use if you are using Centralized Management Groups.
Self-generated private keys use the SKIP NSID 8, signifying that the public value for that key has not been signed. To validate the public value, the hash of the public value associated with that private key is used as the certificate ID. When the certificate is added either manually or through Certificate Discovery Protocol (CDP), the public value can be certified by comparing the hash of the public value in the certificate with the certificate ID. Unsigned Diffie-Hellman certificates are described in the SunScreen Reference Manual.
-
Choose Certificate in the Type choice list.
-
Choose Generate Screen Certificate... in the Add New choice list.
The Certificate dialog window is displayed.
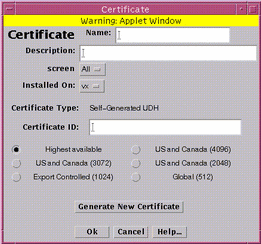
Figure 3-14 Generating a New Certificate

-
Type a name in the Name field.
-
(Optional) Type a description in the Description field.
-
(Optional) Choose the Screen from the Screen choice list.
-
(Optional) Type the name of the Screen on which the Certificate is installed in the Installed On field.
-
Click the radio button to specify the level of encryption the Screen uses.
-
Click the Generate New Certificate button.
The Certificate ID field displays the Certificate ID.
-
Click the OK button.
To Load an Issued Certificate
Note -
Because Netscape Navigator and Internet Explorer do not support the Java mechanism for applet signing, the administration GUI cannot access your system's local resources. (Browser security mechanisms prevent this type of access to local system resources.) See "Accessing Local System Resources" on page 34.
You can add new key pairs and local identities by using a SunScreen Key and Certificate diskette that is available a Certificate Authority. Contact. This type of key and certificate is known as an issued certificate. Certificates are described in the SunScreen Reference Manual.
You also can add new private keys from a directory that contains only one set of private key and certificate files.
-
Choose Certificate in the Type choice list.
-
Choose Load Issued Key Certificate... from the Add New choice list.
The Certificate dialog window appears.
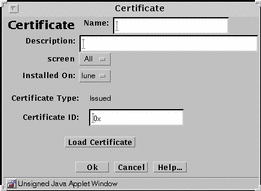
Figure 3-15 Loading an Issued Certificate

-
Type a name in the Name field.
-
(Optional) Type a description in the Description field.
-
(Optional) Choose the Screen from the Screen choice list.
-
(Optional) Choose the Screen the certificate is installed on from the Installed On choice list.
-
Click the Load Certificate button.
-
In the File dialog window:
-
Click the OK button.
To Associate Certificate IDs
Associate Certificate ID lets you assign a name to a Certificate that exists on another Screen. You associate a Certificate ID when you want to encrypt communication between two screens or between a Screen and an Administration Station.
Note -
Self-Generated certificates are validated by a telephone call between two people who know each other and recognize each other's voice.
-
Choose Certificate in the Type choice list.
-
Choose Associate MKID... from the Add New choice list.
The Certificate dialog window appears.
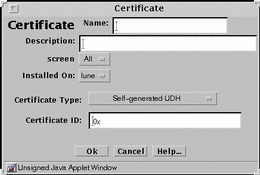
Figure 3-16 Associating an MKID

-
Type a name in the Name field.
-
(Optional) Type a description in the Description field.
-
(Optional) Choose the Screen from the Screen choice list.
-
Choose the Screen the certificate is installed on from the Installed On choice list.
-
Choose the type of certificate from the Certificate Type choice list.
-
Type the Certificate ID for the certificate.
-
Click the OK button.
To Add a Certificate Group
After you have named Certificate IDs, you can group them into logical groups, so that you can use a group instead of single names in a policy object.
-
Choose Certificate in the Type choice list.
-
Choose New Group... from the Add New choice list.
The Certificate dialog window appears.
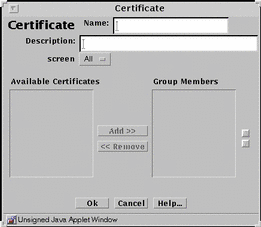
Figure 3-17 Adding a Certificate Group

-
Type a name in the Name field.
-
(Optional) Type a description in the Description field.
-
(Optional) Choose a Screen from the Screen choice list.
-
Click the Add >> button to add selections from the Available Certificates Area to the Group Members area.
-
Click the << Remove button to remove selections from the Group Members area to the Available Certificates area.
-
Click the OK button.
- © 2010, Oracle Corporation and/or its affiliates
