Chapter 4 Installing Lite With Remote Administration
This chapter explains how to install SunScreen 3.1 Lite on remotely administered Screen machines. This installation scenario is basically a three-step process. First you install the appropriate software on the Administration Station, next you install the software on the Screen, last you enable SKIP on the Administration Station.
You use SunScreenTM SKIP (Simple Key-Management for Internet Protocols) to enable encrypted communication between the Administration Station and the Screen. SunScreen includes and installs SunScreen SKIP. For general information regarding SKIP, refer to the SunScreen SKIP 1.5.1 User's Guide.
Topics in this chapter include:
-
Supported configurations for the Administration Station
-
Installation overview
-
Installing the software on the Administration Station
-
Installing certificates on the Administration Station
-
Installing the software and certificates on the Screen
-
Setting up SKIP on the Administration Station
-
Managing your firewall
Note -If you are installing on a system without a monitor, use the command line installation discussed in "Command Line Installation."
Supported Administration Station Configurations
You can use any machine with a Java-enabled web browser compliant with JDK 1.1.3 or later as an Administration Station, as long as it can connect securely to the Screen using SKIP. The SunScreen 3.1 Lite includes SunScreen SKIP for both SPARC and x86 platforms. This allows any hardware running the Solaris 2.6, Solaris 7, or Solaris 8 operating environment to be an Administration Station.
Personal computers operating Windows 95, Windows 98, or NT 4.x with SKIP are supported platforms as an Administration Station, using the administration GUI. This chapter, however, covers Solaris-based Administration Stations only.
Installation Overview
This section explains how to install SunScreen 3.1 Lite in routing mode with remote administration, using either self-generated or issued certificate technology.
This is a multi-step installation that you should complete in the following order:
-
On the Administration Station
Install the SunScreen 3.1 Lite administration software. This step installs the required SunScreen 3.1 Lite and SunScreen SKIP packages on the Administration Station (see "To Install Screen Software").
-
On the Administration Station
Install the Administration Station's certificate (see "To Install a Self-Generated Certificate" or "To Install an Issued Certificate").
-
On the Screen
Install the SunScreen software. This procedure requires the Administration Station's certificate ID and installs the Screen's certificate (see "To Install Screen Software").
-
On the Administration Station
-
Install the Screen's certificate ID.
-
Start encrypted communication by enabling SKIP (see "To Set Up SKIP on the Administration Station").
Note -The installation procedure requires that you reboot your machine when indicated. Do not perform any other tasks on the machine while installing the software, as a delay in rebooting the machine may affect installation and cause your system to hang.
-
Installing the Administration Software
To Install the Software on the Administration Station
-
Insert the Solaris Easy Access CD-ROM into the CD-ROM drive.
A File Manager screen appears listing the CD contents.
-
Navigate to the SunScreen directory.
-
Add the software by double-clicking on the SunScreen installer icon.
Enter the root password for your system when prompted.
-
After the installer wizard's Welcome window appears, click Next to continue.
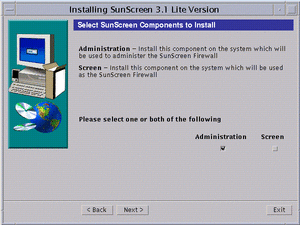
The Select SunScreen Components to Install window appears (as shown in the following figure). Make sure that you select the Administration box only.
Figure 4-1 Select SunScreen Components to Install Window
-
Click Next to continue.
The Select Type of Install window appears. You have two choices: Typical Install or Custom Install. You should use the Typical install.
-
When the Ready to Install window appears, click Install Now to continue.
The installation process continues until you see the Reboot System window.
Figure 4-2 Reboot System Window
-
Select System Reboot to complete the installation process.
The installer wizard disappears.
-
Set the PATH and MANPATH by editing your shell initialization file (such as .profile or .login file).
PATH=/opt/SUNWicg/SunScreen/bin:$PATH export PATH MANPATH=$MANPATH:/opt/SUNWicg/SunScreen/man export MANPATH
To Install SKIP Upgrades
By default, SunScreen 3.1 Lite comes with the Global version of SKIP, which supports the RC2, RC4, and DES cryptography modules and key lengths up to 1024 bits. If the security profile at your site requires additional cryptography packages and greater key lengths, you have to add these packages from the SunScreen Domestic CD. For more information, see "Upgrading Cryptography Modules."
What Is Next?
The required software packages have been installed. Now, you continue the installation process on the Administration Station by adding a certificate.
Installing Certificates on the Administration Station
You need to install certificates on both the Administration Station and the Screen before they can use encrypted communication. You can use either self-generated certificates or issued certificates.
-
If you are using self-generated certificates, see "To Install aq Self-Generated Certificate."
-
If you are using issued certificates, use "To Install an Issued Certificate."
To Install a Self-Generated Certificate
-
Open a terminal window and become root.
-
Create the required SKIP directories by typing:
# skiplocal -i
-
Create the self-generated certificate on the Administration Station by typing:
# skiplocal -k -f -V
The local certificate ID appears, as shown in the following figure. It is the Administration Station's 32-character certificate ID (MKID).
Figure 4-3 Administration Station's Self-Generated Certificate

-
Write down the certificate ID, which begins with `0x.'
-
Add SKIP to all the interfaces by typing:
# skipif -a
-
Reboot the Administration Station to complete the installation by typing:
# sync; init 6
What Is Next?
Now you need to install the SunScreen 3.1 Lite software on the Screen as described in "Installing the Software on the Screen."
To Install an Issued Certificate
To do this procedure, you will need the Key and Certificate diskette.
-
Open a terminal window on the Administration Station and become root.
-
Create the required SKIP directories by typing:
# skiplocal -i
-
Insert the Key and Certificate diskette into the Administration Station's diskette drive.
-
Mount the diskette by typing:
# volcheck
-
Install the SKIP keys by typing:
# install_skip_keys -icg /floppy/floppy0
-
Start the SKIP daemon by typing:
# skipd_restart
-
Eject the Key and Certificate diskette by typing:
# eject floppy0
-
Write down the certificate ID, which is eight characters long.
-
Add SKIP to all the interfaces by typing:
# skipif -a
-
Reboot the Administration Station to complete the installation by entering:
# sync; init 6
What Is Next?
The Administration Station's certificate ID has been installed. Now move to the Screen to install the SunScreen 3.1 Lite software.
Installing the Software on the Screen
The next step is to install the SunScreen 3.1 Lite software on the Screen. If you have a monitor and a keyboard attached to your Screen, you can use the installer wizard. If you are operating the Screen without a monitor, you must either temporarily attach a monitor, or install the software through the command line (see "Command Line Installation").
Note -
Before starting this next step, make sure that all network interfaces you plan on using are configured. For details on Solaris network configuration, see the Solaris operating environment documentation.
To Install Screen Software
Note -
In this procedure, you need the Administration Station's certificate ID (MKID) from the "To Install a Self-Generated Certificate."
-
Insert the Solaris Easy Access CD-ROM into the Screen's CD-ROM drive.
A File Manager screen appears listing the CD contents.
-
Navigate to the SunScreen directory.
-
Add the software by double-clicking on the SunScreen installer icon.
Enter the root password for your system when prompted.
-
After the installer wizard's Welcome window appears, click Next to continue. If you are not logged on as root, you are prompted for the root password.
-
Proceed through the installation windows accepting the default choices, until the Select Administration Type window appears.
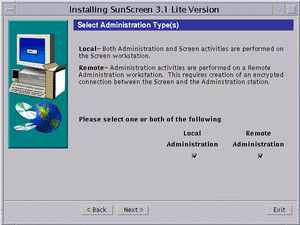
In this window (as shown in the following figure), you are given the choice of Local Administration or Remote Administration with Local Administration as the default. Select Remote Administration.
Figure 4-4 Select Administration Type(s) Window
-
Select Remote Administration and click Next.
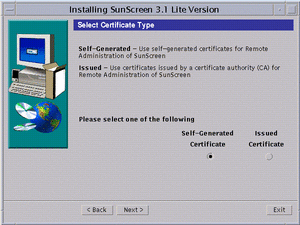
Click next to proceed through the installation until the Select Certificate Type window appears (as shown in the following figure). Self-Generated Certificate is the default. You have to make a choice at this point whether you are going to use self-generated certificates or issued certificates.
Figure 4-5 Select Certificate Type Window
-
If you are using self-generated certificates, follow instructions a-i through iii then go to Step 8. If you are using issued certificates, follow instructions b-i through iv then go to Step 8.
-
Self-Generated Certificates Only
Accept the default (Self-Generated Certificate) and click Next.
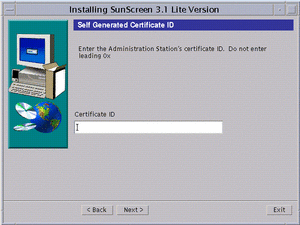
The Self-Generated Certificate ID window appears (as shown in the following figure).
Figure 4-6 Self Generated Certificate ID Window
-
Type the Administration Station's 32-character certificate ID (MKID) obtained in the previous procedure ("To Install a Self-Generated Certificate"). Do not enter the leading two characters: 0x. After you type the ID, click Next.
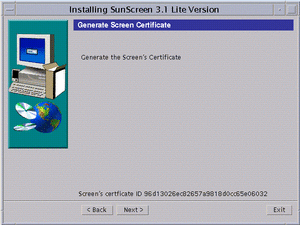
The Generate Screen Certificate window appears. Wait while the Screen's certificate ID generates. When completed, the Screen's 32-character certificate ID appears at the bottom of the window, as shown in the following figure.
Figure 4-7 Generate Screen Certificate Window With Screen's Certificate ID
-
Write down the Screen's 32-character certificate ID (MKID) that appears at the bottom of the window. You need this ID to complete the Administration Station's installation.
-
Go to Step 8.
-
-
Issued Certificates Only
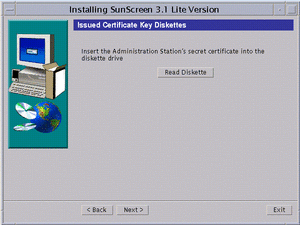
From the Select Certificate Type window, select Issued Certificate and click Next. The Issued Certificate Key Diskettes window next appears (as shown in the following figure).
Figure 4-8 Issued Certificate Key Diskettes Window
-
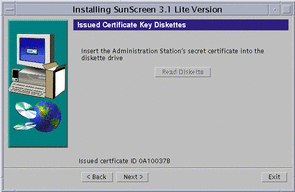
Insert the Administration Station's Key and Certificate diskette and click Read Diskette. Wait until the issued certificate ID appears at the bottom of the window (as shown in the following figure).
Figure 4-9 Issued Certificate Key Diskettes Window With Issued Certificate ID
-
Write down the Administration Station's eight-character certificate ID, and click Next.
The Issued Certificate Key Diskettes window re-appears, and prompts you to use the Screen's certificate ID diskette.
-
Insert the Screen's Certificate ID diskette into the floppy drive and click Read Diskette.
The Issued Certificate ID for the Screen appears at the bottom of the window.
-
Write down the Screen's eight-character certificate ID then go to Step 8.
-
-
-
Click Next to continue.
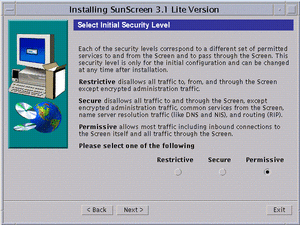
The Select Initial Security Level window appears (as shown in the following figure).
-
Select the level of security you want.
When in doubt, select Permissive as your initial security level. You can change this level later as needed. See "Deciding on Your Initial Security Level," if you need more information.
Figure 4-10 Select Initial Security Level Window
-
Click Next.
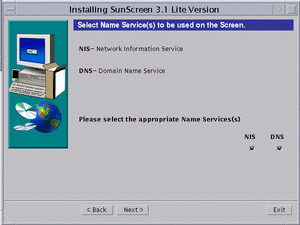
The Select Name Service(s) to be used on the Screen window appears (as shown in the following figure). The default entry is to use both NIS and DNS. You can deselect either one or if you do not want to use a name service, you can deselect both.
Figure 4-11 Select Name Service(s) to be used on the Screen Window
-
Select the appropriate Name Service(s), and click Next.
The Screen Configuration window appears with the message: Configuring Screen. The message changes when the Screen successfully configures.
-
Click Next to continue.
The Reboot System window appears (as shown in the following figure).
Figure 4-12 Reboot System Window
-
Click System Reboot to finish the installation.
The installer wizard disappears.
Note -You must reboot the machine at this time in order to complete the installation process. If you wish to delay rebooting your machine, click Next instead of Reboot Screen. An Installation Summary window appears from which you can exit the install.
Finishing the Installation
The software is installed on the Screen. To finish the installation you need to:
-
Set the PATH
-
Install SKIP upgrades (if needed)
-
Display the AdminSetup.readme file
To Set the PATH
-
On the Screen, open a terminal window and become root, if not already.
-
Set the PATH and MANPATH by editing your shell initialization file (such as .profile or .login file).
PATH=/opt/SUNWicg/SunScreen/bin:$PATH export PATH MANPATH=$MANPATH:/opt/SUNWicg/SunScreen/man export MANPATH
To Install SKIP Upgrades
By default, SunScreen 3.1 Lite comes with the Global version of SKIP, which supports the RC2, RC4, and DES cryptography modules and key lengths up to 1024 bits. If the security profile at your site requires additional cryptography packages and greater key lengths, you have to add these packages from the SKIP Domestic CD. For more information, see "Upgrading Cryptography Modules."
To Display the AdminSetup.readme File
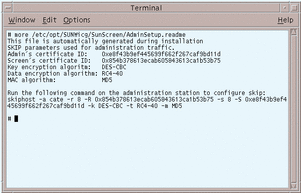
To display the AdminSetup.readme file, in a terminal window, type:
# more /etc/opt/SUNWicg/SunScreen/AdminSetup.readme |
The AdminSetup.readme file contains the Screen's certificate ID as well as the command you run in order to give the Administration Station the Screen's certificate ID (as shown in the following figure). Write the command down for later use, which begins with skiphost -a.
Figure 4-13 AdminSetup.readme File
Note -
If you trust that the network between the Screen and the Administration Station is secure, you can ftp the AdminSetup.readme file from the Screen to the Administration Station. This saves you the task of writing down the information that is required in the next procedure.
What Is Next?
You now return to the Administration Station to complete SKIP configuration. Proceed to "Completing SKIP Setup on the Administration Station."
Completing SKIP Setup on the Administration Station
You complete this installation by establishing encrypted communication between the Administration Station and the Screen. This step involves enabling SunScreen SKIP on the remote Administration Station. In this procedure, you tell the Administration Station which encryption algorithms to use when communicating with the Screen. For more information regarding SunScreen SKIP for Solaris, see the SunScreen SKIP 1.5.1 User's Guide.
Requirements
To configure the Administration Station to communicate with the Screen, you must know:
-
Which access control list (ACL) parameters to set to match the Screen's encryption settings.
-
The Screen's certificate ID.
-
This is where you use the command obtained from the AdminSetup.readme file in "To Display the AdminSetup.readme File."
Note -Instructions for using SKIP from the command line are in "Command Line Installation."
To Set Up SKIP on the Administration Station
-
Open a terminal window and become root.
-
Launch the skiptool GUI by typing:
# skiptool
Note -You may need to use skiptool -i name_of_interface (such as qe3) if you wish to set SKIP parameters on a network interface other than the default interface.
The main window of the skiptool GUI appears (as shown in the following figure).
Figure 4-14 skiptool GUI Main Window
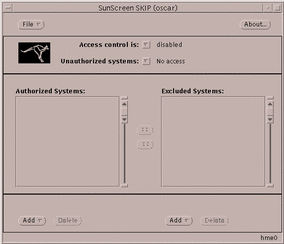
Next, you add a default ACL to talk unencrypted to all hosts.
-
Click the Add button, and under Host, choose the Off security option.
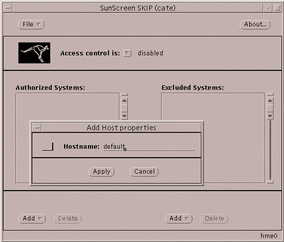
The Add Host properties window opens (as shown in the following figure).
Figure 4-15 Skiptool With Add Host Properties Window Completed
-
Type `default' as the Hostname and click Apply.
Next, you add an ACL entry for the Screen.
-
Click the Add button, and under Host, choose the SKIP security option.
The Add SKIP host properties window appears (as shown in the following figure).
Figure 4-16 Add SKIP Host Properties Window
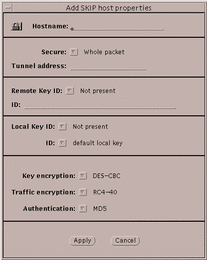
Use the information contained in the AdminSetup.readme file (see "To Display the AdminSetup.readme File") to complete the fields.
-
Type the name of the Screen in the Hostname field.
-
In the Secure field, select Whole Packet from the pull-down menu.
-
In the Remote Key ID, make the appropriate selection from the pull-down menu.
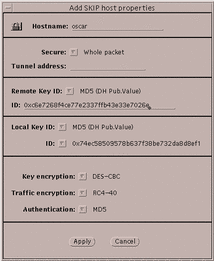
Refer to the AdminSetup.readme file to select the correct Remote Key ID. For self-generated certificates on the Administration Station, select MD5 (DH Public Value). For issued certificates, select IPv4. See the following figure for a sample of the Add SKIP Host Properties window completed.
Figure 4-17 Add SKIP Host Properties Completed
-
In the Local Key ID, make the appropriate selection from the pull-down menu.
Refer to the AdminSetup.readme file to select the correct Local Key ID. For self-generated certificates on the Administration Station, select MD5 (DH Public Value). For issued certificates, select IPv4. The ID value is filled in automatically.
-
Turn SKIP on. From the pull-down menu for "Access control is:," located at the top of the skiptool window, select `enabled.'
Note -When you select enabled from the pull-down menu, a window appears when you save the configuration. Click Cancel to prevent these required systems, which are part of the default configuration, from showing up in the Authorized Systems window
-
Select Save from the File pull-down menu.
Note -After configuring SKIP, check that the encryption parameters and the certificate ID (MKID) values match on both the Administration Station and the Screen.
Managing Your Firewall
Use the administration GUI on the remote Administration Station (or the Screen) to manage your firewall. See the SunScreen 3.1 Administration Guide for more information.
By default there is a pre-defined rule to allow encrypted administration traffic between the Screen and the Administration Station. This is the only default rule so no other communication (like ping or telnet) is allowed between the two systems until you specifically define a rule to allow that service.
To Launch the Administration GUI
-
To configure and manage your Screen from your Administration Station, run a Java-enabled Web browser, and type the following URL:
http://Name_of_Screen:3852/
The administration GUI appears (as shown in the following figure).
Figure 4-18 Administration GUI Login Page

-
To login, type the following and click Login:
User Name: admin
Password: admin
You next configure and manage your Screen with the administration GUI. See the SunScreen 3.1 Administration Guide for further instructions.
Note -One of your first administration tasks should be to change the default User Name and Password to something more secure so you can reduce the risk of compromising the administration traffic.
- © 2010, Oracle Corporation and/or its affiliates
