Chapter 3 Configuring and Tuning
This chapter explains how to configure and tune a ChorusOS operating system.
-
"Configuration Options" explains what items can be configured and how they are defined.
-
"Configuration Tools" explains how to configure your system.
The ChorusOS operating system offers a high degree of flexibility, allowing you to tailor the system configuration to the requirements of your application. Depending on the system configuration, applications are offered a range of Application Programming Interfaces (APIs), and a range of development environment tools. Two standard configuration profiles are included in this ChorusOS operating system delivery: a standard configuration profile and an extended configuration profile. You can use one of these configuration profiles as the starting point for configuring your ChorusOS operating system.
Configuration Options
Configuring a ChorusOS operating system means defining all the components, and their characteristics, which are assembled to form a system image. There are several types of configuration options:
-
Feature options: the ChorusOS operating system features
-
Static tunable parameters
-
Dynamic tunable parameters (the environment)
-
System image components: system and application actors which are loaded at system boot time
Configuration settings, including the configuration profile definitions are stored in the configuration directory, conf, in your system image build area. The configuration directory is read and updated by both the command-line and graphical configuration tools.
Feature Options
A ChorusOS feature is a boolean variable, whose value determines whether or not a particular component is included in the system image. Setting a feature to true results in code being added to the kernel, providing additional services such as file system handlers, or networking protocols.
Feature options within the ChorusOS operating system are listed in "Operating System Components".
Configuration Profiles
The ChorusOS operating system provides profiles which are used to set up an initial configuration. These profiles include or remove certain features in the system.
Two pre-defined configuration profiles, the basic
profile and the extended profile, are provided to
help you select an initial configuration for the ChorusOS operating system.
The extended profile is the default profile, and does not need to be explicitly
specified.
The extended configuration profile corresponds to a reference configuration for telecommunications systems. It includes support for networking using remote IPC over Ethernet and an NFS client. This uses the protected memory model.
The basic configuration profile corresponds to
a realistic configuration, keeping the footprint small. With this configuration,
applications are usually embedded in the system image and launched either
at boot time or subsequently from the image file system or the boot file system.
This configuration uses the flat memory model, to minimize the footprint.
System administration is local, with C_INIT access
through the console.
Table 3-1 shows the settings of all the features
in the extended and basic
configuration profiles.
extended and basic configuration profiles| Name | extended profile value | basic profile value |
|
|---|---|---|---|
| Kernel features | |||
USER_MODE | true | true | |
VIRTUAL_ADDRESS_SPACE | true | false | |
SEM | true | true | |
EVENT | true | true | |
MONITOR | false | false | |
TIMER | true | true | |
DATE | true | true | |
RTC | true | true | |
PERF | true | true | |
IPC | true | true | |
LOG | true | true | |
MON | true | false | |
MIPC | true | true | |
LAPBIND | true | true | |
LAPSAFE | true | true | |
| C_INIT features | |||
LOCAL_CONSOLE | false | false | |
RSH | true | false | |
| IOM features | |||
AF_LOCAL | true | true | |
BPF | true | false | |
DEV_MEM | true | false | |
MSDOSFS | true | true | |
NFS_CLIENT | true | false | |
POSIX_SOCKETS | true | true | |
RAM_DISK | true | true | |
| AM features | |||
ACTOR_EXTENDED_MNGT | true | true | |
| ADMIN features | |||
ADMIN_IFCONFIG | true | true | |
ADMIN_MOUNT | true | true | |
ADMIN_RARP | true | false | |
ADMIN_ROUTE | true | true | |
ADMIN_SHUTDOWN | true | true | |
Note -
The MONITOR feature is an internal feature
which is only used by the Java Virtual Machine.
Both configuration profiles include support for system debugging.
You can use one of these configuration profiles as the initial configuration for your system, and add or remove specific feature options using the configurator utility (see "Command-line Configuration Tool"). Once you have created your initial configuration, you can also use the graphical configuration tool ews (see "Graphical Configuration Tool") to manage the configuration.
Tunable Parameters
Tunable parameters are system parameters which affect system behavior and capabilities. They are used to configure the kernel and the included features, to change their behavior, and adapt them to your needs. Typical examples of tunables are: maximum number of kernel objects, scheduler type and attributes for threads, or system clock frequency. Each system component or feature defines a number of these tunable parameters.
Static Parameters
Static parameters are tunable parameters whose values are permanently set within a system image. Changing these values requires rebuilding the system image.
The procedure for assigning new values to tunable parameters is detailed in "Changing Tunable Parameter Values".
Dynamic Parameters
For some tunable parameters, an additional flexibility is offered: the ability to assign values to these parameters at various stages of system production and execution. These types of parameters are called dynamic parameters. These dynamic parameters define the system environment.
Dynamic parameters form a system-wide environment. A basic set of services allows this environment to be constructed and consulted within a system image, at boot time and runtime.
Compared to static parameters, dynamic parameters require additional target data memory in order to store their names and values.
The procedure for modifying dynamic parameters is detailed in "Modifying the System Environment".
System Image Components
The system image contains a configured version of the ChorusOS operating system, and possibly some user-defined applications (actors).
Depending on its configuration options, the ChorusOS operating system is itself built from a kernel and a collection of actors. These actors, which contribute to the implementation of some ChorusOS operating system features, are called ChorusOS operating system actors.
Configuration options concerning the system image components deal mainly with the inclusion of system and application actors within system images.
Configuration Files
The ChorusOS operating system configuration is expressed in ECML, an XML based language. There are several levels of configuration files, all located in the conf directory used to build the system image.
-
ChorusOS.xml is the top level configuration file. The entire ChorusOS operating system configuration is accessible through this file, which contains references to all other configuration files.
-
mkconfig is the directory containing the configuration information for each system component. Most of the information it contains relates to feature options and tunable parameters. For example:
-
mkconfig/kern.xml contains the kernel feature definitions and dependencies, and contains the tunables for the kernel. This file also contains default values for the standard configuration.
-
mkconfig/kern_action.xml contains specific configuration actions, including the production rules used internally for the configuration.
-
mkconfig/kern_f.xml and mkconfig/kern_action_f.xml are additional configuration files identified by _f.xml that can be used to manage family-specific configuration options.
-
-
mkimage is the directory containing all the information related to the system image build:
-
mkimage/mkimage.xml contains two configurable declarations:
-
BOOT_MODEis set to ram to build an image for RAM, or rom to build an image for ROM. -
SYSTEMis set to chorus to build a default system image, or kernonly to build a kernel-only system image. Other system images are also available.
-
-
mkimage/family.xml contains the family dependent definitions.
-
mkimage/model.xml contains the binary models for the executable files.
-
mkimage/target.xml contains all configuration options related to the BSP, and also the list of drivers.
-
mkimage/system.xml contains all system binaries and the configuration of the system image.
-
mkimage/applications.xml describes the applications to be included in the chorus or kernonly system image.
-
-
basic and extended are the two configuration profiles.
Configuration Tools
The configuration tools allow the configuration of the ChorusOS operating system. They are designed to be flexible enough to be extended to allow the configuration of any other system component (OS or drivers) or even application actors that may be part of the ChorusOS operating system image.
You can use either a graphical interface or a command-line interface to view and modify the characteristics of a ChorusOS operating system image.
Graphical Configuration Tool
The graphical configuration tool, ews, requires Sun Java JDK 1.2 (JAVA 2) to be installed and the location of the Java virtual machine to be in your path.
To start ews and open an existing configuration file, type:
$ ews -c config-file |
The optional config-file specifies the path of the ChorusOS operating system configuration file conf/ChorusOS.xml to open at start-up.
To start ews without opening a file, type:
$ ews |
User Interface Overview
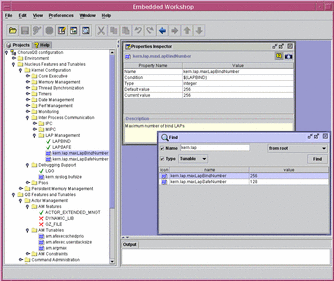
When started, ews opens a main window, containing a menu bar and toolbar at the top, a navigation tree pane on the left, and an output view pane at the bottom. The rest of the window is occupied by a Multiple Document Interface (MDI) area, which is used to display other windows, like the Properties Inspector, or the Find View (both are described later). These other windows can be resized, moved, or closed just like any other window, but are constrained within the MDI area, and cannot be moved outside.
A screenshot of ews is shown in Figure 3-1.
Figure 3-1 EWS User Interface
Navigation Pane
The navigation pane contains two tabbed windows: a Projects tab, which displays any opened configurations as a hierarchical tree, and a Help tab, which displays the online help table of contents.
Within the Project window, every element in the project view tree is represented by a small icon with a name. Right-clicking on an element brings up a floating context menu, which can be used to perform actions such as changing the element's value. Double-clicking on an element opens the main Properties Inspector window in the MDI area.
Within the Help window, selecting an entry in the table of contents will display the appropriate help page in the MDI area.
Other Windows
The Properties Inspector displays the properties of an element, such as its value and description. Some of these properties may be changed.
The Show Children View window displays the sub-element, or first-level child, of a selected element.
The Find window is used to locate an element in the project view tree. Any element can be searched for by specifying a substring of its name or its type. The search can take place from the root, on the entire tree hierarchy, or from the selected element.
Configuring a ChorusOS Operating System Image
Open a Configuration File
The first operation is to open a ChorusOS configuration file (unless the -c option was used on the command line). For this, select the Open option in the File menu. A file selection dialog appears to select the configuration file to open. The configuration to open is the conf/ChorusOS.xml file located in the configuration directory. Once opened, a new configuration item is added to the navigation tree.
Note -
More than one configuration may be opened in ews at the same time.
Browse the Configuration Tree
It is possible to browse the configuration by opening the elements in the navigation tree. There are two general kinds of elements in the tree: folders and variables. Folders are used to organize the configuration variables into hierarchical groups. A folder contains child elements that can be variables or folders. Variables are values used to configure the ChorusOS operating system image.
Disabled Elements
Some of the elements in the configuration tree may be grayed-out and cannot be edited. It is still possible to browse them, however. For example, some variables may depend on the presence of a specific feature: if this feature is not selected, and its current value is set to false, the corresponding tunables will be disabled.
Disabling of elements in the configuration is controlled by a condition. This is an optional property attached to some elements, and if the condition is evaluated to false, the element is disabled (elements without a condition property are always enabled). If a folder is disabled, all its child elements (folders and variables) are also disabled.
Invalid Elements
A configuration is invalid if there are one or more invalid elements in the configuration tree.
Configuring the Features and Tunables
The features of the ChorusOS operating system image are located in the various Features and Tunables folders. Features are expressed as boolean variables, and tunables are expressed as either integers or enumerated variables. The following properties for a tunable are visible in the Properties Inspector:
-
Name
-
Type
-
Default value
-
Current value
To change the value of a tunable parameter, edit the Current value property.
Setting a ChorusOS operating system Environment Variable
The values of the ChorusOS operating system environment variables are contained in the env variable located in the Environment folder. The env variable is a list, where each element represents an environment variable. This list may be empty for a new configuration. It is possible to add, remove or modify environment variables stored in this list.
Adding an Environment Variable
Select the env variable, right-click to display its context menu, and select New Element. The newly created variable is appended to the list (you might need to expand the list to see the new variable). Set the value of the new variable by editing its value field.
Modifying the Value of an Environment Variable
An environment variable is a structured variable containing two fields: a name and a value. The name field stores the name of the environment variable, and the value field stores the value of this environment variable. Edit the value field to change the value of the environment variable.
Deleting an Environment Variable
From the context menu of the environment variable, choose Delete.
Adding an Actor to the ChorusOS System Image
There are two stages to adding an actor to the system image:
-
Specify the new actor characteristics.
Open the Applications folder in the ChorusOS System Image Configuration folder. A newly-created System Image Configuration folder contains two templates for defining actors, one for user actors (user_actor) and one for supervisor actors (supervisor_actor). To create your actor definition, either modify or duplicate one of these templates, or choose New Actor from the context menu of the Applications folder:

A new actor called my_actor is created. Click on the handle icon to the left of the actor, or double-click on my_actor itself, to reveal a list of fields, or children:
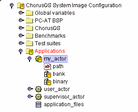
Invalid elements are indicated by an exclamation mark (!) over the icon. Your new actor is invalid because its field values are empty. Double-click on the path field to open the Properties Inspector window within the MDI:
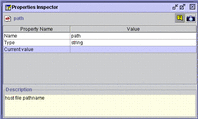
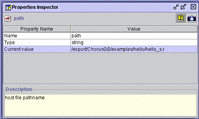
Enter the absolute pathname of your actor by double-clicking in the Value field of the Current Value property. For example:
Now double-click on the bank property to open up its Properties Inspector window, then double-click in the Value field of the Reference property. An ellipsis (...) will appear at the right hand side of the field:
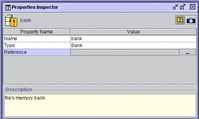
Click on the ellipsis to open the reference selecting window, Select a reference window:
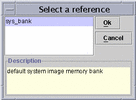
Click on the required reference, sys_bank, then click on Ok.
Now double-click on the binary property and perform similar actions to those you performed for the bank property.
-
Add the actor to the list of application files present in the system image.
The application_files list in the ChorusOS System Image Configuration folder contains references to the actors that will be present in the ChorusOS operating system image. If an actor is defined but not referenced in this list, it will not be added to the image. Add your actor to this list choosing New element from its context menu:
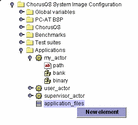
An empty element will appear:
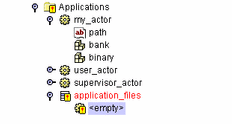
Update the element by opening it in the Properties Inspector and changing the Value field of the Reference property. Scroll down and select your newly defined actor, my_actor in this example, from the opened Select a reference window:
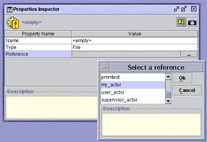
Click on Ok to complete the operation.
Note -
Drivers, defined in the BSP folder of the ChorusOS System Image Configuration folder, may be added to the system image in exactly the same way.
Saving the Modified Configuration
After a configuration has been edited, it can be saved. For this, select the ChorusOS configuration item in the navigation tree (this is the root element of a configuration), and use its context menu. It is also possible to save it using the Save option in the File menu on the main menu bar, or the Save button on the toolbar.
Note -
A modified configuration is displayed in red, as a visual warning that the file has changed.
Build the system image, as described in the next section.
Rebuilding the System Image
To rebuild the system image, select the ChorusOS configuration item in the navigation tree, and use the build item in its context menu (or the corresponding toolbar button). If the configuration file has not been saved since it was last modified, the tool will propose saving it, as the configuration needs to be saved in order to be built. If the configuration is invalid, it is not possible to build the corresponding ChorusOS operating system image.
During the build of the system image, various messages generated by the make tools are displayed in the output window.
It is possible to interrupt the build using the stop button on the toolbar. In this case, the system image is not built.
Command-line Configuration Tool
The following sections explain how to use the command-line configuration tool, configurator, for some common tasks.
Displaying the Configuration
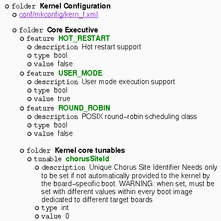
The configurator utility provides an option to display the ChorusOS operating system configuration in HTML format. Within your build directory, type the following command:
$ configurator -display /tmp/ChorusOS.html |
You can then use your browser to navigate through the ChorusOS.html file generated by this command.
Figure 3-2 Kernel Configuration Displayed in HTML
Selecting a Configuration Profile
Two predefined profiles are provided, as described in "Feature Options". To select the basic profile, type:
% configurator -p conf/basic |
To re-select the extended (default) profile, type:
% configurator -p conf/extended |
Adding, Removing, or Listing a Feature
You can use the configurator utility to add, remove, or list a feature.
Adding a Feature
To add a feature, type:
% configurator -set feature_name=true |
The status of the feature_name is set to true.
For example, to add the EVENT feature to the
default configuration:
% configurator -set EVENT=true |
The configurator utility does not handle feature dependencies automatically. If you define a set that is not complete, an error message is displayed.
Removing a Feature
To remove a feature, type:
% configurator -set feature_name=false |
The status of the feature_name feature is set to false.
For example, to remove the EVENT feature:
% configurator -set EVENT=false |
You can reset the value of a feature to the default as follows:
% configurator -reset EVENT |
Note -
The reset command resets the value to the extended profile default.
Listing a Feature
You can check the value of a feature as follows:
% configurator -list feature feature_name |
The output lists the feature and its status. If you omit feature_name, all features are displayed:
% configurator -list feature SEM bool 'true' EVENT bool 'true' RTMUTEX bool 'false' TIMER bool 'true' VTIMER bool 'false' DATE bool 'true' |
You can list a feature in greater detail with the -info option:
% configurator -info feature feature_name |
The output lists the feature, its status, possible values and its description. For example:
% configurator -info feature NFS_SERVER NFS_SERVER:bool='false' Possible values: true|false Description: NFS server access from target machine |
Changing Tunable Parameter Values
Tunable parameters are defined by symbolic names within the ChorusOS operating system components. Symbolic names include dots (.), to maintain compatibility with previous releases of the ChorusOS operating system.
The definition of a tunable parameter includes the definition of a default value for this parameter. Integer values of tunable parameters are expressed either as integers or as hexadecimal numbers.
To change the value of a tunable parameter, use:
% configurator -set tunable_name=value |
For example, to re-configure the kernel to allow the creation of 300 threads:
% configurator -set kern.exec.maxThreadNumber=300 |
You can check the value of a tunable parameter as follows:
% configurator -list tunable tunable_name |
You can list the values of all the kernel executive tunables as follows:
% configurator -list tunable kern.exec.* |
The output lists the kernel executive tunables and their values:
kern.exec.maxCpuNumber int '1' kern.exec.maxActorNumber int '64' kern.exec.maxThreadNumber int '300' kern.exec.bgStackSize int '0x1000' kern.exec.dflSysStackSize int '0x3000' kern.exec.dflUsrStackSize int '0x4000' kern.exec.dblFltStackSize int '0x800' kern.exec.intrStackSize int '0x3000' |
You can list a tunable parameter in greater detail with the -info option:
% configurator -info tunable tunable_name |
The tunable, its value and its description are displayed:
% configurator -info tunable kern.lap.* kern.lap.maxLapBindNumber:int='256' Description: Maximum number of bind LAPs kern.lap.maxLapSafeNumber:int='128' Description: Maximum number of safe LAPs |
Modifying the System Environment
The system environment is defined by the set of dynamic parameters. The system environment is a set of name-value pairs, where name and value are character strings. Values for system environment variables can be obtained by the system and applications at runtime using the sysGetEnv(2K) system call.
To display all the system environment variables, type:
% configurator -list env |
To set a new environment variable, or change its value:
% configurator -setenv envar=value |
Here is an example:
% configurator -setenv MESSAGE='HelloWorld' |
To unset a variable, so that it is removed from the environment, type:
% configurator -resetenv envar |
Rebuilding the System Image
After you have finished modifying the configuration, rebuild the system image by typing:
% make build |
- © 2010, Oracle Corporation and/or its affiliates
