Chapter 2 Logging In to Trusted Extensions (Tasks)
This chapter describes the two desktops and the login process on a system that is configured with Solaris Trusted Extensions. This chapter covers the following topics:
Desktops and Login in Trusted Extensions
The desktop that you use in Trusted Extensions is protected. Labels provide a visible indication of protection. Applications, data, and your communications are labeled. The desktop is a trusted version of the GNOME desktop. The menu item is Solaris Trusted Extensions (GNOME).
The login screen is not labeled. The login process requires you to establish a label for your session. Once you have chosen a label, the desktop, its windows, and all applications are labeled. In addition, applications that affect security are visibly protected by a trusted path indicator.
Trusted Extensions Login Process
The login process on a system that is configured with Trusted Extensions is similar to the login process for the Solaris OS. However, in Trusted Extensions, you examine several screens for security-relevant information before the desktop session can be started. The process is described in more detail in the sections that follow. Here is a brief overview.
-
Desktop choice – As in the Solaris OS, you choose which desktop to use. In Trusted Extensions, you must choose the Solaris Trusted Extensions (GNOME) desktop.
-
Identification – As in the Solaris OS, you type your username in the Username field.
-
Authentication – As in the Solaris OS, you type your password in the Password field.
Successful completion of identification and authentication confirms your right to use the system.
-
Message checking and session type selection – You examine the information in the Last Login dialog box. This dialog box displays the time you last logged in, any messages from the administrator, and the security attributes of your session. If you are permitted to operate at more than one label, you can specify the type of session, single-level or multilevel.
Note –If your account restricts you to operate at one label, you cannot specify the type of session. This restriction is called a single-level or single-label configuration. For an example, see Session Selection Example.
-
Label selection – In the label builder, you choose the highest security level at which you intend to work while in your session.
Note –
By default, remote login is not supported for regular users in Trusted Extensions. If remote login is supported by your site, check with your administrator for the procedure. If your administrator has configured Xvnc, a virtual networking computer (vnc) can be used to remotely display a multilevel desktop. For the procedure, see Logging In Remotely to Trusted Extensions.
Desktop Choice Before Login
When a Solaris workstation is not in a work session, it displays the login screen. The Trusted Extensions login screen is similar to the Solaris login screen. As in the Solaris login screen, you can choose a desktop from the Options menu.
Identification and Authentication During Login
Identification and authentication during login are handled by the Solaris OS. The login screen initially contains the Username prompt. This part of the login process is referred to as identification.
After you have entered the username, the password prompt is displayed. This part of the process is referred to as authentication. The password authenticates that you are indeed the user who is authorized to use that username.
A password is a private combination of keystrokes that validates your identity to the system. Your password is stored in an encrypted form and is not accessible by other users on the system. It is your responsibility to protect your password so that other users cannot use it to gain unauthorized access. Never write down your password or disclose it to anyone else because a person with your password has access to all your data without being identifiable or accountable. Your initial password is supplied by your security administrator.
Review Security Attributes During Login
The review of security attributes is handled by Trusted Extensions, not by the Solaris OS. Before login is complete, Trusted Extensions displays the Last Login dialog box. This dialog box provides status information for you to review. You can review past information, such as when the system was last used by you. You can also review the security attributes that are in effect for the upcoming session. If your account is configured to operate at more than one label, you can select a single-level or a multilevel session.
You then view your single label, or choose a label and clearance from the label builder.
Logging In to Trusted Extensions
The following tasks step you through logging in to Trusted Extensions. You review and specify security information before reaching the desktop.
 Choose a Trusted Desktop
-
On the login screen, choose a desktop from the Options --> Sessions menu.
For Trusted GNOME, choose Solaris Trusted Extensions (GNOME).
-
Continue with Identify and Authenticate Yourself to the System.
 Identify and Authenticate Yourself
to the System
-
In the Username field of the login screen, type your username.
Be sure to type your username exactly as your administrator assigned it to you. Pay attention to spelling and capitalization.
-
If you made an error, restart.
-
To retype your username, click Start Over.
-
To restart the windowing system completely, click Reset Login from the Options menu.
Go to Choose a Trusted Desktop after your restart.
-
-
Confirm your entry.
Press Return to confirm your username.
 Caution –
 You should never see the trusted stripe when the login screen appears. If you ever see the trusted stripe while attempting to log in or unlock the screen, do not type your password. There is a possibility that you are being spoofed. A spoof is when an intruder's program is masquerading as a login program to capture passwords. Contact your security administrator immediately.
-
Type your password in the password entry field, and press Return.
For security purposes, the characters do not display in the field. The system compares the login name and password against a list of authorized users.
Troubleshooting
If the password that you provided is incorrect, a dialog box appears with the message:
Login incorrect; please try again.
Click OK to dismiss the error dialog box. Then, type the correct password.
 Check Messages and Select Session
Type
If you do not restrict yourself to a single label, you can view data at different labels. The range in which you can operate is bounded at the upper end by the session clearance and at the lower end by the minimum label that your administrator assigned to you.
-
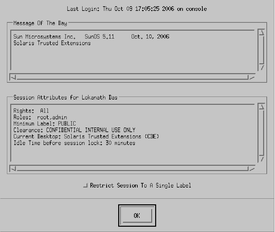
In the Last Login dialog box, check that the time of your last session is accurate.
Always check that nothing is suspicious about the last login, such as an unusual time of day. If you have reason to believe that the time is not accurate, contact your security administrator.
Figure 2–1 Last Login Dialog Box

-
Check for any messages from the administrator.
The Message of the Day field can contain warnings about scheduled maintenance or security problems. Always review the information in this field.
-
Examine the security attributes of your session.
As Figure 2–1 shows, the Last Login dialog box indicates any roles that you can assume, your minimum label, and other security characteristics.
-
(Optional) If you are permitted to log in to a multilevel session, decide if you want a single-label session.
Click the Restrict Session to a Single Label button to log in to a single-label session.
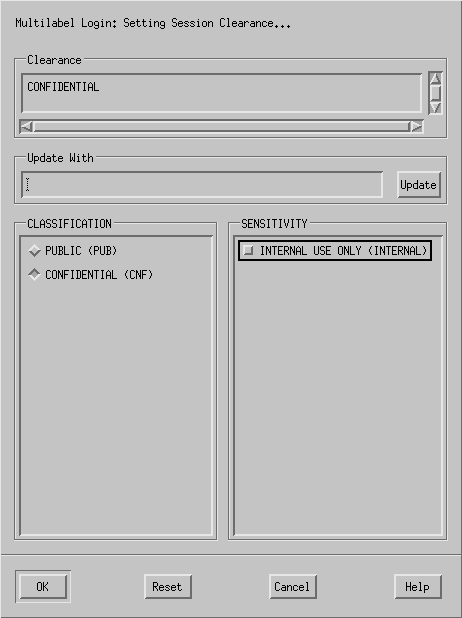
You are presented with a label builder. If you are logging in at a single label, the label builder describes your session label. In a multilabel system, the label builder enables you to choose your session clearance.
-
Confirm your label choice.
Figure 2–2 Label Builder

-
Accept the default, unless you have a reason not to.
-
For a multilevel session, select a clearance.
-
Deselect the current clearance, and click a classification and a sensitivity label.
-
Or, in the Clearance field, type a clearance.
-
Or, in the Update With field, type a label.
-
-
For a single-level session, select a label.
-
Deselect the current label, and click a different classification.
-
Or, in the Update With field, type a label.
-
-
-
Click OK.
The trusted desktop appears.
 Troubleshoot Login Problems
-
If your username or password is not recognized, check with the administrator.
-
If your label range is not permitted on your workstation, check with the administrator.
Workstations can be restricted to a limited range of session clearances and labels. For example, a workstation in a lobby might be limited to PUBLIC labels only. If the label or session clearance that you specify is not accepted, check with an administrator to determine if the workstation is restricted.
-
If you have customized your shell initialization files and cannot log in, you have the following two options.
-
Contact your system administrator to correct the situation.
-
If you can become root, log in to a failsafe session.
In a standard login, the shell initialization files are sourced at startup to provide a customized environment. In a failsafe login, the default values are applied to your system and no shell initialization files are sourced.
In Trusted Extensions, failsafe login is protected. Only superuser can access failsafe login.
-
Logging In Remotely to Trusted Extensions
Virtual Network Computing (vnc) provides a way for you to access a central Trusted Extensions system from your laptop or home computer. The administrator at your site must configure the Solaris Xvnc software to run on the server and client systems. You can work at any label in your label range that is installed on the server.
 How to Log In to a Remote Trusted Extensions Desktop
Before You Begin
Your administrator has completed How to Use Xvnc to Remotely Access a Trusted Extensions System in Solaris Trusted Extensions Administrator’s Procedures.
-
In a terminal window, connect to the Xvnc server.
Type the name of the server that your administrator has configured with Xvnc.
% /usr/bin/vncviewer Xvnc-server
-
Log in.
Follow the procedures in Logging In to Trusted Extensions.
You can now work on the Trusted Extensions desktop in the Xvnc window.
- © 2010, Oracle Corporation and/or its affiliates
