| Sun Fire V210 and V240 Servers Installation Guide |
| Sun Fire V210 and V240 Servers Installation Guide |
| C H A P T E R 2 |
|
Installing the Hardware |
This chapter describes how to mount the Sun Fire V210 and V240 servers into a rack and attach the cables. It includes the following sections:
The rackmount kit consists of the following components:
The slide rail kit enables you to mount the server into a Sun rack. For a complete listing of compatible racks, go to:
Perform the procedures in this chapter, in the order they are listed, to install your server into a four-post rack using the orderable slide rail option. This set of slide rails has been designed to work with both the Sun Fire V210 and Sun Fire V240 servers. These slide rails are compatible with a wide range of equipment racks that meet the following standards:
|
Note - Although the Sun Fire V210 server is pictured in the illustrations, these procedures also apply to the Sun Fire V240 server. |
The procedures in this section contain instructions to install the slide rail assemblies to the rack and the server chassis, with mounting brackets, into the slide rail assemblies that are mounted to the rack.
|
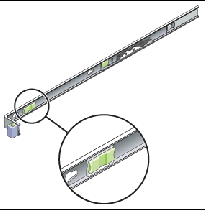
2. Locate the slide rail lock at the front of one of the slide rail assemblies, as shown in FIGURE 2-1.
3. Squeeze and hold the tabs at the top and bottom of the lock while you pull the mounting bracket out of the slide rail assembly, until it reaches the stop. See FIGURE 2-1.
4. Pull the mounting bracket release button toward the front of the mounting bracket, as shown in FIGURE 2-1, and simultaneously withdraw the mounting bracket from the slide rail assembly.
5. Repeat for the remaining slide rail assembly.

|
1. Position a mounting bracket against the chassis so that the slide rail lock is at the server front and the three keyed openings on the mounting bracket are aligned with the three screw holes on the side of the chassis.
2. Attach the slide rail onto the server with the supplied screws.
3. Repeat Steps 1 and 2 to install the other slide rail.
|
1. Position a slide rail assembly in your rack so that the brackets at each end of the slide rail assembly are on the outside of the front and rear rack posts (as depicted in FIGURE 2-2).
2. Attach the slide rail assembly to the rack posts.
The method used to attach the slide rails varies depending on the type of rack:

3. Repeat for the remaining slide rail assembly.
|

|
Caution - This procedure requires a minimum of two people because of the weight of the server. Attempting this procedure alone could result in equipment damage or personal injury. |
1. Push the slide rails into the slide rail assemblies as far as possible.
2. Raise the server so that the rear ends of the mounting brackets are aligned with the slide rail assemblies that are mounted in the equipment rack (see FIGURE 2-3).
3. Insert the mounting brackets into the slide rails, then push the server into the rack until the mounting brackets encounter the slide rail stops (approximately 12 in or 30 cm).

4. Simultaneously, pull and hold the slide rail release buttons on each mounting bracket while you push the server into the rack (see FIGURE 2-3).
5. Continue pushing until the slide rail locks on the front of the mounting brackets engage the slide rail assemblies.

|
Caution - Verify that the server is securely mounted in the rack and that the slide rails locks are engaged with the mounting brackets before continuing. |
The section contains procedures to install the optional cable management assembly (CMA), to route and attach the cables, and to verify the operation of the CMA.
|
2. Take the CMA to the rear of the equipment rack and ensure that you have adequate room to work around the rear of the server.
|
Note - References to "left" or "right" in this procedure assume that you are facing the rear of the equipment rack. |
3. Locate the CMA rail extension and insert it into the left slide rail until the extension locks into place with an audible click (FIGURE 2-4).

|
Note - Support the CMA in the remaining installation steps. Do not allow the assembly to hang by its own weight until it is secured by all three of the attachment points. |
4. Insert the CMA's mounting bracket connector into the right slide rail until the connector locks into place with an audible click (FIGURE 2-5).

5. Insert the remaining CMA arm connector into the plastic cutout on the CMA rail extension (FIGURE 2-6).

6. Position the cable hangers in the appropriate mounting holes in the CMA and snap them into place (FIGURE 2-7).

7. Install the cables to the server, as required.
Refer to the Sun Fire V210 and V240 Servers Getting Started Guide for information about the locations of the power inlets and I/O ports on the front and back of the servers.
8. Route the cables through the CMA cable hangers.
|
|
Note - Two people are recommended for this procedure: one to move the server in and out of the rack and one to observe the cables and CMA. |
1. Slowly pull the server out of the rack until the slide rails reach their stops.
2. Inspect the attached cables for any binding or kinks.
3. Verify that the CMA extends fully and does not bind in the slide rails.
4. Push the server back into the rack, as described below.
When the server is fully extended, you must release two sets of slide rail stops to return the server to the rack:
a. The first set of stops are levers, located on the inside of each slide rail, just behind the rear panel of the server. These levers are labeled "PUSH." Push in both levers simultaneously and slide the server toward the rack.
The server travels approximately 15 inches (38 cm) and stops.
Verify that the cables and the CMA retract without binding before continuing.
b. The second set of stops are the slide rail release buttons, located near the front of each mounting bracket. See FIGURE 2-3. Simultaneously push or pull both of the slide rail release buttons and push the server completely into the rack until both slide rail locks engage.
5. Adjust the cable hangers and CMA as required.
| Sun Fire V210 and V240 Servers Installation Guide | 819-4209-10 |
Copyright © 2006, Sun Microsystems, Inc. All Rights Reserved.

 To Disassemble the Slide Rails