Sun Management Center 3.5 Supplement for Sun Fire 6800/4810/4800/3800 Systems Management Center 3.5 Supplement for Sun Fire 6800/4810/4800/3800 Systems
|
| Sun Management Center 3.5 Supplement for Sun Fire 6800/4810/4800/3800 Systems
|
| C H A P T E R 2 |
|
Installation and Setup |
This chapter contains instructions for installing, setting up, uninstalling, starting, and stopping Sun Fire 6800/4810/4800/3800 add-on software. Refer to the Sun Management Center 3.5 Installation and Configuration Guide for information about installing, setting up, uninstalling, starting, and stopping base Sun Management Center software.

|
Caution - Use the installation scripts and the setup scripts provided with the Sun Management Center 3.5 software. Do not manually add packages or manually change configuration files. |
Your Sun Management Center 3.5 installation and setup scripts or GUI panels may not display exactly the same messages in exactly the same sequence as the examples shown in this chapter. However, these examples show the basic messages you will receive in approximately the sequence you will receive them. Your actual installation and setup scripts depend on the add-on components you choose to install and other choices you make.
See Using the CLI to Install, Set up, Uninstall, Start, and Stop Sun Management Center Software to perform these functions using the command line interface (CLI).
TABLE 2-1 lists the Sun Fire 6800/4810/4800/3800 system-specific packages with the host they should be installed on, and the base layer they belong to.
With Sun Management Center 3.5 software, you can install, set up, uninstall, and update in different ways, primarily using the Sun Management Center 3.5 Wizards or the command line interface (CLI). You might also need to perform certain procedures if you want to use certain features. TABLE 2-2 lists the various procedures with a cross-reference to the information in this chapter.
|
Installing software using the Sun Management Center Installation 3.5 Wizard |
Refer to the Sun Management Center 3.5 Installation and Configuration Guide |
|
Setting Up the Sun Fire 6800/4810/4800/3800 Add-on Software Using the Setup Wizard |
Setting Up the Sun Fire 6800/4810/4800/3800 Add-on Software Using the Setup Wizard |
|
Creating and Setting Up a Sun Fire 6800/4810/4800/3800 Platform Agent Instance |
|
|
Starting Sun Management Center Software Using the Start Wizard |
|
|
Stopping Sun Management Center Software Using the Stop Wizard |
|
|
Uninstalling Sun Management Center Software Using the Uninstall Wizard |
|
|
Install Sun Management Center 3.5 base software using the CLI |
Refer to the Sun Management Center 3.5 Installation and Configuration Guide |
|
Installing Sun Fire 6800/4810/4800/3800 add-on packages using the CLI |
|
|
Setting up Sun Fire 6800/4810/4800/3800 add-on packages using the CLI |
|
|
Uninstalling one module, several modules, or all Sun Management Center software using the CLI |
|
If you want to use the SC Failover capability, you need to do the following before you install and set up the Sun Fire 6800/4810/4800/3800 add-on software:
You then need to use that logical IP address when you set up the Sun Fire 6800/4810/4800/3800 add-on software.
|
|
1. Select an unused IP address that begins with the same subnet address as both SCs.
For example, if one SC has an physical IP address of 129.146.235.14 and the other SC has a physical IP address of 129.146.235.41, the logical IP address would be 129.146.235.xxx, where xxx is an unused IP address within that subnet. For the example in Step 2, 129.146.235.251 is used as the logical IP address.
2. From the SC, set up a logical IP address for the SC using the following command.
schostname:SC> setupplatform -p sc |
The system displays the following:
SC -- SC POST diag Level [off]: Enable SC Failover? [no]: Logical Hostname or IP Address [ ]: |
3. Type yes to Enable SC Failover.
4. Type the logical IP address you selected in Step 1 (129.146.235.251 in our example).
5. Use this logical IP address to set up the platform agent during es-setup or es-guisetup.
Before you install and set up Sun Fire 6800/4810/4800/3800 add-on software, you need to configure SNMP on the platform and the domain. This section contains both procedures, and you need to do both.
|
Note - Do not set up multiple Platform Administration Agents to manage the same Sun Fire 6800/4810/4800/3800 system controller. Doing so causes the system to run slowly or even hang. |
1. As superuser, access the system controller by using the telnet(1) command as shown in CODE EXAMPLE 2-1.
where schostname is the system controller host name.
2. At the system controller main menu, type 0 (or alternatively P or p) to enter the platform shell as shown in CODE EXAMPLE 2-1.
The platform shell prompt, schostname:SC, is displayed.
3. Type setupplatform -p snmp, and answer the questions as shown in CODE EXAMPLE 2-2.

|
Caution - For Trap Hosts, be sure to enter the host name of the machine where you will run the Platform Admin module and from which you will monitor your Sun Fire 6800/4810/4800/3800. For example, your monitoring_machine might be called CompA, and you want to monitor your main SC called tiger-sc0 among other machines. You would run the setupplatform command as shown in CODE EXAMPLE 2-2 on tiger-sc0, and enter CompA as the Trap Host. |
|
Note - You need to enter both the platform trap host here and the domain trap host in Step 4 in To Configure SNMP on a Domain for the platform administration module to monitor the domain state changes. |
4. Press and hold the CTRL key while pressing the ] key, to get to the telnet> prompt.
5. Type q to exit from telnet.
1. As superuser, access the system controller by typing the telnet command as shown in CODE EXAMPLE 2-3.
where schostname is the system controller host name. In CODE EXAMPLE 2-3, domain A is shown as an example.
2. Enter a domain. Type 1, 2, 3, or 4 (or alternatively a, b, c, d, or A, B, C, D) to enter the proper domain shell as shown in CODE EXAMPLE 2-3.
The domain shell prompt, schostname:X, is displayed, where X is the domain that you have selected.
3. If the domain is active and the domain keyswitch is set to on, diag, or secure (you are running the Solaris Operating System, you are in OpenBoot PROM mode, or you are running POST), perform the following steps:
a. Press and hold the CTRL key while pressing the ] key, to get to the telnet> prompt.
b. At the telnet> prompt type send break.
CODE EXAMPLE 2-3 shows a connection to domain A.
4. Type setupdomain -p snmp, and answer the questions as shown in CODE EXAMPLE 2-4.
For Trap Hosts, enter the host name of the Sun Management Center server from which you will perform platform administration.
|
Note - You need to enter both the platform trap host in Step 3 in To Configure SNMP on the Platform and the domain trap host here for the platform administration module to monitor the domain state changes. |
For Public and Private Community Strings, enter a different string for each domain and platform.
5. Type disconnect to exit the connection to the domain shell.
6. Repeat Step 2 through Step 5 for each additional domain, if any.
7. Press and hold the CTRL key while pressing the ] key, to get to the telnet> prompt.
8. Type q to exit from telnet.
This section provides a summary of installing Sun Management Center 3.5 base software and Sun Fire 6800/4810/4800/3800 add-on software using the Install Wizard. Chapter 6, Installation and Setup, of the Sun Management Center 3.5 Installation and Configuration Guide, describes in detail how to install all the software.
1. As superuser, run the es-guiinst script as described in Chapter 6, "Installation and Setup," of the Sun Management Center 3.5 Installation and Configuration Guide.
2. After the base software is installed, the Select Add-on Product screen provides a selectable list of add-on products that you can install. Select those add-ons that apply to Sun Fire 6800/4810/4800/3800 systems, and click Next.
3. The Sun Management Center Setup Wizard starts automatically after all the software is installed.
This section describes how to set up the platform agent and the domain agent on Sun Fire 6800/4810/4800/3800 systems using the Sun Management Center Setup Wizard. For more details about the entire software setup process, refer to Chapter 6, "Installation and Setup," of the Sun Management Center 3.5 Installation and Configuration Guide.
Set up the Sun Fire 6800-3800 Platform Agent on any machine where you have installed it.
1. Type es-guisetup on a machine where the platform agent is installed to start the Sun Management Center Setup Wizard.
Once the Sun Management Center base software setup is complete, the Wizard displays the following message:
Select Add-on Products The following add-on products are newly installed on this system and will be set up. - Sun Fire Platform Administration |

The Sun Fire 6800-3800 Platform Agent Setup panel displays the following message. Go to Step 20l
Setting up server host... Status: Setting up server host... ... Setup of server host complete. |
The Sun Fire 6800-3800 Platform Agent Setup panel displays the following message:
The Sun Fire 6800-3800 Platform Agent Setup panel displays the following:
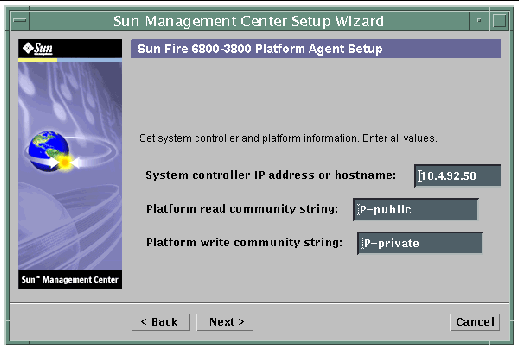
i. Type the host name or IP address of the System Controller (for example, 10.8.28.209).

|
Caution - If you want to use the SC failover feature, you must put a logical IP address in this field. Both SCs can then use this logical IP address. Only one SC can use a physical IP address. If you do not put a logical IP address in this field and if a SC failover occurs, you receive a red alarm that the SC is not responding. For information about enabling SC failover and setting up a logical IP address, see To Enable the SC Failover Capability and Set Up a Logical IP Address. |
ii. Type the read community string for the platform (for example, P-public).
iii. Type the write community string for the platform (for example, P-private).
The Sun Fire 6800-3800 Platform Agent Setup panel displays the following message:
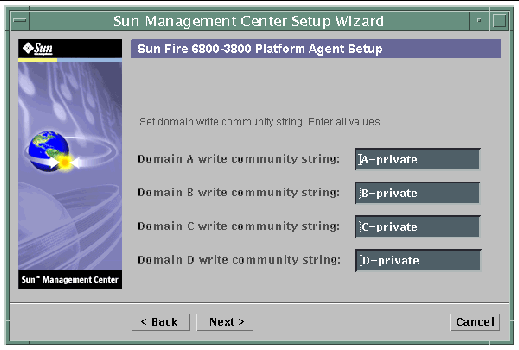
a. Type the write community string for domain A, such as A-private
b. Type the write community string for domain B, such as B-private
c. Type the write community string for domain C, such as C-private
d. Type the write community string for domain D, such as D-private
The Sun Fire 6800-3800 Platform Agent Setup panel displays the following message:
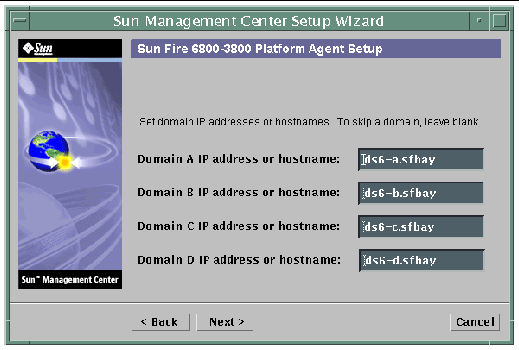
a. Type the IP address or host name of domain A, or leave blank.
b. Type the IP address or host name of domain B, or leave blank.
c. Type the IP address or host name of domain C, or leave blank.
d. Type the IP address or host name of domain D, or leave blank.
The Sun Fire 6800-3800 Platform Agent Setup panel displays the following message:
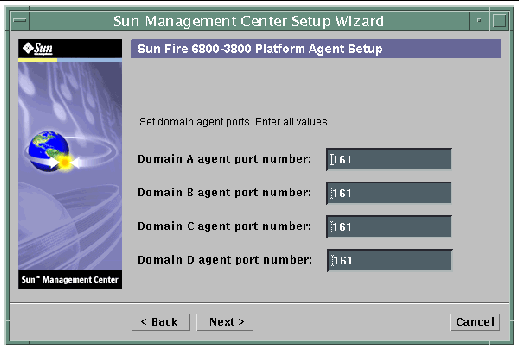
a. Type the Sun Management Center agent port number on domain A.
b. Type the Sun Management Center agent port number on domain B.
c. Type the Sun Management Center agent port number on domain C.
d. Type the Sun Management Center agent port number on domain D.
The Sun Fire 6800-3800 Platform Agent Setup panel displays the following message:
Updating configuration files with platform and domain information. Status: Updating configuration files... Update of configuration files complete. |
The Sun Fire 6800-3800 Platform Agent Setup panel displays the following message:
Error getting chassis model from system controller. |
The Sun Fire 6800-3800 Platform Agent Setup panel displays the following message:
ii. Enter 3800, 4800, 4810, or 6800 for the chassis model.
The Sun Fire 6800-3800 Platform Agent Setup panel displays the following message:
Checking configuration files... Status: Set the platform server: <hostname> or <IPaddress> platform.snmpPort: 166 Default platform agent port: 166 Checking of configuration files complete. |
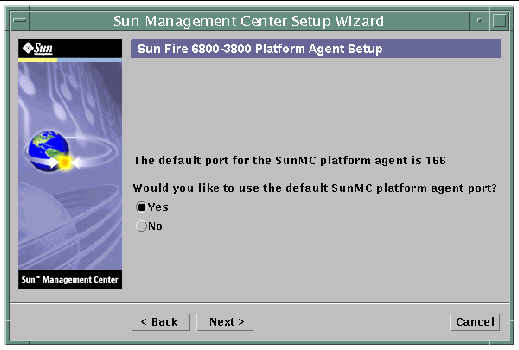
The Sun Fire 6800-3800 Platform Agent Setup panel displays the following message:
Set the platform agent port. Platform agent port number: 166 |
Confirmation of the platform agent port. Platform agent port: 166 |
Confirmation of the platform agent port. Platform agent port: 166 Remember to resolve the port conflict prior to starting Sun Management Center. |

The same Sun Fire 6800-3800 Platform Agent Setup panel appears as in FIGURE 2-7.
The Sun Fire 6800-3800 Platform Setup panel displays this message:
|
Note - Ensure you store the seed password securely. It will be needed if you perform any modifications to your Sun Management Center installation. |
a. Enter a unique password for the seed if this is a first-time installation. If not, enter the seed used in previous versions of Sun Management Center.
b. Reenter the seed to confirm.
The Sun Fire 6800-3800 Platform Setup panel displays this message:
Updating configuration files with module and discover table information... Status: Added module.... Added module.... Updated Discovery Table.... Update of configuration files complete. |
The Sun Fire 6800-3800 Platform Setup panel displays this message:
Sun Fire 6800-3800 Platform Admin setup is complete. |
The Sun Fire 6800-3800 Platform Setup panel displays this message:
The following products have been set up: - Sun Fire Platform Administration Click Next to invoke the Start Wizard now to the various Sun Management Center components. |
Set up the Sun Fire 6800-3800 Domain Agent on any Sun Fire 6800-3800 Domain where you have installed it.
1. Type es-guisetup on a Sun Fire 6800-3800 Domain where the domain agent is installed to start the Sun Management Center Setup Wizard.
Once the Sun Management Center base software setup is complete, the Wizard displays the following message:
Click Next to set up the following products: Sun Fire Domain Administration |
2. Click Next to start the Domain Agent setup.
The Sun Fire 6800-3800 Domain Agent Setup panel displays the following message:
Updating configuration files... Status: Updating configuration files... Update of configuration files complete. |
The Sun Fire 6800-3800 Domain Agent Setup panel displays the following message:
Sun Fire 6800-3800 Domain Agent setup is complete. |
The base Sun Management Center Setup Wizard provides these advanced setup options when the current Sun Management Center installation is already configured:
|
Note - Use the Reconfigure All option instead of the Remove Setup Configuration option at this time. |
Refer to the Sun Management Center 3.5 Installation and Configuration Guide for more information about using these options.
This section describes how to update multiple hosts at once using Agent Update. The Agent Update process itself must be run on the Sun Management Center server machine. You also need to ensure that Sun Management Center 3.5 agents are running on all the target hosts.
To use Agent Update to fully install and set up the Sun Fire 6800/4810/4800/3800 Platform Administration module, you must create an Agent Update configuration file for the module on the target hosts, before you run the Agent Update Process on the Sun Management Center server machine.
|
|
1. Ensure the Sun Fire 6800/4810/4800/3800 Platform Administration module is installed on the target hosts.
2. Ensure that the Sun Fire 6800/4810/4800/3800 Platform Administration module is set up on the target hosts using either the es-setup or the es-guisetup script.
After this has been done, subsequent Platform Administration setup operations using Agent Update will work automatically, using the host-specific information provided initially.
Using the Agent Update process, you will create an Image File of the add-on components to be distributed to the target machines, and then add a New Job to Manage Jobs Task list to be run when you specify.
Using Agent Update you can update the following configurations:
This procedure applies only to updating from Sun Management Center 3.5 add-on software.
1. Create an Image File of the desired Sun Fire 6800-3800 add-on components to be distributed to the desired agent machines using one of the base Sun Management Center scripts es-gui-imagetool or es-imagetool.
Refer to Chapter 8, "Post-Installation Tasks," in the Sun Management Center 3.5 Installation and Configuration Guide for detailed instructions about using either the GUI or the CLI Image Tool.
2. From your main Sun Management Center console window, select the Manage Jobs... option from the Tools menu.
The system displays the Manage Jobs panel (see FIGURE 2-8), which allows you to distribute the Image File.
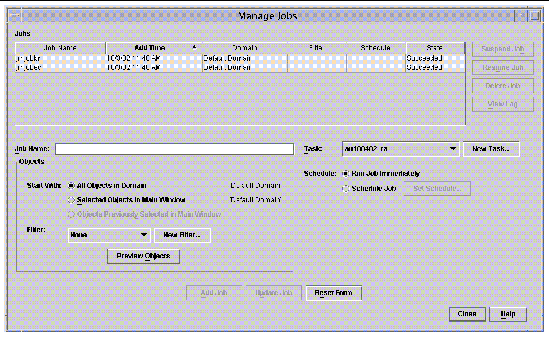
3. In the Manage Jobs panel, select the New Task... button.
The system displays the New Task panel (see FIGURE 2-9), which allows you to specify the Agent Update Image File to distribute.
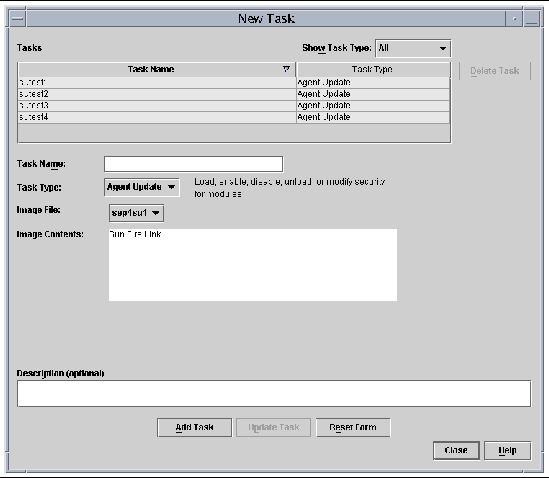
4. In the New Task panel (FIGURE 2-9), do the following:
a. Select Agent Update for the Task Type.
b. Select the Image File you created in Step 1.
5. In the Manage Jobs panel (FIGURE 2-8), do the following:
b. Select the Task you created in Step 4.
c. Do one of the following to schedule when you want the Task to run:
d. Do one of the following to select the objects (agent machines) to which you want to distribute the Image File:
e. Preview the objects (agent machines) you have selected and redo your selections if necessary.
The job starts and distributes the Image File to the objects (agent machines) you selected. When the job is running, it appears in the Job list of the Manage Jobs panel. The panel shows the status of the job when running and when complete.
|
|
This procedure applies to either:
1. Log in as root on the Sun Management Center server machine.
2. Create an agent-update image using either of the image tools.
3. Download the file /opt/SUNWsymon/base/bin/agent-update.bin to each target machine's root directory.
If you installed Sun Management Center in a different directory than /opt, download /installdir/SUNWsymon/base/bin/agent-update.bin, where installdir is the install directory you specified.
4. Log in as root on the target machine.
5. Go to the directory where you downloaded agent-update.bin.
6. Type ./agent-update.bin -s server -r http-port -p image-name, where
7. Provide the security seed and the SNMPv1 community string.
The agent-update process prompts you for the security seed and the SNMPv1 community string.
The update process applies the update to the machine without prompting for further information.
When the update process completes, check the update status by viewing the log file /var/opt/SUNWsymon/log/agent-update.log on the server host.
|
Note - You need to re-run ./es-setup -F to set up the platform agent. |
The default platform administration module can monitor one Sun Fire 6800/4810/4800/3800 system. To monitor more than one Sun Fire 6800/4810/4800/3800 system, you must create one platform agent instance for each additional Sun Fire 6800/4810/4800/3800 system.
1. Become superuser by using the su command.
2. Go to the directory where Sun Management Center software is installed.
For example, if Sun Management Center software is installed in /opt/SUNWsymon, go to the directory /opt/SUNWsymon/sbin.
3. Run the es-platform script:
# ./es-platform -a instanceName |
where instanceName is the name of a new platform agent instance.
This script asks for the port number for the new platform agent and the security seed. If you used a seed other than the default when setting up the Sun Management server, provide the same seed for this agent.
4. To set up this instance, go the Step 3 in the following procedure To Set Up a Sun Fire 6800/4810/4800/3800 Platform Administration Module for a New Platform Agent Instance
1. Become superuser by using the su command.
2. Go to the directory where Sun Management Center software is installed.
For example, if Sun Management Center software is installed in /opt/SUNWsymon, go to the directory /opt/SUNWsymon/sbin.
3. Run the es-platform script:
# ./es-platform -a instanceName |
where instanceName is the name of a new platform agent instance.
This script asks for the port number for the new platform agent.
a. Enter a new, not previously used port number.
|
Note - Be sure you use this port number when you set up this instance and when you create this platform instance object on the Sun Management Center console. |
The script asks for the security seed.
b. If you used a seed other than the default when setting up the Sun Management server, provide the same seed for this agent.
4. Stop the Sun Management Center agent process.
# ./es-stop -A |
5. To set up this instance, go the Step 3 in the following procedure To Set Up a Sun Fire 6800/4810/4800/3800 Platform Administration Module for a New Platform Agent Instance.
|
|
1. Become superuser by using the su command.
2. Go to the directory where Sun Management Center software is installed.
For example, if Sun Management Center software is installed in /opt/SUNWsymon, go to the directory /opt/SUNWsymon/addons/SunFirePltAdmin/sbin.
|
Note - Before you perform Step 3, be sure you have stopped the Sun Management Center agent layer. To stop the agent layer, run the command /opt/SUNWsymon/sbin/es-stop -a. |
# ./es-setup.sh -I instanceName |
where instanceName is the name of a new platform agent instance.
The es-setup.sh script asks for this information:
This script can be run again to change the information provided in the previous setup.
4. To start the platform instance, go to the following procedure To Start the Platform Instance.
When the platform instance is set up, you can start it.
 To start the platform instance, type:
# ./es-start -y instanceName |
If you have a need to stop the platform instance, type:
# ./es-stop -y instanceName |
For information about how to undo setups and delete platform agents, see Undoing Setups and Deleting Platform Agents.
Use the es-guistart script to use the Start Wizard to start Sun Management Center software. Refer to Chapter 7, "Starting and Stopping Sun Management Center Software," in the Sun Management Center 3.5 Installation and Configuration Guide for detailed options and instructions.
Use the es-guistop script to use the Stop Wizard to stop Sun Management Center software. Refer to Chapter 7, "Starting and Stopping Sun Management Center Software," in the Sun Management Center 3.5 Installation and Configuration Guide for detailed options and instructions.
Use the es-guiuninst script to use the Uninstall Wizard to uninstall Sun Management Center software. Refer to Chapter 5, "Uninstalling Previous Versions of Sun Management Center Software," in the Sun Management Center 3.5 Installation and Configuration Guide for detailed options and instructions.
This section describes how to assign users to administrator and operator groups to give the users the type of access they will need to perform operations that are assigned to them.
If a user name is listed in the esusers file, that user can log onto that Sun Fire 6800/4810/4800/3800 system, where the user has read-only access for domain administration agents. In order to read and write platform or domain information under the platform agent, the user name must also be listed in the group file on the server.
The setup procedure creates up to 10 groups on the Sun Fire 6800/4810/4800/3800 server machine. These groups are:
1. Become superuser by using the su command.
2. Add each user to the appropriate group in the file /etc/group.
a. Add Sun Fire 6800/4810/4800/3800 platform administrators to spltadm, to allow them to administer the platform through the platform view of a platform agent.
b. Add Sun Fire 6800/4810/4800/3800 domain administrators to the appropriate domain administrator group.
For example, adding the name of a domain administrator to sdaadm allows that domain administrator to administer domain A through the platform agent.
3. Add each user to the file /var/opt/SUNWsymon/cfg/esusers.
If you no longer need to monitor a Sun Fire 6800/4810/4800/3800 system, you can save system resources by undoing the setup for the corresponding platform agent or instance, and then deleting it.
|
|
1. Become superuser by using the su command.
2. Go to the path/addons/SunFirePltAdmin/sbin directory, where path is the directory where Sun Management Center software is installed.
For example, if Sun Management Center software is installed in /opt/SUNWsymon, go to the directory /opt/SUNWsymon/addons/SunFirePltAdmin/sbin.
3. Undo the setup for the default platform agent by typing:
# ./es-setup.sh -u |
|
|
1. Become superuser by using the su command.
2. Go to the path/addons/SunFirePltAdmin/sbin directory, where path is the directory where the Sun Management Center software is installed.
For example, if Sun Management Center software is installed in /opt/SUNWsymon, go to the directory /opt/SUNWsymon/addons/SunFirePltAdmin/sbin.
3. Undo the setup for a specific platform agent instance by typing:
# ./es-setup.sh -u -I instanceName |
|
Note - Undoing this setup stops the Sun Management Center agent. |
1. Become superuser by using the su command.
2. Go to the directory path/sbin, where path is the directory where Sun Management Center software is installed.
For example, if Sun Management Center software is installed in /opt/SUNWsymon, go to the directory /opt/SUNWsymon/sbin.
3. Delete the platform agent instance by typing:
# ./es-platform -d instanceName |
The instructions in this document deal with two types of domains:
The Sun Fire 6800/4810/4800/3800 systems comes from the factory configured with one hardware domain, domain A. The system administrator has the option of creating additional hardware domains. A Sun Fire 6800 system can have up to four hardware domains. Sun Fire 4810, 4800, and 3800 systems can have up to two hardware domains.
To create additional hardware domains on Sun Fire 6800/4810/4800/3800 systems, refer to the Sun Fire 6800/4810/4800/3800 Systems Platform Administration Manual.
To create and populate an administrative domain, refer to the Sun Management Center 3.5 User's Guide.
| Sun Management Center 3.5 Supplement for Sun Fire 6800/4810/4800/3800 Systems
| 816-7381-10 |
Copyright © 2003, Sun Microsystems, Inc. All rights reserved.
