| C H A P T E R 3 |
|
Installing the Cable Management Arm and System Cables |
This chapter tells you how to install the cable management arm, connect the power cords and an Ethernet cable, and secure the cords and cables to the cable management arm.
When you have completed the procedures in this chapter, you are ready to set up a system console, power on the server, install the Solaris Operating System, and install the electronic documentation. See the Sun Fire V490 Server Quick Start Guide or the Sun Fire V490 Server Administration Guide for information about these procedures.
Make sure that you have installed the Sun Fire V490 server into a 4-post cabinet or 2-post rack (see Chapters 1 and 2) before following the instructions in this chapter.
The system is shipped with one of two CMA designs. To install the CMA, you must do the following:
1. Determine which CMA was shipped with your system.
See Determining Which CMA is Included with Your System.
3. Attach the power and data cables to your system.
See your system installation or setup guide for specific instructions.
4. Secure the system cables to the CMA.
Your system was shipped with one of two CMA designs. See TABLE 3-1 to determine which CMA is included with your system.
|
|
|
The following instructions apply to CMA Type A. If you have CMA Type B, see Installing and Securing Cables to CMA Type B.
|
1. Remove the screws that secure the front of the system to the left and right vertical rails at the front of the cabinet.
2. Slide the chassis smoothly out of the cabinet about 3 inches (76.2 mm).
Sliding the server out of the cabinet provides easy access to the areas where you will attach the cable management arm.
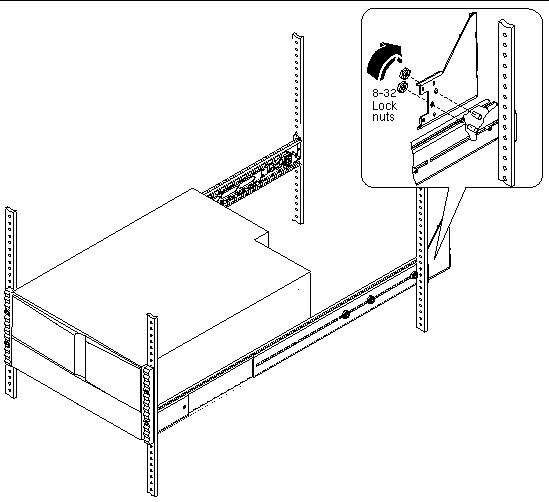
3. Attach a hinged bracket to the posts on the inner glide, as shown in the next figure.
a. Locate the two horizontal posts on the inner glide on the PCI side of the system.
b. Remove the protective covers from the posts.
c. Position the holes on the hinged bracket over the two posts on the inner glide.
d. Secure the hinged bracket to the inner glide using two 8-32 lock nuts.
This figure shows how to attach a hinged bracket to the inner glide.
4. Attach the other hinged bracket to the diagonal posts on the opposite slide assembly.
a. Locate the two diagonal posts on the opposite-side slide assembly.
b. Remove the protective covers from the posts.
c. Position the diagonal holes on the hinged bracket over the two posts on the slide assembly.
d. Secure the hinged bracket to the slide assembly using two 8-32 lock nuts.
5. Attach one end of the cable management arm to the hinged bracket on the slide assembly.
The cable management arm is included in the rack kit.
a. Position the cable management arm so that the two metal fingers in the first section are facing forward, toward the front of the server.
The segment with three metal fingers should be facing away from the server, toward the rear of the cabinet.
b. Locate the hinged bracket on the slide assembly.
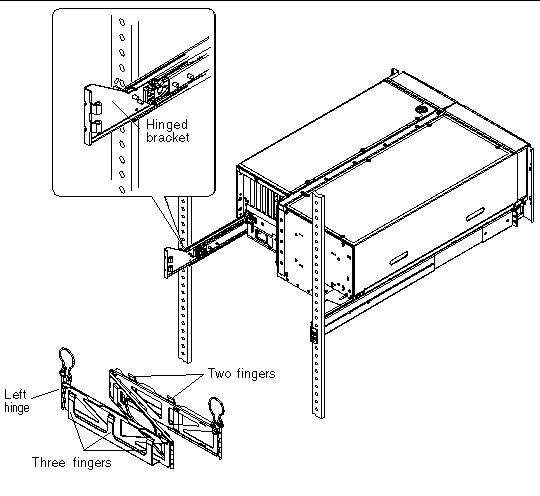
c. Slide the hinge on the cable management arm into the hinge on the slide assembly bracket until the openings in both hinge sides are aligned.
d. Locate the speed pin on the end of the cable management arm.
The speed pin secures the cable management arm to the slide assembly bracket.
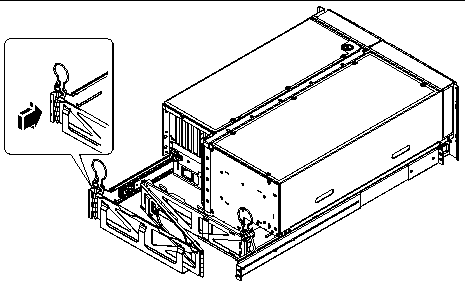
e. Insert the speed pin through the aligned openings of the hinges on the slide assembly and the cable management arm. Push the speed pin down firmly until it snaps into place.
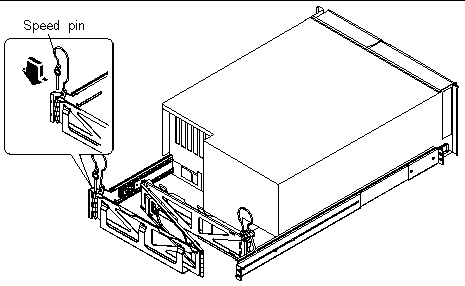
6. Attach the other end of the cable management arm to the hinged bracket on the inner glide.
a. Locate the hinged bracket on the end of the inner glide.
b. Slide the hinge on the cable management arm into the hinge on the bracket attached to the inner glide until the openings in both hinges are aligned.
c. Insert the speed pin through the aligned openings of the hinges on the bracket and the cable management arm and push the speed pin down firmly.
|
|
Note - This procedure illustrates how to route and secure the power cords and the Ethernet cable to the cable management arm. Your system may use additional cables. |
1. If necessary, slide the chassis smoothly out of the cabinet about 3 inches (7.62 cm).
Sliding the server out of the cabinet provides easier access to the cable management arm.
2. Locate the two metal fingers on the first section of the cable management arm and the three metal fingers on the third section of the cable management arm.
Note the Velcro straps in the first and center sections.
3. Locate the large oval cutout in the center section of the cable management arm.
The fingers, oval cutout, and straps enable you to route the cables and cords and secure them to the cable management arm. A single power cord is shown in the figure below to indicate a routing path.
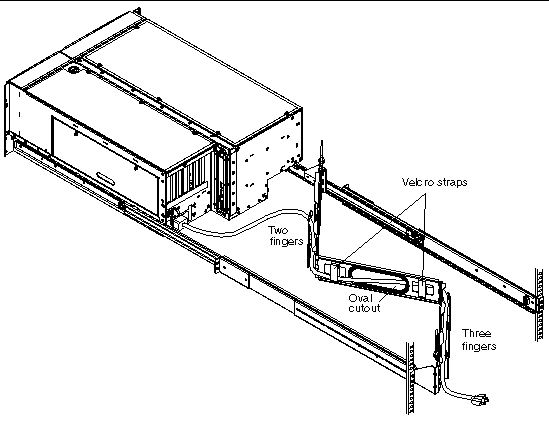
4. Route the cables into the two fingers in the first section of the cable management arm.
Be sure you leave enough slack to ensure an adequate bend radius for the cables.
5. Group the cables and insert the group into the large oval cutout, as shown in the next figure.
Use the oval cutout in the center section to route a group of cables through the cable management arm. Be sure you leave enough slack around the hinge to ensure an adequate bend radius for the cables.
|
Note - Do not insert the cables into the other metal cutouts. Use those cutouts to access and manipulate the cables. |
6. Route the cables into the three fingers in the third section of the cable management arm, as shown in the next figure.
7. Connect the power cords and data cables to the server ports.
See the Sun Fire V490 Server Administration Guide for more information about external ports.
8. Using the Velcro straps, secure the cords and cables to the first and center sections of the cable management arm.
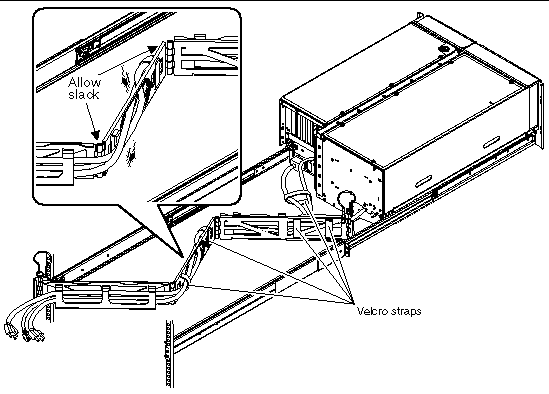
9. Connect the outlet plug of each power cord to the power sequencer in the cabinet, or to a grounded AC power outlet.
|
Note - For increased server redundancy, connect the power cords to separate circuits. |
10. Plug in the twisted-pair Ethernet (TPE) cable to the RJ-45 outlet to connect to your Ethernet network.
See your network administrator if you need more information about how to connect to your network.
11. Secure the server to the front vertical mounting rails using either four M6 screws or four 10-32 screws.
|
Note - The following instructions apply to CMA Type B. If you have CMA Type A, see Installing and Securing Cables to CMA Type A. |
Cable Management Arm Type B is reversable: it can be mounted on either side of the system. In order to ensure proper cable routing, Sun recommends you mount the end of the CMA closest to the back panel of the system on the same side of the system's PCI cards.
See TABLE 3-2 to determine the correct mounting location for the CMA.
|
Note - In the case of the Sun Fire V490, install the CMA to the left-side inner glide, and to the right-side slide assembly. |
|
|
Note - You must determine the correct mounting location for the CMA. See Determining the Correct Mounting Location before proceeding. |
1. Remove the screws that secure the front of the system to the left and right vertical rails at the front of the cabinet.
2. Slide the chassis smoothly out of the cabinet about 3 inches (8 cm).
Sliding the server out of the cabinet provides easy access to the areas where you will attach the cable management arm.
3. Attach one end of the cable management arm to the inner glide.
The cable management arm is included in the rack kit.
a. Go to the back of the cabinet. Locate the inner glide on the PCI-side of the system.
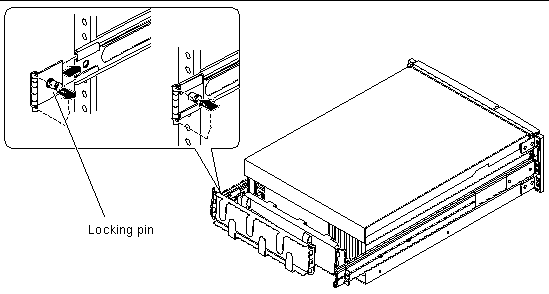
b. Position the cable management arm so that the hinged tab slides into the end of the inner glide.
c. Slide the hinged tab in until its locking pin snaps into place.
|
Note - These illustrations show CMA Type B installed on a different system. See Determining the Correct Mounting Location before installing the CMA on the Sun Fire V490 server. |
4. Attach the other end end of the cable management arm to the slide assembly.
a. Locate the end of the slide assembly.
a. Position the cable management arm so that the hinged tab slides into the end of the slide assembly.
b. Slide the hinged tab in until its locking pin snaps into place.
|
|
Note - This procedure illustrates how to route and secure the power cords and the Ethernet cable to the cable management arm. Your system may use additional cables. |
1. If necessary, slide the chassis smoothly out of the cabinet about 3 inches (8 cm).
Sliding the server out of the cabinet provides easier access to the cable management arm.
2. Locate the metal fingers on the first and third sections of the cable management arm.
3. Locate the center section of the cable management arm.
The Velcro straps enable you to route the cables and cords and secure them to the cable management arm.
4. Connect the power cords and data cables to the server ports.
See the Sun Fire V490 Server Administration Guide for more information about external ports.
5. Route the cables into the fingers in the first section of the cable management arm.
Leave enough slack in the cables to ensure that the hinges operate freely without crimping or binding the cables.
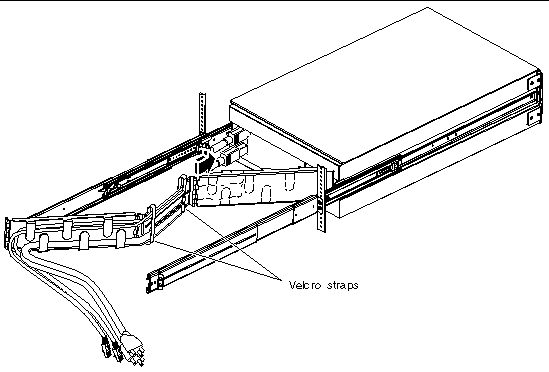
6. Arrange the cables along the center section of the cable management arm.
Distribute the cables evenly above and below the center section of the cable management arm, securing them with the Velcro straps. Leave enough slack around the hinges to ensure that they operate freely without crimping or binding the cables.
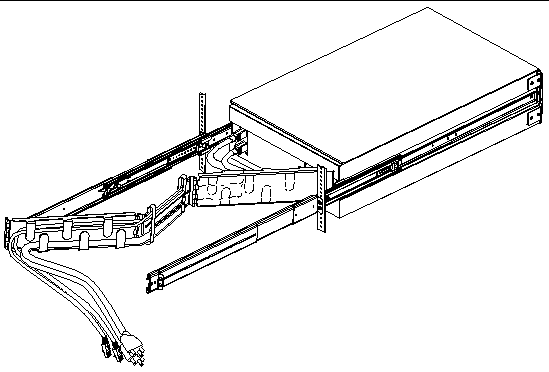
7. Route the cables into the fingers in the third section of the cable management arm.
8. Connect the outlet plug of each power cord to the power sequencer in the cabinet, or to a grounded AC power outlet.
|
Note - For increased server redundancy, connect the power cords to separate circuits. |
9. Plug in the twisted-pair Ethernet (TPE) cable to the RJ-45 outlet to connect to your Ethernet network.
See your network administrator if you need more information about how to connect to your network.
10. Secure the server to the front vertical mounting rails using either four M6 screws or four 10-32 screws.
See the instructions provided with your cabinet to complete these steps.
1. Retract the cabinet's anti-tip legs, if applicable.
2. Replace the side panels, if applicable.
3. Replace the front and back doors, if applicable.
The next step is to set up a system console, power on the server, and install the Solaris Operating System. See your server installation guide for specific instructions.
Copyright © 2005, Sun Microsystems, Inc. All Rights Reserved.