| Netra CT Server Service Manual |
| Netra CT Server Service Manual |
| C H A P T E R 10 |
|
Removing and Replacing Cold-Swappable Subassemblies |
This chapter specifies procedures for the initial installation, removal, and replacement of cold-swappable Netra CT server subassemblies. It is divided into the following sections:
Consult the Netra CT Server Safety and Compliance Manual for safety information prior to performing the procedures in this chapter.
|
Note - Read Chapter 3 before performing the procedures in this chapter. |
This section tells you how to remove and replace an internal hard disk drive. An internal hard disk drive is one that fits in a bay within a server. It is distinguished from an external hard disk drive, which is attached by a cable that connects to an I/O card in the server.
Though the Netra CT 410 server has one disk bay and the Netra CT 810 server has two, the procedures for removal and replacement of a disk are the same for both types of servers.
A hard disk drive is a cold-swappable component if it is being used by the server. For example, if a hard disk drive is being used as the primary boot drive, then that hard disk drive is a cold-swappable component unless disk management software is used to mirror the boot drive to a second hard disk drive installed in the server. For that reason, a hard disk drive in a Netra CT 410 server is a cold-swappable disk drive, unless it is running on the Solaris operating environment over the network and not off of the hard disk drive, in which case it becomes a hot-swappable component.
Instructions for removing and replacing a cold-swappable hard disk drive are covered here; instructions for removing and replacing a hot-swappable hard disk drive are covered in Section 7.1, Hard Disk Drive.
1. Complete the power off steps.
Refer to Section 2.2, Powering Off the Server for those instructions.
2. Attach the antistatic wrist strap.
Refer to Section 1.2, Attaching the Antistatic Wrist Strap.
3. Locate the drive bay cover on your system.
The hard disk drives will be behind the drive bay cover on your system. There would be a maximum of two hard disk drives behind the drive bay cover in a Netra CT 810 server and one behind the drive bay cover in a Netra CT 410 server.

4. Loosen the captive screws that hold the drive bay cover in place.
5. Remove the drive bay cover.
6. Determine which disk drive you want to remove.
7. Unlatch the disk drive handle to release it.
Push down in the direction of the arrow to release the bracket handle latch.
8. Pull the bracket handle out and swing it open.
9. Continue to pivot the disk drive bracket handle against the chassis, applying mild pressure until the drive disconnects.
10. Slide the drive out of the chassis and place it on the electrostatic discharge mat.
11. Secure the drive bay cover over the drive bays (FIGURE 10-1).
You must install the drive bay cover over the drive bays to ensure proper airflow in the system.
1. Attach the antistatic wrist strap.
Refer to Section 1.2, Attaching the Antistatic Wrist Strap.
2. Remove the drive bay cover (FIGURE 10-1).
3. Hold the bracket handle on the disk drive open.
4. Slide the replacement disk drive into the drive slot.
5. Gently push the drive until the locking handle engages.
6. Close the locking handle completely, using gentle downward pressure.
7. Replace the drive bay cover.
8. Complete the power on steps.
Refer to Section 2.1, Powering On the Server for more information.
9. If you are replacing your boot disk, reinstall the Solaris operating environment.
Refer to the Netra CT Server Installation Guide for more information.
10. If your hard disk(s) are under the control of RAID software, perform the necessary steps to bring the disks online.
This section tells you how to remove and replace a power distribution unit in a chassis. Keep in mind that you must remove the server in front of the failed power distribution unit in order to gain access to that power distribution unit; however, you do not have to remove any other servers except for the one directly in front of the failed power distribution unit. The power distribution unit connects directly into the midplane and is located on the chassis, not the server (FIGURE 10-2).

1. Go to the front of the system and use the system status panel on the server to determine which power distribution unit has failed.
The system status panel on each server has power distribution unit LED(s) that shows the status of the power distribution unit(s) behind that particular server. FIGURE 10-3 shows the locations of the power distribution unit LEDs on the Netra CT 810 server and FIGURE 10-4 shows the location of the power distribution unit LEDs on the Netra CT 410 server.


A power distribution unit may have failed if a power supply is inserted, the locking mechanism is in the locked ( ) position, and the green Power LED (
 ) for the PDU is OFF.
|
Note - Verify the DC input power cable is plugged into the PDU before replacing the PDU. If the DC input power cable is unplugged, plug it in and check the PDU LEDs on the system status panel again. |
2. Disconnect the DC input power cable(s) from the DC connector(s) that are supplying power to the server with the failed power distribution unit.
FIGURE 10-5 shows how to disconnect the DC input power cables from the DC connectors on the rear-access model and FIGURE 10-6 shows how to disconnect the DC input power cables from the DC connectors on the front-access model.

|
Caution - An energy hazard is present if you do not unplug the DC input power cable from the DC connector that supplies power to the power distribution unit that you are replacing. |


3. Perform all the necessary procedures to remove the server in front of the failed power distribution unit, including all software power-off procedures.
You must completely remove the server directly in front of the failed power distribution unit in order to gain access to that power distribution unit. Follow the instructions in Section 9.1.1, Removing a Server to safely remove the server.
4. Locate the power distribution unit that you want to replace.
FIGURE 10-7 shows the location of the power distribution units looking at an empty chassis from the front.

5. For front-access models, carefully reach into the chassis from the front and unplug the front-access DC cable connected to the top of the power distribution unit inside the chassis.
6. Carefully reach into the chassis from the front and unscrew the two captive screws that secure the power distribution unit to the chassis (FIGURE 10-8).

7. Remove the power distribution unit from the chassis.
1. Insert the power distribution unit into the slot in the chassis.
2. Tighten the two captive screws to secure the power distribution unit to the chassis (FIGURE 10-8).
3. Plug the DC input power cable(s) into the appropriate DC connector(s).
FIGURE 10-5 shows how to plug the DC input power cables into the DC connectors on the rear-access model and FIGURE 10-6 shows how to plug the DC input power cables into the DC connectors on the front-access model.
4. Perform all the necessary procedures to reinsert the server that you removed to access the failed power distribution unit, including all system power-up procedures.
Refer to Section 9.1.2, Installing a Server for those instructions.
5. Once the system is powered up, go to the system status panel and verify that the power distribution unit LEDs are in the appropriate states.
FIGURE 10-3 shows the locations of the power distribution unit LEDs on the Netra CT 810 server and FIGURE 10-4 shows the locations of the power distribution unit LEDs on the Netra CT 410 server. A power distribution unit is functioning properly if a power supply is inserted and the green Power LED ( ) for the PDU is ON.
The AC power entry unit provides power to all of the servers in the chassis, so you have to power off all of the servers in the chassis in order to remove or install an AC power entry unit. Note that you do not have to remove any of the AC power supply units to remove or install the AC power entry unit.
The part number for the AC power entry unit is F510-5148.
1. Power off all of the Netra CT servers in the chassis.
Refer to Section 2.2, Powering Off the Server for those instructions.
2. Unplug all AC cables from the AC connectors at the rear of the chassis.
FIGURE 10-9 shows the locations of the AC connectors at the rear of the chassis.
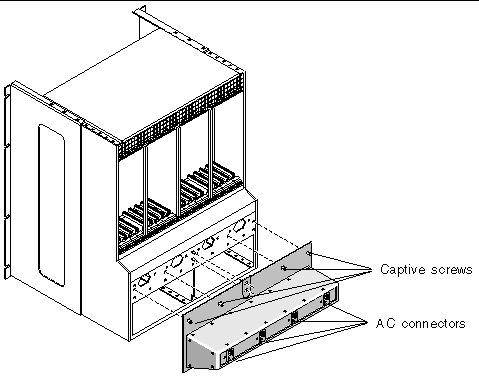
3. Using a No. 2 Phillips screwdriver, loosen the four captive screws that secure the AC power entry unit to the rear of the chassis.
FIGURE 10-9 shows the locations of the four captive screws at the rear of the chassis.
4. Tilt the top of the AC power entry unit away from the chassis, then lift the AC power entry unit up and away from the chassis.
1. Go to the rear of the chassis and insert the lower lip of the AC power entry unit into the opening at the rear of the chassis.
2. Press the top of the AC power entry unit against the chassis.
3. Tighten the four captive screws to secure the AC power entry unit to the chassis (FIGURE 10-9).
Tighten the screws to between 4 and 6 in/lbs torque.
4. Plug all the AC cables into the AC connectors at the rear of the chassis (FIGURE 10-9).
5. Power on all of the Netra CT servers in the chassis.
Refer to Section 2.1, Powering On the Server for those instructions.
6. Verify that all power supplies are functioning properly.
The green power LED ( ) on the power supply unit should go ON.
The front-access DC cable is used to connect the power distribution unit to the power connector at the front of the front-access DC models of the Netra CT 810 server and the Netra CT 410 server.
1. Perform all the necessary procedures to remove the server directly in front of the failed front-access DC cable, including all software power-off procedures.
You must completely remove the server directly in front of the failed front-access DC cable in order to gain access to that cable. Follow the instructions in Section 9.1.1, Removing a Server to safely remove the server.
2. Unplug the DC input power cable from the DC connector at the front of the chassis (FIGURE 10-10).


|
Caution - An energy hazard is present if you do not unplug the DC input power cable from the DC connector. |
3. At the front of the chassis, loosen the two captive screws that secure the front-access DC cable to the chassis.

4. Reach into the chassis and gently pull the front-access DC cable free from the front of the chassis.
5. Carefully reach into the chassis from the front and unplug the front access cable connected to the top of the power distribution unit inside the chassis.
6. Unhook the front-access DC cable from the cable clips along the top inside the chassis.
1. Carefully reach into the chassis from the front and plug one end of the front access cable to the top of the power distribution unit inside the chassis.
2. Insert the other end of the front-access DC cable through the holes at the top of the chassis (FIGURE 10-11).
3. Hook the front-access DC cable to the cable clips along the top inside of the chassis.
4. Tighten the two captive screws to secure the cable to the chassis (FIGURE 10-11).
5. Perform all the necessary procedures to reinsert the server that you removed to access the failed front-access DC cable, including all system power-up procedures.
Refer to Section 9.1.2, Installing a Server for those instructions.
6. Connect the DC input power cable to the DC connectors at the front of the chassis (FIGURE 10-10).
This section describes how to remove and replace a cold-swappable power supply unit. A cold-swappable power supply unit would be either a single remaining power supply unit in the Netra CT 810 server or the only power supply unit in the Netra CT 410 server.
|
Note - If you are replacing one power supply unit in a Netra CT 810 server and the second power supply unit is still up and running, you can replace the failed power supply unit without powering off the server. Refer to Chapter 8 for more information. |
Refer to Section 2.2, Powering Off the Server for those instructions.
2. Attach the antistatic wrist strap.
Refer to Section 1.2, Attaching the Antistatic Wrist Strap.
3. Push the purple locking mechanism up into the unlocked ( ) position.
FIGURE 10-12 shows the location of the locking mechanism for the power supply unit on a Netra CT 810 server, and FIGURE 10-13 shows the location of the locking mechanism for the power supply unit on a Netra CT 410 server. The two LEDs on the power supply unit should go OFF.

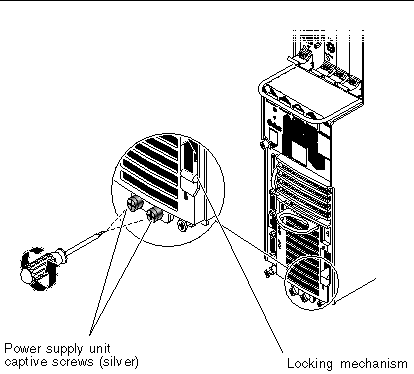
4. Using a No. 2 Phillips screwdriver, loosen the two silver captive screws at the base of the system.
FIGURE 10-12 shows the location of the captive screws for the power supply unit on a Netra CT 810 server, and FIGURE 10-13 shows the location of the captive screws for the power supply unit on a Netra CT 410 server.
|
Note - Do not loosen the black captive screws at the base of the system; those screws hold the server in place. |
5. Grasp the handle on the power supply unit (FIGURE 10-14), slide it out of the server and place it on the electrostatic discharge mat.

1. Attach the antistatic wrist strap.
Refer to Section 1.2, Attaching the Antistatic Wrist Strap.
2. Slide the power supply unit into the slot.
3. Using a No. 2 Phillips screwdriver, tighten the two black captive screws to secure the power supply unit to the server.
FIGURE 10-12 shows the location of the captive screws for the power supply unit on a Netra CT 810 server, and FIGURE 10-13 shows the location of the captive screws for the power supply unit on a Netra CT 410 server.
4. Push the power supply unit locking mechanism(s) down into the locked ( ) position.
FIGURE 10-12 shows the location of the locking mechanisms for the power supply unit on a Netra CT 810 server, and FIGURE 10-13 shows the location of the locking mechanisms for the power supply unit on a Netra CT 410 server. The green LED on the power supply unit should start flashing at this point, indicating that the power supply unit is powered on and functioning properly, but the server has not been powered on yet.
Refer to Section 2.1, Powering On the Server for more information.
6. Verify that the power supply unit you just installed is functioning properly.
The green Power LED ( ) on the power supply unit should go ON and the system should boot.
| Netra CT Server Service Manual | 816-2482-11 |
Copyright © 2003, Sun Microsystems, Inc. All rights reserved.