Viewing or Changing Permissions and ACL Entries
All changes to a file or folder's basic permissions and ACL entries are made using the File Manager's Properties dialog box.
To Display the Properties Dialog Box for a File or Folder
-
Display the File Manager.
-
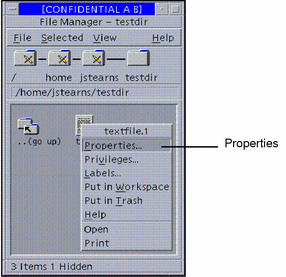
Place the pointer over the file or folder whose properties you wish to access and press the right mouse button (see figure below).
Figure 5-5 Selecting Change Properties from the File Manager Popup Menu
-
Select Properties...
This step displays the Properties dialog box for the selected file or folder. This dialog box lets you:
-
View the file or folder's basic information
-
View or change the file or folder's basic permissions
-
View or change the file or folder's ACL entries
-
Browse for other files or folders to be viewed or changed
-
To View the Basic Information of a File or Folder
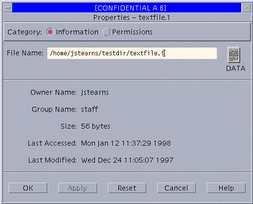
A file or folder's basic information consists of: owner, group, size in bytes, the last access date, and the last modification date.
-
Display the File Manager Properties dialog box.
See "To Display the Properties Dialog Box for a File or Folder".
-
Click the Information button in the Category field.
This step sets the dialog box to basic information mode.
Figure 5-6 File Manager Basic Information Dialog Box
-
Examine the data in the basic file information area.
In addition to the data in the basic file information area, there is an icon at the right of the file identification area that indicates the file or folder's type.
To View or Change a File or Folder's Basic Permissions
-
Display the File Manager Properties dialog box.
See "To Display the Properties Dialog Box for a File or Folder".
-
Click the Permissions button in the Category field.
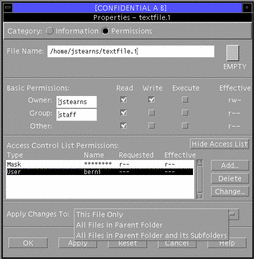
This step sets the dialog box to permissions mode (see below).
Figure 5-7 File Manager: Displaying ACL Entries
-
Examine the settings in the permissions area.
The owner, group, and other's read, write, and execute permissions are displayed here, along with buttons for making changes. The Effective column (at the right side of the permissions area) displays the permissions after the ACL mask has been applied as the permissions appear in the command line interface.
-
To make changes, click the appropriate read, write, or execute buttons for owner, group, or other.
You can check the result in the Effective column at the right of the area.
-
To specify the target item(s) for these changes, select the appropriate target in the Apply Changes To option menu at the bottom of the window.
You can select the current file, all files in the parent folder, or all files in the parent folder and its subfolders.
-
Click OK or Apply to save the permissions.
To View a File or Folder's ACL Entries
-
Display the File Manager Properties dialog box.
See "To Display the Properties Dialog Box for a File or Folder".
-
Click the Permissions button in the Category field.
This sets the dialog box to permissions mode (see Figure 5-7).
-
Click the Show Access Control List button if the access control list area is not currently displayed.
-
Examine the entries in the access control list area.
Any existing ACL entries for the item are displayed in the scroll list, including the type of entry, specified name, requested permissions, and effective permissions. The requested permissions are the default permissions before the ACL mask has been applied--the effective permissions reflect the permissions after the mask has been applied.
To Add an ACL Entry
-
Display the File Manager Properties dialog box as described in "To View a File or Folder's ACL Entries".
-
Click the Add button at the right of the ACL area (see Figure 5-7) to display the Add dialog box.
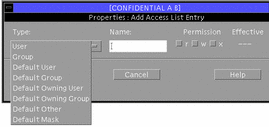
The File Manager Add Access List Entry dialog box with the Type menu displayed is shown below. Note that for folders all menu items are available. For files, only the User and Group menu items are active.
Figure 5-8 File Manager Add ACL Dialog Box
-
Specify the type of ACL entry.
The ACL types enabled in the options menu depend on whether you selected a file or folder. Only the User and Group items are available for files. All entries are enabled for folders. If you need to review the ACL types, see Table 5-1.
In addition, if you select one of the default entries, a message will be displayed at the bottom of the dialog box as a reminder that the default owning user, default owning group, default other, and default mask will be added with their permissions enabled accordingly.
-
Specify the name if enabled.
When you select User, Group, Default User, or Default Group, you must enter a name (or ID).
If you select Default Owning User, Default Owning Group, Default Other, or Default Mask, the name field is disabled, since it is not necessary.
-
Click the permissions you wish to enable (or disable).
A check mark means that the permission is enabled. If you select a permission that will be overridden by the mask, a warning will be displayed in the message display area at the bottom of the dialog box, along with a beep. The effective permissions column will indicate the difference. You are nonetheless allowed to make the entry and it will take effect if the mask is modified to permit it later.
-
Click Add in the dialog box.
This adds the entry, causing it (and any related default entries) to be displayed in the Access Control List area. If you do not like the setting in the default permission settings, you can change them (see "To Change an ACL Entry").
-
To specify the target item(s) for the permissions or ACL entries that you specified, select the appropriate target in the Apply Changes To option menu at the bottom of the window.
You can select the current file, all files in the parent folder, or all files in the parent folder and its subfolders.
-
Click OK or Apply to save the ACL entries (and any permissions you have changed).
To Change an ACL Entry
-
Display the File Manager Properties dialog box as described in "To View a File or Folder's ACL Entries".
-
Select an entry in the access control list area to be changed.
-
Click the Change button at the right of the ACL area to display the Change Access List Entry dialog box.
If you have selected an entry of type User, Group, Default User, or Default Group, the dialog box displays a Type menu and you can change the type. If you select Mask, Default Owning User, Default Owning Group, Default Other, or Default Mask, there is no ACL type menu button and the type is fixed. See the figure below, which is an example of changing a Default Mask entry.
Figure 5-9 File Manager Change ACL

-
Specify the type of ACL entry.
The type will be limited as discussed in Step 3.
-
Specify the name (if enabled) and if you wish to change it.
-
Click the permissions you wish to enable (or disable).
A check mark means that the permission is enabled. If you select a permission that will be overridden by the mask, a warning will be displayed in the message display area at the bottom of the dialog box, along with a beep. The effective permissions column will indicate the difference. You are nonetheless allowed to make the entry and it will take effect if the mask is modified later.
-
Click Change in the dialog box.
This modifies the entry, causing the modification to be displayed in the Access Control List area. Remember that if you select Mask, your modifications may change the effectiveness of the entries for specified users and groups and for the owner's group.
-
To specify the target item(s) for the permissions or ACL entries that you specified, select the appropriate target in the Apply Changes To option menu at the bottom of the window (see Figure 5-7).
You can select the current file, all files in the parent folder, or all files in the parent folder and its subfolders.
-
Click OK or Apply to save the ACL entry changes (and any permissions you have changed).
To Delete an ACL Entry
-
Display the File Manager Properties dialog box as described in "To View a File or Folder's ACL Entries".
-
Select the entry to be deleted in the Access Control List area.
-
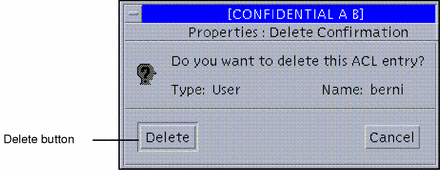
Click the Delete button at the right of the ACL area to display the Delete dialog box (see figure below).
Figure 5-10 File Manager Delete Access List Entry Dialog Box
-
Confirm that the selected entry is correct and click Delete in the dialog box.
This removes the entry from the Access Control List area.
-
To specify the target item(s) for the permissions or ACL entries that you specified, select the appropriate target in the Apply Changes To option menu at the bottom of the window (see Figure 5-7).
You can select the current file, all files in the parent folder, or all files in the parent folder and its subfolders.
-
Click OK or Apply to save the current ACL entries (and any permissions you have changed).
- © 2010, Oracle Corporation and/or its affiliates
