| C H A P T E R 10 |
|
Simple Network Management Protocol |
ILOM supports the Simple Network Management Protocol (SNMP), which is used to exchange data about network activity. SNMP is an open, industry-standard protocol.
This chapter includes the following sections:
Simple Network Management Protocol (SNMP) is an open technology that enables the management of networks and devices, or nodes, that are connected to the network. Using SNMP, data travels between a managed device (node) and a networked management station. A managed device can be any device that runs SNMP, such as hosts, routers, web servers, or other servers on the network. SNMP messages are sent over IP using the User Datagram Protocol (UDP). Any management application that supports SNMP can manage your server.
ILOM supports SNMP versions 1, 2c, and 3. Using SNMP v3 is strongly advised since SNMP v3 provides additional security, authentication, and privacy beyond SNMP v1 and v2c.
SNMP is a protocol, not an operating system, so you need an application to utilize SNMP messages. Your SNMP management software may provide this functionality, or you can use an open source tool like net-SNMP, which is available at:
http://net-snmp.sourceforge.net/
Both management stations and agents use SNMP messages to communicate. Management stations can send and receive information. Agents can respond to requests and send unsolicited messages in the form of traps. Management stations and agents use the following functions:
SNMP functionality requires the following two components:
The management station monitors nodes by polling management agents for the appropriate information using queries. Managed nodes can also provide unsolicited status information to a management station in the form of a trap. SNMP is the protocol used to communicate management information between management stations and agents.
The SNMP agent is preinstalled on your Sun server platform and runs on ILOM, so all SNMP management occurs through ILOM. To utilize this feature, your operating system must have an SNMP client application.
The base component of an SNMP implementation is the Management Information Base (MIB). A MIB is a text file that describes a managed node’s available information and where it is stored. The tree-like, hierarchical system classifies information about resources in a network. The MIB defines the variables that the SNMP agent can access. When a management station requests information from a managed node, the agent receives the request and retrieves the appropriate information from the MIBs. The MIB provides access to the server’s network configuration, status, and statistics.
The following SNMP MIBs are used with ILOM:
This MIB represents an inventory of server and chassis hardware, including all the sensors and indicators along with their status.
This MIB represents a Sun SP or CMM configuration such as user or access management, alerts, and more.
This MIB describes the hardware-related traps that a Sun SP or CMM may generate.
This MIB describes the IPMI Platform Event Traps (PETs) that a Sun SP may generate. See About Alert Management for more information about PETs.
Using ILOM, you can configure up to 15 alert rules. For each alert rule that you configure in ILOM, you must define three or more properties about the alert, depending on the type of alert. The alert type defines the message format and the method for sending and receiving an alert message. ILOM supports these three alert types: IPMI PET alerts, email notification alerts, or SNMP traps.
ILOM supports the generation of SNMP trap alerts to a user-specified IP address. All destinations that you specify must support the receipt of SNMP trap messages.
ILOM has a preinstalled SNMP agent that supports SNMP trap delivery to an SNMP management application.
To use this feature, you must do the following:
There are no trap destinations configured by default. By default, agents listen to port 161 for SNMP requests and agents send traps to port 162. However, you can configure the SNMP trap destination port to any valid port.
You can add, delete, or configure SNMP user accounts and communities using the ILOM command-line interface (CLI).
| Note - When working in the ILOM CLI, if Set Requests is disabled, all SNMP objects are read-only. |
|
1. Log in to the ILOM CLI as Administrator.
2. To add an SNMP v3 read-only user account, type the following command:
create /SP/services/snmp/users/username authenticationpassword=password
|
1. Log in to the ILOM CLI as Administrator.
2. To edit an SNMP v3 user account, type the following command:
edit /SP/services/snmp/users/username authenticationpassword=password
| Note - When changing the parameters of SNMP users, you must provide a value for authenticationpassword, even if you are not changing the password. |
|
1. Log in to the ILOM CLI as Administrator.
2. To delete an SNMP v3 user account, type the following command:
delete /SP/services/snmp/users/username
|
1. Log in to the ILOM CLI as Administrator.
2. To add an SNMP v1/v2c community, type the following command:
create /SP/services/snmp/communities/communityname
|
1. Log in to the ILOM CLI as Administrator.
2. To delete an SNMP v1/v2c community, type the following command:
delete /SP/services/snmp/communities/communityname
The following table lists the targets, properties, and values that are valid for SNMP user accounts.
For example, to change the privacyprotocol for user a1 to DES you would type:
-> set /SP/services/snmp/users/al privacyprotocol=DES privacypassword=password authenticationprotocol=SHA authenticationpassword=password
Your changes would be invalid if you typed only:
-> set /SP/services/snmp/users/al privacyprotocol=DES
| Note - You can change SNMP user permissions without resetting the privacy and authentication properties. |
|
Follow these steps to configure the destinations to which the SNMP traps are sent.
1. Log in to the ILOM CLI as Administrator.
2. Type the show comand to display the current settings of the alert rule.
3. Go to the /SP/alertmgmt/rules/snmp directory. Type:
-> cd /SP/alertmgmt/rules/snmp
4. Choose a rule (from targets 1 through 15) for which you would like to configure a destination for SNMP traps, and go to that directory.
5. Within that rule directory, type the set command to change the rule properties.
-> set type=snmptrap level=critical destination=IPaddress destination_port=0 snmp_version=2c community_or_username=public
This section describes how to use the ILOM web interface to manage SNMP users and communities.
|
Follow these steps to configure SNMP settings:
1. Log in to ILOM as an Administrator to open the web interface.
You can modify SNMP settings only when logged in to ILOM with Administrator privileges.
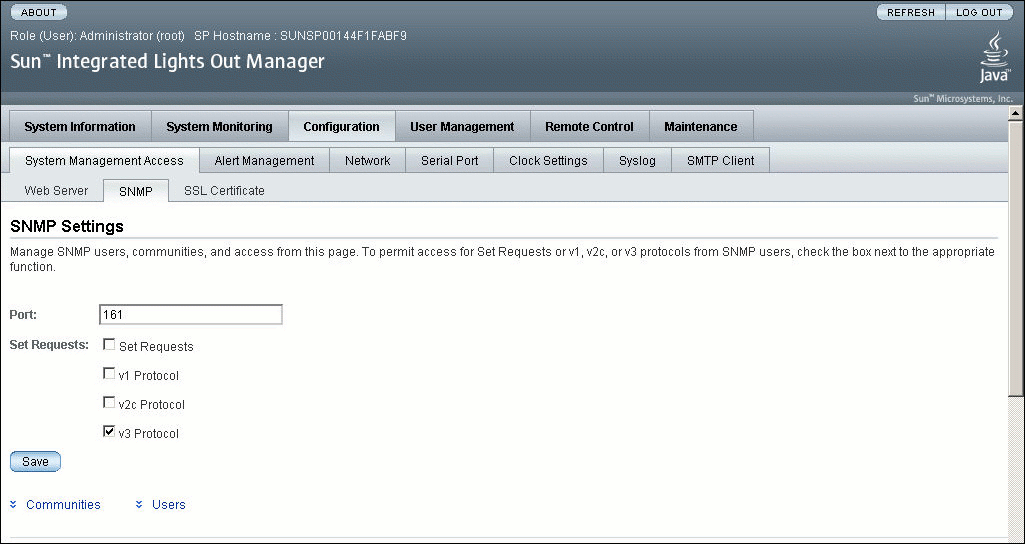
2. Select Configuration --> System Management Access --> SNMP.
The SNMP Settings page appears.
FIGURE 10-1 SNMP Settings Page

3. Type the port number in the Port text field.
4. Select or clear the Set Requests check box to enable or disable the Set Requests option.
If Set Requests is disabled, all SNMP objects are read-only.
5. Select a check box to enable SNMP v1, v2c, or v3.
SNMP v3 is enabled by default. You can enable or disable v1, v2c, and v3 protocol versions.
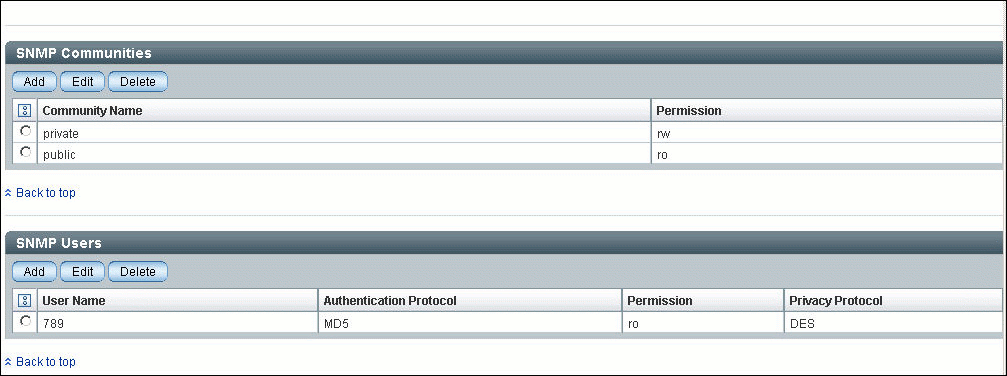
| Note - At the bottom of the page, you can also add, edit, or delete SNMP communities or users, as shown in FIGURE 10-2. |
FIGURE 10-2 SNMP Communities and Users

|
Follow these steps to add or edit an SNMP v3 user account:
1. Log in to ILOM as an Administrator to open the web interface.
You can add an SNMP user or user account only when logged in to ILOM with Administrator privileges.
2. Select Configuration --> System Management Access --> SNMP.
The SNMP Settings page appears.
3. Click the Users link or scroll down to the SNMP Users list.
4. Click Add or Edit under the SNMP Users list.
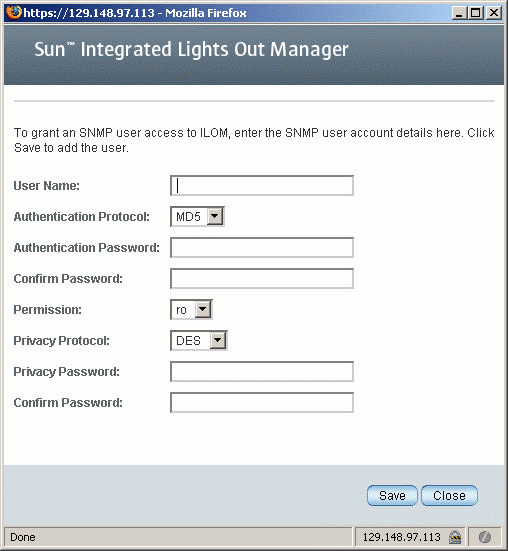
The Add dialog box or the Edit dialog box appears as shown in FIGURE 10-3.
FIGURE 10-3 Add SNMP User Dialog

5. Type a user name in the User Name text field.
The user name can include up to 35 characters. It must start with an alphabetic character and cannot contain spaces.
6. Select either Message Digest 5 (MD5) or Secure Hash Algorithm (SHA) in the Authentication Protocol drop-down list.
7. Type a password in the Authentication Password text field.
The authentication password must contain 8 to 16 characters, with no colons or space characters. It is case-sensitive.
8. Retype the authentication password in the Confirm Password text field.
9. Select read-only (ro) or read-write (rw) in the Permissions drop-down list.
10. Select DES or None in the Privacy Protocol drop-down list.
11. Type a password in the Privacy Password text field.
The privacy password must contain 8 to 16 characters, with no colons or space characters. It is case-sensitive.
12. Retype the password in the Confirm Password text field.
|
Follow these steps to delete an SNMP v3 user account:
1. Log in to ILOM as an Administrator to open the web interface.
You can modify SNMP settings only when logged in to accounts with Administrator privileges.
2. Select Configuration --> System Management Access --> SNMP.
The SNMP Settings page appears.
3. Click the Users link or scroll down to the SNMP Users list.
4. Select the radio button of the SNMP user account to delete.
5. Click Delete under the SNMP User’s List.
A confirmation dialog box opens.
6. Click OK to delete the user account.
|
Follow these steps to add or edit an SNMP v1 or v2c community:
1. Log in to ILOM as an Administrator to open the web interface.
You can add or edit SNMP communities only when logged in to accounts with Administrator privileges.
2. Select Configuration --> System Management Access --> SNMP.
The SNMP Settings page appears.
3. Click the Communities link or scroll down to the Communities list.
4. Click the Add or Edit button for the SNMP Communities list.
The Add or Edit dialog box appears.
5. Type the name of the community in the Community Name field.
The community name can contain up to 35 characters. It must start with an alphabetic character and cannot contain a space.
6. Select read-only (ro) or read-write (rw) in the Permissions drop-down list.
|
Follow these steps to delete an SNMP v1 or v2c community:
1. Log in to ILOM as an Administrator to open the web interface.
You can delete an SNMP community only when logged in to accounts with Administrator privileges.
2. Select Configuration --> System Management Access --> SNMP.
The SNMP Settings page appears.
3. Click the Communities link or scroll down to the Communities list.
4. Select the radio button of the SNMP community to delete.
A confirmation dialog box appears.
6. Click OK to delete the SNMP community.
|
Follow these steps to configure the destinations to which the SNMP traps are sent.
1. Log in to ILOM as an Administrator to open the web interface.
You can configure SNMP trap destinations only when logged in to accounts with Administrator privileges.
2. Select Configuration --> Alert Management.
The Alert Settings page appears. This page shows the table of configured alerts.
3. To modify an alert, select an alert radio button.
4. From the Actions drop-down list, select Edit.
The Create or Modify Alert dialog appears.
5. In the dialog, select the level of the alert from the drop-down list.
6. In the Type drop-down list, select SNMP Trap.
7. Specify the SNMP Trap destination IP address, destination port (selecting Autoselect sets the destination port to the default port 162), SNMP version, or community or user name.
8. Click Save for your changes to take effect.
This section includes various examples of using net-snmp to query the SNMP agent on an ILOM SP.
To begin, download and install the latest version (version 5.2.1 or higher) of
net-snmp that works with the operating system of your management station:
http://net-snmp.sourceforge.net/
net-snmp installs all the standard MIBs (SNMPv2-MIB, SNMP-FRAMEWORK-MIB and ENTITY-MIB) that ILOM supports. You must download the SUN-PLATFORM-MIB.mib, SUN-ILOM-CONTROL-MIB.mib, SUN-HW-TRAP-MIB.mib and SUN-ILOM-PET-MIB.mib files and place those files in the directory where net-snmp tools load MIBs. See the following URL for additional information:
http://net-snmp.sourceforge.net/wiki/index.php/
TUT:Using_and_loading_MIBS
For additional information about SNMP, go to the following URLs:
|
Configure your SP or CMM as described in the previous sections and then follow these steps to view and configure SNMP settings:
1. Go to the /SP/services/snmp directory by typing:
2. Within that directory, type the show command to view SNMP settings.
-> show /SP/services/snmp Targets: communities users Properties: engineid = none port = 161 sets = disabled v1 = disabled v2c = disabled v3 = enabled Commands: cd set show |
4. View the communities by typing:
-> show communities /SP/services/snmp/communities Targets: public Properties: Commands: cd create delete show |
5. View the public communities by typing:
-> show communities/public /SP/services/snmp/communities/public Targets: Properties: permission = ro Commands: cd set show |
6. Create private communities with read/write access by typing:
-> create communities/private permission=rw
|
1. Type the the snmpget command to obtain specific information.
2. Type the snmpwalk command to obtain information about discrete components.
|
 Type the snmpset command to change the location of devices.
$ snmpset -v 2c -c private -m ALL <sp_ip> sysLocation.0 s "<location>"
SNMPv2-MIB::sysLocation.0 = STRING: ILOM Dev Lab
|
 Type the snmptrapd command to receive trap information.
Copyright © 2008 Sun Microsystems, Inc. All Rights Reserved.