| Note - The information in this appendix applies to all Sun Fire X4100/X4100 M2 and X4200/X4200 M2 servers, unless otherwise noted in the text.
|
C.1 External Status Indicator LEDs
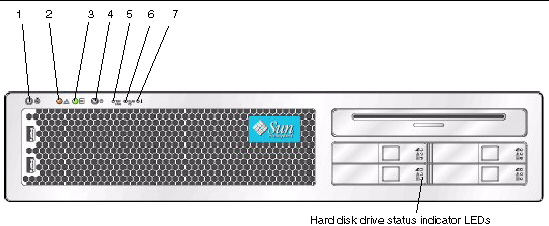
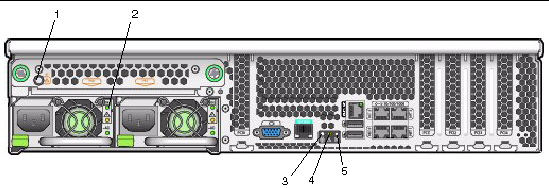
FIGURE C-1 and FIGURE C-2 show the locations of the external status indicator LEDs. A Sun Fire X4200/X4200 M2 server is pictured, but the LED locations are the same for the Sun Fire X4100/X4100 M2 server.
Refer to TABLE C-3 and TABLE C-4 for descriptions of the LED behavior, which differs slightly for Sun Fire X4100/X4100 M2 and X4200/X4200 M2 servers.
FIGURE C-1 Server Front Panel LEDs
 [ D ]
[ D ]
Figure Legend
|
1
|
Locate button/LED
|
|
2
|
Service action required LED
|
|
3
|
Power/OK LED
|
|
4
|
Power button
|
|
5
|
Front fan fault LED
|
|
6
|
Power supply/rear fan tray fault LED
|
|
7
|
System overheat fault LED
|
TABLE C-3 Front Panel LED Functions
|
LED Name
|
Description
|
|
Locate button/LED
|
This LED helps you to identify which system in the rack you are working on in a rack full of servers.
- In the ILOM GUI, navigate to System Monitoring >Indicators and select the radio button next to /SYS/LOCATE. From the drop-down menu, select Turn LED On, or Set LED to Fast Blink.
- In the CLI, enter:
set /SYS/LOCATE value=[Fast_Blink|Off]
- Push and release this button to make the Locate LED blink for 30 minutes.
- Hold down the button for 5 seconds to initiate a “push-to-test” mode that illuminates all other LEDs both inside and outside of the chassis for 15 seconds.
|
|
Service Action Required LED
|
This LED has two states:
- Off: Normal operation.
- Slow Blinking: An event that requires a service action has been detected. It also blinks when only one power supply is plugged in.
|
|
Power/OK LED
|
This LED has three states:
- Off: Server main power and standby power are off.
- Blinking: Server is in standby power mode, with power applied to only the GRASP board and the power supply fans.
- On: Server is in main power mode with power supplied to all components.
|
|
Front Fan Fault LED
|
This LED lights when there is a failed front cooling fan module. LEDs on the individual fan modules indicate which fan module has failed.
|
|
Power Supply/Rear Fan Tray Fault LED
|
This LED lights when:
- Two power supplies are present in the system but only one has power connected. To clear this condition, either plug in the second power supply or remove it from the chassis.
- Any voltage-related event occurs in the system. For CPU-related voltage errors the associated CPU Fault LED will also be illuminated.
- (For Sun Fire X4200/X4200 M2 only) when the rear fan tray has failed or is removed.
|
|
System Overheat Fault LED
|
This LED lights when an upper temperature limit is detected.
|
|
Hard Disk Drive Status LEDs
|
The hard disk drives have three LEDs:
- Top LED (blue): Reserved for future use.
- Middle LED (amber): Hard disk drive failed.
- Bottom LED (green): Hard disk drive is operating properly.
|
FIGURE C-2 Server Back Panel LEDs

Figure Legend
|
1
|
Rear fan tray fault LED (Sun Fire X4200/X4200 M2 only)
|
|
2
|
Power supply LEDs on each power supply
|
|
3
|
Locate button/LED
|
|
4
|
Service action required LED
|
|
5
|
Power/OK LED
|
TABLE C-4 Back Panel LED Functions
|
LED Name
|
Description
|
|
Rear Fan Tray Fault LED
(The rear fan tray and the LED are present only in Sun Fire X4200/X4200 M2 servers.)
|
This LED has two states:
- Off: Fan module is operating properly.
- On (amber): Fan tray has failed.
|
|
Power Supply Status LEDs
|
The power supplies have three LEDs:
- Top LED (green): Power supply is operating properly.
- Middle LED (amber): Power supply failed.
- Bottom LED (green): Power supply is operating properly.
|
|
Locate button/LED
(Same function as on front panel.)
|
This LED helps you identify which system in the rack you are working on in a rack full of servers.
- Push and release this button to make the Locate LED blink for 30 minutes.
- Hold down the button for 5 seconds to initiate a “push-to-test” mode that illuminates all other LEDs for 15 seconds both inside and outside of the chassis.
|
|
Service Action Required LED
(Same function as on front panel.)
|
This LED has two states:
- Off: Normal operation.
- Slow Blinking: An event that requires a service action has been detected.
|
|
Power/OK LED
(Same function as on front panel.)
|
This LED has three states:
- Off: Server main power and standby power are off.
- Blinking: Server is in standby power mode, with power applied to only the GRASP board and the power supply fans.
- On: Server is in main power mode with power supplied to all components.
|
C.2 Internal Status Indicator LEDs
These servers have internal status indicator LEDs for the fan modules, the DIMM slots, the CPUs, and the GRASP board.
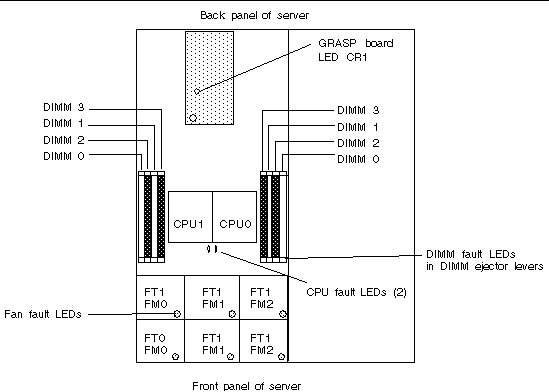
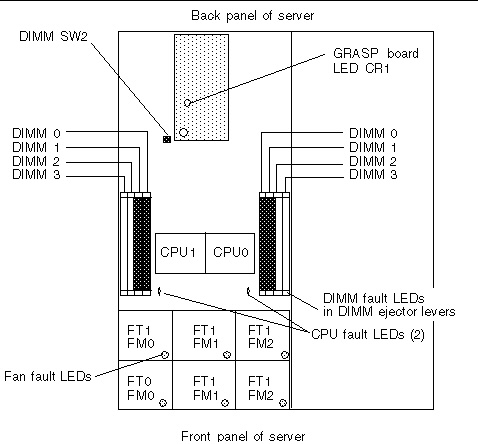
FIGURE C-3 shows the locations of the internal LEDs. TABLE C-5 describes the LED behavior.
Note the following differences between the Sun Fire X4100/X4200 and the X4100 M2/X4200 M2 servers regarding the power requirements for viewing the DIMM fault and CPU fault LEDs:
- For the original Sun Fire X4100/X4200 servers, to see the DIMM fault and CPU fault LEDs, you must put the server in standby power mode, with the power cords attached. See Powering Off the Server.
- For the Sun Fire X4100 M2/X4200 M2 server, you can view the DIMM fault and CPU fault LEDs without the power cords attached. These LEDs can be lit by a capacitor on the motherboard for up to one minute. To light the fault LEDs from the capacitor, push the small button on the motherboard labeled “DIMM SW2.” See FIGURE C-4.
- The internal LED locations are shown in FIGURE C-3 for Sun Fire X4100/X4200 servers.
- The internal LED locations are shown in FIGURE C-4 for Sun Fire X4100 M2/X4200 M2 servers.
FIGURE C-3 Sun Fire X4100/X4200 Internal LEDs

FIGURE C-4 Sun Fire X4100 M2/X4200 M2 Internal LEDs

TABLE C-5 Internal LED Functions
|
LED Name
|
Description
|
|
DIMM Fault LED
(The ejector levers on the DIMM slots are the LEDs.)
|
This LED has two states:
- Off: DIMM is operating properly.
- On (amber): DIMM has failed.
|
|
CPU Fault LED
(on motherboard)
|
This LED has two states:
- Off: CPU is operating properly.
- On (amber): CPU has encountered a voltage or heat error condition.
|
|
Fan Module Fault LED
|
This LED has two states:
- Off: Fan module is operating properly.
- On (amber): Fan module has failed.
|
|
GRASP Board Power Status LED
|
This LED has two states:
- Off: Standby power is not reaching the GRASP board.
- On (green): 3.3V standby power is reaching the GRASP board.
|
| Sun Fire X4100/X4100 M2 and X4200/X4200 M2 Servers Service Manual
|
819-1157-23
|
   
|
Copyright © 2009 Sun Microsystems, Inc. All rights reserved.


