| Sun StorageTek RAID Manager Software User’s Guide |
| C H A P T E R 7 |
|
Monitoring Storage Space |
This chapter describes how the Sun StorageTek RAID Manager software helps you monitor your storage space. The chapter contains the following sections:
The Sun StorageTek RAID Manager software provides many ways to monitor the status of your storage space:
From the local system, you can see status information and messages about the activity (or events) occurring in your storage space.
|
 To open a full-screen version of the event log, go to the Event Viewer by clicking the Events button.
You can sort the events by clicking the column heads.
|
1. From the Event Viewer, review the log of events.
Status is indicated by an icon in the left-hand column. The icons are described in About the Status Icons.
2. Double-click an event to see more details about the event.
The Configuration event detail window is displayed.

3. From the Configuration event detail window, click Next to see the next event in the list.
You can monitor activity on, and the status of, remote systems from the local system by using the Sun StorageTek RAID Manager software’s two notification utilities to broadcast messages--the Notification Manager (see Setting Up Event Notifications) and the Email Notification Manager (see Setting Up Email Notifications).
|
1. To open a full-screen version of the event log, click the Events button.

|
1. In the Enterprise View, click the system you want.
2. In the menu bar, choose Actions > Clear logs on all controllers.
3. Click Yes to clear the log.
The log for the selected system is cleared, except for one event reporting that the log was cleared.
The Sun StorageTek RAID Manager software indicates event status with icons. The following table lists the three categories, or types, of events based on severity.
Warning- and Error-level icons appear next to components (such as systems and logical drives) affected by a failure or error, creating a trail, or rapid fault isolation, that helps you identify the source of a problem when it occurs. See Identifying a Failed or Failing Component for more information.
| Note - All Warning- and Error-level events also cause the audible alarm to sound. See Silencing and Testing the Audible Alarm for more information. |
You can set up the Sun StorageTek RAID Manager software to broadcast messages (or notifications) to selected remote systems and users when an event, such as the creation of a logical drive or the failure of a disk drive, occurs on the local system. (For more information about event types, see Checking Activity in Your Storage Space.)
You can set up one or both of these types of notifications for any system in your storage space:
Event notifications are messages about events on one system that are sent to the Event Viewer of another system in your storage space. These messages, called logged notifications, can help you monitor activity on your entire storage space from a single local station, and are especially useful in storage spaces that include multiple systems running the Sun StorageTek RAID Manager Agent only.
Logged notifications include status information and identify which system (or source) an event occurred on. For instance, in this example, the Event Viewer indicates that two logical drives were added to a system named ‘gas1668b’.
FIGURE 7-1 Identifying Event Types

Logged notifications are not sent to all systems in your storage space. In the Notification Manager, you can specify which systems will send and receive logged notifications; then, you can add or delete systems as your storage space grows and changes.
This section describes how to set up event notifications for one system in your storage space. You must complete the tasks in this section for each individual system that you’ll be monitoring with logged notifications.
1. Note this information for each system that will receive event notifications about the selected system:
2. In the Sun StorageTek RAID Manager software menu bar, choose Configure > system-you-want > Notifications.
FIGURE 7-2 Opening the Notification Manager

The Notification Manager is displayed on the Notifications tab of a new window. The local system is automatically included on the Notification List--by default, all local events are listed in the local Event Viewer.
FIGURE 7-3 Notifications Manager

3. To the Notification List, add the names of the other systems in your storage space that will receive event notifications generated by the system you selected in Step 2:
a. In the tool bar, click Add system.
b. In the Add System window, enter the host name or TCP/IP address of the first system.
If you are not using the default port number, 34571, enter the TCP/IP port. Then, click Add.
c. If you want more than one system to receive the event notifications, repeat Step b as required.
d. When done, click Cancel to close the Add System window.
The systems you added are displayed in the Notification List. Although you can’t sort the list, you can reorganize the columns by clicking and dragging the column heads.
FIGURE 7-4 Reorganizing the Columns of the Notification List

You can specify which levels of events are sent to individual systems by following the instructions in Modifying the Address, Host Name, or Notification Level of a System.
4. Close the Notifications window when you are done.
| Note - You can access other utilities in this window, such as the Task Manager (see Managing Tasks), by clicking their tabs. |
5. Repeat Step 1 to Step 4 for each system you want to monitor with event notifications.
To ensure that a system is receiving logged notifications, you can send a test event.
1. Open the Notification Manager.
See Opening the Notification Manager and Adding Systems.
| Note - You can also access the Notification Manager by selecting the system you want in the Enterprise View, then (on the menu bar) clicking Actions > Agent actions > Configure > Notifications tab. |
2. In the Notification List, click on the system you want to send a test event to.
| Note - You can only send a test event to one system at a time. |
3. On the menu bar, choose Actions > Send test event.
The test event is sent. A message appears indicating either that the test event was sent successfully or that the test failed. (Click OK to clear the message.)
If the test is successful, the receiving system beeps once, and its Event Viewer shows that a test event was received.
FIGURE 7-5 Viewing the Result of a Test Notification

1. Ensure that the receiving system is powered on and running the Sun StorageTek RAID Manager software.
2. Open the receiving system’s System Properties window (see Step 3) and double-check the TCP/IP address and port number.
3. Try sending the test event again.
This section describes how to manage systems in the Notification List:
If you want to specify the notification level for a system, or if the TCP/IP information or host name of a system changes, update its properties in the Notification Manager.
| Note - Does this system receive event notifications from more than one other system? Ensure you enter the updated information in the Notification Manager of all affected systems. |
1. Open the Notification Manager.
See Opening the Notification Manager and Adding Systems.
2. In the Notification List, click the system you want to modify.
3. In the System Properties window, enter the new information or select a new notification level in the Event Type drop-down menu, then click OK.
The Notification List shows the modified information.
FIGURE 7-6 Notification System Properties

You can remove any system (including the local system) from the Notification List. Once a system has been removed, logged notifications from the local system are no longer sent to it.
1. Open the Notification Manager.
See Opening the Notification Manager and Adding Systems.
2. In the Notification List, click on the system you want to remove.
3. In the tool bar, click Delete system.
4. Click Yes to confirm the deletion.
The system is removed from the Notification List.
The Notification Log displays status information and messages about the Notification Manager itself, such as whether notifications were sent successfully or not.
This section describes how to manage the Notification Log and use it to monitor the logged notifications being sent:
By default, notification events are listed in the order they occurred, with the most recent event first. To make it easier to find a specific event, click on the column heads to sort the events. You can also reorganize the columns by clicking and dragging the column heads.
The Notification Log uses icons to show the status of events. These icons also appear in the Event Viewer of the remote systems.
Double-click on an event to see basic information about it. Click Next to see the next event in the list.
FIGURE 7-7 Notification Event Detail Window

To make it easier to monitor recent events, you can clear the Notification Log.
1. Open the Notification Manager.
See Opening the Notification Manager and Adding Systems.
2. In the menu bar, choose File > Clear the event log > Notifications.
FIGURE 7-8 Clearing the Event Log of Notifications

3. Click Yes to clear the log.
The log is cleared, except for one event reporting that the log was cleared.
Event notifications are enabled by default. You can choose disable them, if required.
| Note - If you disable event notifications, events will be generated but not broadcast--not even to the local system. |
1. Open the Notification Manager.
See Opening the Notification Manager and Adding Systems.
2. In the menu bar, choose Actions > Disable notifications.
Event notifications are disabled. The Notifications tab shows the red ‘disabled’ icon.
FIGURE 7-9 Disabling Notifications

Follow Step 1and Step 2in Disabling and Re-Enabling Event Notifications, selecting Enable Notifications during Step 2.

Email notifications are email messages about events on a system in your storage space that are sent to specified users. Email notifications can help you monitor activity on your entire storage space from any location, and are especially useful in storage spaces that include multiple systems running the Sun StorageTek RAID Manager Agent only.
Only the users you specify receive email notifications. (See To Modify Information About a Recipient.) You can specify which types of events generate email messages to which recipients to ensure that errors receive immediate attention from the right people.
In the Email Notification Manager, you can add and delete email recipients, and modify the types of email notices they receive, as your requirements change.
This section describes how to set up email notifications for one system in your storage space. You must complete the tasks in this section for each individual system that you’ll be monitoring with email notifications.
2. In the menu bar, choose Configure > system-name > Email Notifications.
FIGURE 7-10 Opening the Email Notification Manager

The Email Notification Manager is displayed on the Email Notifications tab of a new window.
FIGURE 7-11 Displaying the Email Notifications Tab

3. If this is the first time you are opening the Email Notification Manager, continue with To Enter the SMTP Server Settings.
To set up email notifications, continue with To Add an Email Recipient.
The first time you are opening the Email Notification Manager, the SMTP Server Settings window is opened automatically.
1. Enter the address of your SMTP server.
2. Enter the “From” address to be displayed in email notifications.
FIGURE 7-12 SMTP Server Settings Window

If email recipients will be replying to email notifications, be sure that the “From” address belongs to a system that is actively monitored.
3. Click OK to save the settings.
4. To set up email notifications, continue with To Add an Email Recipient.
1. Open the Email Notification Manager.
See Setting Up Email Notifications.
2. In the menu bar, click Add email recipient.
The Add Email Recipient window is displayed.
3. In the Add Email Recipient window, enter the name and email address of the recipient.
4. In the Event Type drop-down menu, select an event level.
FIGURE 7-13 Add Email Recipient Window

For more information on event levels, see About the Status Icons.
6. Repeat Step 3 to Step 5 to add more email recipients.
7. Click Cancel to close the Add Email Recipient window.
The email recipients you added are now displayed in the Email List.
FIGURE 7-14 Email Recipients in the Email List

Although you cannot sort the list, you can reorganize the columns by clicking and dragging the column heads.
8. Close the Email Notifications window when you are done.
| Note - You can access other utilities in this window, such as the Task Manager (see Managing Tasks), by clicking their tabs. |
9. Repeat Step 1 to Step 8 for each system you want to monitor with email notifications.
To ensure that an email recipient is receiving event notifications, you can send them a test message.
1. Open the Email Notification Manager.
See Setting Up Email Notifications.
| Note - You can also access the Notification Manager from the menu bar by choosing Actions > Agent actions > Configure > Email Notifications tab. |
2. Click the email address to which you want to send the test message.
| Note - You can only send a test message to one email address at a time. |
3. On the menu bar, choose Actions > Send test message.
FIGURE 7-15 Sending a Test Email Message

If the test is successful, the email recipient receives the test message. If the test fails:
a. Ensure that the recipient’s email address is correct. (See To Modify Information About a Recipient to modify the address.)
b. Ensure that your SMTP server address is correct. (See To Change the Email Notification Manager Settings to modify the address.)
c. Try sending the test message again.
This section describes how to:
If the email address of a recipient changes, or if you need to change the types of event notifications the recipient receives, you can update the information about the recipient in the Email List.
1. Open the Email Notification Manager.
See Setting Up Email Notifications.
2. Click on the name of the recipient.
3. Modify the information about the recipient as required, then click OK.
You can remove any recipient from the Email List. Once a recipient has been removed, event notifications from the local system are no longer sent to that email address.
1. Open the Email Notification Manager.
See Setting Up Email Notifications.
2. Click the recipient you want to remove.
3. In the menu bar, choose Delete email recipient.
4. Click Yes to confirm the deletion.
The recipient is removed from the Email List.
The Email Log displays status information and messages about the Email Notification Manager itself, such as whether email notifications were sent successfully or not.
By default, email events are listed in the order they occurred, with the most recent event first. To make it easier to find a specific event, click on the column heads to sort events. You can also reorganize the column by clicking and dragging the column heads.
This section explains how to use and clear the Email Log.
1. Double-click on an event to see basic information about the event, including the event type.
See About the Status Icons for a list of event types.
FIGURE 7-16 Email Event Detail Window

2. Click Next to see the next event in the list.
1. Open the Email Notification Manager.
See Setting Up Email Notifications.
2. In the menu bar, choose Clear the event log > Email Notifications.
FIGURE 7-17 Clearing the Event Log of Email Notifications

3. Click Yes to clear the log.
The log is cleared, except for one event reporting that the log was cleared.
|
You can modify these Email Notification Manager settings as your needs change:
1. Open the Email Notification Manager.
See Setting Up Email Notifications.
2. In the menu bar, choose Actions, > SMTP server settings.
The SMTP server settings window is displayed.
FIGURE 7-18 Changing the SMTP Server Settings for the Email Notification Manager

3. Enter the address of the SMTP server.
4. Enter the From address that will be displayed in email notifications.
If email recipients will be replying to email notifications, be sure that the From address belongs to a system that is actively monitored.
5. Click OK to save the settings.
|
Email notifications are enabled by default, but can be disabled if required.
| Note - If you disable email notifications, events will be generated but email notices won’t be broadcast. |
1. Open the Email Notification Manager.
See Setting Up Email Notifications.
2. In the menu bar, choose Actions > Disable Email Notifications.
FIGURE 7-19 Disabling Email Notifications

Email notifications are disabled. The Email Notifications tab shows the red disabled icon.

Follow Step 1 and Step 2 in To Disable Email Notifications, selecting Enable Notifications during Step 2.
You can set the Sun StorageTek RAID Manager Agent to send event alerts about a specific system to all users who are logged into your storage space. You might want to do this if your storage space isn’t managed by a dedicated person, or if that particular system is off-site or not connected to a monitor. Event alerts signal everyone working on the storage space that a system requires technical assistance.
When you set the Sun StorageTek RAID Manager to broadcast event alerts, all logged-in users receive messages about all types of events. In Windows, these alerts appear as pop-up messages; in all other operating systems, these alerts appear as console messages.
When enabled, event alerts occur independent of event notifications (see Setting Up Event Notifications) and email notifications (see Setting Up Email Notifications).
|
1. On the menu bar, choose Configure > system-name > General Settings.
FIGURE 7-20 Enabling Event Alarms

The General settings window is displayed for that system.
2. Select Broadcast events to logged-in users, then click Save changes.
3. Restart the Sun StorageTek RAID Manager software to apply the change.
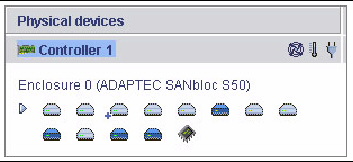
If your storage space includes an enclosure with an enclosure management device, such as a SCSI Accessed Fault-Tolerant Enclosure (SAF-TE) processor, the Sun StorageTek RAID Manager software displays temperature, fan, and power module status in the Physical Device view, as shown in the following figure.
FIGURE 7-21 Enclosure Status Icons
The enclosure status icons change color to indicate status.
|
|
|||
|
|
|||
|
|
|||
|
|
|||
|
|
|||
|
|
|||
|
|
|||
|
|
|||
|
|
|||
|
|
| Note - If your enclosure does not have an enclosure management device, the status icons appear but do not indicate status. |
The Sun StorageTek RAID Manager software supports an audible alarm which is triggered on the local system when a Warning- or Error-level event (see To View Event Details) occurs on any system in the Enterprise View. The alarm is a series of beeps, which sound every five minutes until the event is resolved.
The alarm is disabled by default, but can be enabled on any system. You can also change the frequency and duration of the alarm (see To Change Alarm Settings On a System for more information).
This section describes how to:
|
1. In the Enterprise View, select the system you want.
2. In the menu bar, choose Actions > Agent actions > Alarm Actions > Enable.

The alarm is enabled for that system.
|
Repeat Step 1 and Step 2, above, but choosing Disable instead.

|
Caution - When the alarm is disabled, no audible signal sounds when a Warning- or Error-level event occurs on the system. |
|
1. Ensure that the speakers on your local system are not muted.
2. In the Enterprise View, click on your local system.
3. In the menu bar, choose Actions > Agent actions. > Alarm actions > Test alarm

4. To stop the test, click OK.
|
When a Warning- or Error-level event occurs, you can silence the alarm on your local system while you fix the problem.
Click the Silence button in the main the Sun StorageTek RAID Manager window.

In the menu bar, choose Actions > Agent actions > Alarm actions > Silence alarm.
| Sun StorageTek RAID Manager Software User’s Guide | 820-1177-13 |
Copyright © 2009 Sun Microsystems, Inc. All rights reserved.
 To View the Full List of Events
 To View the Full List of Events