| C H A P T E R 6 |
|
System Configuration Using the WebGUI |
This chapter describes how to do system configuration using the WebGUI.
It includes the following sections:
This section explains how to set the time-out period for your ILOM session. Once you set the time-out period, if your session is inactive for that amount of time, you will be automatically logged out of the session.
1. Log in to the ILOM as Administrator or Operator to reach the WebGUI.
2. From the System Information tab, select Session Time-Out.
The Session Time-out page appears.
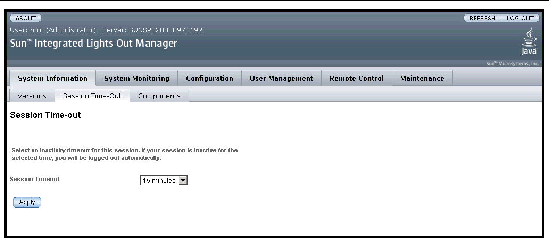
3. From the drop-down list, select the amount of time for the session time-out period.
A confirmation dialog box appears.
5. Click OK in the dialog box.
The session time-out period is set to the selected amount of time. If you exceed the amount of time set for your session, you are automatically logged out of the WebGUI.
This section explains how to configure the ILOM serial port. Use this procedure only when you need to change the serial port default settings, which are 9600 baud and no flow control.
The serial port provides access to the WebGUI, the command-line interface (CLI), and to the system console stream using serial port redirection.
1. Log in to the ILOM as Administrator to reach the WebGUI.
2. From the Configuration tab, select Serial Port.
The Serial Port Settings page appears.
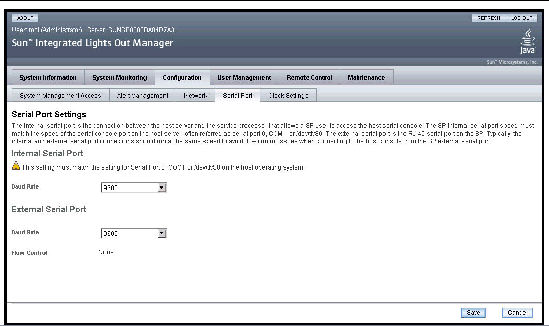
3. Select the baud rate for the internal serial port using the Internal Serial Port drop-down list.
This setting must match the setting for serial port 0, COM1 or /dev/ttyS0 on the host operating system.
The baud rate value must match the speed that was specified for the BIOS serial redirection feature (default is 9600 baud) and the speed used for the boot loader and operating system configuration.
4. Select the baud rate for the external serial port using the External Serial Port drop-down list.
This setting must match the baud rate on the RJ-45 serial port on the Sun server.
5. Click the Save button for your changes to take effect, or click the Cancel button to return to the previous settings.
This section explains how to set the ILOM clock manually or to synchronize the ILOM date and time with a Network Time Protocol (NTP) server.
The ILOM clock is described in Section 5.7.1, Interpreting the System Event Log (SEL) Time Stamps.
Before you begin, obtain IP addresses of the NTP servers you want to use.
1. Log in to the ILOM as Administrator to reach the WebGUI.
2. From the Configuration tab, select Clock Settings.
The Clock Settings page appears.
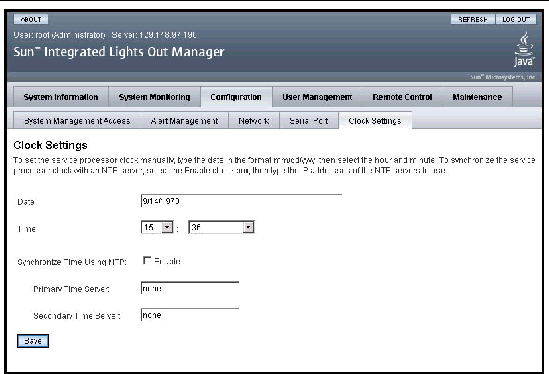
3. Type a date in the Date text box.
Type the date in the format mm/dd/yyyy.
4. Set the hour and minute using the drop-down lists.
5. Click the Save button for your changes to take effect.
1. Log in to the ILOM as Administrator to reach the WebGUI.
2. From the Configuration tab, select Clock Settings.
The Clock Settings page appears. See FIGURE 6-3.
3. Click the Enable check box next to Synchronize Time Using NTP.
4. Type the IP addresses of the NTP servers you want to use.
5. Click the Save button for your changes to take effect.
When the ILOM reboots, the ILOM clock is set to Thu Jan 1 00:00:00 UTC 1970. The ILOM reboots as a result of the following:
After an ILOM reboot, the ILOM clock is changed by the following:
This section explains how to configure the network parameters for the ILOM.
The ILOM automatically configures its IP settings using the Dynamic Host Configuration Protocol (DHCP). If your network does not support this protocol, you need to set the parameters manually.
1. Log in to the ILOM as Administrator to reach the WebGUI.
2. From the Configuration tab, select Network.
The Network Settings page appears.
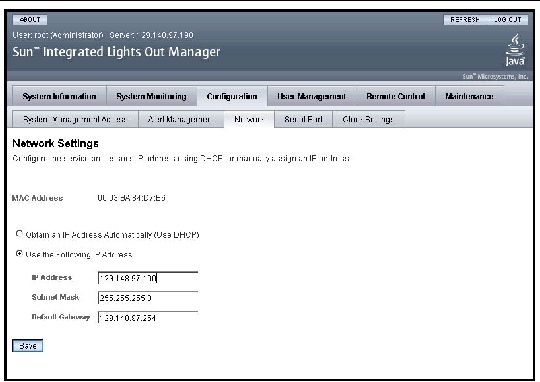
3. Complete the information in the Network Settings page.
Use the descriptions in TABLE 6-1 when completing the information.
4. Click the Save button for your settings to take effect.
Settings are considered pending until you click the Save button. Changing the IP address will end your ILOM session.
You are prompted to close your Internet browser.
5. Log back in to the ILOM using the new IP address.
|
Note - If you changed the network settings, you must log back in with a new browser session. |
This section explains how to upload a Secure Sockets Layer (SSL) certificate and SSL private key to use when accessing the ILOM.
To establish a secure HTTPS connection to the ILOM, you must upload an SSL certificate and a private key into the ILOM. These two together help provide a secure connection to the correct server when using HTTPS. Ensure that the uploaded SSL certificate and private key match. If they do not match, secure access may not work properly.
1. Log in to the ILOM as Administrator to reach the WebGUI.
2. From the Configuration tab, select System Management Access, then select SSL Certificate.
The SSL Certificate Upload page appears.
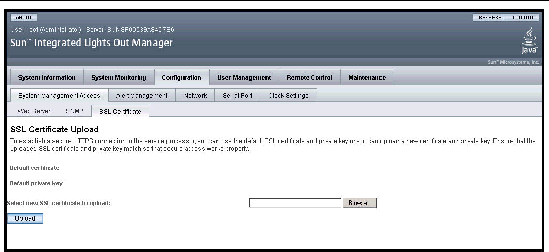
3. Type the file name of the new SSL certificate or click the Browse button to search for a new SSL certificate.
The file name has a .pem file extension. The ILOM does not support pass-phrase encrypted certificates.
4. Click the Upload button to upload the selected SSL certificate.
The SSL Certificate Upload Status dialog appears.
5. Once you have uploaded the certificate and private key, click the OK button to reset the ILOM immediately, or click the Cancel button to reset the ILOM later.
The ILOM must be reset for the new certificate to take effect. If you click OK, you must close your Internet browser and reconnect to the ILOM. HTTPS is enabled by default.
You can now access the ILOM securely using the following format in your IP Address field from your Internet browser:
For example, if the ILOM's IP address is 192.168.0.30, type the following:
This section explains how to view and modify web server settings. Hypertext Transfer Protocol (HTTP) and Hypertext Transfer Protocol Secure (HTTPS) enable you to retrieve hypertext messages from client to server and server to client. Both protocols are based on the Transmission Control Protocol/Internet Protocol (TCP/IP). HTTPS is an extension of HTTP that uses Secure Sockets Layer (SSL) to enable secure transmissions over a TCP/IP network. HTTPS is enabled by default.
1. Log in to the ILOM as Administrator to reach the WebGUI.
2. From the Configuration tab, select System Management Access, then select Web Server.
The Web Server Settings page appears.
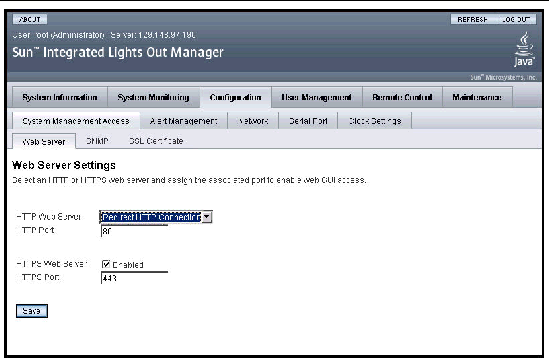
3. Select the HTTP or HTTPS web server.
The HTTPS web server is enabled by default.
4. Assign an HTTP or HTTPS port number.
5. Click the Save button for your settings to take effect.
Copyright © 2006, Sun Microsystems, Inc. All Rights Reserved.