| C H A P T E R 2 |
|
Configuring SNMP Settings in ILOM |
|
Verify and configure the proper ILOM values for enabling SNMP on the managed device |
|
|
Oracle Integrated Lights Out Manager (ILOM) 3.0 Concepts Guide (820-6410) |
||
|
Oracle Integrated Lights Out Manager (ILOM) 3.0 Web Interface Procedures Guide (820-6411) |
||
|
Oracle Integrated Lights Out Manager (ILOM) 3.0 CLI Procedures Guide (820-6412) |
||
|
The ILOM 3.0 Documentation Collection is available at: http://docs.sun.com/app/docs/prod/int.lights.mgr30#hic |
||
You can choose to configure the SNMP settings in the ILOM CLI or web interface. This section describes the procedures for configuring the SNMP settings using the ILOM CLI.
|
Verify and configure the proper ILOM values for enabling SNMP on the managed server |
|
Prior to using the snmpgets commands described in this guide, you should verify that the correct properties for SNMP are enabled in ILOM. Use the following procedure in this section to view and configure the ILOM CLI SNMP properties on the managed server.
|
Verify and configure the proper SNMP properties in ILOM are set on the managed server |
| Note - If the sets property is disabled in ILOM, all SNMP objects are read-only and no snmpset commands will be processed. |
|
2. To view the ILOM SNMP properties, type:
The following SNMP output appears.
/SP/services/snmp Targets: communities mibs users Properties: engineid = (none) port = 161 servicestate = enabled sets = disabled v1 = disabled v2c = disabled v3 = enabled Commands: cd set show |
3. Use the set command to change any of the SNMP properties, for example:
-> set /SP/services/snmp servicestate=enabled
-> set /SP/services/snmp sets=enabled
-> set /SP/services/snmp v#=enabled
where # = the SNMP protocol version you want to enable.
If you enable the snmp property for v3, you can create an account for authorizaiton and provide read write privileges by typing:
create /SP/services/snmp/users/<useraccountname> authenticationpassword=password permission=rw
If you enable the snmp property for v3, you can create an account for authorizaiton and provide readonly privileges by typing:
create /SP/services/snmp/users/<useraccountname> authenticationpassword=password
For more information about user accounts and read and write access, see the following section about Managing SNMP User Accounts and Communities Using the ILOM CLI
After ensuring that the proper SNMP properties are enabled in ILOM, you need to configure SNMP user accounts and communities.
Prior to performing the procedures in this chapter, you must ensure that the following requirements are met:
| Note - When working in the ILOM CLI, if the Sets parameter is disabled, all SNMP MIB objects are read-only. |
The SNMP user account targets, properties, and values are accessible under the /SP/services/snmp target. The following table identifies the targets, properties, and values that are valid for SNMP user accounts.
For example, to change the privacyprotocol for user a1 to DES use the following syntax:
-> set /SP/services/snmp/users/al privacyprotocol=DES privacypassword=password authenticationprotocol=SHA authenticationpassword=password
Note that the changes would be invalid if the following syntax was specified:
-> set /SP/services/snmp/users/al privacyprotocol=DES
| Note - You can change SNMP user permissions without resetting the privacy and authentication properties. |
|
1. To go to the /SP/services/snmp directory, type:
2. Within that directory, type the show command to view SNMP settings. The default settings are as follows:
-> show /SP/services/snmp Targets: communities users Properties: engineid = none port = 161 servicestate = enabled sets = disabled v1 = disabled v2c = disabled v3 = enabled Commands: cd set show |
3. To view the communities, type:
-> show /SP/services/snmp/communities
-> show /SP/services/snmp/communities /SP/services/snmp/communities Targets: private public Properties: Commands: cd create delete show |
4. To create a community with read/write privileges, type:
-> create /SP/services/snmp/communities/communityname permission=rw
-> create /SP/services/snmp/communities/communityname permission=rw Created /SP/services/snmp/communities/communityname |
5. View the public communities by typing:
-> show /SP/services/snmp/communities/public
-> show /SP/services/snmp/communities/public /SP/services/snmp/communities/public Targets: Properties: permission = ro Commands: cd set show |
|
2. To add an SNMP v3 read-only user account, type the following command:
-> create /SP/services/snmp/users/username authenticationpassword=password
|
2. To edit an SNMP v3 user account, type the following command:
-> set /SP/services/snmp/users/username authenticationpassword=password
| Note - When changing the parameters of SNMP users, you must provide a value for authenticationpassword, even if you are not changing the password. |
|
2. To delete an SNMP v3 user account, type the following command:
-> delete /SP/services/snmp/users/username
|
2. To add an SNMP v1/v2c community, type the following command:
-> create /SP/services/snmp/communities/communityname
|
2. To delete an SNMP v1/v2c community, type the following command:
-> delete /SP/services/snmp/communities/communityname
To receive notifications of SNMP traps, you must configure the proper alert rule properties in ILOM. Use the following information in this section to set the proper SNMP alert rules properties in the ILOM CLI.
|
Follow these steps to configure the destinations to which the SNMP traps are sent.
2. Type the show command to display the current settings of the alert rule.
-> show /SP/alertmgmt/rules/1 /SP/alertmgmt/rules/1 Targets: Properties: community_or_username = public destination = 0.0.0.0 level = disable snmp_version = 1 type = snmptrap Commands: cd set show |
3. To show the /SP/alertmgmt/rules directory, type these commands:
-> cd /SP/alertmgmt/rules -> show /SP/alertmgmt/rules Targets: 1 2 . . . 15 Properties: testalert = (Cannot show property) Commands: cd set show |
Choose a rule (from targets 1 through 15) for which you would like to configure a destination for SNMP traps, and go to that directory.
4. Within that rule directory, type the set command to change the rule properties.
-> set type=snmptrap level=critical destination=IPaddress_of_snmp_management_station snmp_version=2c community_or_username=public
The following table describes the CLI commands that you will need to use to manage alert rule configurations in the ILOM CLI.
You can choose to configure the SNMP settings in the ILOM CLI or web interface. This section describes the procedures for configuring the SNMP settings using the ILOM web interface.
|
Verify and configure the proper ILOM values for enabling SNMP are set on the managed server |
|
Prior to using the snmpgets commands described in this guide, you should verify that the correct settings for SNMP are enabled in ILOM. Use the following procedure in this section to view and configure the ILOM CLI SNMP settings on the managed server.
|
Verify and configure the proper SNMP properties in ILOM are set on the managed server |
| Note - If the Set option is disabled in ILOM, all SNMP objects are read-only and no snmpset commands will be processed. |
|
1. Log in to the ILOM web interface.
2. Select Configuration --> System Management Access --> SNMP.
The SNMP Settings page appears.
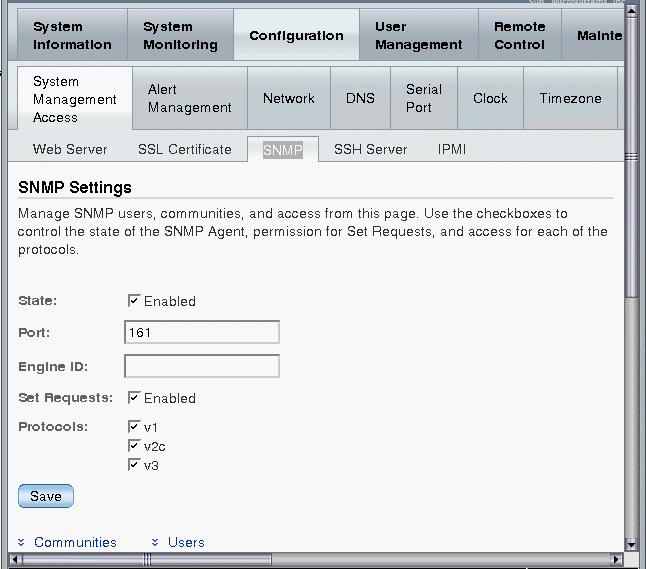
3. Select the State check box to enable the SNMP port.
When State is disabled, the SNMP port is blocked, prohibiting all SNMP communication between ILOM and the network.
4. Type the port number in the Port text field.
5. Leave the Engine ID field blank. This allows the default setting to be used.
The Engine ID is automatically set by the SNMP agent. While you can use this field to set the Engine ID, we recommend that you leave this field blank. The Engine ID uniquely identifies the SNMP engine and enables users to query the SNMP agent. You should only use this field to set the Engine ID if you are familiar with SNMP v3 security and how this setting is used.
6. Select or clear the Set Requests check box to enable or disable the Set Requests option.
If the Set Requests option is disabled, all SNMP objects are read-only and no snmpset commands will be processed.
7. Select a Protocols check box to enable SNMP v1, v2c, or v3.
SNMP v3 is enabled by default. You can enable or disable v1, v2c, and v3 protocol versions.
At the bottom of the SNMP Settings page, you can also add, edit, or delete SNMP communities or users, as shown in the following screen.
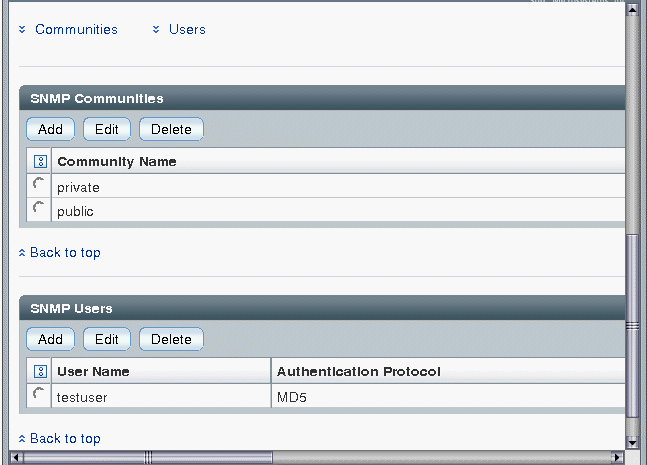
After ensuring that the proper SNMP settings are enabled in ILOM, you need to configure SNMP user accounts and communities.
Prior to performing the procedures in this chapter, you must ensure that the following requirements are met:
| Note - When working in the ILOM CLI, if the Sets parameter is disabled, all SNMP MIB objects are read-only. |
|
Follow these steps to add or edit an SNMP v1 or v2c community:
1. Log in to the ILOM web interface.
2. Select Configuration --> System Management Access --> SNMP.
Scroll to the bottom half of the SNMP Settings page to find the SNMP Communities dialog.
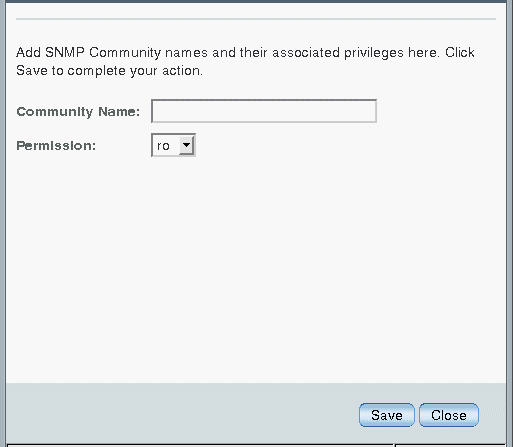
3. To add a community, click Add.
The SNMP Community dialog box appears.
4. To edit a community, do the following:
a. Select the appropriate community radio button
The SNMP Community dialog box appears.
5. If you are adding a new community, type the name of the community in the Community Name field; otherwise proceed to the next step.
The community name can contain up to 35 characters. It must start with an alphabetic character and cannot contain a space.
6. Select read-only (ro) or read-write (rw) in the Permissions drop-down list.
|
Follow these steps to delete an SNMP v1 or v2c community:
1. Log in to the ILOM web interface.
2. Select Configuration --> System Management Access --> SNMP.
The SNMP settings page appears.
3. Click the Communities link or scroll down to the communities list.
4. Select the radio button of the SNMP community to delete.
A confirmation dialog box appears.
6. Click OK to delete the SNMP community.
|
Follow these steps to add or edit a SNMP v3 user accounts.
| Note - User accounts are not applicable to SNMP v1 and v2c because communities are used to control access. |
1. Log in to the ILOM web interface.
2. Select Configuration --> System Management Access --> SNMP.
The SNMP Settings page appears.
3. Click the Users link to expand the SNMP Settings page and display SNMP Users.
4. To add an SNMP user, click Add.
The Add or Edit SNMP User dialog box appears.
5. To edit an SNMP user, do the following:
a. Select the appropriate user radio button
The Add or Edit SNMP User dialog box appears.
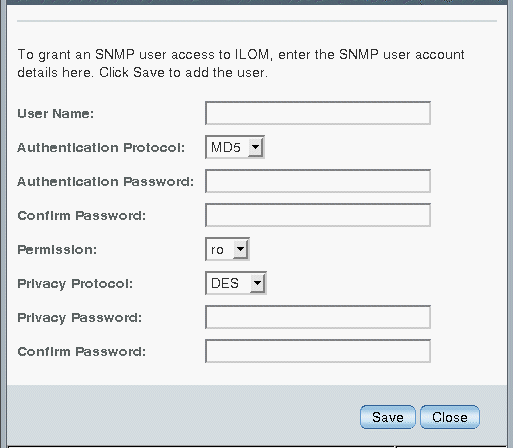
6. If you are adding a user, type a user name in the User Name text field; otherwise proceed to the next step.
The user name can include up to 35 characters. It must start with an alphabetic character and cannot contain spaces.
7. Select either Message Digest 5 (MD5) or Secure Hash Algorithm (SHA) in the Authentication Protocol drop-down list.
8. Type a password in the Authentication Password text field.
The authentication password is case-sensitive and must contain 8 to 16 characters, with no colons or space characters.
9. Retype the authentication password in the Confirm Password text field.
10. Select read-only (ro) or read-write (rw) in the Permissions drop-down list.
11. Select DES or None in the Privacy Protocol drop-down list.
12. Type a password in the Privacy Password text field.
The privacy password is case-sensitive and must contain 8 to 16 characters, with no colons or space characters.
13. Retype the password in the Confirm Password text field.
|
Follow these steps to delete an SNMP v3 user account:
1. Log in to the ILOM web interface.
2. Select Configuration --> System Management Access --> SNMP.
The SNMP Settings page appears.
3. Click the Users link or scroll down to the SNMP Users list.
4. Select the radio button of the SNMP user account to delete.
5. Click Delete under the SNMP User’s List.
A confirmation dialog box opens.
6. Click OK to delete the user account.
To receive notifications of SNMP traps, you must configure the proper alert rule properties in ILOM. Use the following information in this section to set the proper SNMP alert rules properties in the ILOM CLI.
|
1. Log in to the ILOM web interface.
2. Select Configuration --> Alert Management.
The Alert Settings page appears. This page shows a table of the alerts that you can configure. You can configure up to 15 alerts.
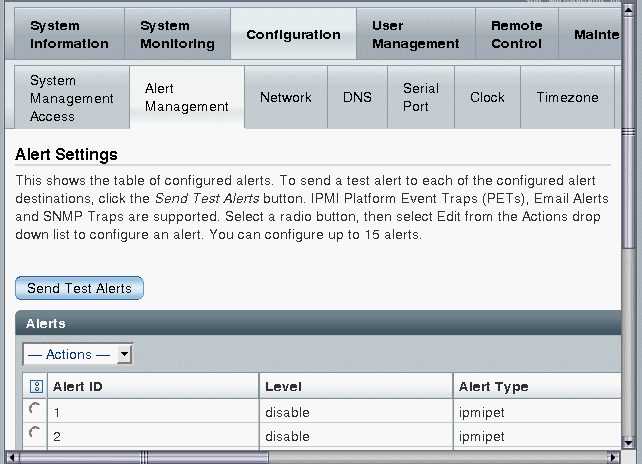
3. To create or modify an alert, select an alert radio button.
4. From the Actions drop-down list, select Edit.
The Create or Modify Alert dialog appears.
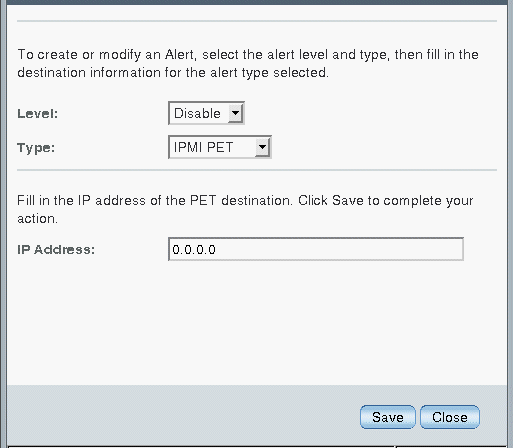
5. In the Level drop-down list, select the level of the alert.
6. In the Type drop-down list, select the alert type.
7. In the IP Address field, specify the alert destination IP address.
8. Click Save for your changes to take effect.
Copyright © 2010, Oracle and/or its affiliates. All rights reserved.