Removing and Installing a PCIe2 x16 Card
This section describes how to remove and install a PCIe2 card.
Note –
For information about how to remove and install a PCIe card, see Removing and Installing PCIe Cards.
 To Remove a PCIe2 x16 Card
-
Power off the workstation using the procedure described in the section, To Power Off the Workstation.
-
Remove the left-side access panel using the procedure described in the section, To Remove the Left-Side Access Panel.
-
Gently lay the system on its right side on a stable, nonslip surface.
-
Remove any cables connected to the card.
Note –Some graphics cards require supplemental power, which is supplied by connecting an auxiliary power cable directly from the power supply to the card.
-
If necessary, disconnect the supplemental power connector from the card.
-
Use a #2 screwdriver to remove the card retaining screw.
-
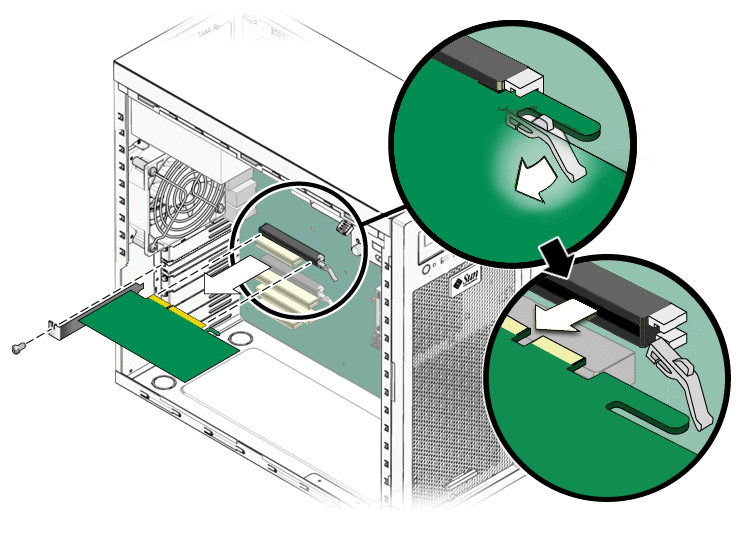
Pull gently upward on the card while pressing the release latch (see Figure 3–18).
This combined action releases the card, allowing you to remove it from the workstation.
Figure 3–18 Removing a PCIe Graphics Card

-
If you are replacing the card, see To Install a PCIe2 x16 Card.
-
Install the back panel slot filler using the retaining screw.
-
Close the workstation and prepare for operation using the procedures in the section, Closing the Workstation and Preparing for Operation
 To Install a PCIe2 x16 Card
Note –
See PCIe and PCI Expansion Slots for PCIe slot locations and specifications.
-
Power off the workstation using the procedure described in the section, To Power Off the Workstation.
-
Remove the left-side access panel using the procedure described in the section, To Remove the Left-Side Access Panel.
-
Gently lay the system on its right side on a stable, nonslip surface.
-
Refer to the service label on the inside of the access panel or the section, PCIe and PCI Expansion Slots, to help you choose an empty card slot that is compatible with the card that you are installing.
-
Use a #2 screwdriver to remove the back panel slot filler bracket.
-
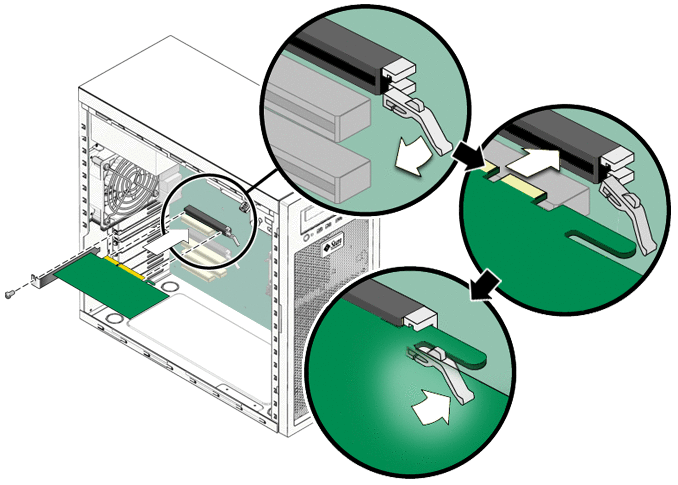
Position the PCIe2 x16 card in the selected slot. Ensure that the notch in the connector on the motherboard is aligned with the notch in the connector of the card and that the notch in the end of the card engages the retainer (see Figure 3–21).
Figure 3–19 Installing a PCIe Graphics Card

-
Press down on the card until it is completely seated in the slot.
The card should sit evenly in the connector.
-
If you are installing a card (or cards) that requires supplemental power, see Adding Supplemental Power to PCIe2 Cards.
-
Secure the card to the chassis using the retaining screw.
-
Close the system and prepare for operation using the procedures described in the section, Closing the Workstation and Preparing for Operation.
- © 2010, Oracle Corporation and/or its affiliates
