JavaScript is required to for searching.
Skip Navigation Links
Exit Print View
Sun Fire X4800 Server Service Manual
search filter icon
search icon

Document Information

Using This Documentation

Product Information Web Site

Documentation and Feedback

About This Documentation (PDF and HTML)

Contributors

Change History

Sun Fire X4800 Server Service Manual Overview

Server and Component Overview

Sun Fire X4800 Server Overview

Component Overviews

Power and Reset

Power Modes

Power Button and Power OK LED

How to Power On the Server

How to Power Off the Server

Controlling Server Power Remotely

Removing and Installing Components

Preparing for Service and Operation

Removal and Installation Procedures

Removing and Installing a Power Supply (CRU)

Removing and Installing a Hard Drive (CRU)

Removing and Installing a Hard Drive Filler

Replacing the Hard Drive Backplane (FRU)

Adding, Removing, and Installing a CMOD (CRU)

CPU Module (CMOD) Designation and Population Rules

Removing and Installing a CMOD Filler

How to Replace the CMOD Battery (CRU)

Removing and Installing DIMMs (CRU)

DIMM Population Rules

Removing and Installing a RAID Expansion Module (CRU)

How to Replace the RAID Expansion Module Battery (CRU)

Removing and Installing a Fabric Expansion Module (CRU)

Replacing a CPU and Heatsink Assembly (FRU)

Removing and Installing a Fan Module (CRU)

Replacing a Fan Module Controller Board (FRU)

Removing and Installing a NEM or a NEM Filler (CRU)

Removing and Installing a PCIe EM (CRU)

Removing and Installing the Service Processor Module (CRU)

Removing and Installing the Multi port Cable

Removing and Installing the Subassembly Module (FRU)

Sun Fire X4800 Server Service Procedures, and Information

Managing FRUID Information

Firmware Information and Procedures

How to Access the BIOS Setup Utility

Updating the CPLD

Component LED Locations and Meanings

Front Indicator Panel LEDs

CPU Module (CMOD) LEDs

Front Panel Power Supply LED's

Front Panel Hard Drive LED's

Back Panel Network Express Module LED's
Back Panel SP Module LEDs

Back Panel PCIe EM LEDs

Sun Fire X4800 Server Specifications

Physical Specifications

Power Specifications

Environmental Specifications

Index

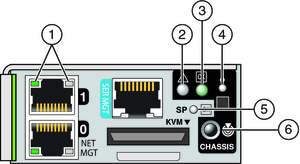
Back Panel SP Module LEDs

image:An illustration showing the SP module's LEDs.
LED Name
Color
Activity
1
10/1000/1000Base-T Ethernet LED (left)
Green
On: Link established at 1 gigabit.
Amber
On: Link established at 100 megabits. Amber LED indicates that the link established is not at full capacity for that port.
Amber
Off: Link established at 10 megabits. Amber LED indicates that the link established is not at full capacity for that port.
10/1000/1000Base-T Ethernet LED (right)
Green
On: Link activity.
2
Chassis Service Action Required (fault) LED
Amber
Indicates a server fault condition.
  • Off normally.

  • On solid when the server is in a fault state.

3
Chassis Power OK LED
Green
Indicates the power status of the server.
  • Off when AC power cords are disconnected.

  • Blinks quickly during SP boot (when AC power cords are connected to the server.

  • Blinks slowly in standby power mode (post SP boot).

  • On solid when in full power mode.

  • See Power and Reset

4
Chassis Over-temperature LED
Amber
Indicates an over-temperature condition within the server.
  • Off normally.

  • On solid when the internal server temperature exceeds the upper threshold.

5
SP module OK LED
Green or Yellow
Indicates the power status of the SP module.
  • Off when AC power cords are disconnected.

  • Blinks three times when SP module first receives power.

  • Off while SP is booting.

  • On when SP is functional.

  • Yellow when SP is not functional.

  • See Power and Reset

6
Chassis Locate LED
White
Identifies the server in a rack:
  • Off normally

  • Blinks when activated by the Locate button or ILOM.