Working With Physical Destinations
A physical destination is a location on a message broker where messages received from a message producer are held for later delivery to one or more message consumers. Destinations are of two kinds, depending on the messaging domain in use: queues (point-to-point domain) and topics (publish/subscribe domain). See the Message Queue Technical Overview for further discussion of messaging domains and the destinations associated with them.
Creating a Physical Destination
By default, message brokers are configured to create new physical destinations automatically whenever a message producer or consumer attempts to access a nonexistent destination. Such auto-created destinations are convenient to use while testing client code in a software development environment. In a production setting, however, it is advisable to disable the automatic creation of destinations and instead require all destinations to be created explicitly by an administrator. The following procedure shows how to add such an admin-created destination to a broker.
 To Add a Physical Destination to a Broker
-
Click on the Destinations item under the broker’s name in the Administration Console window’s navigation pane and choose Add Broker Destination from the Actions menu.
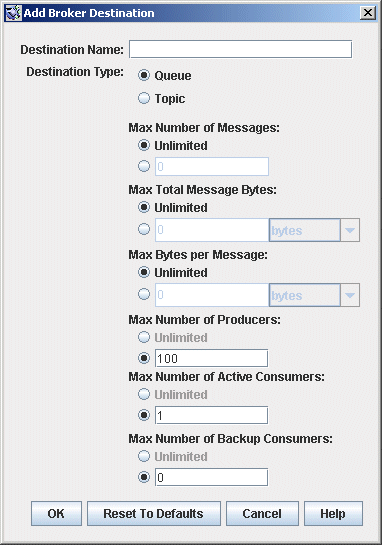
Alternatively, you can right-click on Destinations and choose Add Broker Destination from the pop-up context menu. In either case, the Add Broker Destination dialog box (Figure 2–8) will appear.
Figure 2–8 Add Broker Destination Dialog Box

-
Enter a name for the physical destination in the Destination Name field.
Note the name that you assign to the destination; you will need it later when you create an administered object corresponding to this physical destination.
For this exercise, type in the name MyQueueDest.
-
Select the Queue or Topic radio button to specify the type of destination to create.
For this exercise, select Queue if it is not already selected.
-
Click OK to add the physical destination and dismiss the dialog box.
The new destination will appear in the result pane.
Viewing Physical Destination Properties
You can use the Properties command on the Administration Console’s Actions menu to view or modify the properties of a physical destination.
 To View or Modify the Properties of a Physical Destination
-
Select Destinations under the broker’s name in the Administration Console window’s navigation pane.
A list of the available physical destinations will appear in the result pane, showing the name, type, and current state of each destination.
-
Select a physical destination by clicking on its name in the result pane.
-
Choose Properties from the Actions menu.
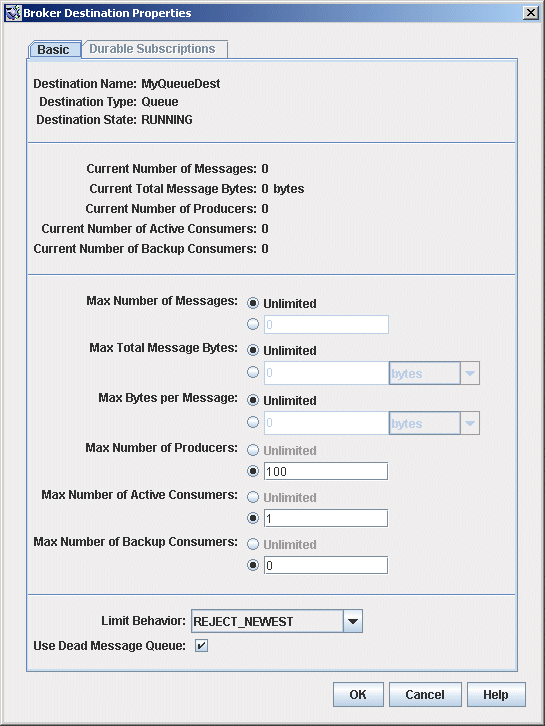
The Broker Destination Properties dialog box (Figure 2–9) will appear, showing current status and configuration information about the selected physical destination. You can use this dialog box to change various configuration properties, such as the maximum number of messages, producers, and consumers that the destination can accommodate.
Figure 2–9 Broker Destination Properties Dialog Box

For this exercise, do not change any of the destination’s properties.
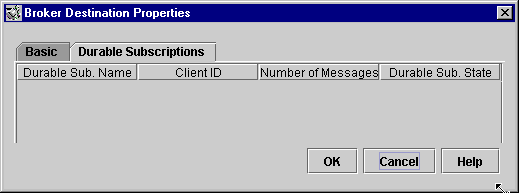
For topic destinations, the Broker Destination Properties dialog box contains an additional tab, Durable Subscriptions. Clicking on this tab displays the Durable Subscriptions panel (Figure 2–10), listing information about all durable subscriptions currently associated with the given topic.
Figure 2–10 Durable Subscriptions Panel

You can use the Durable Subscriptions panel’s Purge and Delete buttons to
-
Purge all pending messages associated with a durable subscription
-
Remove a durable subscription from the topic
The Durable Subscriptions tab is disabled for queue destinations.
-
-
Click OK to accept the new property values and dismiss the dialog box.
Purging Messages From a Physical Destination
Purging messages from a physical destination removes all pending messages associated with the destination, leaving the destination empty.
 To Purge Messages From a Physical Destination
-
Select Destinations under the broker’s name in the Administration Console window’s navigation pane.
A list of the available physical destinations will appear in the result pane, showing the name, type, and current state of each destination.
-
Select a destination by clicking on its name in the result pane.
-
Choose Purge Messages from the Actions menu.
A confirmation dialog box will appear, asking you to confirm that you wish to proceed with the operation.
-
Click Yes to confirm the operation and dismiss the confirmation dialog.
Deleting a Physical Destination
Deleting a destination purges all of its messages and then destroys the destination itself, removing it permanently from the broker to which it belongs.
 To Delete a Physical Destination
-
Select Destinations under the broker’s name in the Administration Console window’s navigation pane.
A list of the available destinations will appear in the result pane, showing the name, type, and current state of each destination.
-
Select a destination by clicking on its name in the result pane.
-
Choose Delete from the Edit menu.
A confirmation dialog box will appear, asking you to confirm that you wish to proceed with the operation.
-
Click Yes to confirm the operation and dismiss the confirmation dialog.
For this exercise, do not delete the destination MyQueueDest that you created earlier; instead, click No to dismiss the confirmation dialog without performing the delete operation.
- © 2010, Oracle Corporation and/or its affiliates
