Configuring the Tango Web Services Attributes exposed by the HTTP Binding Component
For composite applications, the Web Services attributes are configured for a WSDL port using in the WS Policy Attachment Editor associated with the specific endpoint. The WS Policy Attachment Editor for a WSDL port is accessed in the CASA Editor.
This section contains the following topics:
Accessing the Tango (WSIT) Web Service Attribute Configuration
The Web Services attributes are configured for each WSDL port using in the WS Policy Attachment Editor associated with the specific endpoint. The WS Policy Attachments Editor is accessed from the CASA Editor by right-clicking a WSDL port and selecting Edit Web Service Attributes -> Server Configuration, or Client Configuration.
The following directions assume that you have already created a Composite Application. This option is available after a WSDL port has been cloned or created in CASA.
 Accessing the WS-Policy Attachment Editor for a Specific
Endpoint
-
From the NetBeans IDE's Projects window, expand your composite application. Right-click the Service Assembly node and select Edit from the popup menu.
The Composite Application Service Assembly (CASA) Editor appears, containing the composite application.
-
In the CASA Editor, select the Build Project icon to build the composite application.
When the build successfully completes, the Design view displays the WSDL port endpoints, JBI modules, and the connections between each.
-
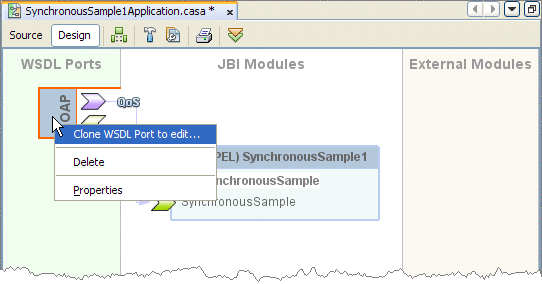
If you did not build or clone the WSDL port, the WS Policy Attachment for that port is not available for configuration. To clone a port, right-click the WSDL port, and select Clone WSDL Port to edit in the popup menu.

After the port has been cloned, the Port Properties and Web Service Attributes icons are added to the port.
-
Click the ports Web Service Attributes icon (the bottom icon on the port) and select Server Configuration or Client Configuration to open the appropriate WS Policy Attachment Configuration Editor.
Server Configuration—Web Service Attributes
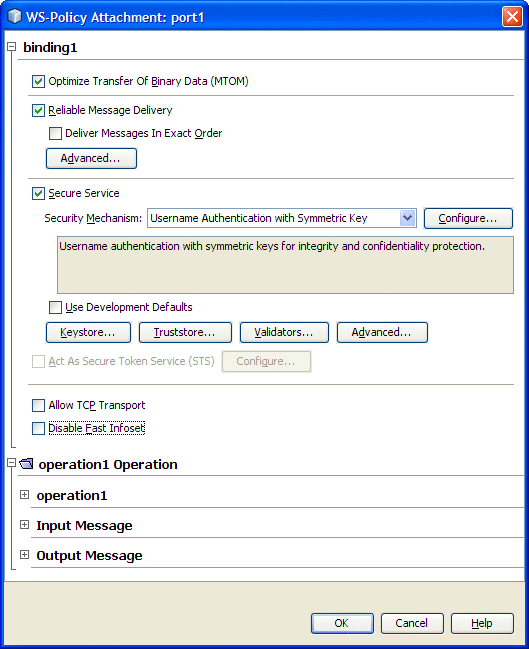
The Server Configuration web service attributes exposed by the HTTP Binding Component are configured from the WS Policy Attachment Configuration Editor.

The Server Configuration web service attributes include the following:
|
Attribute |
Description |
Value |
|---|---|---|
|
Binding Settings |
||
|
Optimize Transfer of Binary Data (MTOM) |
Specifies whether the web service is configured to optimize messages that it transmits and decodes optimized messages that it receives. |
Select the checkbox to enable. |
|
Reliable Message Delivery |
Specifies whether the service sends an acknowledgement to the clients for each message that is delivered, thus enabling clients to recognize message delivery failures and retransmit the message. |
Select the checkbox to enable. |
|
Deliver Messages in Exact Order: Specifies whether the Reliable Messaging protocol ensures that the application messages for a given message sequence are delivered to the endpoint application in the order indicated by the message numbers. This option increases the time to process application message sequences and may result in slower of web service performance. Only enable this option when ordered delivery is required by the web service |
Select the checkbox to enable. |
|
|
Flow Control: Specifies whether the Flow Control feature is enabled. It may be necessary to withhold messages from the application if ordered delivery is required and some preceding messages have not yet arrived. If the number of stored messages reaches the threshold specified in the Max Buffer Size setting, incoming messages belonging to the sequence are ignored. |
Select the checkbox to enable. |
|
|
Maximum Flow Control Buffer Size: Specifies the number of messages that are buffered for a message sequence. 32 is the default setting. |
32 is the default value. |
|
|
Inactivity Timeout (ms): Specifies in milliseconds, the time interval at which source or destination can terminate a message sequence due to inactivity. A web service endpoint will always terminate a sequence whose timeout has expired. To keep a sequence active, an inactive client sends a stand-alone message with an AckRequested header to act as a heartbeat when the end of the inactivity timeout interval approaches. |
600,000 (milliseconds) is the default value. |
|
|
Secure Service |
Specifies whether web service security options are enabled for all of the operations of a web service. |
Select the checkbox to enable. |
|
Security Mechanism |
Specifies the security mechanism used by the web service operation. The available security mechanisms are: See the Configuring Security Mechanisms section for more information. |
Select the security mechanism to be used by your application. Information about your selected mechanism and its additional requirements is displayed in the message box below your selection. |
|
Configure: The configuration button opens a configuration editor for the selected security mechanism. |
See the Security Mechanisms section for more information about configuration properties. |
|
|
Use Development Defaults: Specifies whether to import certificates into the GlassFish keystore and truststore to be used immediately for development. The default certificates are imported in the correct format and a default user is created in the file realm, with username "wsitUser". For your project you will most likely choose to use your own certificates and user settings, but in a development environment you may find the defaults useful. |
Check box Selected indicates that you are using the default certificates. |
|
|
Keystore |
Click the Keystore button to open the Keystore Configuration Editor. The editor specifies the following information:
|
Configure the Keystore from the Keystore Configuration Editor. |
|
Truststore |
Click the Truststore button to open the Truststore Configuration Editor. The editor specifies the following information:
|
Configure the Truststore from the Truststore Configuration Editor. |
|
Validators |
Click the Validators button to open the Validator Configuration Editor. The editor specifies the following information:
|
Configure the Validators from the Validator Configuration Editor. |
|
Advanced (Advanced Security Options) |
Click the Advanced button to open the Advanced Security Options Editor. The editor specifies the following information:
|
Configure the Advanced Security Options from the Advanced Security Options Editor. |
|
Act as a Secure Token Service (STS) |
Select the Act as a Secure Token Service checkbox and click the Configure button to open the STS Configuration Editor. The editor specifies the following information:
|
Configure the STS Configuration Options from the STS Configuration Editor. |
|
Allow TCP Transport |
Specifies whether the service supports TCP and HTTP message transport. TCP enhances performance for smaller messages by eliminating the overhead of sending messages over HTTP protocol. |
Select the checkbox to enable. |
|
Disable Fast Infoset |
Specifies whether Fast Infoset is enables for faster parsing, faster serializing, and creating smaller document sizes, compared with equivalent XML Documents. When this option is selected, the Web service will not process incoming messages or produce outgoing messages encoded using Fast Infoset. |
Select the checkbox to enable. |
|
Operation Settings |
||
|
Transactions |
Specifies the level at which transactions are secured. | |
|
Input Message Settings |
||
|
Authentication Token |
Specifies which supporting token will be used to sign and/or encrypt the specified message parts. Options include Username, X509, SAML, Issued, or None. |
Username |
|
Signed: Specifies that the authentication token must be a signed, supporting token. A signed supporting token is also signed by the primary message signature. |
Select the checkbox to enable. |
|
|
Endorsed: Specifies that the authentication token must be endorsed. With an endorsing supporting token, the key represented by the token is used to endorse/sign the primary message signature. |
Select the checkbox to enable. |
|
|
Message Parts: Specifies the message parts that must be signed and/or encrypted. Click the Message Parts button to open the Message Parts dialog box. From the Message Parts dialog box you can specify the following options for message parts or elements:
The Message Parts dialog box also includes the following buttons:
|
Sign |
|
|
Output Message Settings |
||
|
Message Parts |
Specifies the message parts that must be signed and/or encrypted. Click the Message Parts button to open the Message Parts dialog box. See Message Parts under Input Message above for more information. | |
Client Configuration — Web Service Attributes
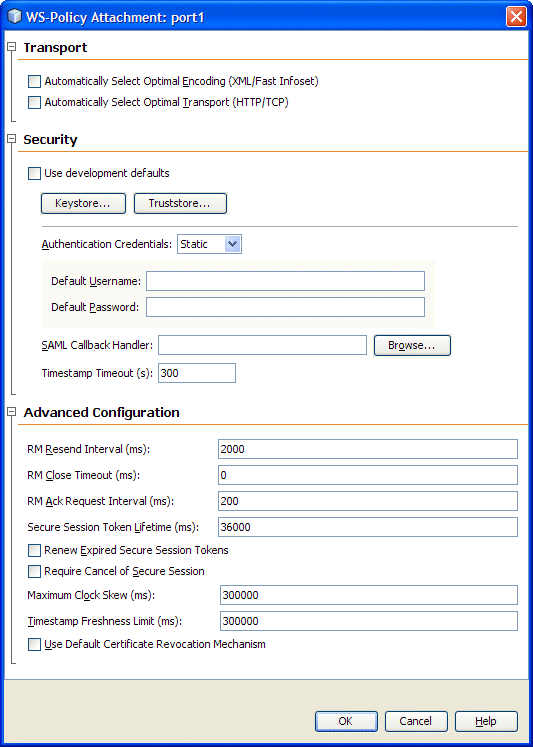
The Client Configuration web service attributes exposed in the WS Policy Attachment Editor are dependent on the project and the server configuration.

The attributes exposed by the HTTP Binding Component are described in the following table.
|
Attribute |
Description |
Value |
|---|---|---|
|
Transport Settings |
||
|
Automatically Select Optimal Encoding (XML/Fast Infoset) |
Specifies whether to use XML or Fast Infoset encoding. Fast Infoset is a more efficient alternative to XML that uses a binary encoding. If the service is configured to allow Fast Infoset, select this option to use Fast Infoset for faster parsing, faster serializing, and smaller document sizes when compared with equivalent XML documents. |
Select the checkbox to enable. |
|
Automatically Select Optimal Transport (XML/Fast Infoset) |
Specifies whether client runtime checks to see if the service supports TCP. If it does, the client uses TCP transport automatically for service-client communication. TCP provides better performance when sending smaller messages. The performance enhancement is visible mostly in smaller messages because the overhead of sending messages over the HTTP protocol is eliminated. If the service does not support TCP, or if this option is not selected for the client, HTTP is used for transport. |
Select the checkbox to enable. |
|
Security Settings |
||
|
Use development defaults |
Specifies whether to import certificates into the GlassFish Keystore and Truststore so that they can be used immediately for development. The security mechanisms require the use of v3 certificates. The default GlassFish Keystore and Truststore do not contain v3 certificates at this time. In order to use message security mechanisms with GlassFish, it is necessary to obtain Keystore and Truststore files that contain v3 certificates and import the appropriate certificates into the default GlassFish stores. In addition to importing certificates, when this option is selected a default user is created in the file realm with username wsitUser. For a production environment, provide your own certificates and user settings. |
Select the checkbox to enable. |
|
Keystore |
Click the Keystore button to open the Keystore Configuration Editor. The editor specifies the following information:
|
Configure the Keystore from the Keystore Configuration Editor. |
|
Truststore |
Click the Truststore button to open the Truststore Configuration Editor. The editor specifies the following information:
|
Configure the Truststore from the Truststore Configuration Editor. |
|
Authentication Credentials |
Specifies whether the Authentication Credentials are Dynamic or Static. The two proceeding property fields that are associated with Authentication Credentials change, depending on the Authentication Credentials property value. When the value is set as Static, specify the default username and password. Note: The Static option has a risk of exposing the password as a plain text String stored in the WSIT client side configuration. However, when used in the context of GlassFish, this static option has a special utility for embedded web service clients (Example: A servlet or an EJB acting as a web service Client). The Password in this case can be specified as a placeholder by starting the password String start with a "$" character. The WSIT security runtime then makes a SecretKeyCallback passing the password placeholder (minus the "$" character). The actual password is then obtained as a result of the SecretKeyCallback. For more information seeWSIT Security Configuration Demystified |
Dynamic |
|
Username Callback Handleror Username |
Specifies the Username Callback Handler (when the Authentication Credentials value is set as Dynamic). A CallbackHandler is a class that implements a javax.security.auth.callback. For the Username Callback Handler (javax.security.auth.callback.NameCallback), the NameCallback is used to retrieve the Username. This is necessary when the Security Mechanism requires the client to supply a Username and a Password. The CallbackHandler invocation only applies to a Plain J2SE web service client. For more information seeWSIT Security Configuration Demystified |
Username Callback Handler |
|
Specifies the name of an authorized user (when the Authentication Credentials value is set as Static). This option is best used only in the development environment. When the Default Username and Default Password are specified, the username and password are stored in the wsit-client.xml file in clear text, which presents a security risk. Do not use this option for production. |
Username |
|
|
Password Callback Handleror Password |
Specifies the Username Callback Handler (when the Authentication Credentials value is set as Dynamic). For the Password Callback Handler (javax.security.auth.callback.PasswordCallback), the PasswordCallback is used to retrieve the Password. This is necessary when the Security Mechanism requires the client to supply a Username and a Password. The CallbackHandler invocation only applies to a Plain J2SE web service Client. For more information seeWSIT Security Configuration Demystified |
Password Callback Handler |
|
Specifies the password for the authorized user (when the Authentication Credentials value is set as Static). This option is best used only in the development environment. When the Default Username and Default Password are specified, the username and password are stored in the wsit-client.xml file in clear text, which presents a security risk. Do not use this option for production. |
Password |
|
|
SAML Callback Handler |
Specifies the SAML Callback Handler. To use a SAML Callback Handler, you need to create one, as there is no default. A CallbackHandler is a class that implements a javax.security.auth.callback. The SAML Callback Handler (com.sun.xml.wss.impl.callback.SAMLCallback), is necessary when using a Security Mechanism that requires the client to supply a SAMLAssertion, such as a Sender-Vouches or a Holder-of-Key assertion. For more information seeWSIT Security Configuration Demystified |
SAML Callback Handler |
|
Advanced Configuration Settings |
||
|
RM Resend Interval (ms) |
Specifies the time interval (in milliseconds) at which the sender resends unacknowledged messages to the receiver. By default, the resend happens every 2000ms. |
2000 |
|
RM Close Timeout (ms) |
Specifies the interval (in milliseconds) at which the client waits for a close() call to return. If unacknowledged messages are received after this interval is reached, and the call to close has returned, an error is logged regarding the lost messages. |
0 |
|
RM Ack Request Interval (ms) |
Specifies the suggested minimum interval (in milliseconds) that the sender should allow to elapse between Acknowledgement requests to the receiver. |
200 |
|
Secure Session Token Lifetime (ms) |
Specifies the life span of the security session (the interval at which the security session expires). |
36000 |
|
Renew Expired Secure Session Tokens |
Specifies whether expired secure session tokens are renewed. |
Select the checkbox to enable. |
|
Require Cancel of Secure Session |
Specifies whether cancel of secure session is enabled. |
Select the checkbox to enable. |
|
Maximum Clock Skew (ms) |
Specifies the maximum difference allowed between the system clocks of the sender and recipient in milliseconds. |
300000 |
|
Timestamp Freshness Limit (ms) |
Specifies the Timestamp Freshness Limit in milliseconds. Timestamps received with a creation time older than the Timestamp Freshness Limit period are rejected by the receiver. |
300000 |
|
Use Default Certificate Revocation Mechanism |
If this option is selected, the default revocation checking mechanism of the underlying PKIX service provider is used. |
Select the checkbox to enable. |
- © 2010, Oracle Corporation and/or its affiliates
