Using Normalized Message Properties in a BPEL Process
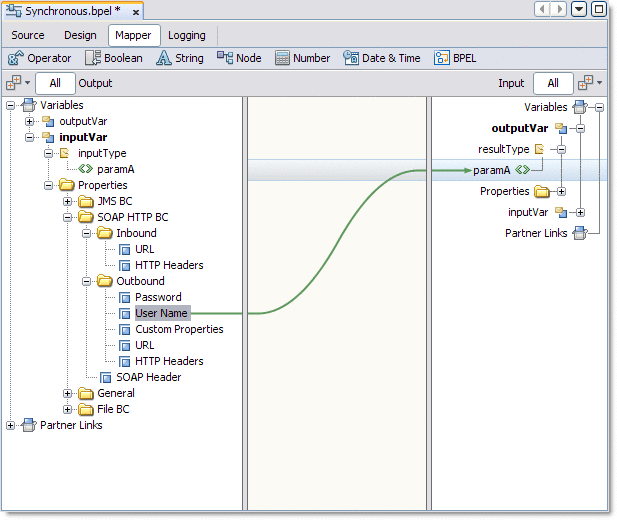
The Normalized Message properties are accessed from the BPEL Designer Mapper view. When you expand a variable's Properties folder it exposes the variable's predefined NM properties, as well as the regular BPEL specific WSDL properties used in correlation sets, assigns, and to build expressions . If the specific NM property you need is not currently listed, additional NM properties can be added.
Using Predefined Normalized Message Properties in a BPEL Process
Predefined Normalized Message properties are ready for use, from a variable's Properties file.
 To use predefined normalized message properties in
a BPEL process
-
From the Design View diagram, select the activity with the process you want to edit.
-
Click Mapper to switch to the Mapper view of the BPEL process.
-
From the Output pane, expand the Variable you want to edit and its Properties file.
The Properties file contains the predefined Normalized Message (NM) properties.

-
To use a predefined NM Property, select the property and use it to build an expression or an assign.
Adding Additional Normalized Message Properties to a BPEL Process
If the specific NM Property you want is not listed, you can add additional NM properties.
There are two options available when adding NM Properties:
-
Add NM Property Shortcut: This option typically supports simple type properties, in that it does not grant access to some data within the NM Property.
-
Add NM Property: This option provides access to data within the NM property used to build expressions.
 To add a Normalized Message Property Shortcut to a
BPEL process
-
From the Output or Input panes of the BPEL Mapper, expand the node for the variable to which you want to add an NM property. Right-click that variables Properties directory node and select Add NM Property Shortcut from the pop-up menu.
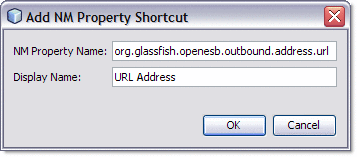
The Add NM Property Shortcut dialog box appears.
-
Enter the information for the new NM property into the the Add NM Property Shortcut dialog box, as follows:
-
Click OK.
The new NM property is added to the Mapper tree under the variables Properties directory. The property can now be used in assigns and to build expressions.
 To edit an NM Property Shortcut
-
To edit an existing NM property shortcut, right-click the NM property shortcut in the BPEL Mapper tree and choose Edit NM Property Shortcut in the pop-up menu.
The Add NM Property Shortcut dialog box appears.
-
Edit the NM Property Name or Display Name, and click OK.
 To delete an NM Property Shortcut
-
To delete an NM property shortcut, right-click the property in the Mapper tree.
-
Choose Delete NM Property Shortcut in the pop-up menu.
The NM Property Shortcut is deleted.
 To add a Normalized Message Property to a BPEL process
-
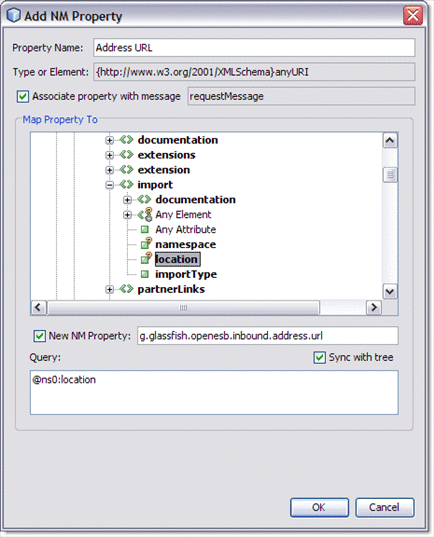
From the Output or Input panes of the BPEL Mapper, expand the node for the variable to which you want to add an NM property. Right-click that variables Properties directory node and select Add NM Property from the pop-up menu.
The Add NM Property dialog box appears.
-
Enter the information for the new NM property in the the Add NM Property dialog box, as follows:
-
Property Name: User-defined property name. This name is displayed in mapper tree and stored in WSDL file.
-
Type or Element:Displays the property type or element associated with the selected node in the Map Property To tree.
-
Associate property with message: Specifies with which message type the property is associated.
-
A check mark indicates that the new NM property is associated with all variables of the specified message type. For example, in the image below, the new NM property will be associated with the requestMessage type.
-
Unchecked indicates that the new NM property is associated with all variables of any message type.
-
-
Map Property To: The Map Property To tree displays all of the predefined NM properties. This is used to build a query or choose a property type.
When you select a node within the property tree the Type or Element and Query fields are populated automatically. Valid endpoint nodes are displayed in bold.
-
New NM Property: Select the New NM Property checkbox to add a specific NM property, and enter the name of the property in the New NM Property field. The new NM property is added to the Map Property To tree.
-
Sync with tree:When this checkbox is selected, the Query field is automatically synchronized with the selected node in the Map Property To tree.
-
Query: Displays the query type associated with the selected node in the Map Property To tree.

-
-
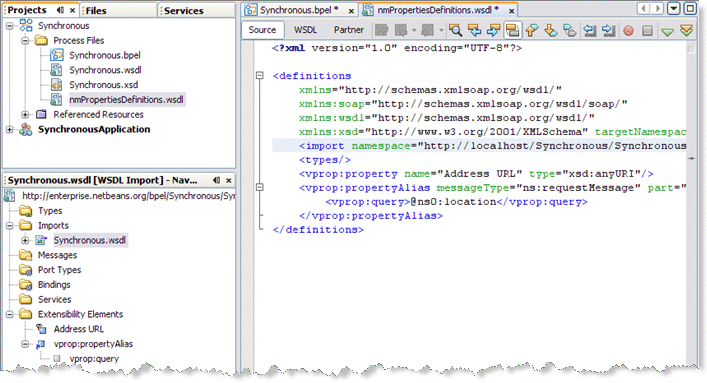
Click OK. The new NM property name is added to the tree in the BPEL Mapper, and the NM property is stored in nmPropertiesDefinitions.wsdl as a pair of elements: <vprop:property> and <vprop:propertyAlias>

The new NM property can now be used in assigns and to build expressions.
 To delete an NM Property
-
To delete a new NM property, right-click the property in the Mapper tree.
-
Choose Delete NM Property in the pop-up menu.
The property is deleted.
BPEL Code Generation Using NM Properties
Data copied from an NM property or an NM property shortcut generates code that is similar to the following:
<from variable="inputVar" sxnmp:nmProperty="org.glassfish.openesb.file .outbound.dcom.username"/> |
Data copied from WSDL properties based on NM property generates code that is similar to the following:
<from variable="inputVar" property="ns3:DemoNMProperty"/> |
When properties and NM properties are used to build an expression, code similar to the following code is generated:
<from>concat(bpws:getVariableProperty('inputVar', 'ns3:DemoNMProperty'),
sxnmp:getVariableNMProperty('inputVar','org.glassfish.openesb.file.outbound.dcom.
username'))</from>
|
An NM property used in a condition generates code that is similar to the following:
<condition>sxnmp:getVariableNMProperty('inputVar', 'my.nmProperty.boolean')</condition>
|
- © 2010, Oracle Corporation and/or its affiliates

