Using the Access Manager for Authentication and Authorization
To use Access Manager to configure access-level authorization, you configure the consuming endpoint to use the Sun Access Manager to authenticate the client's credentials. The HTTP Binding Component SOAP binding integrates seamlessly with Sun Access Manager to authenticate the HTTP client's credentials (the username and password extracted from the HTTP Authorization header) against the user's credentials in the Sun Access Manager database.
Installing the Access Manager Add-on
Access Manager is installed as an GlassFish add-on which includes the Access Manager Server and JAR files. To install Access Manager, do the following:
-
Download the standalone (15 MB) Sun Java System Access Manager 7.1 Patch 1.
-
Extract the access_manager-7_1–p01–rr.zip file to the following directory: /GlassFishESBv21/glassfish/bin/accessmanager
-
Install the Access Manager add-on to GlassFish using the following asadmin command from your CLI: /GlassFishESBv21/glassfish/bin/asadmin install-addon /accessmanager/am_installer.jar
Access Manager is extracted into /GlassFishESBv21/glassfish/addons/accessmanager with the necessary JAR files and AMConfig.properties.
-
Restart the GlassFish server. Upon restart the post-configuration is done automatically for Access Manager
Installing Access Manager with JavaTM Application Platform SDK
You can also download Access Manager as part of the Java Application Platform SDK installation, following the SDK Update 7 Installation Instructions. Upon installation, the Access Manager is available in the SDK install directory in the addons/accessmanager directory.
To configure and deploy the Access Manager instance that is installed with the SDK package from GlassFish ESB, modify the server.policy file of GlassFish from GlassFish ESB as follows:
-
Copy (cp) /GlassFishESB21/glassfish/domains/domain1/config/server.policy to /GlassFishESB21/glassfish/domains/domain1/config/server.policy.Orig
-
Cat /~<SDK_location>/addons/accessmanager/as9.0_serverpolicy to /GlassFishESB21/glassfish/domains/domain1/config/server.policy.
-
Autodeploy amserver.war.
Copy (cp) /~<SDK_location>/addons/accessmanager/amserver.war to /GlassFishESB21/glassfish/domains/domain1/autodeploy
-
Restart GlassFish
/GlassFishESB21/stop_glassfish_domain1
/GlassFishESB21/start_glassfish_domain1
From the Command Line:
Configure the HTTP Binding Component to use Access Manager
-
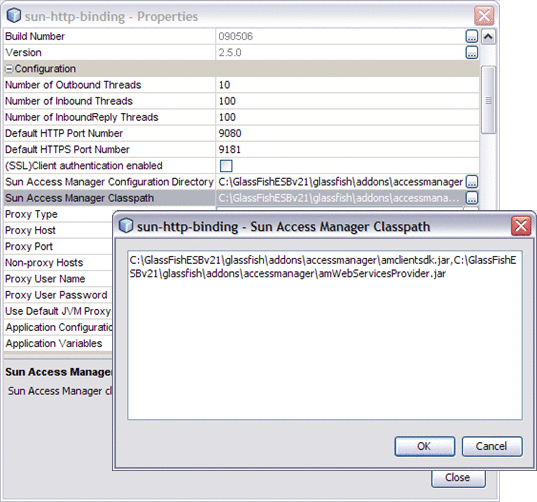
Access the HTTP Binding Component Properties from the NetBeans Services window. Right-click sun-http-binding under Servers -> GlassFish -> JBI -> Binding Components, and choose Properties from the pop-up menu.
-
Configure the Sun Access Manager Configuration Directory property to specify the location of the Sun Access Manager's AMConfig.properties file. For example: C:/GlassFishESBv21/glassfish/addons/accessmanager
Configure the Sun Access Manager Configuration Directory property to point to the directory that contains the the AMConfig.properties file. For example: C:/GlassFishESBv21/glassfish/addons/accessmanager
-
Configure the Sun Access Manager Classpath property to point to the following JAR files extracted to the /GlassFishESBv21/glassfish/addons/accessmanager directory:
-
amclientsdk.jar
-
amWebServicesProvider.jar
Note that the two files must be separated by a comma.

-
-
Modify the AMConfig.properties file as needed to connect to Access Manager. At a minimum, the following properties must be configured:
com.iplanet.am.naming.url=@PROTOCOL@:
   //@SERVER_HOST@:@SERVER_PORT@/@DEPLOY_URI@/namingservice
com.sun.identity.agents.app.username=@APPLICATION_USER@
com.iplanet.am.service.password=@APPLICATION_PASSWD@
am.encryption.pwd=@ENCRYPTION_KEY@
com.iplanet.am.server.protocol=@SERVER_PROTOCOL@
com.iplanet.am.server.host=@SERVER_HOST@
com.iplanet.am.server.port=@SERVER_PORT@
com.iplanet.am.services.deploymentDescriptor=@DEPLOY_URI@
com.sun.identity.loginurl=@SERVER_PROTOCOL@://@SERVER_HOST@:
   @SERVER_PORT@/@DEPLOY_URI@/UI/Login
com.sun.identity.liberty.authnsvc.url=@SERVER_PROTOCOL@://
   @SERVER_HOST@:@SERVER_PORT@/@DEPLOY_URI@/Liberty/authnsvc
-
Configure the policy in the WSDL to enable Authorization by changing the Access Manager authorization attribute to true (note the attribute authorization="true" in the example below). This attribute is optional and the default value is false.
To configure the Sun Access Manager Configuration Directory, do the following:
The following sample WSDL contains the policy and its reference to use Access Manager.
<service name="AuthAMService">
    <port name="AuthAMPort" binding="tns:AuthAMBinding">
        <soap:address location="http://localhost:${HttpDefaultPort}/AuthAMService
/AuthAMPort"/>
        <wsp:PolicyReference URI="#HttpAuthorizationBindingAMPolicy"/>
    </port>
</service>
<wsp:Policy wsu:Id="HttpAuthorizationBindingAMPolicy">
    <mysp:MustSupportBasicAuthentication on="true">
        <!-- authenticationType is one of simple, am, or realm -->
        <mysp:BasicAuthenticationDetail>
            <mysp:AccessManager authorization="true"/>
        </mysp:BasicAuthenticationDetail>
    </mysp:MustSupportBasicAuthentication>
</wsp:Policy>
|
For more information on HTTP Binding Component authorization using Sun Access Manager, and Access Manager Classpath configuration, see: HTTP BC Access Manager Authorization.
Note –
When OpenSSO Enterprise Server is running on an HTTPS port, the certificates on the OpenSSO Enterprise server must be installed on the client side in order for the HTTP Binding Component to access the server. Certificates should be installed in the GlassFish domain config directory. For example: \GlassFishESBv21\glassfish\domains\domain1\config.
- © 2010, Oracle Corporation and/or its affiliates
