| Sun ONE Calendar Server 6.0 Administrator's Guide |
Chapter 3
Managing Calendar ServerThis chapter describes how to configure and manage Sun™ ONE Calendar Server.
This chapter contains these sections:
You manage Calendar Server by running command-line utilities and by editing the ics.conf configuration file.
To run the command-line utilities, you must log in as a user who has administrative rights to the system where Calendar Server is running.
For more information, see Chapter 11, "Calendar Server Command-Line Utilities" and Chapter 12, "Calendar Server Configuration Parameters".”
Starting and Stopping Calendar ServerYou can start and stop Calendar Server using the start-cal and stop-cal commands. See "Using the start-cal and stop-cal Utilities".
Using the start-cal and stop-cal Utilities
The start-cal and stop-cal utilities are located in the cal_svr_base/opt/SUNWics5/cal/sbin directory. You must run these utilities on the local machine where Calendar Server is installed. For problems that might occur, see "Troubleshooting the start-cal and stop-cal Utilities".
The start-cal utility starts Calendar Server services in the following order:
For a description of these services, see “Calendar Server Services.”
To start Calendar Server using the start-cal command:
To stop Calendar Server using the stop-cal command:
Troubleshooting the start-cal and stop-cal Utilities
When you are starting and stopping Calendar Server, the following problems might occur:
- The start-cal utility does not start all Calendar Server processes. For example, start-cal might start the enpd, csnotifyd, and csadmind processes but not cshttpd. In this situation, you must stop all Calendar Server processes before you try to restart Calendar Server.
- The stop-cal utility does not stop all Calendar Server processes. For example, stop-cal might stop the cshttpd parent process but not any cshttpd child processes. In this situation, you must stop the remaining Calendar Server processes.
To stop Calendar Server processes on Solaris Systems:
- Log in as a user who has administrative rights to the system where Calendar Server is running.
- Determine the process ID (PID) of the remaining Calendar Server processes by entering a ps command for each service:
ps -elf | grep cs-process
where cs-process is enpd, csnotifyd, csdwpd, csadmind, or cshttpd. For example:
ps -elf | grep cshttpd
- Using the PID of each process that is still running, enter a pkill -15 command to kill the process. For example:
pkill -15 9875
- Enter each ps command again to make sure that all Calendar Server processes are stopped.
If a Calendar Server process is still running, enter a pkill -9 command to kill it. For example:
pkill -9 9875
Caution
After you have stopped all Calendar Server processes and before you restart Calendar Server, consider running the csdb utility check command to check for any calendar database corruption that might have occurred.
For information about the check command, see "Checking and Rebuilding a Calendar Database".
Configuring Calendar Server Timeout ValuesFor information about editing ics.conf parameters, see "Editing the ics.conf Configuration File".
Configuring Timeout Values for csadmind
Table 3-1 describes the Calendar Server timeout parameters in the ics.conf file used by the Administration (csadmin) service.
Configuring HTTP Timeout Values for End Users
Table 3-2 describes the Calendar Server HTTP timeout parameters in the ics.conf file that apply to end users.
Configuring Single Sign-on (SSO)Single Sign-on (SSO) allows a user to authenticate once and then use multiple trusted applications without having to authenticate again. Sun ONE Communications servers, including Calendar Server and Messaging Server, can implement SSO as follows:
Configuring SSO Through Identity Server
Sun ONE servers, including Calendar Server and Messaging Server, can implement SSO using Sun ONE Identity Server 6.1 or later.
Identity Server serves as the SSO gateway for Sun ONE servers. That is, users log in to Identity Server and then can access other Sun ONE servers, as long as the servers are configured properly for SSO.
To use SSO with Calendar Server, follow these steps:
- Make sure that Sun ONE Identity Server and Sun ONE Directory Server are installed and configured. For information about installing and configuring these products, refer to the Sun Java Enterprise System Installation Guide.
- Configure SSO for Calendar Server by setting the parameters shown in Table 3-3 and then restarting Calendar Server for the values to take effect. If necessary, remove the comment character (!) when you set each parameter.
Note When you set the local.calendar.sso.amnamingurl parameter, you must use a fully qualified name for Identity Server.
- To configure SSO for Messaging Server, refer to the Sun ONE Messaging Server 6.0 Administrator's Guide.
- Users log into Identity Server using their Directory Server LDAP user name and password. (A user who logs in through another server such as Calendar Server or Messaging Server will not be able to use SSO to access the other Sun ONE servers.)
- After logging in, users can access Calendar Server through Calendar Express using the appropriate URL. Users can also access other Sun ONE servers such as Messaging Server, if the servers are configured properly for SSO.
Considerations for Using SSO With Identity Server
- A calendar session is valid only as long as the Identity Server session is valid. If a user logs out of Identity Server, the calendar session is automatically closed (single sign-off).
- SSO applications must be in the same domain.
- SSO applications must have access to the Identity Server verification URL (naming service).
- Browsers must support cookies.
- If you are using the Sun ONE Portal Server gateway, set the following Calendar Server parameters:
Configuring SSO Through Communications Servers Trusted Circle Technology
When configuring SSO through Communications Servers trusted circle technology (that is, not through Identity Server), consider these points:
- Each trusted application must be configured for SSO.
- SSO does not work correctly if the default.html page is in your browser’s cache. Before using SSO, be sure to reload the default.html page in your browser. For example, in Netscape Navigator, hold down the Shift key and then click Reload.
- SSO works only for bare URLs. For example, SSO works for http://servername but not for URLs such as http://servername/command.shtml?view.
Table 3-4 describes the Calendar Server configuration parameters for SSO through Communications Servers trusted circle technology.
Table 3-5 describes the Messaging Server configuration parameters for SSO through Communications Servers trusted circle technology.
For more information about configuring Messaging Server for SSO, see the Sun ONE Messaging Server 6.0 Administrator's Guide.
Configuring the LDAP Calendar Lookup Database (CLD) Plug-inThe LDAP CLD plug-in provides horizontal scalability of the calendar database by allowing user and resource calendars to be distributed over a number of back-end servers for a single calendar instance. The LDAP CLD plug-in uses the icsDWPHost attribute to determine the back-end server where a calendar is located.
This section describes the following topics:
How the LDAP CLD Plug-in Works
The LDAP CLD plug-in allows the calendar database to be distributed over a number of back-end servers. Each calendar in the database is identified by a unique calendar ID (calid) in the following format:
userid[@domain][:calendar-name]
where:
Calendar Server accesses calendar data on a back-end server as follows:
- When a Calendar Express end user accesses a calendar, the LDAP CLD plug-in extracts the userid from the calendar’s calid and then looks up the calendar owner in the LDAP server database.
- After finding the calendar owner, the plug-in uses the owner’s icsDWPHost LDAP attribute to determine the host name of the back-end server where the calendar resides. This host name must be resolvable by your Domain Name Service (DNS) into a valid IP address.
- Using the host name, Calendar Server accesses the calendar data on the back-end server using the Database Wire Protocol (DWP). DWP is an internal protocol that runs as the csdwpd service and provides the networking capability for the calendar database.
- Using DWP, Calendar Server sends the calendar data to the server where the user is logged in, and then Calendar Express renders the data in the end user’s browser.
Note
If your site is using the LDAP CLD plug-in and you are using the cscal utility to create a new calendar, you must create the new calendar on the same back-end server where the user’s calendars reside (or will reside), as indicated by the user’s icsDWPHost LDAP attribute. If you try to create a calendar on a different back-end server, Calendar Server returns an error.
For more information, see "cscal".
Calendar Server Configurations for the LDAP CLD Plug-in
The LDAP CLD plug-in supports the following Calendar Server configurations:
In these configurations, each front-end and back-end server must:
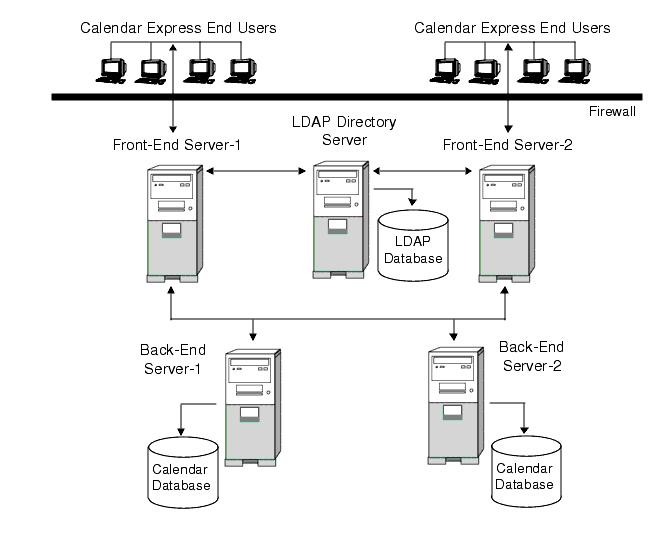
Multiple Front-End Servers with Multiple Back-End Servers
The following figure shows two front-end servers and two back-end servers running a single Calendar Server instance. You can also configure more than two front-end or back-end servers, if you wish.
This configuration allows the servers to be protected by a firewall to restrict access to the LDAP and calendar databases. The calendar database is distributed across the two back-end servers.
The front-end servers are CPU intensive, with most CPU time spent rendering calendar data for end-users. The back-end servers are disk intensive, with most CPU time spent accessing the calendar database.
Figure 3-1 Multiple Front-End Servers with Multiple Back-End Servers
Configuring a Front-End Server
To configure a front-end server, set the following parameters in the ics.conf file on each front-end server.
- Enable calendar database lookup plug-ins:
csapi.plugin.calendarlookup = "y"
- Specify that Calendar Server load all plug-ins:
csapi.plugin.calendarlookup.name = "*"
- Set the type of calendar lookup plug-in for the LDAP CLD plug-in:
caldb.cld.type = "directory"
- Set the port number for the DWP service (csdwpd):
service.dwp.port = "59779"
The default is “59779”. The port number must be the same for all configured front-end and back-end servers.
- Set the server name for each back-end server in the configuration:
caldb.dwp.server.backend-server-1.ip = "backend-server-1"
caldb.dwp.server.backend-server-2.ip = "backend-server-2"
...
caldb.dwp.server.backend-server-n.ip = "backend-server-n"The server name must be fully qualified and be resolvable by your Domain Name Service (DNS) into a valid IP address. In each part of the parameter, the server name must be identical and fully qualified. For example:
caldb.dwp.server.calendar.sesta.com.ip = "calendar.sesta.com"
The server name must also match the name used for the icsDWPHost LDAP attribute for the applicable calendar owners.
- Set the default DWP server name:
caldb.dwp.server.default = "server-name"
where server-name is the fully qualified default server name used by Calendar Server if the user or resource entry in the LDAP server database does not have an icsDWPHost attribute. This name must be resolvable by your Domain Name Service (DNS) into a valid IP address. For example:
caldb.dwp.server.default = "calendar.sesta.com"
- Restart Calendar Server for the changes to take effect.
Example Configuration Parameters for a Front-End Server
The following example shows the configuration parameters for a front-end server with two back-end servers named calendar.sesta.com and calendar.siroe.com. The default DWP server is calendar.sesta.com.
Code Example 3-1 LDAP CLD Configuration Parameters for a Front-End Server
Configuring a Back-End Server
To configure a back-end server, set the following parameters in the ics.conf file on each back-end server.
- Enable the DWP service (csdwpd) and set the DWP port number:
service.dwp.enable = "y"
service.dwp.port = "59779"
The default port number is “59779”. The port number must be the same for all configured front-end and back-end servers.
- Disable the HTTP service because it is not required on a back-end server (the Admin service should be set to the default value of "yes"):
service.http.enable = "no"
service.admin.enable = "yes"- Set the type of calendar lookup plug-in for the LDAP CLD plug-in:
caldb.cld.type = "local"
- Set csapi.plugin.calendarlookup to "n" because a back-end server does not need to lookup any calendar data:
csapi.plugin.calendarlookup = "n"
- Restart Calendar Server for the changes to take effect.
Example Configuration Parameters for a Back-End Server
The following example shows the configuration parameters for a back-end server.
Code Example 3-2 LDAP CLD Configuration Parameters for a Back-End Server
service.dwp.enable = "y"
service.dwp.port = "59779"
service.http.enable = "no"
service.admin.enable = "yes"
caldb.cld.type = "local"
csapi.plugin.calendarlookup = "n"
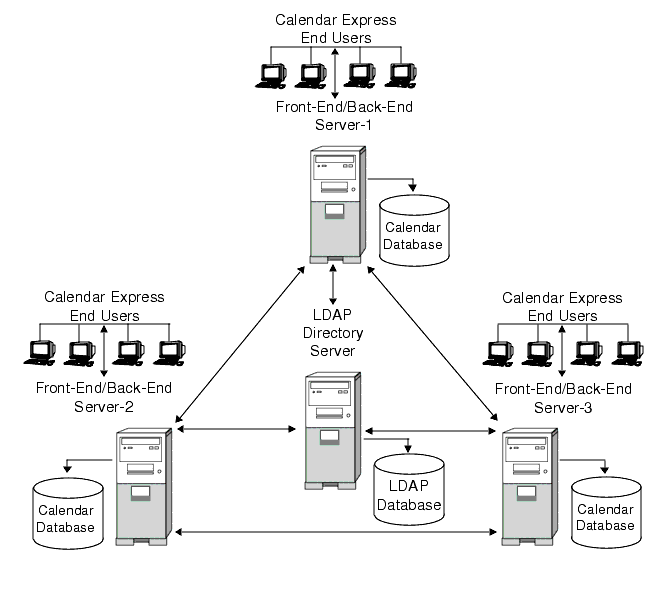
Multiple Front-End/Back-End Servers
The following figure shows three front-end/back-end servers, with each server connected to a calendar database. This configuration allows calendars to be geographically distributed, with each calendar residing on the server where its owner logs into Calendar Server.
Figure 3-2 Multiple Front-End/Back-End Servers
Configuring a Front End/Back-End Server
To configure a front-end/back-end server, set the following parameters in the ics.conf file on each server.
- Enable the DWP service (csdwpd):
service.dwp.enable = "y"
- Set the port number for the DWP service (csdwpd):
service.dwp.port = "59779"
The default is “59779”. The port number must be the same for all configured front-end and back-end servers.
- Enable calendar lookup plug-ins:
csapi.plugin.calendarlookup = "y"
- Have Calendar Server load all plug-ins:
csapi.plugin.calendarlookup.name = "*"
- Specify the type of calendar lookup plug-in that Calendar Server should use:
caldb.cld.type = "directory"
- Set the default DWP server name:
caldb.dwp.server.default = "server-name"
where server-name is the fully qualified default server name used by Calendar Server if the user or resource entry in the LDAP server database does not have an icsDWPHost attribute. This name must be resolvable by your Domain Name Service (DNS) into a valid IP address. For example:
caldb.dwp.server.default = "calendar.sesta.com"
- Set the server name for all front-end/back-end servers in the configuration, including the local server:
caldb.dwp.server.server-1.ip = "server-1"
caldb.dwp.server.server-2.ip = "server-2"
...
caldb.dwp.server.server-n.ip = "server-n"The server name must be fully qualified and be resolvable by your Domain Name Service (DNS) into a valid IP address. In each part of the parameter, the server name must be identical and fully qualified. For example:
caldb.dwp.server.calendar.sesta.com.ip = "calendar.sesta.com"
The server name must also match the name used for the icsDWPHost LDAP attribute for the applicable calendar owners.
- Restart Calendar Server for the changes to take effect.
Example Configuration Parameters for Each Front-End/Back-End Server
The following example shows the configuration parameters for each front-end/back-end server. The servers are sesta.com, siroe.com, and varrius.com. The default DWP server is sesta.com.
Code Example 3-3 LDAP CLD Configuration Parameters for Each Front-End/Back-End Server
service.dwp.enable = "y"
service.dwp.port = "59779"
csapi.plugin.calendarlookup = "y"
csapi.plugin.calendarlookup.name = "*"
caldb.cld.type = "directory"
! Default DWP server
caldb.dwp.server.default = "calendar.sesta.com"
! Back-end servers
caldb.dwp.server.calendar.sesta.com.ip = "calendar.sesta.com"
caldb.dwp.server.calendar.siroe.com.ip = "calendar.siroe.com"
caldb.dwp.server.calendar.varrius.com.ip = "calendar.varrius.com"
Maintaining Security Between Front-End and Back-End Servers
A front-end server uses the Database Wire Protocol (DWP) to communicate with a back-end server. Because DWP uses HTTP as the transport mechanism, Calendar Server 6.0 provides authentication for DWP connections between front-end and back-end servers using the configuration parameters in Table 3-6 and Table 3-7.
These parameters are optional and by default are not included in the ics.conf file. To use authentication for DWP connections, you must add the required parameters to the ics.conf file on each front-end and back-end server.
Table 3-6 Back-end Configuration Parameters for Authentication of a DWP Connection
Parameter
Description
service.dwp.admin.userid
On a back-end server, specifies the user ID that is used to authenticate a DWP connection. If a back-end server does not specify a user ID, no authentication is performed.
service.dwp.admin.cred
On a back-end server, specifies the password that is used to authenticate a DWP connection. If a back-end server does not specify a password, no authentication is performed.
Table 3-7 Front-end Configuration Parameters for Authentication of a DWP Connection
Parameter
Description
caldb.dwp.server.back-end-server.admin
On a front-end server, specifies the user ID that is used for authentication for a DWP connection to a back-end server, where back-end-server is the name of the server.
caldb.dwp.server.back-end-server.cred
On a front-end server, specifies the password that is used for authentication for a DWP connection to a back-end server, where back-end-server is the name of the server.
To set up the authentication for DWP connections between front-end and back-end servers, follow these steps:
- In the ics.conf file on each front-end server, add these parameters:
caldb.dwp.server.back-end-server.admin = "userid"
caldb.dwp.server.back-end-server.cred = "password"where back-end-server is the name of the back-end server and userid and password are the user ID and password you want Calendar Server to use to authenticate the connection.
- In the ics.conf file on each back-end server indicted by back-end-server, add these parameters:
service.dwp.admin.userid = "userid"
service.dwp.admin.cred = "password"where userid and password are the same user ID and password you specified on the front-end server.
When the front-end server first connects to the back-end server, it sends the user ID and password specified by the parameters. The back-end server checks the parameters, and if both parameters match, the authentication is successful. The back-end server then sends a session ID back to the front-end server. The front-end server uses the session ID in subsequent DWP commands to the back-end server.
Subsequent connections from the same front-end server do not need to be authenticated again, unless:
If you have multiple front-end and back-end server, you can use the same user ID and password for each one.
If a back-end server does not specify a user ID and password in this parameter, no authentication is performed.
Improving Performance of the LDAP CLD Plug-in
To improve the performance of Calendar Server with the LDAP CLD plug-in, make sure the following configuration parameters are set to “yes” (the default value for each parameter):
- caldb.cld.cache.enable enables the CLD cache option. This option stores the DWP host server information (icsDWPHost LDAP attribute) for calendar users and thus reduces calls to the LDAP directory server.
- service.calendarsearch.ldap specifies that calendar searches are done using the LDAP or a user preference plug-in.
Clearing the CLD Cache
If you are using the CLD cache option and you have updated a server name for an ics.conf parameter or moved a calendar to a different back-end server, you should clear the CLD cache to remove the server names. An out-of-date entry in the CLD cache can prevent a front-end server from establishing a connection to the correct back-end server or cause Calendar Server not to find a calendar after it have been moved.
To clear the CLD cache, follow these steps:
Moving a Calendar to a Different Back-End Server
To move a user or resource calendar from one back-end server to another back-end server, follow these steps:
- On the original server, disable the calendar user using the csuser utility for a user calendar or csresource for a resource calendar. For example to disable the user with the user ID and calid bkamdar:
csuser disable bkamdar
- On the original server, export the calendar from the calendar database to a file using the csexport utility. For example:
csexport -c bkamdar calendar bkamdar.ics
If a user has more than one calendar, you must perform this step for each calendar.
- Copy the exported calendar (*.ics) files from the original server to the new server.
- On the new server, import the calendar from the file to the calendar database using the csimport utility. For example:
csimport -c bkamdar calendar bkamdar.ics
Again, you must perform this step for each of the calendars you exported.
- On the LDAP directory server, update the calendar owner’s icsDWPHost LDAP attribute to point to the new back-end server using the csattribute utility. To update an attribute, you must first delete the attribute and then add it with the new value. For example, to set the new server name to sesta.com:
csattribute -a icsDWPHost delete bkamdar
csattribute -a icsDWPHost=sesta.com add bkamdar- On the new server, enable the calendar user using the csuser utility for a user calendar or csresource for a resource calendar. For example:
csuser enable bkamdar
- On the new server, use the following commands to verify that the attributes are correct and that each calendar has been moved correctly. For example:
cscal -v -o bkamdar list bkamdar
...
csattribute -v list bkamdar- On the original server, delete each calendar you just moved. For example:
cscal -o bkamdar delete bkamdar
The -o option deletes all calendars whose primary owner is bkamdar.
Managing LDAP AttributesTo manage the LDAP attributes used by Calendar Server, use the csattribute utility.
Note
If your site is using the LDAP CLD plug-in, do not use csattribute to change the icsDWPHost attribute to specify a new back-end host server. Modifying icsDWPHost does not cause a new calendar to be created on the new back-end host. For more information, see "Configuring the LDAP Calendar Lookup Database (CLD) Plug-in".
Listing LDAP Attributes
To list LDAP attributes for a user or resource, use the csattribute utility add command. For example, to list the LDAP attributes for the user TChang:
csattribute list TChang
Adding an LDAP Attribute
To add an attribute to the LDAP server, use the csattribute utility add command. For example, to add the LDAP attribute icsCalendar with the value Conference_Schedule to the user TChang:
csattribute -a icsCalendar=Conference_Schedule add TChang
Deleting an LDAP Attribute
To delete an attribute to the LDAP server, use the csattribute utility delete command. For example, to delete the LDAP attribute icsCalendar from TChang:
csattribute -a icsCalendar delete TChang
Managing the Group Scheduling Engine (GSE) QueueGroup scheduling allows a Calendar Server user to create an event such as a meeting and then invite other attendees. By using the free/busy lookup feature, the user can determine when an invitee is actually available for an event.
If an attendee is on the same Calendar Server, the event is scheduled in the attendee’s calendar. If an attendee is not on the same Calendar Server, the invitation is sent via email. The attendee can then accept or decline the invitation.
Calendar Server users can also compare a group schedule by viewing attendees' calendars side-by-side.
To manage entries in the GSE queue, use the csschedule utility. You must run csschedule on the local machine where Calendar Server is installed.
Listing Entries in the GSE Queue
To list entries in the GSE queue, use the csschedule utility list command. For example, to list all entries in the GSE queue:
csschedule list
To list the first ten entries stored in the GSE queue:
csschedule -c 10 list
To list all entries in the GSE queue for a calendar with the calid Holiday_Schedule:
csschedule -v list Holiday_Schedule
Deleting Entries in the GSE Queue
To delete entries in the GSE queue, use the csschedule utility delete command. For example, to delete all entries in the GSE queue:
csschedule -v delete
To delete the entry in the GSE queue for calendar calA with the first schedule time of 13:30:45 on 11/30/2001, an offset number of 1, the unique identifier 1111, the recurrence ID 0, and the sequence number 0:
csschedule -v -t 20011130T133045Z -o 1 -u 1111 -r 0 -n 0 delete calA
Monitoring Calendar ServerTo monitor Calendar Server activity, use the csmonitor, csstats, and cstool utilities. This section describes the following tasks:
Listing Counter Statistics
The csstats utility displays statistical information from counter objects defined in the calendar configuration (counter.conf) files. Counter objects such as httpstat, authstat, wcapstat, or dbstat show information about Calendar Server including:
For more information about Calendar Server counter statistics, see "Counters Configuration (counter.conf) File".
To list statistical information, use the csstats utility list command. For example, to display basic information about the counter objects and the types available:
csstats list
To list statistics specifically about the httpstat counter object:
csstats list http
To list statistics about the wcapstat counter object every 10 seconds for one hour:
csstats -i 360 -s 10 list wcap
Monitoring Calendar Server Log Files
Each Calendar Server service writes status information to its own log file. Each log file is named after its associated service name, as shown in Table 3-8:
Table 3-8 Calendar Server Log Files
Service Name
Log File Name
Administration Service (csadmind)
admin.log
Distributed Database Service (csdwpd)
dwp.log
HTTP Service (cshttpd)
http.log
Notification Service (csnotifyd)
notify.log
Calendar Server log files are stored in the following default directory on Solaris Systems:
/var/opt/SUNWics5/logs
Each log file is rolled-over to a new log file with a new name based on the configured time and size limits as follows:
ServiceName.TimeStamp.#
For example:
admin.20000801115354.1
http.20000801115354.2Log Event Severity Levels
Calendar Server provides eight levels of severity for events reported to the log files as described in Table 3-9.
Table 3-9 Calendar Server Log Error Severity Levels
Severity Level
Meaning
EMERGENCY
System is unusable. This level indicates events with the highest (most critical) severity.
ALERT
Action must be taken immediately.
CRITICAL
Critical condition.
ERROR
Error condition.
WARNING
Warning condition.
NOTICE
Normal, but signification condition. This is the default reporting level for each calendar service.
INFORMATION
Informational.
DEBUG
Debug-level message.
A log event is represented by a single line that shows the associated timestamp, server host name, severity level, process name (process ID), type of event, priority, and description. You can specify the level of severity of the events that Calendar Server reports to the log files by modifying certain configuration settings in the ics.conf file. For information, see "Calendar Log Information Configuration".
You should inspect the log files on a regular basis for EMERGENCY, ALERT, CRITICAL, ERROR, and WARNING level errors and, if found, examine the events for possible problems with the operation of Calendar Server. The NOTICE and INFORMATION level log events are generated during normal operation of Calendar Server and are provided to help you monitor server activity.
Note
When requesting technical support for Calendar Server, you might be asked to provide the log files for help in resolving problems.
Pinging Calendar ServerTo verify that a Calendar Server service is listening on a specified port number, use the cstool utility ping command. Pinging a service does not verify that a service is actually running but indicates if it can accept a socket connection.
The Calendar Server service options are:
To run cstool, Calendar Server must be running.
For example, to ping the machine with the host name calserver to see if the cshttpd service is listening on port 80:
cstool -p 80 -h calserver ping http
By default, cstool waits 120 seconds for a response; however, you can change by value by using the -t timeout option.
Refreshing the Calendar Server ConfigurationIn the current release, do not use the cstool refresh command to refresh a configuration. Instead, use the stop-cal and start-cal commands. For more information, see "Starting and Stopping Calendar Server".