The Accounts Area of the Interface
A user is anyone who holds an Identity Manager system account. Identity Manager stores a range of data for each user. Collectively, this information forms a user’s Identity Manager identity.
The Identity Manager Accounts / User List page lets you manage Identity Manager users. To access this area, click Accounts on the Administrator interface menu bar.
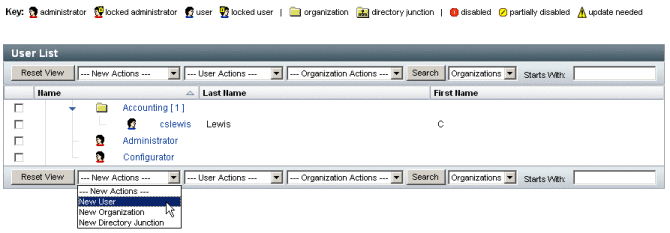
The accounts list shows all Identity Manager user accounts. Accounts are grouped into organizations and virtual organizations, which are represented hierarchically in folders.
You can sort the accounts list by full name (Name), user last name (Last Name), or user first name (First Name). Click the header bar to sort by a column. Clicking the same header bar toggles between ascending and descending sort order. When you sort by full name (the Name column), then all items in the hierarchy, at all levels, are sorted alphabetically.
To expand the hierarchical view and see accounts in an organization, click the triangular indicator next to a folder. Collapse the view by clicking the indicator again.
Actions Lists in the Accounts Area
Use the actions lists (located at the top and bottom of the accounts area, as shown in Actions Lists in the Accounts Area), to perform a range of actions.
Actions list selections are divided among:
-
New Actions. Create users, organizations, and directory junctions.
-
User Actions. Edit, view, and change status of users; change and reset passwords; delete, enable, disable, unlock, move, update, and rename users; and run a user audit report.
-
Organization Actions. Perform a range of organization and user actions.

Searching in the Accounts List Area
Use the accounts area search feature to locate users and organizations. Select Organizations or Users from the list, enter one or more characters that the user or organization name starts with in the search area, and then click Search. For more information about searching in the accounts area, see Finding & Viewing User Accounts.
User Account Status
Icons that display next to each user account indicate current, assigned account status. Table 3–1 describes what each icon represents.
Table 3–1 User Account Status Icon Descriptions|
Indicator |
Status |
|---|---|
|
|
The user’s Identity Manager account is locked. Note that this icon only reflects the locked state of the Identity Manager account, not any of the user’s resource accounts. Users become locked after exceeding the maximum number of failed Identity Manager account login attempts as defined in the Identity Manager Account Policy. Only failed password or question logins to Identity Manager accounts are counted towards the maximum allowed. Therefore, if an Identity Manager login application (that is, the administrator interface, the end-user interface, and so on) does not include the Identity Manager Login Module in its login module group, then the Identity Manager failed password policy will not be considered. However, regardless of the stack of login modules configured for a given Identity Manager login application, failed question logins that exceed the maximum configured in the Identity Manager Account Policy can cause a user to become locked and this icon to be displayed. For information on how to unlock accounts see Unlocking User Accounts. |
|
|
The administrator Identity Manager account is locked. Note that this icon only reflects the locked state of the Identity Manager account, not any of the administrator’s resource accounts. For more information, see the description for the user lockout icon, above. |
|
|
The account is disabled on all assigned resources and on Identity Manager. (When an account is enabled, no icon appears.) For information about how to enable disabled accounts, see Disabling, Enabling, & Unlocking User Accounts. |
|
|
The account is partially disabled, meaning that it is disabled on one or more assigned resources. |
|
|
The system attempted but failed to create or update the Identity Manager user account on one or more resources. (When an account is updated on all assigned resources, no icon appears.) |
Note –
In the Manager column, a manager’s user name appears inside parentheses if Identity Manager cannot find an Identity Manager account that matches the name listed.
The User Pages (Create/Edit/View)
This section describes the Create User, Edit User, and View User pages that are available in the Administrator interface. Instructions on how to use these pages appear later in this chapter.
Note –
This documentation describes the default set of Create User, Edit User, and View User pages that ship with Identity Manager. To better reflect your business processes or specific administrator capabilities, however, you should create custom user forms specifically for your environment. For more information about customizing the user form, see Chapter 3, Identity Manager Forms, in Sun Identity Manager Deployment Reference.
The default Identity Manager user pages are organized into the following tabs or sections:
-
Identity
-
Assignments
-
Security
-
Delegations
-
Attributes
-
Compliance
Identity Tab
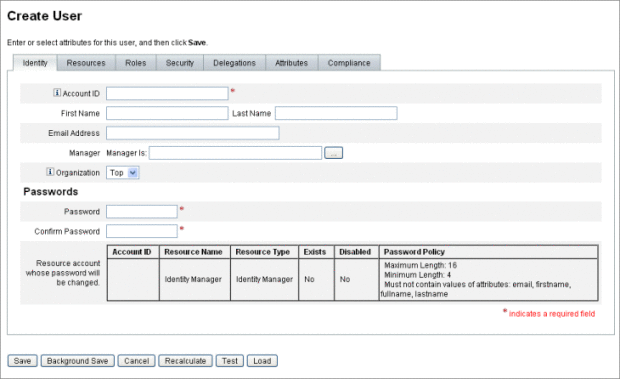
The Identity area defines a user’s account ID, name, contact information, manager, governing organization, and Identity Manager account password. It also identifies the resources to which the user has access, and the password policy governing each resource account.
Note –
For information about setting up account password policies, read the section in this chapter titled Managing Account Security and Privileges.
The following figure illustrates the Identity area of the Create User page.
Figure 3–1 Create User - Identity

Resources Tab
The Resources area provides for the direct assignment of resources and resource groups to a user. Resource exclusions can also be assigned.
Directly assigned resources supplement resources that are indirectly assigned to the user through role assignment. Role assignment profiles a class of users. Roles define user access to resources through indirect assignment.
Roles Tab
The Roles tab is used to assign one or more roles to a user, and manage those role assignments.
See To Assign Roles to a User for information about this tab.
Security Tab
In Identity Manager terminology, a user who is assigned extended capabilities is an Identity Manager administrator. Use the Security tab to assign a user administrator privileges.
For more information on using the Security tab to create administrators, see Creating and Managing Administrators.
The Security form consists of the following sections.
-
Admin roles. Assigns one or more administrative roles to the user. A role is a specific pairing of capabilities and controlled organizations that facilitates assigning administrative duties to users in a coordinated way.
-
Capabilities. Enables rights in the Identity Manager system. Each Identity Manager administrator is assigned one or more capabilities, frequently aligned with job responsibilities.
Capabilities are discussed on Understanding and Managing Capabilities. A list of task-based capabilities with definitions is included in Appendix D, Capabilities Definitions on Appendix D, Capabilities Definitions. This appendix also lists the tabs and subtabs that may be accessed with each capability.
-
Controlled organizations. Assigns organizations that this user has rights to manage as an administrator. He can manage objects in the assigned organization and in any organizations below that organization in the hierarchy.
Note –
To have administrator capabilities, a user must be assigned at least one Admin role, or one or more capabilities AND one or more controlled organizations. For more information about Identity Manager administrators, seeUnderstanding Identity Manager Administration.
-
User Form. Specifies the user form that the administrator will use when creating and editing users. If None is selected, the administrator will inherit the user form assigned to his organization.
-
View User Form. Specifies the user form that the administrator will use when viewing users. If None is selected, the administrator will inherit the view user form assigned to his organization.
-
Account policy. Establishes password and authentication limits.
Delegations Tab
The Delegations tab on the Create User page lets you delegate work items to other users for a specified length of time. For more information about delegating work items, read Delegating Work Items.
Attributes Tab
The Attributes tab on the Create User page defines account attributes associated with assigned resources. Listed attributes are categorized by assigned resource, and differ depending on which resources are assigned.
Compliance Tab
The Compliance tab:
-
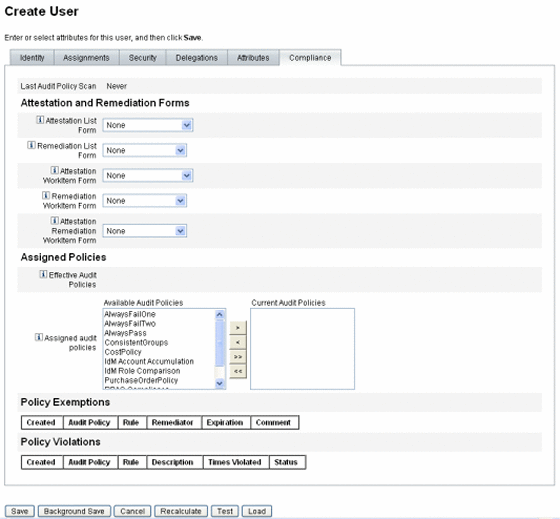
Lets you select the attestation and remediation forms for the user account.
-
Specifies the assigned audit policies for the user account, including those in effect through the user’s Organization assignment. These policy assignments can be changed only by editing the user’s current organization or moving the user to another Organization.
-
Indicates the current status of policy scans, violations, and exemptions (as illustrated by the following figure), if applicable for the user account. The information includes the date and time of the last audit policy scan for the selected user.

To assign audit policies, move selected policies from the Available Audit Policies list to the Current Audit Policies list.
Note –
You can view compliance violations logged for a user for a specific time period, by selecting View Compliance Violation Log from the User Actions list and specifying the range of entries to view.
- © 2010, Oracle Corporation and/or its affiliates


