Understanding and Managing Identity Manager Resources
Read this section for information and procedures to help you set up Identity Manager resources.
What are Resources?
Identity Manager resources store information about how to connect to a resource or system on which accounts are created. Identity Manager resources define the relevant attributes about a resource and help specify how resource information is displayed in Identity Manager.
Identity Manager provides resources for a wide range of resource types, including:
-
Mainframe security managers
-
Databases
-
Directory services
-
Operating systems
-
Enterprise Resource Planning (ERP) systems
-
Messaging platforms
The Resources Area in the Interface
Identity Manager displays information about existing resources on the Resources page.
To access resources, select Resources on the menu bar.
Resources in the resource list are grouped by type. Each resource type is represented by a folder icon. To see currently defined resources, click the indicator next to the folder. Collapse the view by clicking the indicator again.
When you expand a resource type folder, it dynamically updates and displays the number of resource objects it contains (if it is a resource type that supports groups).
Some resources have additional objects you can manage, including the following:
-
Organizations
-
Organizational units
-
Groups
-
Roles
Select an object from the resources list, and then make selections from one of these options lists to initiate a management task:
-
Resource Actions. Perform a range of actions on resources, including edit, active synchronization, rename, and delete; as well as work with resource objects and manage resource connection.
-
Resource Object Actions. Edit, create, delete, rename, save as, and find resource objects.
-
Resource Type Actions. Edit resource policies, work with the account index, and configure managed resources.
When you create or edit a resource, Identity Manager launches the ManageResource workflow. This workflow saves the new or updated resource in the repository, and allows you to insert approvals or other actions before the resource is created or saved.
Managing the Resources List
Before you can create a new resource, you have to tell Identity Manager which resource types you want to be able to manage. To enable resources and create custom resources, use the Configure Managed Resources page.
 To Open the Configure Managed Resources Page
Use the following steps to open the Configure Managed Resources page.
-
Log in to the Administrator interface.
-
Click the Resources tab.
Use one of the following methods to open the Configure Managed Resources page:
-
Locate the Resource Type Actions drop-down list and choose Configure Managed Resources.
-
Click the Configure Types tab.
The Configure Managed Resources page opens.
This page has three sections:
-
Resource Connectors. This section lists resource connector types, the connector version, and connector server.
-
Resource Adapters. This section lists resource types that are commonly found in large enterprise environments. The version of the Identity Manager adapter that connects to the resource is listed in the Version column.
-
Custom Resource Adapters. This section is used to add custom resources to the Resources list.
-
 To Enable Resource Types
You can enable a resource type from the Configure Managed Resources page by using the following steps.
-
Open the Configure Managed Resources page if it is not already open (Managing the Resources List).
-
In the Resources section, select the box in the Managed? column for the resource type that you want to enable.
To enable all of the listed resource types, select Manage all resources.
-
Click Save at the bottom of the page.
The resource is added to the Resources list.
 To Add a Custom Resource
You can add a custom resource from the Configure Managed Resources page by using the following steps.
-
Open the Configure Managed Resources page if it is not already open (Managing the Resources List).
-
In the Custom Resources section, click Add Custom Resource to add a row to the table.
-
Enter the resource class path for the resource, or enter your custom-developed resource. For adapters provided with Identity Manager, see theSun Identity Manager 8.1 Resources Reference for the full class path.
-
Click Save to add the resource to the Resources list.
 To Create a Resource
Once a resource type is enabled, you can then create an instance of that resource in Identity Manager. To create a resource, use the Resource Wizard.
The Resource Wizard will guide you in setting up the following items:
-
Resource-specific parameters. You can modify these values from the Identity Manager interface when creating a specific instance of this resource type.
-
Account attributes. Defined in the schema map for the resource. These determine how Identity Manager user attributes map to attributes on the resource.
-
Account DN or identity template. Includes account name syntax for users, which is especially important for hierarchical namespaces.
-
Identity Manager parameters for the resource. Sets up policies, establishes resource approvers, and sets up organization access to the resource.
-
Log in to the Administrator interface.
-
Click the Resources tab. Verify that the List Resources subtab is selected.
-
Locate the Resource Type Actions drop-down list and select New Resource.
The “New Resource” page opens.
-
Select a resource type from the drop-down list. (If the resource type you are looking for is not listed, you need to enable it. See Managing the Resources List.)
-
Click New to display the Resource Wizard Welcome page.
-
Click Next to begin defining the resource.
The Resource Wizard steps and pages display in the following order:
-
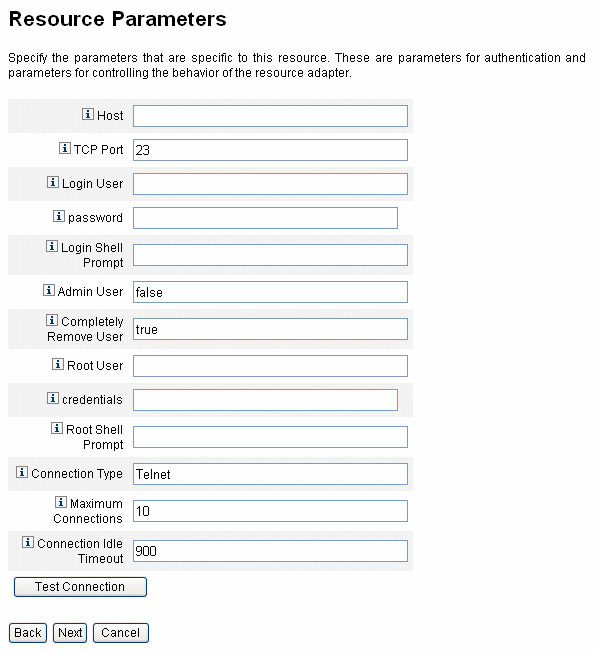
Resource Parameters. Set up resource-specific parameters that control authentication and resource adapter behavior. Enter parameters, and then click Test Connection to ensure the connection is valid. On confirmation, click Next to set up account attributes.
The following figure shows the Resource Parameters page for Solaris resources. The form fields on this page are different for different resources.
-
Account Attributes (schema map). Maps Identity Manager account attributes to resource account attributes. For more information about resource account attributes, see To View or Edit Resource Account Attributes.
-
To add an attribute, click Add Attribute.
-
To remove one or more attributes, select the boxes next to the attribute and click Remove Selected Attributes.
The next figure shows the Account Attributes page in the Resource Wizard.
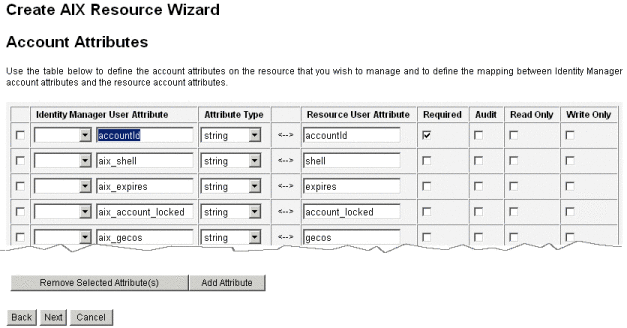
Note –If you want to export attributes to the EXT_RESOURCEACCOUNT_ACCTATTR table, you must check the Audit box for each attribute to be exported.
When you are finished, click Next to set up the Identity Template.
-
-
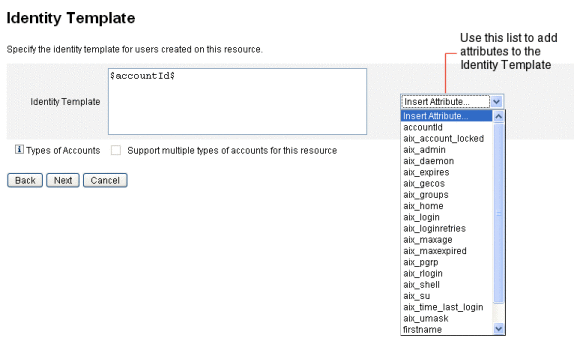
Identity Template. Defines account name syntax for users. This feature is particularly important for hierarchical namespaces.
-
To add an attribute to the template, select it from the Insert Attribute list.
-
To delete an attribute, highlight it in the string and use the delete key on your keyboard. Delete the attribute name, as well as the preceding and following $ (dollar sign) characters.
-
Type of accounts. Identity Manager provides the ability to assign multiple resource accounts to a single user. For example, a user may require an administrator-level account as well as a regular user account on a particular resource. To support multiple account types on this resource, select the Type of accounts check box.
Note –You cannot select the Type of accounts check box if you have not created one or more Identity Generation rules identified by the subtype IdentityRule. Because accountIds must be distinct, different types of accounts must generate different accountIds for a given user. Identity Generation rules specify how these unique accountIds should be created.
Sample identity rules are provided in sample/identityRules.xml.
You cannot remove an account type until it is no longer referenced by other objects within Identity Manager. Also, you cannot rename an account type.
For more information about completing the Type of accounts form, see the Identity Manageronline Help. For more information about creating multiple resource accounts for a user, see Creating Multiple Resource Accounts for a User.
-
-
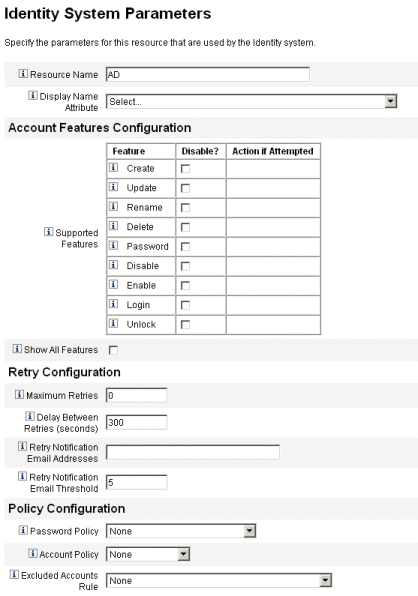
Identity System Parameters. Sets Identity Manager parameters for the resource, including retry and policy configuration, as shown in To Create a Resource.
-
-
Use Next and Back to move among the pages. When you complete all selections, click Save to save the resource and return to the list page.
Managing Resources
This section describes how to manage existing resources.
The topics are organized as follows:
 To View the Resource List
You can view existing resources from the Resource List.
-
Log into the Administrator Interface.
-
Click Resources in the main menu.
The Resource List is displayed on the List Resources subtab.
 To Edit a Resource Using the Resource Wizard
Use the Resource Wizard to edit resource parameters, account attributes, and identity system parameters. You can also specify the identity template that should be used for users created on the resource.
-
In the Identity Manager Administrator Interface, click Resources in the main menu.
The Resource List is displayed on the List Resources subtab.
-
Select the resource you want to edit.
-
In the Resource Actions drop-down menu, select Resource Wizard (under Edit).
The Resource Wizard opens in Edit mode for the selected resource.
 To Edit a Resource Using Resource List Commands
In addition to the Edit Resource Wizard, you can use the Resource List commands to perform a range of edit actions on a resource.
-
Choose one or more options from the Resource List.
These options include:
-
Delete resources. Select one or more resources, and then select Delete from the Resource Actions list. You can select resources of several types at the same time. You cannot delete a resource if any roles or resource groups are associated with it.
-
Search for resource objects. Select a resource, and then select Find Resource Object from the Resource Object Actions list to find a resource object (such as an organization, organizational unit, group, or person) by object characteristics.
-
Manage resource objects. For some resource types, you can create new objects. Select the resource, and then select Create Resource Object from the Resource Object Actions list.
-
Rename resources. Select a resource, and then select Rename from the Resource Actions list. Enter a new name in the entry box that appears, and then click Rename.
-
Clone resources. Select a resource, and then select Save As from the Resource Actions list. Enter a new name in the entry box that appears. The cloned resource appears in the resource list with the name you select.
-
Perform bulk operations on resources. Specify a list of resources and actions to apply (from CSV-formatted input) to all resources in the list. Then launch bulk operations to initiate the bulk-operation background task.
-
-
Save your changes.
 To View or Edit Resource Account Attributes
Resource account attributes (or schema maps) provide an abstract method for referring to attributes on managed resources. The schema map allows you to specify how attributes will be referred to within Identity Manager (the left side of the schema map) and how that name is mapped to the attribute name on the actual resource (the right side of the schema map). You can then refer to the Identity Manager attribute name within forms or workflow definitions and effectively reference the attribute on the resource, itself.
An example of a mapping between attributes in Identity Manager and those for an LDAP resource is as follows:
|
Identity Manager Attribute |
LDAP Resource Attribute |
|
|
firstname |
<--> |
givenName |
|
lastname |
<--> |
sn |
Any reference to the Identity Manager attribute, firstname, is actually a reference to the LDAP attribute, givenName when an action is taken upon that resource.
When managing multiple resources from Identity Manager, mapping a common Identity Manager account attribute to many resource attributes can greatly simplify resource management. For example, the Identity Manager fullname attribute can be mapped to the Active Directory resource attribute displayName. Meanwhile, on an LDAP resource, the same Identity Manager fullname attribute can be mapped to the LDAP attribute cn. As a result, an administrator only needs to provide a fullname value once. When the user is saved, the fullname value is then passed to the resources that have different attribute names.
By setting up a schema map on the Account Attributes page of the Resource Wizard, you can do the following:
-
Define attribute names and data types for attributes coming from managed resources
-
Limit resource attributes to only those that are essential for your company or organization
-
Create common Identity Manager attribute names to use with multiple resources
-
Identify required user attributes and attribute types
To view or edit resource account attributes, follow these steps:
-
In the Administrator interface, click Resources.
-
Select the resource for which you want to view or edit the account attributes.
-
In the Resource Actions list, click Edit Resource Schema.
The Edit Resource Account Attributes page opens.
The left column of the schema map (titled Identity System User Attribute) contains the names of Identity Manager account attributes that are referenced by the forms used in the Identity Manager Administrator and User interfaces. The right column of the schema map (titled Resource User Attribute) contains the names of attributes from the external source.
Resource Groups
Use the resources area to manage resource groups, which let you group resources to be updated in a specific order. By including and ordering resources in a group, and assigning the group to a user, you determine the order in which that user’s resources are created, updated, and deleted.
Activities are performed on each resource in turn. If an action fails on a resource, the remaining resources are not updated. This type of relationship is important for related resources.
For example, an Exchange Server 2007 resource relies on an existing Windows Active Directory account. This account must exist before the Exchange account can be successfully created. By creating a resource group with (in order) a Windows Active Directory resource and an Exchange Server 2007 resource, you ensure the correct sequence when creating users. Conversely, this order ensures that resources are deleted in the correct sequence when you delete users.
Select Resources, and then select List Resource Groups to display a list of currently defined resource groups. From that page, click New to define a resource group. When defining a resource group, a selection area lets you choose and then order chosen resources, as well as select the organizations to which the resource group will be available.
Global Resource Policy
This section describes how to edit the Global Resource Policy and set timeout values for a resource.
 To Edit Policy Attributes
You can edit resource policy attributes from the Edit Global Resource Policy Attributes page.
-
Open the Edit Global Resource Policy Attributes page and edit the attributes as needed.
These attributes include:
-
Default Capture Timeout. Enter a value, in milliseconds, that specifies the maximum time that the adapter should wait from the command line prompt before the adapter times out. This value applies to GenericScriptResourceAdapter or ShellScriptSourceBase adapters only. Use this setting when the results of a command or script are important and will be parsed by the adapter.
The default value for this setting is 30000 (30 seconds).
-
Default Wait for Timeout. Enter a value, in milliseconds, to specify the maximum time that a scripted adapter should wait between polls before checking to see if a command has characters (or results) ready. This value applies to GenericScriptResourceAdapter or ShellScriptSourceBase adapters only. Use this setting when the results of a command or script are not examined by the adapter.
-
Wait for Ignore Case. Enter a value, in milliseconds, to specify the maximum time the adapter should wait for the command line prompt before timing out. This value applies to GenericScriptResourceAdapter or ShellScriptSourceBase adapters only. Use this setting when the case (uppercase or lowercase) is irrelevant.
-
Resource Account Password Policy. If applicable, select a resource account password policy to apply to the selected resource. None is the default selection.
-
Excluded Resource Accounts Rule. If applicable, select a rule that governs excluded resource accounts. None is the default selection.
-
-
You must click Save to save your changes to the policy.
 To Set Additional Timeout Values
You can modify the maxWaitMilliseconds property by editing the Waveset.properties file. The maxWaitMilliseconds property controls the frequency in which an operation’s timeout will be monitored. If you do not specify this value, the system uses a default value of 50.
-
Add the following line to the Waveset.properties file:
com.waveset.adapter.ScriptedConnection.ScriptedConnection.maxwaitMilliseconds.
-
Save the file.
Bulk Resource Actions
You can perform bulk operations on resources by using a CSV-formatted file or by creating or specifying the data to apply for the operation.
Figure 5–13 shows the launch page for bulk operations using a create action.
Figure 5–13 Launch Bulk Resource Actions Page
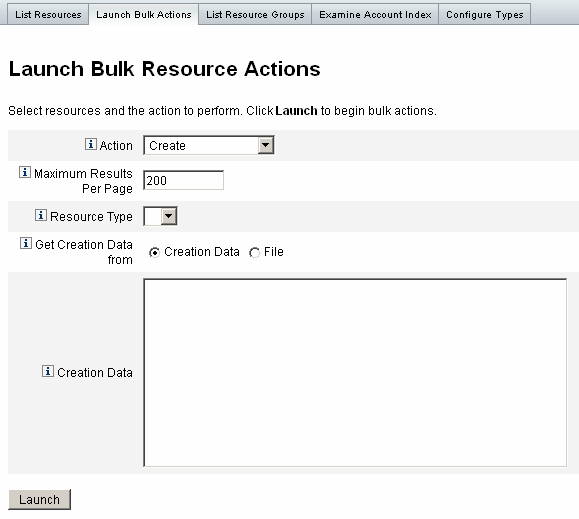
The options available for the bulk resource operation depend on the Action you select for the operation. You can specify a single action to apply to the operation or select From Action List to specify multiple actions.
-
Actions. To specify a single action, select one of the following options: create, clone, update, delete, change password, reset password.
For a single action selection, you will be presented with options to specify the resource involved with the action. For a Create action, you will specify the resource type.
If you specify From Action List, use the Get action list from area to specify either the file to use that contains the actions or the actions you specify in the Input area.
Note –The actions you enter in the input area list or in the file must be in comma-separated value (CSV) format.
-
Maximum Results Per Page. Use this option to specify the maximum number of bulk action results to display on each task results page. The default value is 200.
Click Launch to start the operation, which runs as a background task.
- © 2010, Oracle Corporation and/or its affiliates
