Configuring Data Exporter
The Data Exporter configuration page allows you to define what types of data to retain, specify which attributes to export, and schedule when to export the data. Each data type can be configured independently.
 To Configure Data Exporter
-
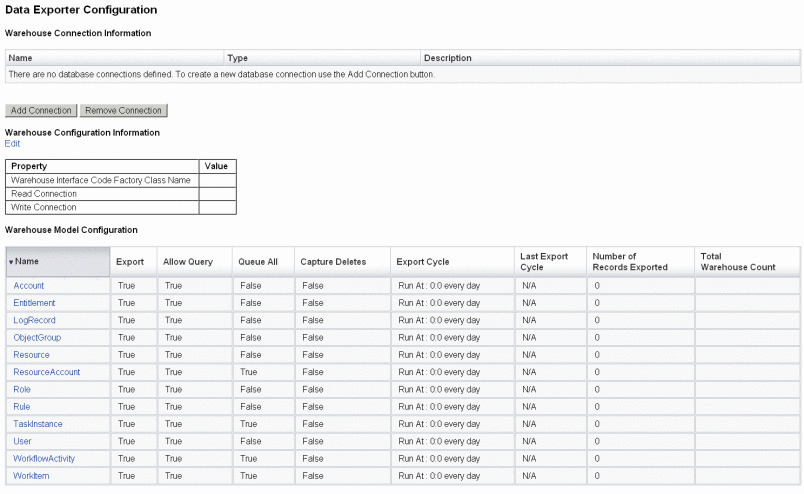
In the Administrator interface, click Configure in the main menu. Then click the Warehouse secondary tab. The Data Exporter Configuration page opens.
Figure 16–1 Data Exporter Configuration

-
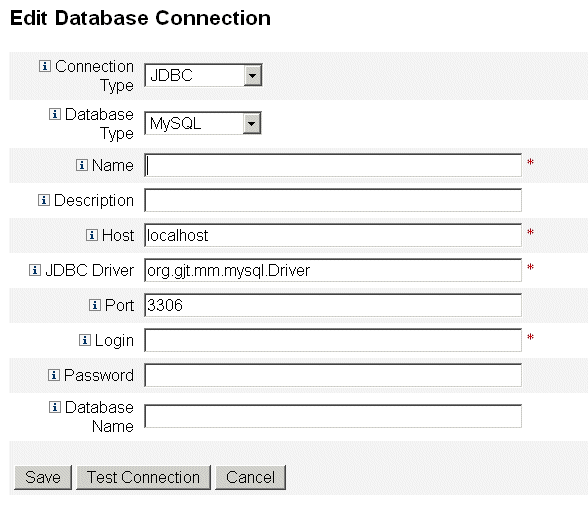
To define read and write connections, click the Add Connection button. The Edit Database Connection page opens.
Complete the fields on this page and click Save to return to the Data Exporter Configuration page. See Defining Read and Write Connections for more information.
-
To assign the WIC class and database connections, click the Edit link that is in the Warehouse Configuration Information section. The Data Exporter Warehouse Configuration page opens.
Complete the fields on this page and click Save to return to the Data Exporter Configuration page. See Defining the Warehouse Configuration Information for more information.
-
Click on a data type link in the Warehouse Model Configuration table. The Data Exporter Type Configuration page opens.
Complete the Export, Attributes, and Schedule tabs on this page and click Save to return to the Data Exporter Configuration page. See Configuring Warehouse Models for more information.
Repeat this step for every data type.
-
To configure which workflow to run before and after each data type is exported, click the Edit link in the Exporter Automation section. The Data Exporter Automation Configuration opens.
Complete the fields on this page and click save to return to the Data Exporter Configuration page. See for more information.
-
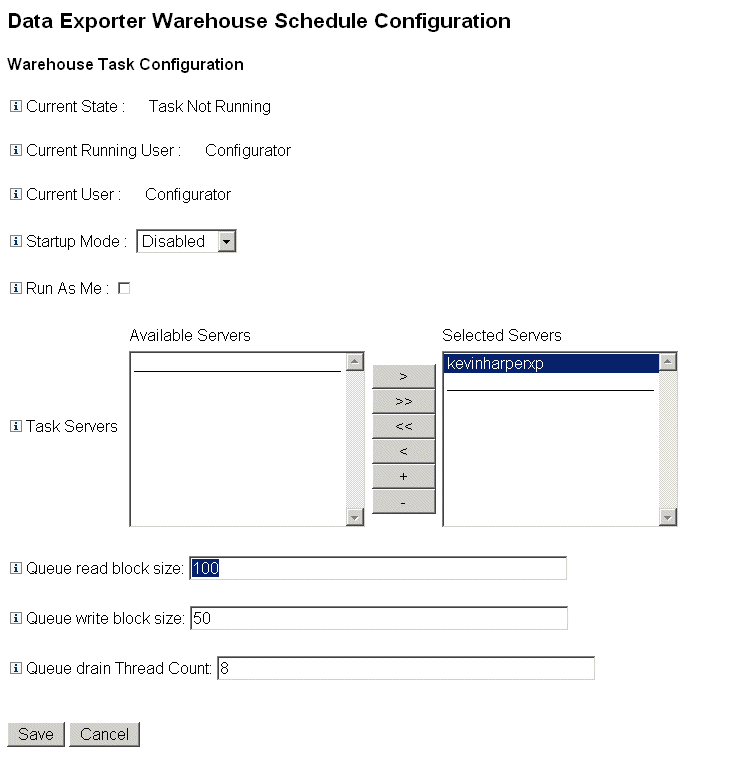
To configure the export task daemon, click the Edit link that is in the Warehouse Task Configuration section. The Data Exporter Warehouse Configuration page opens.
Complete the fields on this page and click Save to return to the Data Exporter Configuration page. See Configuring the Warehouse Task for more information.
Note –Exporting is fully operational once these steps have been completed. When exporting is enabled, data records will start queuing for export. If you do not enable the export task, the queue tables will fill up, and queuing will be suspended. It is generally more efficient to export smaller batches (more frequently) than larger ones, but exporting is subject to the write availability of the warehouse itself, which may be constrained for other reasons.
-
Optionally set the maximum queue size. See Modifying the Configuration Object for more information.
Defining Read and Write Connections
Identity Manager uses a write connection during the export cycles. It uses the read connection to indicate how many records are currently in the warehouse (during warehouse configuration) and to service the forensic query interface.
Warehouse connections can be defined as an application server DataSource, as a JDBC connection, or as a reference to a database resource. If a JDBC connection or database resource is defined, data exporting uses a small number of connections extensively during write operations and then closes all of the connections. Data Exporter only uses the read connection during warehouse configuration and during forensic query execution, and it will close those connections as soon as the operation completes.
Exporter uses the same schema for write and read connections, and you can use the same connection information for both. However, if you have separate connections, the deployment can write to a set of warehouse staging tables, transform those tables into the real warehouse, and then transform the warehouse tables to a data mart that Identity Manager will read from.
You can edit the Data Export Configuration form to prevent Identity Manager from reading from the warehouse. This form contains the includeWarehouseCount property, which causes Identity Manager to query the warehouse and display the number of records of each data type. To disable this feature, copy the Data Export Configuration Form, change the value of the includeWarehouseCount property to true, and import your customized form.
 To Define Read and Write Connections
-
From the Data Exporter Configuration page, click the Add Connection button.
Figure 16–2 Data Exporter Configuration

-
Specify how Identity Manager will establish read or write connections to the data warehouse by selecting an option from the Connection Type drop-down menu.
-
JDBC. Connects to a database using the Java Database Connectivity (JDBC) application programming interface. Connection pooling is provided by the Warehouse Interface Code.
-
Resource. Uses the connection information defined in a resource. Connection pooling is provided by the Warehouse Interface Code.
-
Data Source. Uses the underlying application server for connection management and pooling. This type of connection requests connections from the application server.
The fields that are displayed on the page vary, depending on which option you selected from the Connection Type drop-down menu. Refer to the online help for detailed information about configuring the database connection.
-
-
Click Save to save your configuration changes and return to the Data Exporter Configuration page.
Repeat this procedure if you will use separate read and write connections.
Defining the Warehouse Configuration Information
To configure the warehouse, you must select a read connection, a write connection, and specify a Warehouse Interface Code factory class. The WIC factory class provides the interface between Identity Manager and the warehouse. Identity Manager provides a default implementation of the code, but you may build your own. See Chapter 6, Data Exporter, in Sun Identity Manager Deployment Guide for information about creating custom factory classes.
The jar file containing the factory class and any supporting jar files must be present in the $WSHOME/exporter directory on the Identity Manager server that executes the export task and on any server that configures the Data Exporter. Only one Identity Manager server can export data at any given time.
 To Define Warehouse Configuration Information
-
From the Data Exporter Configuration page, click the Edit link that is in the Warehouse Configuration Information section.
Figure 16–3 Data Exporter Configuration

-
Specify a value in the Warehouse Interface Code Factory Class Name field. If your integrator has not created a custom class, enter the value com.sun.idm.warehouse.base.Factory.
-
Specify the connections by selecting an option from both the Read Connection and Write Connection drop-down menus.
-
Click Save to save your configuration changes and return to the Data Exporter Configuration page.
Configuring Warehouse Models
Each exportable data type has a set of options that are used to control if, how and when the type is exported. Exporting data increases the load on the Identity Manager servers, so exporting should only be enabled for data types that are of business interest.
The following table describes each of the data types that can be exported.
Table 16–1 Supported Data Types|
Data Type |
Description |
|---|---|
|
Account |
A record containing the linkage between a User and a ResourceAccount |
|
AdminGroup |
A group of Identity Manager permissions available on all ObjectGroups |
|
AdminRole |
The permissions assigned to one or more ObjectGroups |
|
AuditPolicy |
A collection of rules evaluated against an Identity Manager object to determine complicance to a business policy. |
|
ComplianceViolation |
A record containing a user's non-compliance with an AuditPolicy |
|
Entitlement |
A record containing the list of attestations for a specific User |
|
LogRecord |
A record containing a single audit record |
|
ObjectGroup |
A security container that is modeled as an organization |
|
Resource |
A system/application on which accounts are provisioned |
|
ResourceAccount |
A set of attributes that comprise an account on a specific Resource |
|
Role |
A logical container for access |
|
Rule |
A block of logic that can be executed by Identity Manager |
|
TaskInstance |
A record indicating an executing or completed process |
|
User |
A logical user that includes zero or more accounts. |
|
WorkflowActivity |
A single activity of an Identity Manager workflow |
|
WorkItem |
A manual action from an Identity Manager workflow |
 To Configure Warehouse Models
-
From the Data Exporter Configuration page, click on a data type link.
-
In the Export tab, specify whether to export the data type. If you do not want to export this data type, deselect the Export check box and click Save. Otherwise, select the remaining options on this Export tab as needed.
-
Allow Query. Controls whether the model can be queried.
-
Queue All. Captures all changes to objects of this type. Checking this option may add significant processing costs to the Exporter. Use this option sparingly.
-
Capture Deletes. Records all deleted objects of this type. Checking this option may add significant processing costs to the Exporter. Use this option sparingly.
-
-
The Attributes tab allows you to select which attributes may be specified as part of a forensic query, and which attributes can be displayed in the query results. You cannot delete the default attributes from the Administrator interface. See Chapter 2, Working with Attributes, in Sun Identity Manager Deployment Guide for information about changing the default attributes.
New attribute names have the following characteristics:
-
attrName — The attribute is a top-level and scalar.
-
attrName[] — The attribute is a list-valued top-level attribute, and the elements in the list are scalar.
-
attrName[’key’] — The attribute contains a map value, and the value of the map with the specified key is desired.
-
attrName[].name2 — The attribute is a list-valued top-level attribute, where the elements in the list are structures. name2 is the attribute in the structure to be accessed.
Note –If you want to export attributes to the EXT_RESOURCEACCOUNT_ACCTATTR table, you must check the Audit box for each attribute to be exported.
-
-
Specify how often to export the information associated with the data type on the Schedule tab. Cycles are relative to midnight on the server. A cycle of every 20 minutes would occur on the hour, then 20 minutes and 40 minutes past the hour. If an export attempt takes longer than a scheduled cycle, the next cycle will be skipped. For example, if a cycle is defined as 20 minutes and starts at midnight, and it takes 25 minutes to complete the export, the next export will start at 12:40. The export originally scheduled for 12:20 will not occur.
Configuring Exporter Automation
Identity Manager allows you to specify workflows that executes before and after exporting data.
The Cycle Start workflow could be used to prevent an export if an event occurs that warrants a cancellation. For example, if an application that reads or writes to the staging tables needs exclusive access to the tables at the same time an export is scheduled to occur, the export should be cancelled. The workflow should return a value of 1 to cancel the export. Identity Manager creates an audit record that indicates the export was skipped and provides the error results. If the workflow returns 0 and no errors occur, the data type will be exported.
The Cycle Complete workflow runs after all the records have been exported. This workflow usually triggers another application to process the exported data. After this workflow completes, the Exporter checks for another data type to export.
Sample workflows are provided in the $WSHOME/sample/web/exporter.xml file. The subtype for a Exporter workflow is DATA_EXPORT_AUTOMATION and the authType is WarehouseConfig.
 To Configure Exporter Automation
-
From the Data Exporter Configuration page, click the Edit link that is in the Exporter Automation section.
-
Optionally select a workflow to run before an export from the Cycle Start Workflow drop-down menu.
-
Optionally select a workflow to run after an export from the Cycle Start Workflow drop-down menu.
Configuring the Warehouse Task
It is not required to run the export task on a dedicated server, but you should consider it if you expect to export a large amount of data. The export task is efficient at transferring data from Identity Manager to the warehouse, and will consume as much CPU as possible during the export operation. If you do not use a dedicated server, you should restrict the server from handling interactive traffic, because the response time will degrade dramatically during a large export.
 To Configure the Warehouse Configuration Information
-
From the Data Exporter Configuration page, click the Edit link that is in the Warehouse Task Configuration section.
Figure 16–4 Data Warehouse Schedule Configuration

-
Select an option from the Startup Mode drop-down menu to determine whether the warehouse task starts automatically when Identity Manager starts. Selecting Disabled means the task must be started manually.
-
Check the Run As Me check box to cause the Exporter task to run under the your administrative account.
-
Select the servers that the task can run on. You may specify multiple servers, but only one warehouse task can run at any given time. If the server executing the task is stopped, the scheduler automatically restarts the task on another server from the list (if available).
-
Specify the number of records read from the queue into a memory buffer before writing in the Queue read block size field. The default value for this field is good for most exports. Increase this value if the Identity Manager repository server is slow compared to the warehouse server.
-
Specify the number of records written to the warehouse in a single transaction in the Queue write block size field.
-
Specify the number of Identity Manager threads to use for reading queued records in the Queue drain Thread Count field. Increase this number if the queue table has a large number of records of different types. Decrease this number if the queue table has few data types.
-
Click Save to save your configuration changes and return to the Data Exporter Configuration page.
Modifying the Configuration Object
When Data Exporter is configured and operational, any data types that are configured to be queued will be captured in the internal queue table. By default this table does not have an upper bound, but one can be configured by editing the Data Warehouse Configuration Configuration object. This object has a nested object named warehouseConfig. Add the following line to the warehouseConfig object:
<Attribute name=’maxQueueSize’ value=’YourValue’/>
The value of maxQueueSize can be any positive integer that is less than 231. Data Exporter disables queuing when that limit is reached. Data that is generated cannot be exported until the queue is drained.
Normal Identity Manager operation can generate multiple thousands of changed records per hour, so the queued table can grow very quickly. Since the queue table is in the Identity Manager repository, this growth will consume tablespace in the RDBMS, with the potential to exhaust the tablespace. Placing a cap on the queue may be necessary if you have a limited amount of tablespace.
Use the Data Queue JMX Mbean to monitor the size of the queue table. See Monitoring Data Exporter for more information.
- © 2010, Oracle Corporation and/or its affiliates
