Administering Service Provider Users
This section describes procedures and information for administering Service Provider users through Identity Manager.
This section contains the following topics:
User Organizations
With Service Provider, the value of an attribute on the user determines to which organization the user is assigned. This is specified by the Identity Manager Organization Attribute Name field in the Service Provider Main configuration (see Initial Configuration). However, the names of those organizations must match the value of a user attribute assigned in the directory server.
If the Identity Manager Organization Attribute Name is defined, then a multi-select list of available organizations appears on the Create User and Edit User pages. The short organization names are displayed by default. You can modify the Service Provider User Form to display the full organization path.
You may pick which attribute becomes the organization name attribute. The organization name attribute is then used in the Service Provider user administration pages to constrain which administrators can search for and manage that user.
Note –
There are now account ID and password policies for Service Provider and resource accounts.
The Service Provider System Account Policy is available from the main Policies table.
Create Users and Accounts
All service provider users must have an account in the Service Provider directory. If a user has accounts on other resources, then links to these accounts are stored in the user’s directory entry, so information about these accounts is available when the user is viewed.
Note –
A sample Service Provider User Form for creating and editing users is provided. Customize this form to meet the requirements for managing users in your Service Provider environment. For more information, see Chapter 3, Identity Manager Forms, in Sun Identity Manager Deployment Reference.
 To Create a Service Provider Account
-
In the Administrator interface, click Accounts on the menu bar.
-
Click the Manage Service Provider Users tab.
-
Click Create User.
Note –When using the default Service Provider User Form the actual fields that are displayed depend on the attributes configured in the Account Attributes table (Schema map) of the Service Provider directory resource. Also, when you assign resources to the user (such as a delegated administrator), you should see new sections added to the display where you can specify values for the attributes for those resources. You may also customize the fields.
-
Specify attribute values for these resources as required.
These attribute values include:
-
accountid (required)
-
password
-
confirmation (password confirmation)
-
firstname (required)
-
lastname (required)
-
fullname
-
email
-
home phone
-
cell phone
-
password retry count
-
account unlock time
-
-
Assign any desired Resources from the Available listing by using the arrow keys.
-
The Account Status displays whether the account is locked or unlocked. Click this option to lock or unlock the account.
Figure 17–9 Create Service Provider Users and Accounts
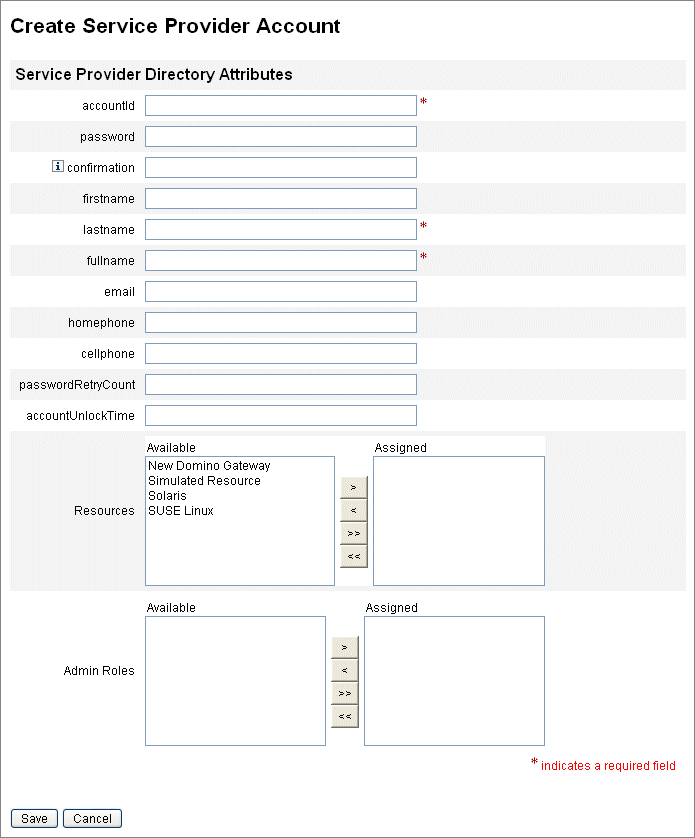
Note –This form automatically populates values for the resource account attributes based on the attributes defined for the directory account (at the top). For example, if the resource defines firstName, then the product populates it with the firstName value from the directory account. However, after this initial population, modifications to these attributes are not propagated to the resource accounts. If desired, customize the provided sample Service Provider User Form.
-
Click Save to create the user account.
Search Service Provider Users
Service Provider includes a configurable search capability to aid in administering user accounts. Only the users within your scope, (as defined by your organization, and perhaps other factors) are returned in a search.
To perform a basic search of service provider users, from the Accounts area in the Identity Manager interface, click Manage Service Provider Users, then enter the search value and click Search.
The following topics discuss the Service Provider search features:
Advanced Search
Use the following instructions to perform an Advanced Search of Service Provider users.
 To Perform an Advanced Search of Service Provider Users
-
From the Service Provider Users Search page, click Advanced.
-
Choose the desired Attribute from the list.
-
Choose the desired Operation from the list.
You are specifying a set of conditions in order to filter the users returned from the search and that the users returned must meet all of the specified conditions.
-
Enter the desired search value, and then click Search.
Figure 17–10 Search Users
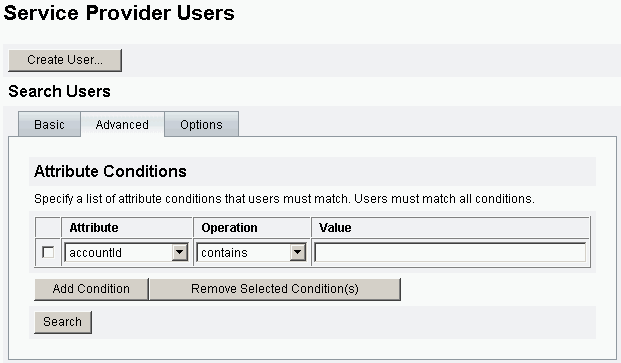
You can add or remove Attribute Conditions, using the following options:
-
Click Add Condition and specify the new attribute.
-
Select the item and click Remove Selected Conditions.
-
Search Results
Service Provider search results are displayed in a table, as depicted in Figure 17–11. The results can be sorted by any attribute by clicking on the column header for that attribute. The results displayed depend on the attributes you selected.
The arrow buttons navigate to the first, previous, next, and last pages of results. You can jump to a specific page by entering the number in the text box and pressing Enter.
To edit a user, click the user name in the table.
Figure 17–11 Example of Search Results
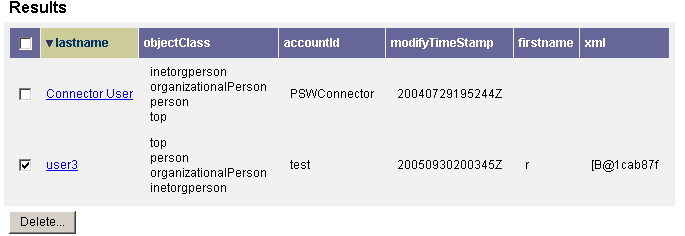
The search results page enables you to delete users or unlink resource accounts, by selecting one or more users and clicking the Delete button. This action brings up a delete user page and presents additional options (see Delete, Unassign, or Unlink Accounts)
Link Accounts
Service Provider may be installed in environments in which users have accounts on multiple resources. The account linking feature of Service Provider enables you to assign existing resource accounts to Service Provider users in an incremental fashion. The account linking process is controlled by the Service Provider linking policy, which defines a link correlation rule, a link confirmation rule, and a link verification option.
 To Link User Accounts
-
In the Administrator interface, click Resources in the menu bar.
-
Select the desired resource.
-
Select Edit Service Provider Linking Policy from the Resources Action menu.
-
Select a link correlation rule. This rule searches for accounts on the resource that the user may own.
-
Select a link confirmation rule. This rule eliminates any resource accounts from the list of potential accounts that the link correlation rule selects.
Note –If the link correlation rule selects no more than one account, then the link confirmation rule is not required.
-
Select Link verification required to link the target resource account to the Service Provider user.
Delete, Unassign, or Unlink Accounts
 To Delete, Unassign, or Unlink User Accounts
-
Click Accounts from the menu bar.
-
Click Manage Service Provider Users.
-
Perform a basic or advance search.
-
Select the desired user or users.
-
Click the Delete button.
-
Select one of the optional global options.
These options include:
-
Delete All resource accounts
Note –Deleting a resource deletes the account, but the resource assignment still exists. A subsequent update of the user recreates the account. Delete always implies an unlink of the resource account.
-
Unassign All resource accounts
Note –Unassigning a resource removes that resource assignment. Unassign implies an unlink of the resource account. The resource account is not deleted when the resource is unassigned.
-
Unlink All resource accounts
Note –Unlinking removes the link between a user and the resource account, but this does not delete the account. The resource assignment is not removed either, so a subsequent update to the user relinks the account or creates a new account on the resource.
-
-
Alternatively, select an action for one or more resource accounts in the Delete, Unassign, or Unlink columns.
-
After selecting the desired user accounts, click OK.
Figure 17–12 Delete, Unassign, or Unlink Accounts

Set Search Options
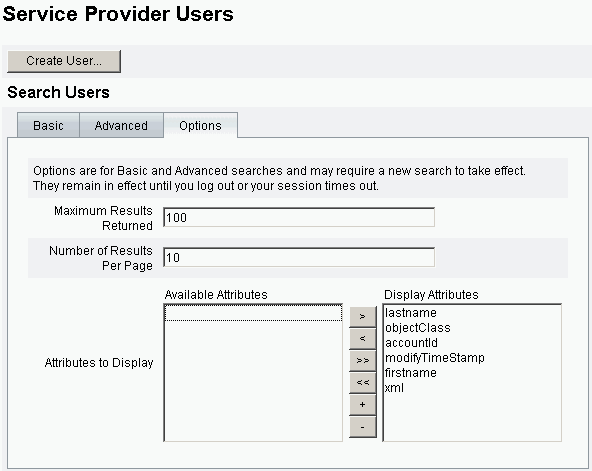
 To Set Search Options for Service Provider Users,
-
In the Administrator interface, click Accounts in the menu bar.
-
Click Service Provider.
-
Click Options.
Note –These options are only valid for the current login session. The options effect how the search results are displayed, that they effect both the basic and advanced search results, and that some settings only take effect on new searches.
-
Enter the Maximum Results Returned.
-
Enter the Number of Results Per Page.
-
Choose the desired Display Attribute from the Available Attributes using the arrow keys.
Figure 17–13 Set Search Options for Service Provider Users
End-User Interface
The bundled sample end-user pages provide examples for registration and self-service typical in xSP environments. The samples are extensible and can be customized. You may change the look and feel, modify navigation rules between pages, or display locale-specific messages for your deployment. For further information about customizing end-user pages see Sun Identity Manager Service Provider 8.1 Deployment.
In addition to auditing self-service and registration events, notification to the affected user can be sent using e-mail templates. Examples of using account ID and password policies, as well as account lockout, are also provided. Application developers can also leverage Identity Manager forms. The modular authentication service implemented as a servlet filter can be extended or replaced if necessary. This allows integration with access management systems like the Sun Access Manager.
Sample End-User Pages
The bundled sample end-user pages allow the user to register and maintain basic user information through a series of easy-to-navigate screens and receive email notification of their actions.
The example pages include the following features:
-
Login (and logout) including authentication using challenge questions
-
Registration and enrollment
-
Password changing
-
User name changing
-
Challenge questions changing
-
Notification address changing
-
User name forgotten handling
-
Password forgotten handling
-
Email notification
-
Auditing
Note –
Identity Manager uses a validation table for registration. Only users in that table are allowed to register. For example, when user Betty Childs registers, an entry for Betty Childs with email address bchilds@example.com, is found in the validation table and registration is accepted.
These pages are easy to customize for your deployment.
You can easily customize these pages for your deployment as follows:
-
Change the branding
-
Modify the configuration options (for example, the number of failed login attempts)
-
Add or remove pages
For more information on customizing the pages see Sun Identity Manager Service Provider 8.1 Deployment.
New User Registration
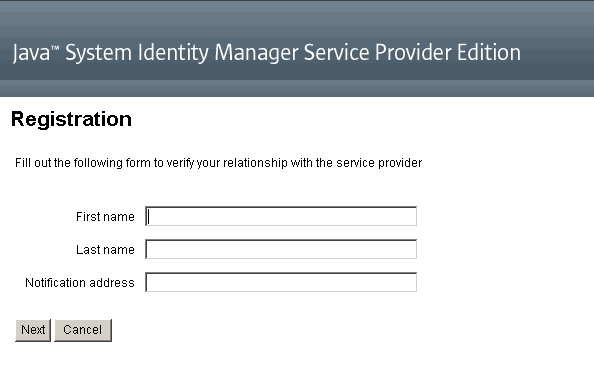
New users are asked to register. During registration users can set their login, challenge questions, and notification information.
Figure 17–14 Registration Page
Home and Profile Screens
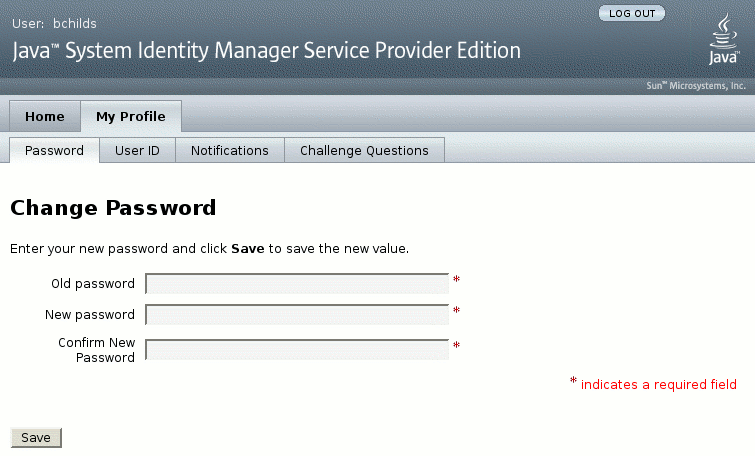
Figure 17–15 shows the end user home tab and Profile page. A user may change their login ID and password, manage notification, and create challenge questions.
Figure 17–15 My Profile Page
- © 2010, Oracle Corporation and/or its affiliates
