Understanding and Managing Roles
Read this section for information about setting up roles in Waveset. In large organizations, role-based resource assignments greatly simplify resource management.
Note –
Do not confuse roles and admin-roles. Roles are used to manage end-user access to external resources. Admin-roles, on the other hand, are primarily used to manage administrator access to internal Waveset objects such as users, organizations, and capabilities.
The information in this section discusses roles. For information about admin-roles, see Understanding and Managing Admin Roles.
What are Roles?
A role is an Waveset object that allows resource access rights to be grouped and efficiently assigned to users.
Roles are organized into four role types:
-
Business Roles
-
IT Roles
-
Applications
-
Assets
Business Roles organize into groups the access rights that people who do similar tasks in an organization need to do their job duties. Typically, Business Roles represent user job functions. In a financial institution, for example, Business Roles might correspond to job functions like bank teller, loan officer, branch manager, clerk, accountant, or administrative assistant.
IT Roles, Applications, and Assets organize resource entitlements into groups. In order to provide end-users with access to resources, IT Roles, Applications, and Assets are assigned to Business Roles so that users can access the resources they need to do their jobs. IT Roles contain a specific set of Applications, Assets, and/or Resources, including specific entitlements on those assigned Resources. IT Roles can also contain other IT Roles.
Note –
The concept of role types is new in Waveset version 8.0. If your organization upgraded to version 8.0 from an earlier version of Waveset, your legacy roles were imported as IT Roles. For more information, see Managing Roles Created In Versions Prior to Version 8.0.
IT Roles, Applications, and Assets can be required, conditional, or optional.
-
A required role will always be assigned to the end-user.
-
A conditional role has conditions that must evaluate to true in order for the role to be assigned.
-
An optional role can be requested separately, and, upon approval, assigned to the end-user.
Required, conditional, and optional roles allow a Business Role designer to define coarse-grained access to contained roles in order to achieve regulatory compliance, while still allowing flexibility for an end-user’s manager to fine-tune the end-user’s access rights. Users assigned conditional or optional roles can still share the same assigned Business Role, but have different assigned access rights. With this approach, there is no need to define a new Business Role for each permutation of access requirements within an organization (a problem known as role explosion).
Putting Role Types to Work
The following discussion describes how to use role types effectively. For role type descriptions, see the previous section.
Managing Roles Created In Versions Prior to Version 8.0
Organizations that upgraded from an earlier version of Waveset to version 8.0 will automatically have their legacy roles converted to IT Roles. These IT Roles will remain directly assigned to users. Legacy roles will not be assigned a role owner as part of the upgrade process. A role owner can be assigned later, however. (For information on role owners, see Designating Role Owners and Role Approvers.)
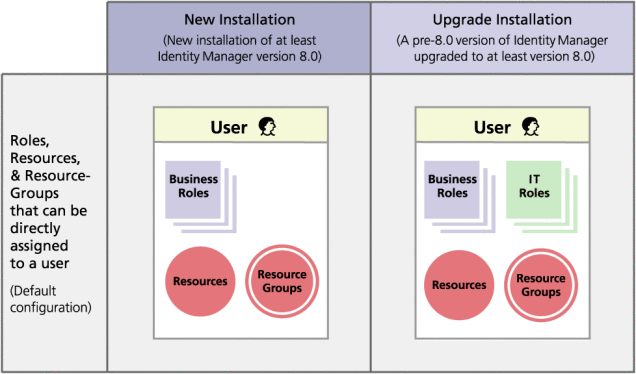
By default, organizations that upgrade to version 8.0 can directly assign both IT Roles and Business Roles to users (see Figure 5–2).
Organizations with legacy roles should consider creating new roles based on the guidelines outlined in the next section.
Using Role Types to Design Flexible Roles
IT Roles, Applications, and Assets are the role designer’s building blocks. These three role types are used in combination to build up user entitlements (or, access rights). IT Roles, Applications, and Assets are then assigned to Business Roles.
Designing Business Roles
In Waveset, a user can be assigned one or more roles, or no role. With the introduction of role types in Waveset 8.0, it is recommended that you only directly assign Business Roles to users. In fact, by default, you cannot directly assign any of the other role types to users unless your organization had a pre-8.0 version of Waveset installed and upgraded to at least version 8.0. This default restriction can be changed by modifying the role configuration object (Configuring Role Types).
To reduce complexity, Business Roles cannot be nested. In other words, one Business Role cannot contain another Business Role. In addition, Business Roles cannot directly contain resources and resource groups. Instead, resources and resource groups should be assigned to either an IT Role or an Application, which can then be assigned to one or more Business Roles.
Designing IT Roles
IT Roles can contain Applications, and Assets, as well as other IT Roles. IT Roles can also contain resources and resource groups.
IT Roles are intended to be created and managed either by your organization’s IT staff, or by the resource owners who understand the entitlements that are required to enable specific privileges within the resource.
Designing Applications and Assets
Applications and Assets are role types that are intended to represent commonly used business terms to describe things that end-users need in order to do their jobs. For example, an Application role could be named “Customer Support Tools” or “Intranet HR-Tool Admin.“
-
Applications cannot contain roles, but they can contain resources and resource groups. Applications can also define specific entitlements that restrict access to only specific applications on contained resources.
-
Assets are (typically) non-connected or non-digital resources, such as mobile phones and portable computers, that require manual provisioning. Consequently, assets cannot contain roles, resources, or resource groups.
Applications and Assets are intended to be assigned to Business Roles and IT Roles.
Note –
Role administrators should be assigned one or more of the following capabilities:
-
Asset Administrator
-
Application Administrator
-
Business Role Administrator
-
IT Role Administrator
See Assigning Capabilities to Users for more information.
Role Types in Summary
The following figure shows which role-types, resources, and resource-groups can be assigned to each of the four role-types. The figure also shows that role-type exclusions can be assigned to all four role-types. (For a description of Role exclusions, see To Assign Resources and Resource Groups.)
Figure 5–1 The Business Role, IT Role, Application, and Asset Role-Types
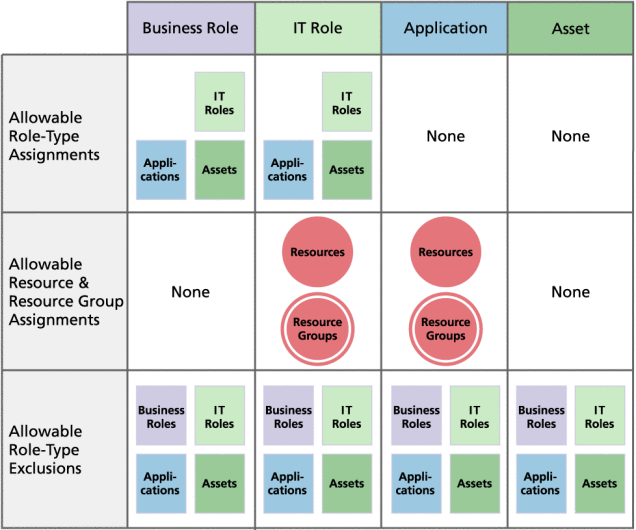
Optional, conditional, and required contained-roles (What are Roles?) provide added flexibility. Flexible role definitions can reduce the total number of roles your organization needs to manage.
Figure 5–2 shows that Business Roles and IT Roles are directly assignable to users if a pre-8.0 version of Waveset is upgraded to at least version 8.0. On upgrade, legacy roles are converted to IT Roles, and, to ensure backwards compatibility, IT Roles are directly assigned to users. If Waveset was not upgraded from a pre-8.0 version, then only Business Roles are directly assignable to users.
Figure 5–2 Roles and resources that can be directly assigned to users.
Creating Roles
This section describes how to create roles and the information is organized as follows:
Note –
For tips on designing roles, see Using Role Types to Design Flexible Roles
When you create or edit a role, Waveset launches the ManageRole workflow. This workflow saves the new or updated role in the repository, and allows you to insert approvals or other actions before the role is created or saved.
 To Create Roles Using the Create Role Form
-
In the Administrator interface, click Roles in the main menu.
The Roles page (List Roles tab) opens.
-
Click New at the bottom of the page.
The Create IT Role page opens. To create another type of role, use the Type drop-down menu.
-
Complete the form fields on the Identity tab.
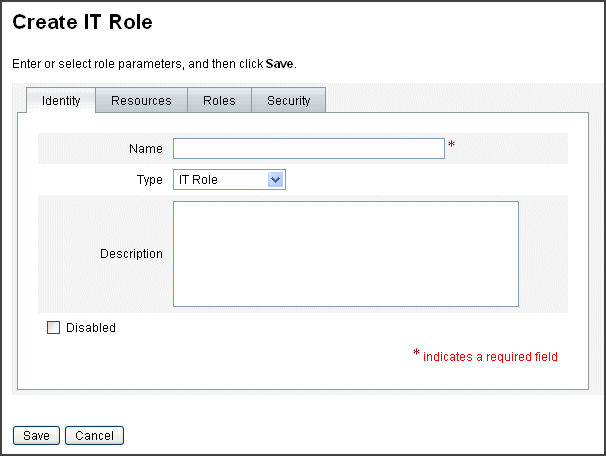
The following figure shows the Identity tab.
Figure 5–3 Identity Tab on the Create IT Role Page
-
Complete the form fields on the Resources tab (if applicable). For help filling out the fields on this tab, refer to online help, and also see To Assign Resources and Resource Groups.
For help setting extended attributes values on roles, see To View or Edit Resource Account Attributes.
The following figure shows the Resources tab.
Figure 5–4 Resources Tab on the Create IT Role Page
-
Complete the form fields on the Roles tab (if applicable). For help filling out the fields on this tab, refer to online help, and also see To Assign Roles and Role Exclusions.
Figure 5–6 shows the Roles tab.
-
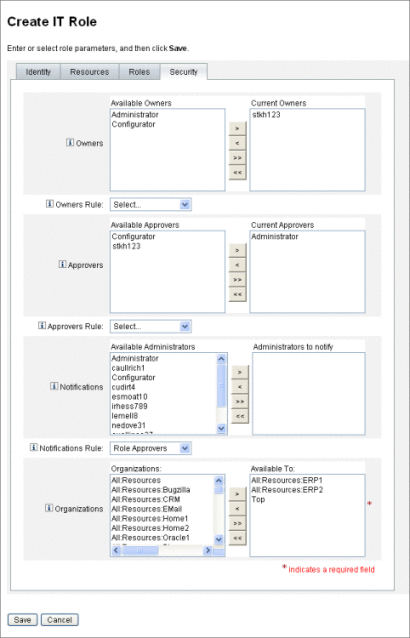
Complete the form fields on the Security tab. For help filling out the fields on this tab, refer to online help, and also see Designating Role Owners and Role Approvers and Designating Notifications.
Designating Role Owners and Role Approvers shows the Security tab.
-
Click Save at the bottom of the page.
-
Enter a role name and description on the Identity tab of the Create Role form. If you are creating a new role, use the Type drop-down menu to select the role-type you are creating.
Figure 5–4 shows the Identity portion of the Create Role form’s Identity tab. For help using this form, see online help.
 To Assign Resources and Resource Groups
Resources and Resource Groups can be directly assigned to IT Roles and Application roles using the Resources tab of the Create Role form. Resources are described later, in the Understanding and Managing Waveset Resources section. Resource Groups are described in the Resource Groupssection.
-
Resources and Resource Groups cannot be directly assigned to Business Roles because only roles can be assigned to Business Roles.
-
Resources and Resource Groups cannot be assigned to Asset roles because Asset roles are reserved for non-connected or non-digital resources that require manual provisioning.
This procedure describes how to assign resources and resource groups to a role when completing the Create Role form. See To Create Roles Using the Create Role Form to get started.
-
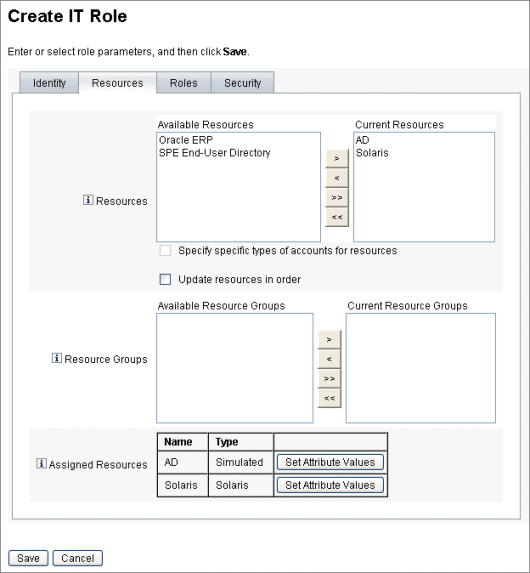
Click the Resources tab in the Create Role page.
-
To assign a resource, select it in the Available Resources column and move it to the Current Resources column by clicking the arrow buttons.
-
If you are assigning multiple resources, you can specify the order in which the resources are updated: Select the Update resources in order checkbox and use the + and - buttons to change the order of the resources in the Current Resources column.
-
To assign a resource group to this role, select it in the Available Resource Groups column and move it to the Current Resource Groups column by clicking the arrow buttons. A resource group is a collection of resources that provides another way to specify the order in which resource accounts are created and updated.
-
To specify account attributes for this role on a per resource basis, click Set Attribute Values in the Assigned Resources section. See To View or Edit Resource Account Attributes for more information.
-
Click Save to save the role, or click the Identity, Roles, or Security tabs to continue with the role creation process.
The following figure shows the Create Role form’s Resources tab.
Figure 5–5 The Resources section of the Create Role Tabbed Form

 To Edit Assigned Resource Attribute Values
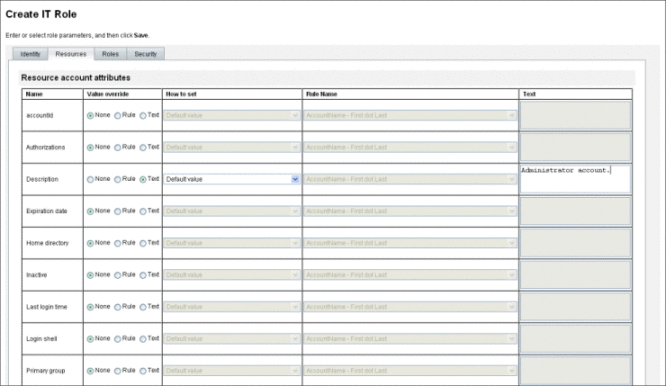
Use the Assigned Resources table to set or modify resource attribute values on resources assigned to a role. A resource can have different attribute values defined on a role-by-role basis. Clicking the Set Attribute Values button opens the Resource Account Attributes page.
The following figure shows the Resource Account Attributes page, which is used to set extended attribute values on resources assigned to a role.
-
From the page Resource Account Attributes page, specify new values for each attribute and determine how attribute values are set.
Waveset enables you to directly set values or use a rule to set values and provides a range of options for overriding existing values or merging values with existing values. For general information about resource attribute values, see To View or Edit Resource Account Attributes.
Use the following options to establish values for each resource account attribute:
-
Value override. Choose one of the following options:
-
None (Default). No value is established.
-
Rule. Uses a rule to set the value.
If you select this option, you must select a rule name from the list.
-
Text. Uses specified text to set the value.
If you select this option, you must enter the text in the adjacent Text field.
-
-
How to set. Choose one of the following options:
-
Default value. Makes the rule or text the default attribute value.
The user can change or override this value.
-
Set to value. Sets the attribute value as specified by the rule or text.
The value will be set and override any user changes.
-
Merge with value. Merges the current attribute value with the values specified by the rule or text.
-
Merge with value, clear existing. Removes the current attribute values and sets the value to a merger of values specified by this and other assigned roles.
-
Remove from value. Removes the value specified by the rule or text from the attribute value.
-
Authoritative set to value. Sets the attribute value as specified by the rule or text.
The value will be set and override any user changes. If you remove the role, the new value is null, even if it previously existed on the attribute.
-
Authoritative merge with value. Merges the current attribute value with the values specified by the rule or text.
Removing the role removes the value that was assigned when the role was assigned and leaves the original attribute value intact.
-
Authoritative merge with value, clear existing. Removes the current attribute values and sets the value to a merger of values specified by this and other assigned roles.
Clears the attribute value specified by this role if the role is removed, even if it previously existed on the attribute.
-
-
Rule Name. If you select Rule in the Value override area, select a rule from the list.
-
Text. If you select Text in the Value override area, enter text to be added to, deleted from, or used as the attribute value.
-
-
Click OK to save your changes and return to the Create or Edit Role page.
 To Assign Roles and Role Exclusions
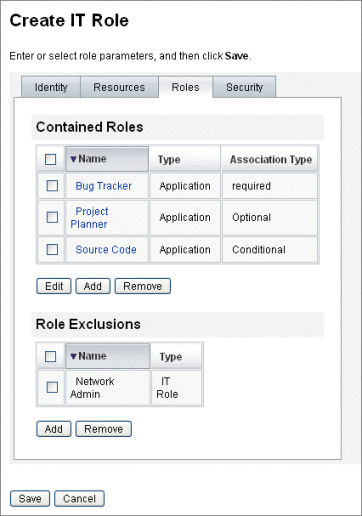
Roles can be assigned to Business Roles and IT Roles using the Roles tab of the Create Role form. Assigned roles should be added to the Contained Roles table.
-
Roles cannot be assigned to Application roles and Asset roles.
-
Business roles cannot be assigned to any role type.
Role exclusions can be assigned to all four role types using the Roles tab of the Create Role form. If a role with a role exclusion is assigned to a user, the excluded role cannot also be assigned to the user. Role exclusions should be added to the Role Exclusions table.
This procedure describes how to assign one or more roles to a role when completing the Create Role form. See To Create Roles Using the Create Role Form to get started.
To complete the Roles tab
-
Click the Roles tab in the Create Role page.
-
Click Add in the Contained Roles section.
The tab refreshes and displays the Find Roles to Contain form.
-
Search for the role (or roles) that you will be assigning to this role. Start first with any required roles. (You will add conditional and optional roles later.)
See To Search for Roles for help using the search form. Business Roles cannot be nested or assigned to other role-types.
-
Use the checkboxes to select one or more roles to be assigned, then click Add.
The tab refreshes and displays the Add Contained Role form.
-
Select Required (or Conditional or Optional, as appropriate) from the Association Type drop-down menu.
Click OK.
-
Repeat the previous four steps to add conditional roles (if required). Repeat the previous four steps again to add optional roles (if required).
-
Click Save to save the role, or click the Identity, Resources, or Security tabs to continue with the role creation process.
Figure 5–6 shows the Create Role form’s Roles tab. For help using this form, see online help.
Figure 5–6 The Roles Portion of the Create Role Tabbed Form
Designating Role Owners and Role Approvers
Roles have designated owners and approvers. Only role owners can authorize changes to the parameters that define the role, and only role approvers can authorize the assignment of the role to end-users.
Note –
If you have Waveset integrated with Oracle Role Manager, you should allow Role Manager to handle all role change approvals and notifications by manually disabling Waveset's ability to perform these actions.
You must edit the RoleConfiguration configuration object in Waveset as follows:
-
Find all instances of changeApproval and set the value to false.
-
Find all instances of changeNotificaiton and set the value to false.
To be a role owner is to be the business owner responsible for the underlying resource account rights that are assigned through the role. If an administrator makes changes to a role, a role owner must approve of the changes before they can be carried out. This feature guards against an administrator changing a role without a business owner’s knowledge and approval. If change approvals have been disabled in the Role configuration object, however, a role owner’s approval is not required in order for changes to be carried out.
In addition to approving role changes, roles cannot be enabled, disabled, or deleted without a role owners’ approval.
Owners and approvers can either be directly added to a role, or dynamically added using a role-assignment rule. In Waveset it is possible (but not recommended) to create roles without owners and approvers.
Note –
Role-assignment rules have a RoleUserRule authType.
If you need to create a custom role-assignment rule, refer to the three default role-assignment rule objects and use them as an example:
-
Role Approvers
-
Role Notifications
-
Role Owners
Owners and approvers are notified by email if a work item requires their approval. Change-approval work items and approval work items are discussed in the Initiating Change-Approval and Approval Work Items section.
Owners and approvers are added to roles on the Security tab in the Create Role form.
Designating Role Owners and Role Approvers shows the Create Role form’s Security tab. For help using this form, see the online help.
Designating Notifications
One or more administrators can be sent notifications when a role is assigned to a user.
Specifying a notification recipient is optional. You could choose to notify an administrator if you decide not to require an approval when a role is assigned to a user. Or you could designate one administrator to serve as an approver, and, another administrator to serve as a notification recipient when the approval is made.
As with owners and approvers, notifications can either be directly added to a role, or dynamically added using a role-assignment rule. Notification recipients are notified by email when a role is assigned to a user. A work item is not created, however, because an approval is not required.
Notifications are assigned to roles on the Security tab on the Create Role form. Designating Role Owners and Role Approvers shows the Create Role form’s Security tab.
Initiating Change-Approval and Approval Work Items
When changes are made to a role, the role owners can receive a change-approval email, a change-notification email, or no email. When a role is assigned to a user, role approvers receive role approval emails.
By default, role owners are sent change-approval emails whenever the roles they own are changed. This behavior is configurable, however, on a role-type by role-type basis. For example, you could choose to enable change-approvals for Business Roles and IT Roles, and enable change-notifications for Application and Asset roles.
For instructions on enabling and disabling change-approval and change-notification email, see Configuring Role Types.
This is how change-approvals and change-notifications work:
-
If change-approvals are enabled, when an administrator changes a role, a work item is generated and an approval email is sent to the role owner. A role owner must approve the work item in order for the change to be made. Change-approval work items can be delegated. See Approving User Accounts for more information.
If change-approvals are disabled, no work item is generated and no change approval email is sent to the role owner.
-
If change-notifications are enabled, when an administrator changes a role, the change is made immediately, and a notification email is sent to the role owner.
If change-notifications are disabled, no notifications are sent to the role owner.
When a role is assigned to a user, role approvers receive role approval emails. Role approval emails cannot be disabled in Waveset.
For role approvals, when a user is assigned a role, a work item is generated and an approval email is sent to the role approver. A role approver must approve the work item in order for the role to be assigned to the user.
Change-approval and approval work items can be delegated. For more information on delegating work items, see Delegating Work Items.
Editing and Managing Roles
Most role editing and role management tasks can be performed using the Find Roles and List Roles tabs, which are located under the Roles tab in the main menu.
This section contains the following topics:
 To Search for Roles
Use the Find Roles tab to search for roles that meet the search criteria you specify.
Using the Find Roles tab, you can search for roles based on a wide variety of criteria such as role owners and approvers, assigned account types, contained roles, and so on.
For information on finding users assigned to a role, see To Find Users Assigned to a Specific Role.
-
In the Administrator interface, click the Roles tab.
The List Roles tab opens.
-
Click the Find Roles secondary tab.
Figure 5–7 shows the Find Role tab. For help using this form, see online help.
Figure 5–7 The Find Role Tab
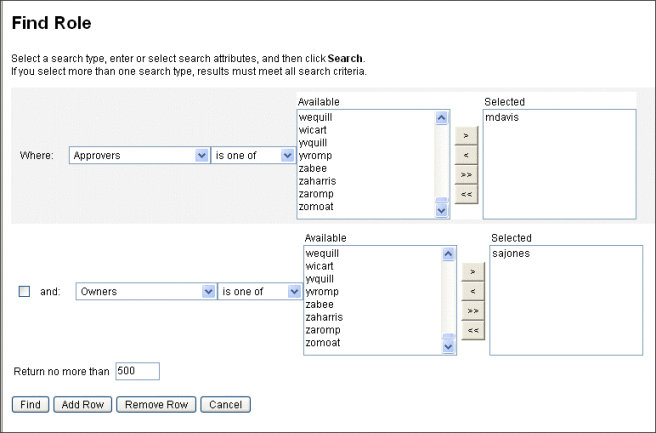
Use the drop-down menus to define the parameters of your search. Click the Add Row button to add additional parameters.
 To View Roles
Use the List Roles tab to view roles. Use the filter fields at the top of the List Roles page to find roles by name or role type. Filtering is not case-sensitive.
-
In the Administrator interface, click the Roles tab.
The List Roles tab opens.
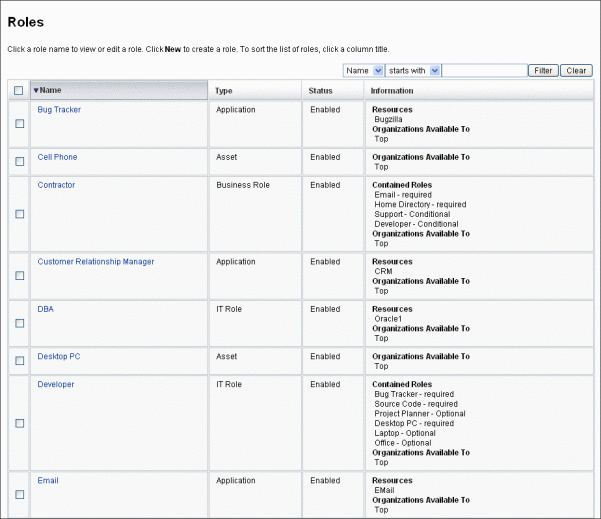
Figure 5–8 shows the List Roles tab. For help using this form, see online help.
Figure 5–8 The List Roles Tab
 To Edit a Role
Search for the role you want to edit using the List Roles or Find Roles tabs. If you make changes to a role, and change approvals are set to true, a role owner must approve your changes before they can be carried out.
For information on updating users with role changes, see To Update Roles Assigned to Users.
-
Search for the role you want to edit by following the instructions on To Search for Roles or To View Roles.
-
Click the name of the role you want to edit.
The Edit Role page opens.
-
Edit the role as needed. Refer to the steps in the To Create Roles Using the Create Role Form section for help completing the Identity, Resources, Roles, and Security tabs.
Click Save. The Confirm Role Changes page opens.
-
If this role is assigned to users, you can select when to update the users with role changes. See To Update Roles Assigned to Users for more information.
-
Click Save to save your changes.
 To Clone a Role
-
Search for the role you want to edit by following the instructions on To Search for Roles or To View Roles.
-
Click the name of the role you want to clone.
The Edit Role page opens.
-
Enter a new name in the Name field, and then click Save.
The Role: Create or Rename? page opens.
-
Click Create to make a copy of the role.
 To Assign a Role to Another Role
Waveset’s requirements around role assignments are described in What are Roles? and Putting Role Types to Work. You should understand this information before assigning roles.
Waveset will change a role’s role assignments if the role-owner of the parent role approves.
-
Search for the Business Role or IT Role to which you will be assigning one or more contained roles. (Roles can only be assigned to Business Roles and IT Roles.) Use the instructions on To Search for Roles or To View Roles to search for roles.
-
Click the Business Role or IT Role to open it.
The Edit Role page opens.
-
Click the Roles tab in the Edit Role page.
-
Click Add in the Contained Roles section.
The tab refreshes and displays the Find Roles to Contain form.
-
Search for the role (or roles) that you will be assigning to this role. Start first with any required roles. (You will add conditional and optional roles later.)
See To Search for Roles for help using the search form. Business Roles cannot be nested or assigned to other role-types.
-
Use the checkboxes to select one or more roles to be assigned, then click Add.
The tab refreshes and displays the Add Contained Role form.
-
Select Required (or Conditional or Optional, as appropriate) from the Association Type drop-down menu.
Click OK.
-
Repeat the previous four steps to add conditional roles (if required). Repeat the previous four steps again to add optional roles (if required).
-
Click Save to open the Confirm Role Changes page.
The Confirm Role Changes page opens.
-
In the Update Assigned Users section select an Update Assigned Users menu option and then click Save to save your role assignments.
See To Update Roles Assigned to Users for more information.
 To Remove a Role Assigned to Another Role
Waveset will remove a contained role from another role if the role-owner of the parent role approves. The removed role will be removed from users when users receive role updates. (See To Update Roles Assigned to Users for more information.) When the role is removed, users lose the entitlements that were bestowed by the role.
-
For information about removing a role assigned to one or more users, see To Remove One or More Roles From a User.
-
For information about disabling a role, see To Enable or Disable Roles.
-
For information about deleting a role from Waveset, see To Delete a Role.
-
Search for the Business Role or IT Role from which you want to remove a role. Use the instructions on To Search for Roles or To View Roles to search for roles.
-
Click the role to open it.
The Edit Role page opens.
-
Click the Roles tab in the Edit Role page.
-
In the Contained Roles section, select the checkbox next to the role that you want to remove, then click Remove. Select multiple checkboxes to remove multiple roles.
The table updates to show the remaining contained roles.
-
Click Save.
The Confirm Role Changes page opens.
-
In the Update Assigned Users section select an Update Assigned Users menu option. See To Update Roles Assigned to Users for more information.
-
Click Save to finalize your changes.
 To Enable or Disable Roles
Roles can be enabled and disabled on the List Roles tab. Role status is displayed in the Status column. Click the Status column header to sort the table by role status.
Disabled roles do not appear on the Roles tab in the Create/Edit user form and cannot be directly assigned to users. Roles that contain disabled roles can be assigned to users, but the disabled roles cannot be assigned.
Users who are assigned roles that are later disabled do not lose their entitlements. Role disablement only blocks future role assignments from occurring.
Disabling and re-enabling a role requires the permission of the role owner.
Upon enabling or disabling a role with assigned users, Waveset will prompt you to update these users. For more information, see To Update Roles Assigned to Users.
-
Search for the role you want to delete by following the instructions on To Search for Roles or To View Roles.
-
Click the checkboxes next to the roles that need to be enabled or disabled.
-
Click Enable or Disable at the bottom of the Roles table.
The Enable Role or Disable Role confirmation page opens.
-
Click OK to enable or disable the role.
 To Delete a Role
This section describes the procedure for deleting a role from Waveset.
-
For information on removing a role assigned to another role, see To Remove a Role Assigned to Another Role.
-
For information on removing a role assigned to one or more users, see To Remove One or More Roles From a User.
If you delete a role that is currently assigned to a user, Waveset blocks the deletion when you try to save the role. You must unassign (or reassign) all users assigned to a role before Waveset can delete it. You also must remove the role from any other roles.
Waveset requires a role owner’s approval before it will delete a role.
-
Search for the role you want to delete by following the instructions on To Search for Roles or To View Roles.
-
Select the checkbox next to each role that you want to delete.
-
Click Delete.
The Delete Role confirmation page displays.
-
Click OK to delete one or more of the roles.
 To Assign a Resource or a Resource Group to a Role
Waveset’s requirements around resource and resource group assignments are described in What are Roles? and Putting Role Types to Work. You should understand this information before assigning resources to roles.
Waveset will change a role’s resource and resource group assignments if the role-owner approves.
-
Search for the IT Role or Application to which you want to add a resource or resource group. For instructions on how to search for a role, see To Search for Roles or To View Roles.
-
Click the role to open it.
-
Click the Resources tab in the Edit Role page.
-
To assign a resource, select it in the Available Resources column and move it to the Current Resources column by clicking the arrow buttons.
-
If you are assigning multiple resources, you can specify the order in which the resources are updated: Select the Update resources in order checkbox and use the + and - buttons to change the order of the resources in the Current Resources column.
-
To assign a resource group to this role, select it in the Available Resource Groups column and move it to the Current Resource Groups column by clicking the arrow buttons. A resource group is a collection of resources that provides another way to specify the order in which resource accounts are created and updated.
-
To specify account attributes for this role on a per resource basis, click Set Attribute Values in the Assigned Resources section. See To View or Edit Resource Account Attributes for more information.
-
Click Save to open the Confirm Role Changes page.
The Confirm Role Changes page opens.
-
In the Update Assigned Users section select an Update Assigned Users menu option. See To Update Roles Assigned to Users for more information.
-
Click Save to save your resource assignments.
 To Remove a Resource or Resource Group Assigned to
a Role
Waveset will remove a resource or resource group from a role if the role-owner approves. The removed resource will be removed from users when users receive role updates. (See To Update Roles Assigned to Users for more information.) When the resource is removed, users lose their entitlements on that resource unless the resource is also directly assigned to the user.
-
Search for the IT Role or Application from which you want to remove a resource or resource group. Use the instructions on To Search for Roles or To View Roles to search for roles.
-
Click the role to open it.
The Edit Role page opens.
-
Click the Resources tab in the Edit Role page.
-
To remove a resource, select it in the Current Resources column and move it to the Available Resources column by clicking the arrow buttons.
To remove a resource group, select it in the Current Resource Groups column and move it to the Available Resource Groups column by clicking the arrow buttons.
-
Click Save.
The Confirm Role Changes page opens.
-
In the Update Assigned Users section select an Update Assigned Users menu option. See To Update Roles Assigned to Users for more information.
-
Click Save to finalize your changes.
Managing User Role Assignments
Roles are assigned to users in the Accounts area of Waveset.
 To Assign Roles to a User
Use the following procedure to assign one or more roles to a user (or users).
End-users can also make role assignment requests for themselves. (Only optional roles where the parent role is already assigned to the user can be requested.) See Requests Tab in the Waveset End-User Interface section for information on how end-users can request available roles.
-
In the Administrator interface, click the Accounts tab.
The List Accounts subtab opens.
-
To assign a role to an existing user, follow these steps:
-
Click the user’s name in the User List.
-
Click the Roles tab.
-
Click Add to add one or more roles to the user account.
By default, only Business Roles can be directly assigned to users. (If your installation of Waveset was upgraded from a pre-8.0 version, both Business Roles and IT Roles can be directly assigned to users.)
-
In the table of roles, select the roles you want to assign to the user and then click OK.
To sort the table alphabetically by Name, Type, or Description, click the column headers. Click a second time to reverse sort. To filter the list by role type, make a selection from the Current drop-down menu.
The table updates to show the selected role assignments, plus any required role assignments that are connected to the parent role assignments.
-
Click Add to view optional role assignments that can also be assigned to the user.
Select the optional roles to be assigned to the user and click OK.
-
(Optional) In the Activate On column, select the date that the role should become active. If you do not specify a date, the role assignment will become active as soon as a designated role approver approves the role assignment.
To make the role assignment temporary, select the date that the role should become inactive in the Deactivate On column. Role deactivation takes effect at the beginning of the selected day.
See To Activate and Deactivate Roles on Specific Dates for more information.
-
Click Save.
-
To Activate and Deactivate Roles on Specific Dates
When assigning a role to a user, you can specify an activate date and a deactivate date. Role-assignment work-item requests are created when the assignment is made. If a role assignment is not approved by the scheduled activation date, however, the role is not assigned. Role activations and deactivations take place a little after midnight (12:01 AM) on the date scheduled.
By default, only Business Roles can have activate dates and deactivate dates. All other role-types inherit the activate date and deactivate date of the Business Role that is directly assigned to the user. Waveset can be configured to allow other role types to have directly assignable activate and deactivate dates. For instructions, see Configuring Role Types.
 To Edit the Schedule for the Deferred Task Scanner
The Deferred Task Scanner scans user role assignments and activates and deactivates roles as needed. By default, the Deferred Task Scanner task runs every hour.
-
In the Administrator interface, click Server Tasks.
-
Click Manage Schedule in the secondary menu.
-
In the Tasks Available For Scheduling section, click on the Deferred Task Scanner TaskDefinition.
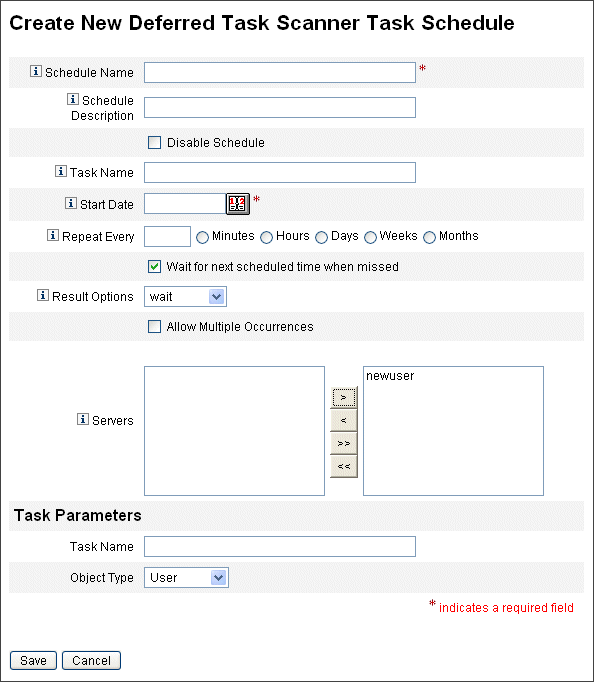
The “Create New Deferred Task Scanner Task Schedule” page opens.
-
Complete the form. For help, refer to the i-Helps and online help.
To specify a date and time when the task should run, in Start Date use the format mm/dd/yyyy hh:mm:ss. For example, to schedule a task to start running at 7:00 P.M. on September 29, 2008, type 09/29/2008 19:00:00.
In the Result Options drop-down menu, select rename. If you select wait, future instances of this task will not run until you remove the previous results. See online help for more information on the various Result Options settings.
-
Click Save to save the task.
Figure 5–9 shows the scheduled task form for the Deferred Task Scanner task.
Figure 5–9 The Deferred Task Scanner Scheduled Task Form
To Update Roles Assigned to Users
When editing roles assigned to users you can choose to update users with the new role changes immediately, or defer the update to run during a scheduled maintenance window.
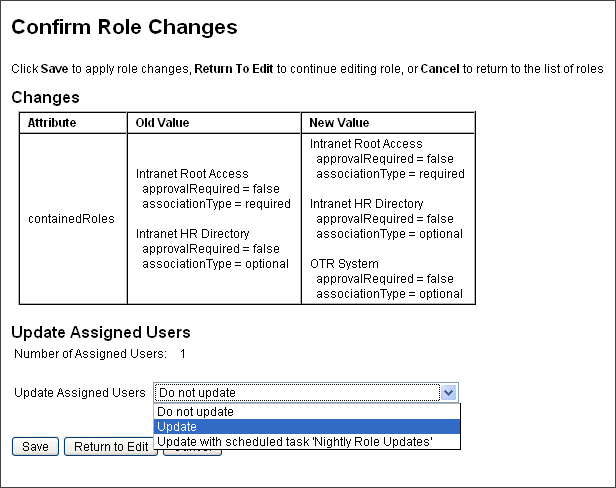
Upon making changes to a role, the Confirm Role Changes page opens. The Confirm Roles Changes page is shown in To Update Roles Assigned to Users.
-
The Update Assigned Users section of this page displays the number of users who currently have the role assigned.
-
Use the Update Assigned Users menu to select whether to immediately update users with the new role changes (Update), to defer updating users until a later time (Do not update), or to select a custom scheduled update task.
-
Because Update updates users immediately, you should avoid choosing this option if a large number of users will be affected. Updating users can be time and resource-intensive. If many users need to be updated, it is preferable to schedule the update for off-peak hours.
-
When Do not update is selected for a role, users assigned to the role will not receive role updates until an administrator views the user’s user profile or until the user is updated by the Update Role Users task. For information on scheduling the Update Role Users task, see the next section.
-
If you have created an Update Role Users task schedule, you can select it from the menu. The selected Update Role Users task will update users assigned to the role according to the schedule defined for the task. See the next section for more information.
To Update Roles Assigned to Users shows the Confirm Role Changes page. The Update Assigned Users section displays the number of users who currently have this role assigned. The Update Assigned Users drop-down menu has two default options: Do not update and Update. You can also select from a list of scheduled Update Role Users tasks. For instructions on creating scheduled Update Role Users tasks, see To Schedule an Update Role Users Task.
-
 To Manually Update Assigned Users
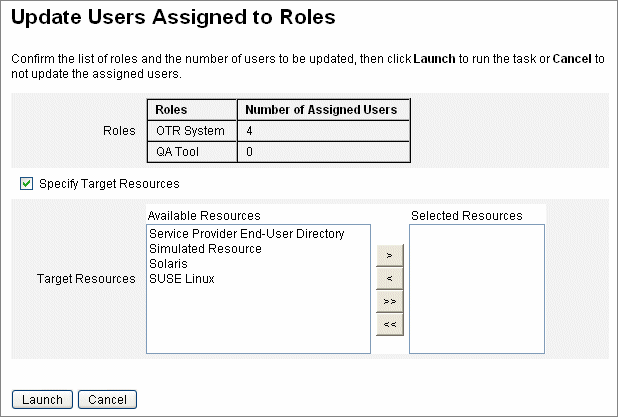
You can update users assigned to roles by selecting one or more roles and clicking the Update Assigned Users button. This procedure runs an instance of the Update Role Users Task for the roles specified.
-
Search for the role (or roles) whose assigned users should be updated by following the instructions on To Search for Roles or To View Roles.
-
Select the role (or roles) using the checkboxes.
-
Click Update Assigned Users.
The Update Users Assigned to Roles page (Figure 5–10) displays.
-
Click Launch to start the update.
-
Check the status of the Update Role Users task by clicking Server Tasks in the main menu, then click All Tasks in the secondary menu.
Figure 5–10 The Update Users Assigned to Roles Page
 To Schedule an Update Role Users Task
Note –
You should schedule an Update Role Users task to run on a regular basis.
Schedule the update Role Users task to update users with outstanding role changes as follows:
-
In the Administrator interface, click Server Tasks.
-
Click Manage Schedule in the secondary menu.
-
In the Tasks Available For Scheduling section, click on the Update Role Users TaskDefinition.
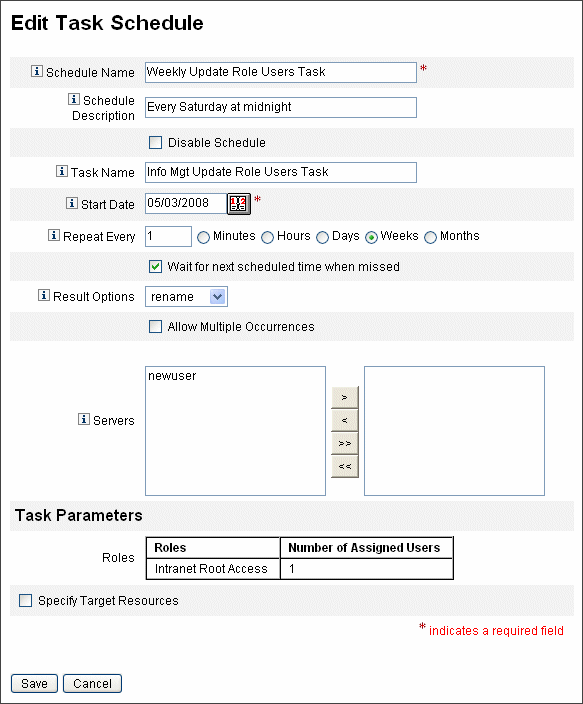
The “Create New Update Role Users Task Schedule” page opens, or, if you are editing an existing task, the “Edit Task Schedule” page opens (Figure 5–11).
-
Complete the form. For help, refer to the i-Helps and online help.
To specify a date and time when the task should run, in Start Date use the format mm/dd/yyyy hh:mm:ss. For example, to schedule a task to start running at 7:00 P.M. on September 29, 2008, type 09/29/2008 19:00:00.
In the Result Options drop-down menu, select rename. If you select wait, future instances of this task will not run until you remove the previous results. See online help for more information on the various Result Options settings.
-
Click Save to save the task.
Figure 5–11 shows the scheduled task form for the Update Role Users task. Specific roles can be assigned to specific Update Role Users tasks (as shown in the Task Parameters section.) See To Update Roles Assigned to Users for more information.
Figure 5–11 The Update Role Users Scheduled Task Form
 To Find Users Assigned to a Specific Role
You can search for users who have a specific role assigned.
-
In the Administrator interface, click Accounts.
-
Click Find Users in the secondary menu. The Find Users page opens.
-
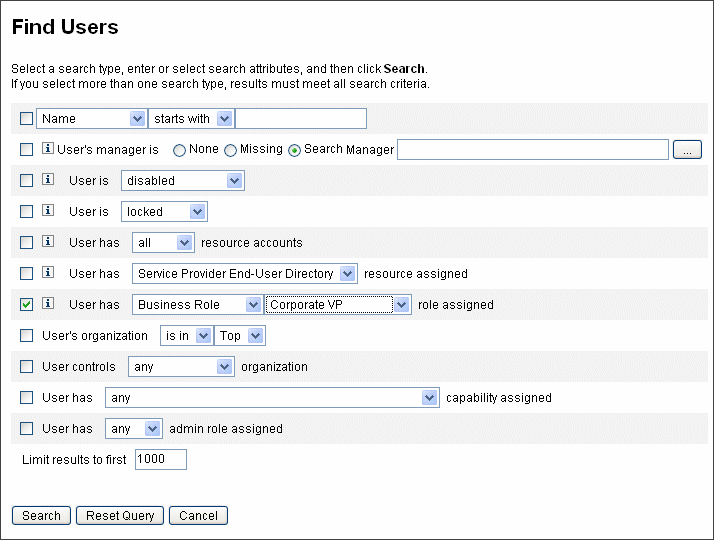
Locate the search type User has [Select Role Type] role assigned.
-
Select the option box and use the Select Role Type drop-down menu to filter the list of available roles.
A second role menu opens.
-
Select a role.
-
Clear the other search-type checkboxes, unless you want to narrow your search further.
-
Click Search.
Figure 5–12 Searching for users assigned a role using the Find Users page
 To Remove One or More Roles From a User
Using the Edit User page, one or more roles can be removed from a user account. Only a directly assigned role can be removed. Indirectly assigned roles (that is, conditional and/or required contained roles) are removed when the parent role is removed. Another way for an indirectly assigned role to be removed from a user is if the role is removed from the parent role (see To Remove a Role Assigned to Another Role).
End-users can also request that assigned roles be removed from their user accounts. See Requests Tab in the Waveset End-User Interface section.
For information on removing a role using a scheduled deactivation date, see To Activate and Deactivate Roles on Specific Dates.
-
In the Administrator interface, click the Accounts tab.
The List Accounts subtab opens.
-
Click the user from which you want to remove a rule (or rules).
The Edit User page opens.
-
Click the Roles tab.
-
In the table of roles, select the roles you want to remove from the user and then click OK.
To sort the table alphabetically by Name, Type, Activate On, Deactivate On, Assigned By, or Status, click the column headers. Click a second time to reverse sort. To filter the list by role type, make a selection from the Current drop-down menu.
The table shows the parent role assignments (those roles that can be selected), plus any role assignments that are connected to the parent role assignments (those roles that cannot be selected).
-
Click Remove.
The table of assigned roles updates to show the remaining assigned roles.
-
Click Save.
The Update Resource Accounts page opens. Deselect any resource accounts that you do not want removed.
-
Click Save to save your changes.
Configuring Role Types
Role Type functionality can be modified by editing the Role configuration object.
 To Configure Role Types to be Directly Assignable
to Users
By default, only certain role types can be directly assigned to users. To change these settings, use the following steps.
Note –
It is a recommended best practice that you only directly assign Business Roles to users. See Using Role Types to Design Flexible Roles for more information.
To change which role types can be directly assigned to users, follow these steps:
-
Open the Role configuration object for editing using the steps in Editing Waveset Configuration Objects.
-
Locate the role object that corresponds to the role type that you want to edit.
-
To edit the IT Role, locate Object name=’ITRole’
-
To edit the Application Role, locate Object name=’ApplicationRole’
-
To edit the Asset Role, locate Object name=’AssetRole’
-
-
Specify a set of instructions to update your configuration.
Depending on how you want to update your configuration, choose one of the following:
-
To modify a role type so that it can be directly assigned to a user, locate the following userAssignment attribute inside the role object:
<Attribute name=’userAssignment’>
        <Object/>
    </Attribute>
And replace it with the following:
<Attribute name=’userAssignment’> <Object> <Attribute name=’manual’ value=’true’/> </Object> </Attribute> -
To modify a role type so that it cannot be directly assigned to a user, locate the userAssignment attribute inside the role object and delete the manual attribute as follows:
<Attribute name=’userAssignment’>
        <Object>
        </Object>
    </Attribute>
-
-
Save the Role configuration object. You do not need to restart your application servers in order for the changes to take effect.
 To Enable Role Types for Assignable Activation Dates
and Deactivation Dates
By default, only Business Roles can have activate dates and deactivate dates that can be specified when roles are assigned. All other roles will inherit the activate date or deactivate date of the Business Role that is directly assigned to the user.
Note –
It is a recommended best practice that you only directly assign Business Roles to users. See Using Role Types to Design Flexible Roles for more information.
If you opt to allow another role type to be directly assignable to users (for example, the IT Role type), you may also want to be able to assign activate and deactivate dates for that role type.
Use the following steps to change which role types can have assignable activate dates and deactivate dates:
-
Open the Role configuration object for editing using the steps in Editing Waveset Configuration Objects.
-
Locate the role object that corresponds to the role type that you want to edit.
-
To edit the Business Role, locate Object name=’BusinessRole’
-
To edit the IT Role, locate Object name=’ITRole’
-
To edit the Application Role, locate Object name=’ApplicationRole’
-
To edit the Asset Role, locate Object name=’AssetRole’
-
-
Specify a set of instructions to update your configuration.
Depending on how you want to update your configuration, choose one of the following:
-
To modify a role type so that it can have directly assignable activate dates and deactivate dates, locate the following userAssignment attribute inside the role object:
<Attribute name=’userAssignment’>
        <Attribute name=’manual’ value=’true’/>
     </Attribute>
And replace it with the following:
<Attribute name=’userAssignment’> <Object> <Attribute name=’activateDate’ value=’true’/> <Attribute name=’deactivateDate’ value=’true’/> <Attribute name=’manual’ value=’true’/> </Object> </Attribute> -
To modify a role type so that it cannot have directly assignable activate dates and deactivate dates, locate the userAssignment attribute inside the role object and delete the activateDate and deactivateDate attributes as follows:
<Attribute name=’userAssignment’>
        <Object>
        </Object>
    </Attribute>
-
-
Save the Role configuration object. You do not need to restart your application servers in order for the changes to take effect.
 To Enable or Disable Change-Approval and Change-Notification
Work Items
By default, change-approval work items are enabled for all role types. This means that every time a role is changed (whether it is a Business Role, an IT Role, an Application, or an Asset), if the role has an owner, the owner must approve the change in order for the change to be made.
For more information on change-approval and change-notification work items, see Initiating Change-Approval and Approval Work Items.
Use the following steps to enable or disable change-approval and change-notification work items for role types, follow these steps:
-
Open the Role configuration object for editing using the steps in Editing Waveset Configuration Objects.
-
Locate the role object that corresponds to the role type that you want to edit.
-
To edit the Business Role, locate Object name=’BusinessRole’
-
To edit the IT Role, locate Object name=’ITRole’
-
To edit the Application Role, locate Object name=’ApplicationRole’
-
To edit the Asset Role, locate Object name=’AssetRole’
-
-
Locate the following attributes located in the <Object> element, which is located in the <Attribute name=’features’> element:
<Attribute name=’changeApproval’ value=’true’/>
 <Attribute name=’changeNotification’ value=’true’/>
-
Set the attribute values to true or false as needed.
-
If necessary, repeat steps 2 - 4 to configure another role type.
-
Save the Role configuration object. You do not need to restart your application servers in order for the changes to take effect.
 To Configure the Maximum Number of Rows that the Role
List Page Can Load
The List Roles page in the Administrator interface can display a configurable maximum number of rows. The default number is 500. Use the steps in the section to change the number.
Use the following steps to change the maximum number of rows that the List Roles page can display.
-
Open the Role configuration object for editing using the steps in Editing Waveset Configuration Objects.
-
Locate the following attribute and change the value:
<Attribute name=’roleListMaxRows’ value=’500’/>
-
Save the Role configuration object. You do not need to restart your application servers in order for the changes to take effect.
Synchronizing Waveset Roles and Resource Roles
You can synchronize Waveset roles with roles created natively on a resource. When synchronized, the resource is assigned, by default, to the role. This applies to roles that are created with the synchronization task, as well as existing Waveset roles that match one of the resource role names.
 To Synchronize an Waveset Role with a Resource
Role
- © 2010, Oracle Corporation and/or its affiliates
