Creating Roles
This section describes how to create roles and the information is organized as follows:
Note –
For tips on designing roles, see Using Role Types to Design Flexible Roles
When you create or edit a role, Waveset launches the ManageRole workflow. This workflow saves the new or updated role in the repository, and allows you to insert approvals or other actions before the role is created or saved.
 To Create Roles Using the Create Role Form
-
In the Administrator interface, click Roles in the main menu.
The Roles page (List Roles tab) opens.
-
Click New at the bottom of the page.
The Create IT Role page opens. To create another type of role, use the Type drop-down menu.
-
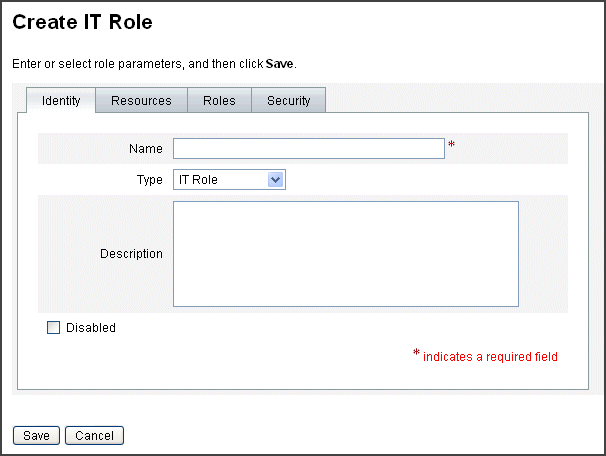
Complete the form fields on the Identity tab.
The following figure shows the Identity tab.
Figure 5–3 Identity Tab on the Create IT Role Page
-
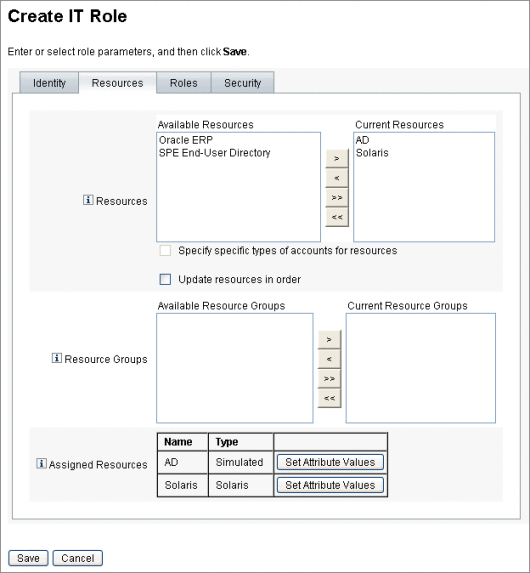
Complete the form fields on the Resources tab (if applicable). For help filling out the fields on this tab, refer to online help, and also see To Assign Resources and Resource Groups.
For help setting extended attributes values on roles, see To View or Edit Resource Account Attributes.
The following figure shows the Resources tab.
Figure 5–4 Resources Tab on the Create IT Role Page
-
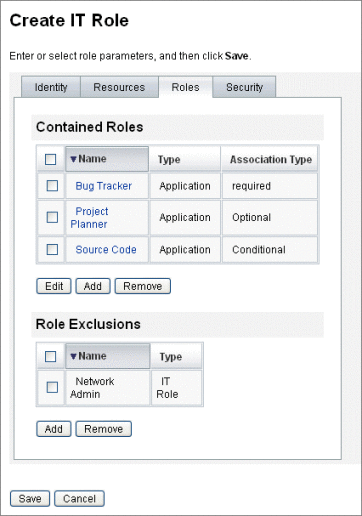
Complete the form fields on the Roles tab (if applicable). For help filling out the fields on this tab, refer to online help, and also see To Assign Roles and Role Exclusions.
Figure 5–6 shows the Roles tab.
-
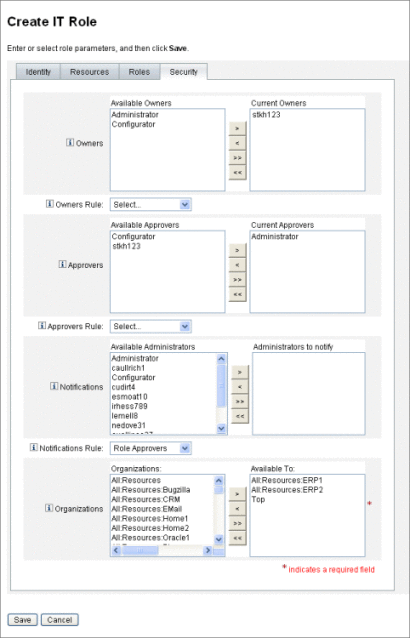
Complete the form fields on the Security tab. For help filling out the fields on this tab, refer to online help, and also see Designating Role Owners and Role Approvers and Designating Notifications.
Designating Role Owners and Role Approvers shows the Security tab.
-
Click Save at the bottom of the page.
-
Enter a role name and description on the Identity tab of the Create Role form. If you are creating a new role, use the Type drop-down menu to select the role-type you are creating.
Figure 5–4 shows the Identity portion of the Create Role form’s Identity tab. For help using this form, see online help.
 To Assign Resources and Resource Groups
Resources and Resource Groups can be directly assigned to IT Roles and Application roles using the Resources tab of the Create Role form. Resources are described later, in the Understanding and Managing Waveset Resources section. Resource Groups are described in the Resource Groupssection.
-
Resources and Resource Groups cannot be directly assigned to Business Roles because only roles can be assigned to Business Roles.
-
Resources and Resource Groups cannot be assigned to Asset roles because Asset roles are reserved for non-connected or non-digital resources that require manual provisioning.
This procedure describes how to assign resources and resource groups to a role when completing the Create Role form. See To Create Roles Using the Create Role Form to get started.
-
Click the Resources tab in the Create Role page.
-
To assign a resource, select it in the Available Resources column and move it to the Current Resources column by clicking the arrow buttons.
-
If you are assigning multiple resources, you can specify the order in which the resources are updated: Select the Update resources in order checkbox and use the + and - buttons to change the order of the resources in the Current Resources column.
-
To assign a resource group to this role, select it in the Available Resource Groups column and move it to the Current Resource Groups column by clicking the arrow buttons. A resource group is a collection of resources that provides another way to specify the order in which resource accounts are created and updated.
-
To specify account attributes for this role on a per resource basis, click Set Attribute Values in the Assigned Resources section. See To View or Edit Resource Account Attributes for more information.
-
Click Save to save the role, or click the Identity, Roles, or Security tabs to continue with the role creation process.
The following figure shows the Create Role form’s Resources tab.
Figure 5–5 The Resources section of the Create Role Tabbed Form

 To Edit Assigned Resource Attribute Values
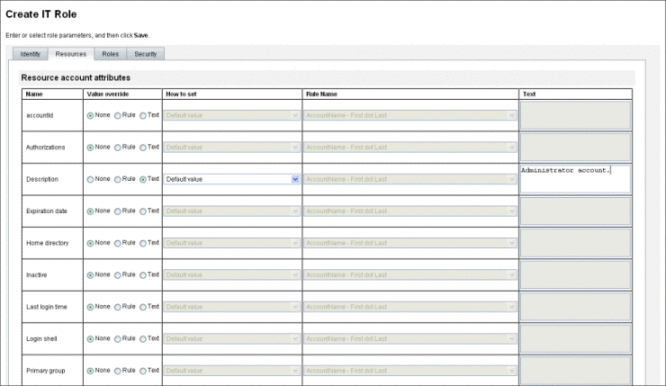
Use the Assigned Resources table to set or modify resource attribute values on resources assigned to a role. A resource can have different attribute values defined on a role-by-role basis. Clicking the Set Attribute Values button opens the Resource Account Attributes page.
The following figure shows the Resource Account Attributes page, which is used to set extended attribute values on resources assigned to a role.
-
From the page Resource Account Attributes page, specify new values for each attribute and determine how attribute values are set.
Waveset enables you to directly set values or use a rule to set values and provides a range of options for overriding existing values or merging values with existing values. For general information about resource attribute values, see To View or Edit Resource Account Attributes.
Use the following options to establish values for each resource account attribute:
-
Value override. Choose one of the following options:
-
None (Default). No value is established.
-
Rule. Uses a rule to set the value.
If you select this option, you must select a rule name from the list.
-
Text. Uses specified text to set the value.
If you select this option, you must enter the text in the adjacent Text field.
-
-
How to set. Choose one of the following options:
-
Default value. Makes the rule or text the default attribute value.
The user can change or override this value.
-
Set to value. Sets the attribute value as specified by the rule or text.
The value will be set and override any user changes.
-
Merge with value. Merges the current attribute value with the values specified by the rule or text.
-
Merge with value, clear existing. Removes the current attribute values and sets the value to a merger of values specified by this and other assigned roles.
-
Remove from value. Removes the value specified by the rule or text from the attribute value.
-
Authoritative set to value. Sets the attribute value as specified by the rule or text.
The value will be set and override any user changes. If you remove the role, the new value is null, even if it previously existed on the attribute.
-
Authoritative merge with value. Merges the current attribute value with the values specified by the rule or text.
Removing the role removes the value that was assigned when the role was assigned and leaves the original attribute value intact.
-
Authoritative merge with value, clear existing. Removes the current attribute values and sets the value to a merger of values specified by this and other assigned roles.
Clears the attribute value specified by this role if the role is removed, even if it previously existed on the attribute.
-
-
Rule Name. If you select Rule in the Value override area, select a rule from the list.
-
Text. If you select Text in the Value override area, enter text to be added to, deleted from, or used as the attribute value.
-
-
Click OK to save your changes and return to the Create or Edit Role page.
 To Assign Roles and Role Exclusions
Roles can be assigned to Business Roles and IT Roles using the Roles tab of the Create Role form. Assigned roles should be added to the Contained Roles table.
-
Roles cannot be assigned to Application roles and Asset roles.
-
Business roles cannot be assigned to any role type.
Role exclusions can be assigned to all four role types using the Roles tab of the Create Role form. If a role with a role exclusion is assigned to a user, the excluded role cannot also be assigned to the user. Role exclusions should be added to the Role Exclusions table.
This procedure describes how to assign one or more roles to a role when completing the Create Role form. See To Create Roles Using the Create Role Form to get started.
To complete the Roles tab
-
Click the Roles tab in the Create Role page.
-
Click Add in the Contained Roles section.
The tab refreshes and displays the Find Roles to Contain form.
-
Search for the role (or roles) that you will be assigning to this role. Start first with any required roles. (You will add conditional and optional roles later.)
See To Search for Roles for help using the search form. Business Roles cannot be nested or assigned to other role-types.
-
Use the checkboxes to select one or more roles to be assigned, then click Add.
The tab refreshes and displays the Add Contained Role form.
-
Select Required (or Conditional or Optional, as appropriate) from the Association Type drop-down menu.
Click OK.
-
Repeat the previous four steps to add conditional roles (if required). Repeat the previous four steps again to add optional roles (if required).
-
Click Save to save the role, or click the Identity, Resources, or Security tabs to continue with the role creation process.
Figure 5–6 shows the Create Role form’s Roles tab. For help using this form, see online help.
Figure 5–6 The Roles Portion of the Create Role Tabbed Form
Designating Role Owners and Role Approvers
Roles have designated owners and approvers. Only role owners can authorize changes to the parameters that define the role, and only role approvers can authorize the assignment of the role to end-users.
Note –
If you have Waveset integrated with Oracle Role Manager, you should allow Role Manager to handle all role change approvals and notifications by manually disabling Waveset's ability to perform these actions.
You must edit the RoleConfiguration configuration object in Waveset as follows:
-
Find all instances of changeApproval and set the value to false.
-
Find all instances of changeNotificaiton and set the value to false.
To be a role owner is to be the business owner responsible for the underlying resource account rights that are assigned through the role. If an administrator makes changes to a role, a role owner must approve of the changes before they can be carried out. This feature guards against an administrator changing a role without a business owner’s knowledge and approval. If change approvals have been disabled in the Role configuration object, however, a role owner’s approval is not required in order for changes to be carried out.
In addition to approving role changes, roles cannot be enabled, disabled, or deleted without a role owners’ approval.
Owners and approvers can either be directly added to a role, or dynamically added using a role-assignment rule. In Waveset it is possible (but not recommended) to create roles without owners and approvers.
Note –
Role-assignment rules have a RoleUserRule authType.
If you need to create a custom role-assignment rule, refer to the three default role-assignment rule objects and use them as an example:
-
Role Approvers
-
Role Notifications
-
Role Owners
Owners and approvers are notified by email if a work item requires their approval. Change-approval work items and approval work items are discussed in the Initiating Change-Approval and Approval Work Items section.
Owners and approvers are added to roles on the Security tab in the Create Role form.
Designating Role Owners and Role Approvers shows the Create Role form’s Security tab. For help using this form, see the online help.
Designating Notifications
One or more administrators can be sent notifications when a role is assigned to a user.
Specifying a notification recipient is optional. You could choose to notify an administrator if you decide not to require an approval when a role is assigned to a user. Or you could designate one administrator to serve as an approver, and, another administrator to serve as a notification recipient when the approval is made.
As with owners and approvers, notifications can either be directly added to a role, or dynamically added using a role-assignment rule. Notification recipients are notified by email when a role is assigned to a user. A work item is not created, however, because an approval is not required.
Notifications are assigned to roles on the Security tab on the Create Role form. Designating Role Owners and Role Approvers shows the Create Role form’s Security tab.
Initiating Change-Approval and Approval Work Items
When changes are made to a role, the role owners can receive a change-approval email, a change-notification email, or no email. When a role is assigned to a user, role approvers receive role approval emails.
By default, role owners are sent change-approval emails whenever the roles they own are changed. This behavior is configurable, however, on a role-type by role-type basis. For example, you could choose to enable change-approvals for Business Roles and IT Roles, and enable change-notifications for Application and Asset roles.
For instructions on enabling and disabling change-approval and change-notification email, see Configuring Role Types.
This is how change-approvals and change-notifications work:
-
If change-approvals are enabled, when an administrator changes a role, a work item is generated and an approval email is sent to the role owner. A role owner must approve the work item in order for the change to be made. Change-approval work items can be delegated. See Approving User Accounts for more information.
If change-approvals are disabled, no work item is generated and no change approval email is sent to the role owner.
-
If change-notifications are enabled, when an administrator changes a role, the change is made immediately, and a notification email is sent to the role owner.
If change-notifications are disabled, no notifications are sent to the role owner.
When a role is assigned to a user, role approvers receive role approval emails. Role approval emails cannot be disabled in Waveset.
For role approvals, when a user is assigned a role, a work item is generated and an approval email is sent to the role approver. A role approver must approve the work item in order for the role to be assigned to the user.
Change-approval and approval work items can be delegated. For more information on delegating work items, see Delegating Work Items.
- © 2010, Oracle Corporation and/or its affiliates
