Configuring Conduits
The Conduits tab contains a list of all the conduits that are available to the PDA Sync application. This is not a fixed list, as conduits can be added and removed. Active conduits are indicated with a check mark. A Synchronize operation runs all of the active (checkmarked) conduits ONLY, as shown in the following figure.
Figure 22–3 Configuring Conduits
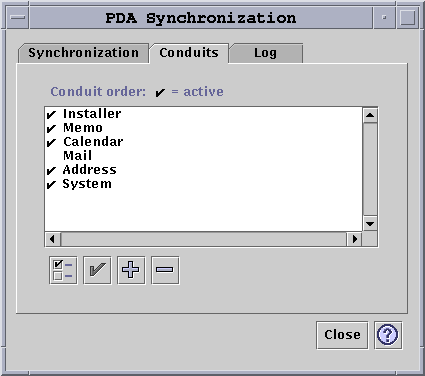
The buttons below the scrolling list represent actions you can take on the selected conduit in the list (except the Add Conduit button). When the pointer is over one of the buttons, the button name is displayed in a small Button Tag that appears near the button. The button names in the toolbar are:
-
“Change Conduit Settings” (a checked box) - brings up the configuration dialog for that particular conduit and is disabled if more than one item is selected.
-
“Toggle the Conduit's Activate State” (a check mark) - Either activates or deactivates the conduit. When a conduit is active, it is executed in the next synchronization.
-
“Add New Conduit to List” (a plus (+) symbol) - Brings up a file selection dialog enabling you to add new conduits. (See the Adding a Conduit section.)
-
“Delete Conduit from List”(a minus (-) symbol) - Removes the conduit from the list, after a confirmation dialog.
Calendar
The Configure Calendar Conduit window enables you to determine how appointments are synchronized between calendar applications. Refer to the following figure.
Figure 22–4 Configuring the Calendar Conduit
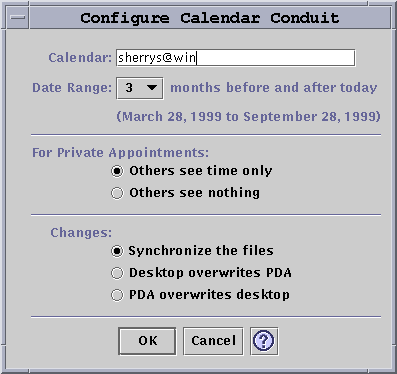
In this window you can:
-
Change the host name. The default is user@host.
-
Specify the base calendar on the workstation or server.
-
Determine a rolling date range to synchronize. The default range is six months.
-
Determine what information is displayed for others to see on private appointments marked on your PDA.
-
Change the data synchronization direction to:
-
Synchronize the files (this is the default) — merges the calendar information on your desktop and your PDA.
-
Desktop overwrites PDA — replaces your PDA calendar information with the calendar information you have on your workstation.
-
PDA overwrites desktop — replaces your desktop calendar information with the calendar information you have on your PDA.
-
Memo
The Configure Memo Conduit window enables you to synchronize text files between the desktop and the PDA as shown in the following figure.
Figure 22–5 Configuring the Memo Conduit
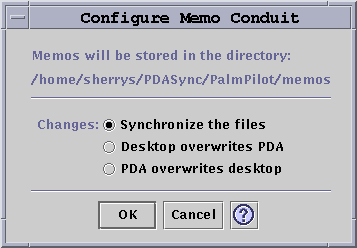
You change the data synchronization direction to:
-
Synchronize the files (this is the default) — merges together information on your desktop and your PDA.
-
Desktop overwrites PDA — replaces your PDA memo information with the memo information you have on your workstation.
-
PDA overwrites desktop — replaces your desktop memo information with the memo information you have on your PDA.
In the memos directory, separate directories can be created for different categories of memos, such as Business and Personal. These become categories on your PDA when synchronized. Conversely, new categories on your PDA become directories in the memo folder on your file system when synchronized. If the category directory is deleted from the desktop, the category and all of its records are deleted from the handheld device when synchronized.
Address
The Configure Address Conduit dialog box (refer to the following figure) enables you to determine how entries are synchronized between address applications.
Figure 22–6 Configuring the Address Conduit
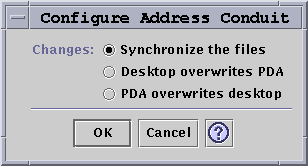
In this window you can select the data synchronization direction. The default is to merge the data. In the address directory, subdirectories can be created for different categories of addresses, such as Business and Personal. These become categories on your PDA when synchronized. If the category directory is deleted from the desktop, the category and all of its records are deleted from the handheld device when synchronized. Additional layers of subordinate directories are not supported.
System
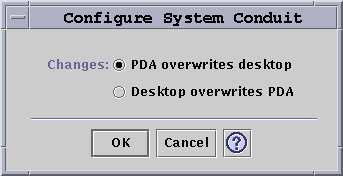
The Configure System Conduit backs up all system information, graffiti shortcuts, and any .pdbs and .prcs that are NOT already associated with other applications. The default is that your PDA overwrites the desktop. Refer to the following figure.
Note –
You should choose "Desktop overwrites PDA" only if everything on your PDA has been corrupted or lost. Refer to the following figure.
Figure 22–7 Configuring the System Conduit
The Configure Mail Conduit window tells your PDA your INBOX location. Refer to the following figure.
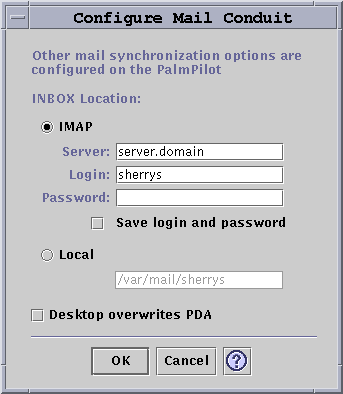
In this dialog you can define the IMAP location of the INBOX (server.domain) or the local location of the INBOX (path and filename).
In addition, the IMAP choice requires that you submit a login ID and password. You can save the login and password to avoid retyping. If the ID and password are NOT saved, synchronization is interrupted every time with the following dialog box (refer to the following figure).
Figure 22–8 Configuring the Mail Conduit

You can choose to have the desktop mailbox overwrite your PDA mailbox. This is set to “OFF” by default.
Note –
This option should only be used if your PDA INBOX folder is not in sync with your desktop.
All other setup for mail synchronization is done on your PDA. When you synchronize, your PDA automatically:
-
Sends mail from the Outbox.
-
Destroys the deleted mail in the Deleted folder.
-
Does the things you have defined in the options.
In the Mail synchronization options on the PDA, you can tell your PDA to:
-
Synchronize mailbox (for example, make the two Inboxes identical, given the constraints, which include no attachments and truncation of messages). This is the same as setting the PDA parm option to All.
-
Send mail from the Outbox only and retrieve nothing. This is the same as setting the PDA parm option to Send Only.
-
Synchronize mail according to a filter. This is the same as setting the PDA parm option to Filter. The messages are truncated to a specified length; the range is: 250, 500, 1000, 2000, 4000, 6000, 8000. The filter can operate two ways:
-
Ignore messages with a certain criteria and retrieve all others.
-
Retrieve messages with a certain criteria and ignore all others.
-
Installer
The Configure Installer Conduit window allows you to determine which files (applications or databases) to install on your PDA. Refer to the following figure
Figure 22–9 Configuring the Installer Conduit
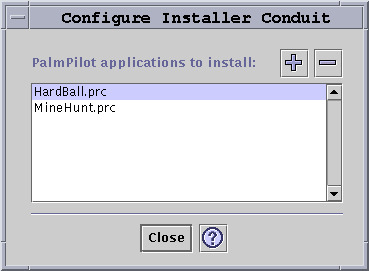
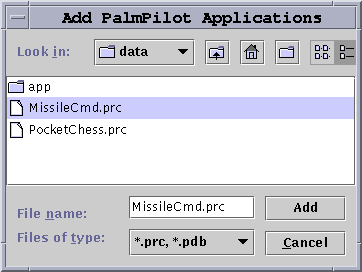
In this dialog you can display all the files that are available for installation to your PDA. These are all the files currently in the default install directory. Use the Add PalmPilot Applications window refer to the following figure), by clicking the plus (+) symbol, to add files. To delete files from the list, select the file and click the minus (-) symbol. All files in the list are installed on the next sync operation.
Figure 22–10 Adding an Application
Adding a Conduit
Click the Add button on the Add PalmPilot Applications window to get to the Add Conduit window. This enables you to add conduits to PDA Sync. Refer to the following figure.
Figure 22–11 Adding a Conduit
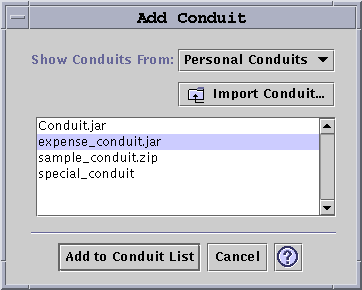
The available conduits come from one of three categories, represented in the pull-down menu:
-
Personal Conduits (default) — Conduits that you may have obtained from the Web or elsewhere.
-
System Default — The default set that the PDA Sync application comes with (for example, Calendar, Memo, Address). You should use conduits from this category to replace any defaults that have been deleted.
-
System Additions — Any third-party conduits added automatically through packages.
If you want to add a new conduit not currently in any of the folders, press the “Import Conduit” button to bring up the Import Conduit dialog. Refer to the following figure.
Figure 22–12 Importing a Conduit
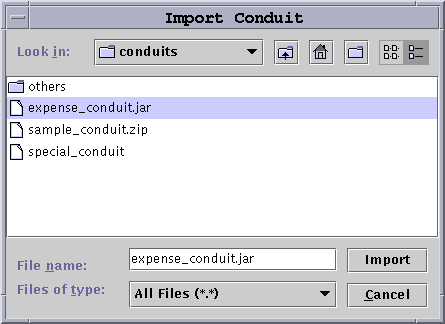
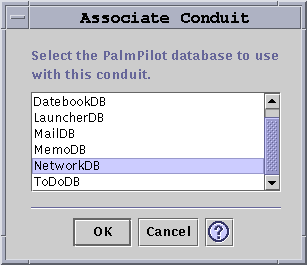
Select a file and press the Import button. The file will be copied into the selected folder. If it is a conduit previously deleted from the Conduit tab, it will automatically be added back to the list. If the Conduit is a new one, then the Associate Conduit dialog will display. Refer to the following figure.
A list of the available databases will display in this list only if they are already installed on the PalmPilot. If you want to install a new database you must first install the database (refer to the Installer section under Configuring Conduits).
Then select a database in the list and click OK. The conduit will be added to the conduit list.
Figure 22–13 Associating Conduits
- © 2010, Oracle Corporation and/or its affiliates
