Chapter 11 Solaris Live Upgrade and ZFS (Overview)
With Solaris Live Upgrade, you can migrate your UFS file systems to a ZFS root pool and create ZFS root file systems from an existing ZFS root pool.
Note –
Creating boot environments with Solaris Live Upgrade is new in the Solaris 10 10/08 release. When performing a Solaris Live Upgrade for a UFS file system, both the command-line parameters and operation of Solaris Live Upgrade remain unchanged. To perform a Solaris Live Upgrade on a system with UFS file systems, see Part I, Upgrading With Solaris Live Upgrade of this book.
The following sections provide an overview of these tasks:
-
You can migrate a UFS file system with or without SVM volumes.
-
You can either create a new ZFS boot environment within the existing root pool or on another root pool.
-
Creating a New Boot Environment From a Source Other Than the Currently Running System.
-
Creating a ZFS Boot Environment on a System With Non-Global Zones Installed.
Introduction to Using Solaris Live Upgrade With ZFS
If you have a UFS file system, Solaris Live Upgrade works the same as in previous releases. You can now migrate from UFS file systems to a ZFS root pool and create new boot environments within a ZFS root pool. For these tasks, the lucreate command has been enhanced with the -p option. The command syntax is the following:
# lucreate [-c active_BE_name] -n BE_name [-p zfs_root_pool] |
The -p option specifies the ZFS pool in which a new boot environment resides. This option can be omitted if the source and target boot environments are within the same pool.
The lucreate command -m option is not supported with ZFS. Other lucreate command options work as usual, with some exceptions. For limitations, see System Requirements and Limitations When Using Solaris Live Upgrade.
Migrating From a UFS File System to a ZFS Root Pool
If you create a boot environment from the currently running system, the lucreate command copies the UFS root (/) file system to a ZFS root pool. The copy process might take time, depending on your system.
When you are migrating from a UFS file system, the source boot environment can be a UFS root (/) file system on a disk slice. You cannot create a boot environment on a UFS file system from a source boot environment on a ZFS root pool.
Migrating From a UFS root (/) File System to ZFS Root Pool
The following commands create a ZFS root pool and a new boot environment from a UFS root (/) file system in the ZFS root pool. A ZFS root pool must exist before the lucreate operation and must be created with slices rather than whole disks to be upgradeable and bootable. The disk cannot have an EFI label, but must be an SMI label. For more limitations, see System Requirements and Limitations When Using Solaris Live Upgrade.
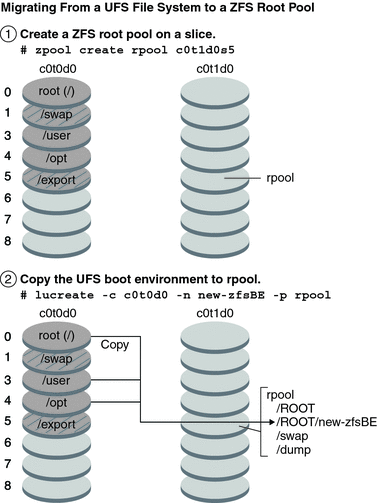
Figure 11–1 shows the zpool command that creates a root pool, rpool on a separate slice, c0t1d0s5. The disk slice c0t0d0s0 contains a UFS root (/) file system. In the lucreate command, the -c option names the currently running system, c0t0d0, that is a UFS root (/) file system. The -n option assigns the name to the boot environment to be created, new-zfsBE. The -p option specifies where to place the new boot environment, rpool. The UFS /export file system and the /swap volume are not copied to the new boot environment.
Figure 11–1 Migrating From a UFS File System to a ZFS Root Pool

Example 11–1 Migrating From a UFS root (/) File System to ZFS Root Pool
This example shows the same commands as in Figure 11–1. The commands create a new root pool, rpool, and create a new boot environment in the pool from a UFS root (/) file system. In this example, the zfs list command shows the ZFS root pool created by the zpool command. The next zfs list command shows the datasets created by the lucreate command.
# zpool create rpool c0t1d0s5 # zfs list NAME USED AVAIL REFER MOUNTPOINT rpool 9.29G 57.6G 20K /rpool |
# lucreate -c c0t0d0 -n new-zfsBE -p rpool # zfs list NAME USED AVAIL REFER MOUNTPOINT rpool 9.29G 57.6G 20K /rpool rpool/ROOT 5.38G 57.6G 18K /rpool/ROOT rpool/ROOT/new-zfsBE 5.38G 57.6G 551M /tmp/.alt.luupdall.110034 rpool/dump 1.95G - 1.95G - rpool/swap 1.95G - 1.95G - |
The new boot environment is rpool/ROOT/new-zfsBE. The boot environment, new-zfsBE, is ready to be upgraded and activated.
Migrating a UFS File System With Solaris Volume Manager Volumes Configured to a ZFS Root File System
You can migrate your UFS file system if your system has Solaris Volume Manager (SVM) volumes. To create a UFS boot environment from an existing SVM configuration, you create a new boot environment from your currently running system. Then create the ZFS boot environment from the new UFS boot environment.
Overview of Solaris Volume Manager (SVM). ZFS uses the concept of storage pools to manage physical storage. Historically, file systems were constructed on top of a single physical device. To address multiple devices and provide for data redundancy, the concept of a volume manager was introduced to provide the image of a single device. Thus, file systems would not have to be modified to take advantage of multiple devices. This design added another layer of complexity. This complexity ultimately prevented certain file system advances because the file system had no control over the physical placement of data on the virtualized volumes.
ZFS storage pools replace SVM. ZFS completely eliminates the volume management. Instead of forcing you to create virtualized volumes, ZFS aggregates devices into a storage pool. The storage pool describes such physical characteristics of storage device layout and data redundancy and acts as an arbitrary data store from which file systems can be created. File systems are no longer constrained to individual devices, enabling them to share space with all file systems in the pool. You no longer need to predetermine the size of a file system, as file systems grow automatically within the space allocated to the storage pool. When new storage is added, all file systems within the pool can immediately use the additional space without additional work. In many ways, the storage pool acts as a virtual memory system. When a memory DIMM is added to a system, the operating system doesn't force you to invoke some commands to configure the memory and assign it to individual processes. All processes on the system automatically use the additional memory.
Example 11–2 Migrating From a UFS root (/) File System With SVM Volumes to ZFS Root Pool
When migrating a system with SVM volumes, the SVM volumes are ignored. You can set up mirrors within the root pool as in the following example.
In this example, the lucreate command with the -m option creates a new boot environment from the currently running system. The disk slice c1t0d0s0 contains a UFS root (/) file system configured with SVM volumes. The zpool command creates a root pool, c1t0d0s0, and a RAID-1 volume (mirror), c2t0d0s0. In the second lucreate command, the -n option assigns the name to the boot environment to be created, new-zfsBE-name. The -p option specifies where to place the new boot environment, rpool.
# lucreate -n ufsBE -m /:/dev/md/dsk/d104:ufs # zpool create rpool mirror c0t0d0s0 c0t1d0s0 # lucreate -n c0t0d0s0 -s ufsBE -p zpool |
The boot environment, c0t0d0s0, is ready to be upgraded and activated.
Creating a New Boot Environment From a ZFS Root Pool
You can either create a new ZFS boot environment within the same root pool or on a new root pool. This section contains the following overviews:
Creating a New Boot Environment Within the Same Root Pool
When creating a new boot environment within the same ZFS root pool, the lucreate command creates a snapshot from the source boot environment and then a clone is made from the snapshot. The creation of the snapshot and clone is almost instantaneous and the disk space used is minimal. The amount of space ultimately required depends on how many files are replaced as part of the upgrade process. The snapshot is read-only, but the clone is a read-write copy of the snapshot. Any changes made to the clone boot environment are not reflected in either the snapshot or the source boot environment from which the snapshot was made.
Note –
As data within the active dataset changes, the snapshot consumes space by continuing to reference the old data. As a result, the snapshot prevents the data from being freed back to the pool. For more information about snapshots, see Chapter 7, Working With ZFS Snapshots and Clones, in Solaris ZFS Administration Guide.
When the current boot environment resides on the same ZFS pool, the -p option is omitted.
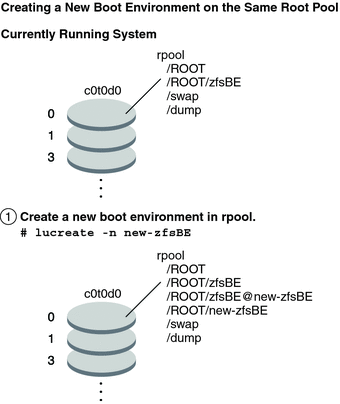
Figure 11–2 shows the creation of a ZFS boot environment from a ZFS root pool. The slice c0t0d0s0 contains a the ZFS root pool, rpool. In the lucreate command, the -n option assigns the name to the boot environment to be created, new-zfsBE. A snapshot of the original root pool is created rpool@new-zfsBE. The snapshot is used to make the clone that is a new boot environment, new-zfsBE. The boot environment, new-zfsBE, is ready to be upgraded and activated.
Figure 11–2 Creating a New Boot Environment on the Same Root Pool

Example 11–3 Creating a Boot Environment Within the Same ZFS Root Pool
This example shows the same command as in Figure 11–2 that creates a new boot environment in the same root pool. The lucreate command names the currently running boot environment with the -c zfsBE option, and the -n new-zfsBE creates the new boot environment. The zfs list command shows the ZFS datasets with the new boot environment and snapshot.
# lucreate -c zfsBE -n new-zfsBE # zfs list AME USED AVAIL REFER MOUNTPOINT rpool 9.29G 57.6G 20K /rpool rpool/ROOT 5.38G 57.6G 18K /rpool/ROOT rpool/ROOT/zfsBE 5.38G 57.6G 551M rpool/ROOT/zfsBE@new-zfsBE 66.5K - 551M - rpool/ROOT/new-zfsBE 5.38G 57.6G 551M /tmp/.alt.luupdall.110034 rpool/dump 1.95G - 1.95G - rpool/swap 1.95G - 1.95G - |
Creating a New Boot Environment on Another Root Pool
You can use the lucreate command to copy an existing ZFS root pool into another ZFS root pool. The copy process might take some time depending on your system.
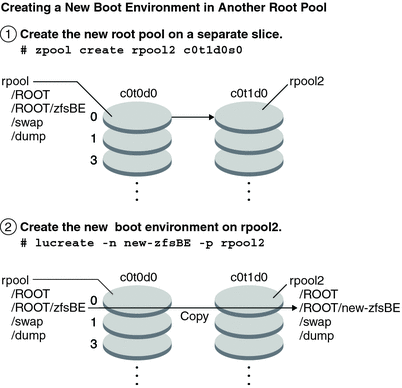
Figure 11–3 shows the zpool command that creates a ZFS root pool, rpool2, on c0t1d0s5 because a bootable ZFS root pool does not yet exist. The lucreate command with the -n option assigns the name to the boot environment to be created, new-zfsBE. The -p option specifies where to place the new boot environment.
Figure 11–3 Creating a New Boot Environment on Another Root Pool

Example 11–4 Creating a Boot Environment on a Different ZFS Root Pool
This example shows the same commands as in Figure 11–3 that create a new root pool and then a new boot environment in the newly created root pool. In this example, the zpool create command creates rpool2. The zfs list command shows that no ZFS datasets are created in rpool2. The datasets are created with the lucreate command.
# zpool create rpool2 c0t2d0s5 # zfs list NAME USED AVAIL REFER MOUNTPOINT rpool2 9.29G 57.6G 20K /rpool2 rpool 9.29G 57.6G 20K /.new.lulib.rs.109262 rpool/ROOT 5.46G 57.6G 18K legacy rpool/ROOT/zfsBE 5.46G 57.6G 551M rpool/dump 3.99G - 3.99G - rpool/swap 3.99G - 3.99G - |
The new ZFS root pool, rpool2, is created on disk slice c0t2d0s5.
# lucreate -n new-zfsBE -p rpool2 # zfs list NAME USED AVAIL REFER MOUNTPOINT rpool2 9.29G 57.6G 20K /rpool2 rpool2/ROOT/ 5.38G 57.6G 18K /rpool2/ROOT rpool2/ROOT/new-zfsBE 5.38G 57.6G 551M /tmp/.new.luupdall.109859 rpool2/dump 3.99G - 3.99G - rpool2/swap 3.99G - 3.99G - rpool 9.29G 57.6G 20K /.new.lulib.rs.109262 rpool/ROOT 5.46G 57.6G 18K legacy rpool/ROOT/zfsBE 5.46G 57.6G 551M rpool/dump 3.99G - 3.99G - rpool/swap 3.99G - 3.99G - |
The new boot environment, new-zfsBE, is created on rpool2 along with the other datasets, ROOT, dump and swap. The boot environment, new-zfsBE, is ready to be upgraded and activated.
Creating a New Boot Environment From a Source Other Than the Currently Running System
If you are creating a boot environment from a source other than the currently running system, you must use the lucreate command with the -s option. The -s option works the same as for a UFS file system. The -s option provides the path to the alternate root (/) file system. This alternate root (/) file system is the source for the creation of the new ZFS root pool. The alternate root can be either a UFS (/) root file system or a ZFS root pool. The copy process might take time, depending on your system.
Example 11–5 Creating a Boot Environment From an Alternate Root (/) File System
The following command creates a new ZFS root pool from an existing ZFS root pool. The -n option assigns the name to the boot environment to be created, new-zfsBE. The -s option specifies the boot environment, source-zfsBE, to be used as the source of the copy instead of the currently running boot environment. The -p option specifies to place the new boot environment in newpool2.
# lucreate -n new-zfsBE -s source-zfsBE -p rpool2 |
The boot environment, new-zfsBE, is ready to be upgraded and activated.
Creating a ZFS Boot Environment on a System With Non-Global Zones Installed
You can use Solaris Live Upgrade to migrate your non-global zones to a ZFS root file system. For overview, planning and step-by-step procedures, see Chapter 14, Solaris Live Upgrade For ZFS With Non-Global Zones Installed.
Additional Resources
For additional information about the topics included in this chapter, see the resources listed in Table 11–1.
Table 11–1 Additional Resources|
Resource |
Location |
|---|---|
|
For ZFS information, including overview, planning, and step-by-step instructions | |
|
For using Solaris Live Upgrade on a system with UFS file systems |
Part I, Upgrading With Solaris Live Upgrade of this book |
- © 2010, Oracle Corporation and/or its affiliates
